Friday, July 19, 2024

Quilt Top!!!

Quilt Top

I made this quilt top using 12 different pattern block designs with the addition of solid blocks and half-triangle blocks. 


I still have to decide on the backing and the border before I can complete this one. 

Happy Quilting!!!!

Rilla

Tuesday, July 2, 2024

Beadable Pens!!!!

Beadable Pens!!!!

I listed my pens on TikTok.  $7.00 each and that includes shipping. Each are already packaged in a clear cellophane bag.  These are great for yourself, kids, teachers, stocking stuffers, office staff - basically for anyone. I have tons of designs - seasonal, holidays, animals and just gorgeous colors I have put together.  Just let me know what you want.  

I accept Apple Pay, PayPal, Cash App or Facebook Pay. If ordering more than one, I do offer discounts. 

The pens are to help with my medical costs associated with me being in non-alcoholic cirrhosis of the liver. Insurance only pays so much. 

If interested, comment or message me. 

Thanks so much,

Rilla

Patriotic Gnome…

Patriotic Gnome…


How cute is this simple Patriotic Gnome?  I used items I had in my stash to make this. A bottle (recycled), a cardboard cone (recycled after I used all the yarn from it), a napkin to modpodge, 2 star buttons, cotton balls, red foam sheet to make the hands, a wood bead, fabric scrap, blue paint and little pearl beads from the Dollar Tree. 


Happy Crafting…

Rilla


Thursday, June 27, 2024

DIY: Recycling Patriotic Craft

DIY:  Recycling Patriotic Craft

I used an empty pill bottle washed and dried. I modpodge around and added a patriotic napkin I had picked up from the Dollar Tree. Let it dried. And, then modpodge a second coat. I tied a piece of jute rope into a bow.

For the rose, I used red and green foam sheets, skewer and green chenille stem. 

With the red sheet, I made 3 circles, each 3”. I used my hot glue gun to make the rose. I hot glue attached the skewer and wrapped the chenille around it. I freehand drew two leaves and attached to the stem with hot glue. 

I glued a small piece of styrofoam inside the bottle and added the rose.  Added filler to the bottle for looks and a few small pebbles for weight.

The beadable pen is just a nice extra gift to add to this craft project. The pen has adjustable colors and I randomly placed the beads the way I wanted them. 


Happy Crafting!!!!

Rilla

Sunday, June 23, 2024

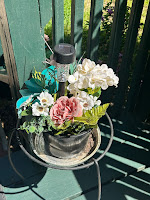
How to Make a Flower Pot

 How to Make a Hanging

Flower Pot


This was a super easy project and just required a few items to make:  a balloon, jute rope and modpodge.  

Directions:

Blow up your balloon to get a desired fullness and tie off. I then add modpodge around the fullness of the balloon and wrap with the jute rope. I add 4-6 layers of modpodge to the jute rope, letting each layer dry before adding the next layer. 

I let this set overnight. The following morning I gently pop and remove the balloon. 


For the straps, I just measured the length I wanted and cut 12 pieces. I used 3 pieces at a time and made a braid. I then got glued and E6000 glued it to the center bottom. I repeated 3 more times and let it set until it was dried. 


Once dried, I brought the straps up and around the basket and used glue to secure in place.  I then used jute rope at the top, wrapped around all 4 straps to secure as one piece. 

Last, I glued a Styrofoam to the center and added festive, summer flowers. 

Happy Crafting!!!!
Rilla


Thursday, June 13, 2024

DIY: Lantern Recycled

DIY:  Lantern Recycled 

Okay, Y’all, my mother-in-law wanted to trash her rusted, old lantern.  But, I told her to let me have a day with it and see what I could do with it.   

I’m really happy with the finished outcome - and so is my MIL.  She’s absolutely in love with her lantern now. 

First, I washed and cleaned it.  Then, I removed any loose paint. Once cleaned, I painted all of the metal with black acrylic paint.  I used little wood cubes, painted black, and hot glued/E-6000 to the bottoms of each round leg. 


Inside the lantern, instead of adding back a candle, I placed a small piece of round styrofoam with glue. I then added some flowers, greenery and moss.  Last, I added a set of green, battery-operated lights. I glued the battery case underneath the lantern. 

The transformation to this project was absolutely gorgeous. Remember, before you trash something, think about the potential possibilities in recycling/repurposing it.

Happy Crafting!!!

Rilla

Wednesday, June 12, 2024

Topiary - Dollar Tree DIY

 Topiary - Dollar Tree DIY

The thing that inspired me the most with this project was the fact that it’s VERY affordable.  I want to get a nice basket to place it inside. 

So, to start.  Materials:

Pool noodle cut in strips

Duct tape

Broom handle

Styrofoam

E-6000 and hot glue gun

Moss

Rocks 

Bucket or basket


Directions:

I used both glues and attached the styrofoam to the center.  I then placed both glues on the end of the broom handle and inserted into the styrofoam. Next, I filled about 3/4 way up with rocks. As you can see in the pictures above, I just twisted the pool noodle around the handle and secured with duct tape. You can shape this as much and how you like. I think the next time, I will use 2 pool noodles to make it fatter.   

Now, I was faced with the daunting task of adding the moss. This was the longest part of the whole project. It wasn’t hard - just time consuming. I attached the moss with a hot glue gun. 


I added Spanish moss to cover the rocks. I then added battery-operated lights. 

This project cost me around $12 to make. 

Happy Crafting!!!
Rilla