Sunday, March 24, 2019

How To: Easy Peasy Decorative Pillow...

Easy Peasy Decorative Pillow...
Today, I bought my granddaughter, Miss Arielle, new bedding and curtains for her bedroom.  A wonderful array of pink and teal colors.  However, there was no matching decorative pillow.  And, I love pillows - the more, the merrier.

So, I head over to the craft department.  2 Waverly Fat Quarters, a 12” x 16” pillow form and $5.25 later, I have a super cute pillow made - one side pink; the other teal.  Easy and quick project - less than an hour.  Now, if I had walked downstairs to my laundry room and used my sewing machine, well, the project would’ve taken about 15 minutes start to finish.

Now, let’s get started!!!

First, gather your materials:
—2 Waverly Fat Quarters
—(1) 12” x 16” pillow form
—scissors
—pins
—needle and thread (OR sewing machine)
—tape measure

Cut fabric:
I added 1” to the length and 1” to the width.  So, I want my fabric to measure 13” x 17.”  I used my tape measure as a guide and freestyle cut the pink fabric.  I then placed it on top of the teal and used as a guide to cut the teal.

Pin it:
I placed the fabric on top of each other with right sides facing and pinned around, leaving one short end open.  
Sew together:
Ideally, a sewing machine is much more quicker and gives a very clean, tight stitch.  But, I decided to hand stitch mine.  If you remember, from the start, I added an inch to the width and length.  With that said, you will want to start in the corner of one of the long ends, measuring a 1/2” inward.  Sew straight and evenly 1/2” seam allowance across the long end, up/down the short end and across the second long end.  Secure your stitch before fastening off.  Turn right side out and insert pillow form.  

 
Pin short end:
Turn the rough edges inward 1/2” and pin across in place.  You will want to sew short, neat stitches across this final side.  Secure stitch and fasten off.  Yay!!!  You are finished making your very own decorative pillow...

Here’s a picture of each side of mine:

 
And, look at my seam in this picture - neat and pretty.  I think this turned out super cute and my granddaughter will enjoy having this on her bed.  
 
I hope you enjoyed this easy tutorial.  I’d love to see your decorative pillows.  If you have Instagram, hashtag #rilla2u; share to my Crocheting & Crafting Page on Facebook or email pictures to rilla2u@gmail.com....


Tuesday, March 19, 2019

Cobblestone Plaid Blanket

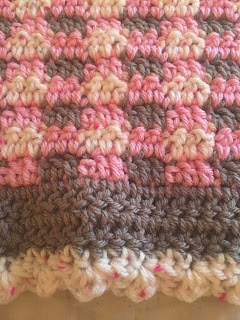
I was asked to make a baby blanket in pink and grey for an upcoming baby shower.  And, plaid, just stuck out in my mind.

This is the first plaid blanket I’ve made using #4 worsted weight acrylic yarn.  I’ve got to say #6 yarn works up a whole lot quicker than #4 yarn...lol.  But, this was a fun project.  I even made a hat and booties to match the blanket.

While working on this project, I kept thinking about cobblestone streets and, aptly, decided to name this blanket, “Cobblestone Plaid.”

This blanket measures 28” x 32”.
Cobblestone Plaid Blanket
Size:  Approximately 28” x 32”

Materials:
—6.0mm hook
—1 skein each of “I Love This Yarn” in Pink, Greybeard and Crushed Raspberry
—tapestry needle for weaving

U.S. Stitch Abbreviations:
Ch:  chain
St:  stitch(es)
Sl St:  slip stitch
SC:  single crochet
DC:  double crochet 
Rep:  repeat
Sk:  skip
FO:  fasten off

Special Note:  
1.  The pattern is worked in multiples of 6 + 2.  You can make this blanket any size you desire, just keep the multiples of 6 + 2 in mind when making your beginning chain row. 

2.  Plaid Stitch: 
Row 1:  3DC st in Pink, then 3 DC st in Grey.  You will repeat with these 2 colors across. Now, remember:  1.  Before completing the 3rd DC st, you will want to join the next color.  2.  You will be carrying your yarn across since you are constantly rotating between the 2 colors.
Row 2:  same as #1 except you will be starting with Pink (goes over previous row’s Grey) and then rotating this row with Crushed Raspberry (this color will go over previous row’s Pink)

3.  Raspberry stitch:  SC, DC, SC in same st.  Skip 2 stitches.  Repeat.  

Directions:
1.  With Pink yarn, ch 92.  Starting in 3rd ch from the hook, complete Row 1 of the Plaid Stitch. (90)
2.  Continue with Plaid Stitch, completing Row 2.  (90)
3-55.  Continue with Plaid Stitch, rotating between rows 1 and 2.  At the end of Row 55, FO and weave ends.  (90)
Border:
1.  With grey yarn, evenly DC around, placing 3 DC st in each corner.  Working on the sides, I placed 2 DC st in each end stitch.  
2.  Rep #1.  At the end of the round, Sl St join to first st and FO.  Weave ends.  Join Crushed Raspberry yarn and Ch1.  
3.  1 SC in each st around, placing 3 SC st in each corner.  Sl St join to first st and Ch1.  
4.  Raspberry stitch (see Special Note) around, placing 3 DC in each corner.  Sl St join to first st.  FO and weave ends.
 

And, here's a few pics of the hat and booties I made to go with this blanket.  I think it looks so pretty and girly.
 
 Happy Crocheting...

Legal:
--don't use/claim my design as your own
--don't use/claim my pics as your own
--okay to make and sale your finished work
--don't share my pattern electronically or in print format (without prior consent) but provide a link to my blog

Social Media:
If you are on the following sites, let's connect and hook up...
  • Instagram:  Rilla2u
  • Pinterest:  Rilla2u
  • Twitter:  Rilla2u
  • Facebook:  /rilla.edwards 


Monday, March 11, 2019

Harmony’s Blanket

I made this beautifully textured blanket for my sweet little cousin, Miss Harmony, who was born in WV and had to spend her first month in the hospital.  After multiple surgeries, she is doing good now.  I used “I Love This Yarn,” from Hobby Lobby and a 6.0mm hook.

Harmony’s Blanket

Size:  Approximately 32" x 36"

Materials:
--6.0mm hook
--1 skein each of #4 worsted weight yarn in pink, yellow, white and gray (I used I Love This yarn from Hobby Lobby)
--tapestry needle for weaving

U.S. Stitch Abbreviations:
Ch:  chain
St:  stitch(es)
Sl st:  slip stitch
SC:  single crochet
HHDC:  herringbone half double crochet
DC:  double crochet
Rep:  repeat
FO:  fasten off

Directions:
1.  With Pink yarn, Ch101.  HHDC in 2nd ch from hook and across.  Ch1 and turn.  (100)
2-12.  1 HHDC in each st across.  Ch1 and turn.  At the end of Row 12, FO Pink yarn and weave ends.  Join White yarn. Ch1.  (100)
13-15.  1 SC in each st across.  Ch1 and turn.  At the end of Row 15, FO White yarn and weave ends.  Join Gray yarn.  Ch1.  (100)


16.  1 SC in first st, 1 DC in next st.  Rep across.  Ch1 and turn.  (100)
17.  1 DC in first st, 1 SC in next st.  Rep across.  Ch1 and turn.  (100)
18-27.  Rep #16 & #17.  At the end of Row 27, FO Gray yarn and weave ends.  Join White yarn.  Ch1.  (100)
28-30.  1 SC in each st across.  Ch1 and turn.  At the end of Row 28, FO White yarn and weave ends.  Join Yellow yarn.  (100)

31-42.  With Yellow yarn, 1 HHDC in each st across.  Ch1 and turn.  At the end of Row 38, FO Yellow yarn and weave ends.  Join White yarn.  (100)
43-45.  1 SC in each st across.  Ch1 and turn.  At the end of Row 15, FO White yarn and weave ends.  Join Pink yarn.  Ch1.  (100)

46.  1 SC in first st, 1 DC in next st.  Rep across.  Ch1 and turn.  (100)
47.  1 DC in first st, 1 SC in next st.  Rep across.  Ch1 and turn.  (100)
48-57.  Rep #46 & #47.  At the end of Row 57, FO Pink yarn and weave ends.  Join White yarn.  Ch1.  (100)
58-60.  1 SC in each st across.  Ch1 and turn.  At the end of Row 54, FO White yarn and weave ends.  Join Gray yarn.  Ch1.  (100)

61-72.  1 HHDC in each st across. Ch1 and turn.  At the end of Row 64, FO Gray yarn and weave ends.  Join White yarn.  Ch1.
73-75.  1 SC in each st across.  Ch1 and turn.  At the end of Row 75, FO White yarn and weave ends.  Join Yellow yarn.   

76.  1 SC in first st, 1 DC in next st.  Rep across.  Ch1 and turn.  (100)
77.  1 DC in first st, 1 SC in next st.  Rep across.  Ch1 and turn.  (100)
78-87.  Rep #76 & #77.  At the end of Row 87, FO Yellow yarn and weave ends.  Join White yarn.  Ch1.  (100)

Border:
88.  With White yarn, 1 SC in each st around, placing 3 SC st in each corner.  Sl st join to first st and FO.  Weave ends.

And, that's it, for this beautifully textured blanket...ENJOY!!!


 And, I included a matching hat in 0 - 3 months size...
Happy Crocheting...

Legal:
--don't use/claim my design as your own
--don't use/claim my pics as your own
--okay to make and sale your finished work
--don't share my pattern electronically or in print format (without prior consent) but provide a link to my blog

Social Media:
If you are on the following sites, let's connect and hook up...
  • Instagram:  Rilla2u
  • Pinterest:  Rilla2u
  • Twitter:  Rilla2u
  • Facebook:  /rilla.edwards 

Ares Blanket

This Blanket was designed and made for my newest little cousin, Ares, who lives in Oklahoma.  I used Red Heart Super Saver yarn in light blue, gray and white.  I used a 6.0mm hook.

I designed the C2C graph on Stitch Fiddle.  I used HDC stitches and Ch5.  This was a fairly quick blanket to make.

Ares Blanket
Size:  Approximately 32" x 36"

Materials:
--6.0mm hook
--1 skein each of #4 worsted weight yarn in light blue, gray and white (I used Red Heart Super Saver yarn)
--tapestry needle for weaving

U.S. Stitch Abbreviations:
Ch:  chain
St:  stitch(es)
Sl st:  slip stitch
SC:  single crochet
HDC:  half double crochet
PS:  popcorn stitch
Rep:  repeat
FO:  fasten off

Special Stitch:
1.  Popcorn Stitch (PS):  4 SC stitches in same st, remove hook from last stitch and place in the first SC stitch made (front to back) and then insert back into the hoop of the last stitch and pull through.  

Directions:
Using my C2C Graph below, start in the lower right hand corner and work the pattern diagonally.  I used HDC stitches with Ch5.  If desired, you can use DC stitches and Ch6.

Once I completed the graph portion of the blanket, I then worked on the border design.

Border:
1-3.  With light blue, HDC in each st around, placing 3 HDC st in each corner.  Sl st join to first st and Ch1.  At the end of Round 3, FO light blue yarn and join gray yarn.
4.  1 SC in each st around, placing 3 SC st in each corner.  Sl st join to first st and Ch1.
5.  *1 SC in first 2 st, then 1 PS in next st.* Rep around, placing 3 SC st in each corner.  Sl st join to first st and Ch1.
6.  Rep #4.  Sl st join to first st and FO.  Weave ends.

Simple, yet so pretty!!!  Enjoy...

C2C Graph
Happy Crocheting...
Legal:
--don't use/claim my design as your own
--don't use/claim my pics as your own
--okay to make and sale your finished work
--don't share my pattern electronically or in print format (without prior consent) but provide a link to my blog

Social Media:
If you are on the following sites, let's connect and hook up...
  • Instagram:  Rilla2u
  • Pinterest:  Rilla2u
  • Twitter:  Rilla2u
  • Facebook:  /rilla.edwards 

Sleeping Mask

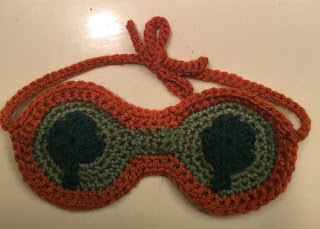
I made this Sleeping Mask last weekend in colors to celebrate St. Patrick's Day.  I added 4-leaf clovers to the center of each eye.  I love how this turned out.  And, as an added bonus, I have actually slept better wearing this mask.  The yarn isn't bothersome, confining or irritating to the skin/face.  It is comfortable, blocking on the light perfectly.

I want to make more of these in different colors and/or themes for myself and to give as gifts.

I hope you will enjoy this pattern as much as I do!!!

Sleeping Mask

Size:  Fits most adults

Materials:
--3.5mm (for Appliqué) & 4.5mm hook (for Mask)
--#4 worsted weight yarn - I used Midgreen, Burnt Pumpkin and Dark Green
--tapestry needle for weaving

U.S. Stitch Abbreviations:
Ch:  chain
St:  stitch(es)
Sl st:  slip stitch
SC:  single crochet
HDC:  half double crochet
Rep:  repeat
MR:  magic ring
FO:  fasten off

Directions:
For my mask, I made my first circle and bridge of nose section.  I then made my second circle and whipstitched together.  I then added the border.

I worked pattern in the round, unless otherwise noted.  So, use a stitch marker to keep up with the first st of each round and move up accordingly.

First Eye:
1.  With 4.5mm hook, 6 SC into MR.  (6)
2.  2 SC in each st around.  (12)
3.  2 SC in first st, 1 SC in next st.  Rep around.  (18)
4.  2 SC in first st, 1 SC in next 2 st.  Rep around.  (24)
5.  2 SC in first st, 1 SC in next 3 st.  Rep around.  (30)

For a smaller, adult-sized, STOP increase rounds.

For a larger, adult-sized, CONTINUE to make another increase round:
6.  2 SC in first st, 1 SC in next 4 st.  Rep around.  Sl st join to first st.  (36)

Bridge of Nose:
7.  Ch5.  SC in 2nd ch from hook and next 3 ch.  Sl st to 2nd st of Round 6.  Ch1 and Turn.  (4)
8.  1 SC in each st.  Ch1 and turn.  (4)
9.  1 SC in each st.  Sl st to 3rd st of Round 6.  Ch1 and turn.  (4)
10.  1 SC in each st.  FO and leave a long tail for attaching second eye.  (4)

Second Eye:
Rep #1 - 6 of first eye. Attach second eye to the opposite end of the Bridge of the Nose.  Weave ends.

Border:
1.  Join yarn in any st and Ch1.  SC evenly around the first eye, across the bridge, around the second eye, across the bridge and sl st join to first st.
2.  1 SC in each st around.

Straps:
I joined yarn on each side with a sl st and then Ch51.  I sl st in the 2nd ch from hook and across.  Sl st joined to the mask and weaved ends.  Rep on opposite side.  (Note:  make sure the strap will be long enough for your head before completing; you may need to make it bigger or smaller, depending on the size of your head)

4-Leaf Clover (make 2):
1.  With a 3.5mm hook, make a MR and *Ch2.  2 HDC, Ch2 and sl st into MR.* rep until you have 4 clovers made.  Then sl st into MR.  Ch5.  SC in 2nd ch from hook.  Sl st into remaining chains.  Sl st into MR and FO.  Leave a tail long enough for attaching.  

And, that's it!!!!  Super easy, cute, and functional...
Happy Crocheting...
Legal:
--don't use/claim my design as your own
--don't use/claim my pics as your own
--okay to make and sale your finished work
--don't share my pattern electronically or in print format (without prior consent) but provide a link to my blog

Social Media:
If you are on the following sites, let's connect and hook up...
  • Instagram:  Rilla2u
  • Pinterest:  Rilla2u
  • Twitter:  Rilla2u
  • Facebook:  /rilla.edwards 

Sunday, March 10, 2019

Delightful Stripes Throw Blanket

When I started this project, I wasn’t exactly sure of the colors I was going to use or if there was even going to be any alternating stitches.  As I progressed along on this blanket, I just let it create itself, so to speak.

And, guess what?

I’m absolutely in love with the outcome of this blanket.  The colors are rich and beautiful.  I couldn’t be more happier with this blanket.

I hope you will enjoy it as much as I do.  I used “I Love This Yarn” from Hobby Lobby and a 6.0mm hook.  The overall size is 45” x 65”.

Delightful Stripes Blanket
Size:  45” x 65”

Materials:
—6.0mm hook
—1 skein each of Calico Stripes, White, Soft Pink, Mid Green and Old Rose and 2 skeins of Aubergine (NOTE:  it was a close call with the Calico Stripes, I barely had enough to finish the second set of 10 rows; so please be mindful if you have a loose tension.  You may want a second skein to be safe)
—tapestry needle for weaving

U.S. Stitch Abbreviations:
Ch:  chain
St:  stitch(es)
Sl st:  slip stitch
SC:  single crochet
HDC:  half double crochet
DC:  double crochet
Rep:  repeat
Sk:  skip
FO:  fasten off

Special Stitch:
1.  DC Crossover Stitch:  DC in the first st of the row.  *Sk next st.  DC in the next st.  Then DC in the sk st.* Rep from * to * until the last st.  DC in last st.    

Directions:
1.  With Calico Stripes, Ch121.  HDC in 2nd ch from hook and across.  Ch1.  (120)
2-10.  1 HDC in each st across.  Ch1 and turn.  (120)

At the end of the 10th Row, you will fasten off and weave ends.  Join next color.

11-13.  Join White yarn.  Ch1.  DC in first st.  DC Crossover across.  DC in last st.  Ch1 and turn.  (120)

At the end of Row 13, you will fasten off and weave ends.  Join next color.

Continue to complete Rows 1-13 with the Order of Colors below:

Order of Colors:
10 Rows:  Calico Stripes
3 Rows:  White
10 Rows:  Aubergine
3 Rows:  White
10 Rows:  Soft Pink
3 Rows:  White
10 Rows:  Mid Green
3 Rows:  White
10 Rows:  Old Rose
3 Rows:  White
10 Rows:  Calico Stripes
3 Rows:  White
10 Rows:  Aubergine
3 Rows:  White
10 Rows:  Soft Pink
3 Rows:  White
10 Rows:  Mid Green
3 Rows:  White
10 Rows:  Old Rose


Border:
1.  With White yarn, join in any st and Ch1.  HDC in each st st across the top and the bottom, place 3 HDC st in each corner, and when working down or up the sides you will place 1 HDC st in each of the "10 Row" sections and 2 HDC st in each of the "3 Row" sections.
2.  1 HDC in each st around, placing 3 HDC in each corner.  FO and weave ends.
3.  Join Mid Green yarn, 1 SC in each st around, placing 3 SC in each corner.  FO and weave ends.
4.  Join Aubergine, 1 HDC in each st around, placing 3 HDC st in each corner.
5.  Last Round:  fan stitch:  *1 SC in first st, sk 2 st, 5 HDC in next st, sk 2 st.* Rep from * to * around, placing 3 HDC in each corner.  It's okay if you have to skip a stitch here or there to make your fan stitch pattern work.  FO and weave ends.
 Happy Crocheting...
Legal:
--don't use/claim my design as your own
--don't use/claim my pics as your own
--okay to make and sale your finished work
--don't share my pattern electronically or in print format (without prior consent) but provide a link to my blog

Social Media:
If you are on the following sites, let's connect and hook up...
  • Instagram:  Rilla2u
  • Pinterest:  Rilla2u
  • Twitter:  Rilla2u
  • Facebook:  /rilla.edwards  


Saturday, March 9, 2019

Men's "UK Wildcats" Hat

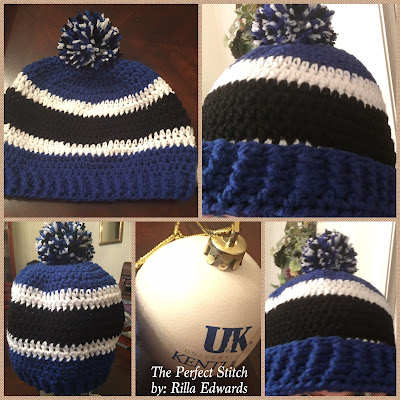
This hat was inspired by my love for the "UK Wildcats" Men's Basketball program.  My hubby and youngest brother are also big UK fans.  We love watching and playing basketball.

The pattern is enough to alter the colors to into your favorite team.  I used Red Heart Super Saver yarn for this project.  However, you can use any #4 worsted weight yarn; just note there may be a slight variation in overall size.

So, enjoy the pattern and support your favorite team!!!!

Men's "UK Wildcats" Hat

Size: 22" - 24" head circumference

Gauge:  I did not gauge pattern

Materials:
--6.0mm hook
--RHSS yarn in Royal, Black and White
--tapestry needle for weaving ends

U.S. Stitch Abbreviations:
Ch:  chain
St:  stitch(es)
Sl st:  slip stitch
HDC:  half double crochet
FPHDC:  front post half double crochet
BPHDC:  back post half double crochet
Rep:  repeat
MR:  magic ring
FO:  fasten off

Note:
I worked the first 6 rounds of this hat in the round.  Thereafter, I sl st join to the first st and Ch1. 

Directions:
1.  With Royal yarn, 10 HDC into MR.  (10)
2.  2 HDC into each st around.  (20)
3.  2 HDC into first st, 1 HDC in next st.  Rep around.  (30)
4.  2 HDC into first st, 1 HDC in next 2 st.  Rep around.  (40)
5.  2 HDC into first st, 1 HDC in next 3 st.  Rep around.  (50)
6.  2 HDC into first st, 1 HDC in next 4 st.  Rep around.  (60)
-- NOTE:  at the end of Round 6, your diameter will be 6.5" (this is the right diameter for a 19" - 21" head circumference) --
7.  2 HDC into first st, 1 HDC in next 5 st.  Rep around.  Sl st join to first st and FO.  Weave ends.  (70)
8.  Join White yarn into any st and Ch1.  1 HDC into each st around.  Sl st join and Ch1.  (70)
9.  1 HDC in each st around.  Sl st join to first st and FO.  Weave ends.  (70)
10.  Join Black yarn into any st and Ch1.  1 HDC into each st around.  St st join and Ch1.  (70)
11-13.  1 HDC into each st around.  Sl st join and Ch1.  At the end of Round 13, FO and weave ends.  (70)
14.  Rep #8.
15.  Rep #9.
16.  Join Royal yarn into any st and Ch1.  1 HDC into each st around.  Sl st join and Ch1.  (70)
17-19.  1 HDC into each st around.  Sl st join and Ch1.  (70)

At the end of Round 19, your hat will measure approximately 8" in length.  If desired, you can FO at the end of Round 19 and weave ends.  However, if you would like to add a band to flip up, then proceed below.

Band:
20-22.  FPHDC around first post, BPHDC around next post.  Rep around.  Sl st join and Ch1.  At the end of Round 22, FO and weave ends.  (70)

Pompom (optional):
I held all 3 color strands together.  I wrapped around 4 of my fingers 50 times.  I then tied a double knot in the center to secure.  I then trimmed the ends, fluffed and attached to the center top of the hat.
I hope you will enjoy this easy pattern.  Support your favorite team by making this in their team colors.
 Happy Crocheting...

Legal:
--don't use/claim my design as your own
--don't use/claim my pics as your own
--okay to make and sale your finished work
--don't share my pattern electronically or in print format (without prior consent) but provide a link to my blog

Social Media:
If you are on the following sites, let's connect and hook up...
  • Instagram:  Rilla2u
  • Pinterest:  Rilla2u
  • Twitter:  Rilla2u
  • Facebook:  /rilla.edwards