Wednesday, July 31, 2019

Unisex Scarf & Hat...

I came across this gorgeous Premier Puzzle yarn in “Backgammon” last week in Oklahoma at Hobby Lobby and fell in love with it.  From the moment it caught my eye, I knew it would make the most perfect winter projects for men and women.

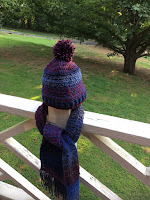
So, here ya go!!!  Here’s the FREE patterns for my beautifully textured, flowing “Unisex Scarf and Hat(s).”  I added fringe to the ends but it looks just as good without the fringe.

Unisex Scarf & Hat Pattern
Size:
Scarf - 60” in length before fringe added
Hats:  Average Adult-Sized

Materials:
—6.0mm hook
—#5 Premier Puzzle yarn in “Backgammon” (328 yds/skein) = 1 skein is enough for 1 Scarf and 1 Hat 
—tapestry needle for weaving

U.S. Stitch Abbreviations:
Ch:  chain
St:  stitch(es)
Sl St:  slip stitch 
SC:  single crochet
DC:  double crochet 
BLO:  back loops only
FLO:  front loops only
FPDC:  front post double crochet
BPDC:  back post double crochet
MR:  magic ring
Rep:  repeat
FO:  fasten off 

Directions:
Unisex Scarf:

1.  Ch21.  SC in 2nd chain from hook.  *DC in next ch.  SC in next.* Rep across.  DC in last ch.  Ch1 and turn.  (20) 
2.  Working in BLO, *SC in first st, DC in next st.* Rep across.  DC in last st.  Ch1 and turn. (20)
Now, continue to Rep #2 until your scarf measures 60” in length OR your desired length.  

Optional:
If desired, add fringe in each stitch across the short ends.  I cut strands of yarn about 6-8” long.  I put my hook through each stitch, grabbed the center of the strand, pulled through, removed hook and pulled two ends of strand through the strand hole to secure.  Once I completed this for each stitch on both ends, I then aligned my scarf ends and trimmed ends to match in fringe length.

Special Note:  Each hat is worked in the round, unless otherwise specified.  Be sure to use a stitch marker to keep track of your first/last stitch of each round.  Move the stitch marker up after each round.  

Beanie Hat:
  
1.  10 DC in MR.  (10)
2.  2 DC in each st around.  (20)
3.  *2 DC in first st, 1 DC in next st.* Rep around.  (30)
4.  *2 DC in first st, 1 DC in next 2 st.* Rep around.  (40)
5.  *2 DC in first st, 1 DC in next 3 st.* Rep around.  For this round, Sl St join to the first st and Ch1.  (50)
6.  *Working in BLO, SC in first st, DC in next st.* Rep around.  (50)
7.  *Working in BLO, DC in first st, SC in next st.* Rep around.  (50)
8.  Rep #6.
9.  Rep #7.
10.  Rep #6.
11.  Rep #7.
12.  Rep #6.
13.  Rep #7.  
14.  1 DC in each st around.  Sl St join to the first st.  (50)
15.  Ch3.  This counts as the FPDC.  *Next, BPDC, then FPDC.*  Rep around.  Sl St join to first st.  (50)
16.  Rep #15.  
17.  Loosely Sl St join in each st around.  Sl St join to first st and FO.  Weave ends.  
Pom (optional): 
For the pom, I wrapped yarn around 4 of my fingers, 75 times.  I then tied a secure double knot in the center.  Trimmed ends and attached to the center top of the hat.  
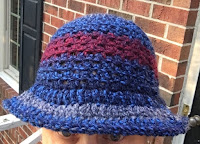
Brimmed Hat: 
  
1-13.  Repeat steps 1-13 for the Beanie Hat Pattern above.  At the end of Round 13, Sl St join to first st.  (50)
14.  Ch3 (counts as first st), DC in same st as the Ch3.  *DC in next st.  2 DC in next st.*  Rep around.  Sl St join to first st.  (75) 
15.  Ch3 (counts as first st).   DC in same st as the Ch3.  *DC in next 2 st.  2DC in next st.* Rep around.  Sl St join to first st.  (100) 
16.  Ch3 (counts as first st).  DC in each of the remaining st.  Sl St join to first st.  (100)
17.  Loosely Sl St in each st around.  Sl St join to first st.  FO.  Weave ends.  
 
And, that’s it for this very stylish and beautiful Unisex Scarf & Hat Set.  I hope you all will enjoy this pattern. 
  
Happy Crocheting...

Legal:
--don't use/claim my design as your own
--don't use/claim my pics as your own
--okay to make and sale your finished work
--don't share my pattern electronically or in print format (without prior consent) but provide a link to my blog

Social Media:
If you are on the following sites, let's connect and hook up...
  • Instagram:  Rilla2u
  • Pinterest:  Rilla2u
  • Twitter:  Rilla2u
  • Facebook:  /rilla.edwards 


Friday, July 26, 2019

Ares Swirl Blanket

I’ve had the privilege of spending the last 9 days in Oklahoma getting to know my little cousin, Ares. He is 4 months old, chunky and all-around adorable.  I’m completely smitten!!!  I have thoroughly enjoyed my time with him.

So, as crocheters often do, I had to whip up a special blanket for him.  I used Yarn Bee’s Sugarwheel in Green Tea Swirl.  It sorta reminds me of Harry Potter...lol.  I used 2 skeins of yarn (355 yds/skein) and a 6.0 mm hook.

This blanket measures approximately 30” x 30”.  For the blanket portion, I used the C2C (Corner-2-Corner) method with DC stitches.  I think the border I created makes this extra cute...

Ares Swirl Blanket...

And, here’s a picture of my sweet Ares...
Happy Crocheting...


Monday, July 15, 2019

Everything Is Peachy Hat & Booties...

The past couple months has really been busy on my home front.  I've worked on quite a few crochet projects, but I've been really lax in updating my blog with the patterns.  I'm hoping to get caught up over the next few weeks.

I know some of you have asked about the hat and booties set I made for my Everything Is Peachy Blanket.  So, ask and it shall be given!!!!

Enjoy...
Everything Is Peachy Hat & Booties...
Size: 0-3 Months (15.5" head circumference)

Materials:
--6.0mm (Hat) & 3.5mm (Booties) hooks
--#4 worsted weight yarn in peach, gray and white (I used I Love This Yarn from Hobby Lobby)
--1 faux fur pom
--tapestry needle 

U.S. Stitch Abbreviations:
Ch:  chain
Sl st:  slip stitch
St:  stitch(es)
SC:  single crochet
DC:  double crochet
HHDC:  herringbone half double crochet
Rep:  repeat
Sk:  skip
MR:  magic ring
FO:  fasten off

Special Stitch:
Herringbone Half Double Crochet Stitch:  Yarn over, insert hook into next stitch or chain, yarn over, draw through stitch or chain and first loop on hook; yarn over and pull remaining two loops on hook through.

Crab Stitch (Reverse Stitch):  Work single crochet stitches in reverse.  


Directions:
Hat:
*

1.  With peach yarn, 8 HHDC into MR.  Sl st join to first st and Ch1.  (8)
2.  2 HHDC into each st around.  Sl st join to first st and Ch1.  (16)
3.  2 HHDC in the first st, 1 HHDC in the next st.  Rep around.  Sl st join to first st and Ch1.  (24)
4.  2 HHDC in the first st, 1 HHDC in the next 2 st.  Rep around.  Sl st join to first st and Ch1.  (32)
5.  2 HHDC in the first st, 1 HHDC in the next 3 st.  Rep around.  Sl st join to first st and Ch1.  (40)
6.  2 HHDC in the first st, 1 HHDC in the next 4 st.  Rep around.  Sl st  join to the first st and FO peach yarn.  Weave ends.  (48)
7.  Join white yarn in any st and ch1.  *SC and DC in the first st, Sk the next st.* Rep from * to * around.  Sl st join to first st and Ch2.  (48)
8.  *DC in the first st, SC in the next st.* Rep from * to * around.  Sl st join to first st and Ch1.  (48)
9.  Rep #7.  (48)
10.  Rep #8.  At the end of this Round, FO white yarn and weave ends.  (48)
11.  Join gray yarn in any stitch and Ch1.  HHDC in each st around.  Sl st join to first st and Ch1.  (48)
12.  HHDC in each st around.  Sl st join to first st and Ch1.  (48)
13.  For the final round, I used the Crab Stitch.  If desired, you can work the single crochet stitches as normal.

Add the pom and you're all done!!!!

Booties:

For the booties, I used Ellie the Elephant Baby Bootie free pattern by hopefulhoney.com.  I did add an extra round of SC stitches and omitted the camel stitch round.

I added little yarn poms to mine.  I used the gray and white yarn.  I held the 2 colors together and  wrapped around 3 of my fingers 10-15 times.  I tied a double knot in the center, trimmed ends and attached to the center front of the booties.

You could also add bows, if you’d prefer.  For bows, just make a magic ring and Ch2.  Then add  2 HHDC stitches into the MR.  Sl st into MR.  Ch2.  2 HHDC stitches into the MR.  Sl st into MR.  FO and leave a long tail.  Pull tail to close center.  Wrap tail around the center of the bow.  Be sure to leave enough tail to attach to the top front of each bootie.


And here is my super cute Everything Is Peachy Lovey...
Happy Crocheting...

Legal:
--don't use/claim my design as your own
--don't use/claim my pics as your own
--okay to make and sale your finished work
--don't share my pattern electronically or in print format (without prior consent) but provide a link to my blog

Social Media:
If you are on the following sites, let's connect and hook up...
  • Instagram:  Rilla2u
  • Pinterest:  Rilla2u
  • Twitter:  Rilla2u
  • Facebook:  /rilla.edwards

Saturday, July 6, 2019

Everything Is Peachy Lovey...

I was asked to make a “Lovey-sized” version of my Everything Is Peachy Baby Blanket.  This Lovey measures 14” x 14”.  The combination of peach, grey and white yarn is just so pretty.

I decided to design and add a mouse head with arms to the center of it.  I wanted to turn my Lovey into a cute animal, but not the everyday favorite animals...lol.  So, with my own twist, I settled on a mouse.  The real thing may not be cute and cuddly but this Lovey sure is...

I used a 6.0mm hook for the Lovey portion and a 4.5mm hook for the mouse head and arms.  I decided on buttons for the eyes and nose, instead of animal eyes since this is for a baby and I felt the buttons provided a more secure safety measure.  But, this is optional and your choice.  I embroidered the whiskers and mouth with black thread.  And, of course, I had to add a little “fuzzy” hair and bow.

Isn’t she so cute?  Well, I hope you all will enjoy this pattern.

Everything Is Peachy Lovey
Size:  14” x 14”

Materials:
--4.5mm & 6.0mm hooks
--#4 worsted weight yarn in peach, gray and white (I used I Love This Yarn from Hobby Lobby)
--small amount of Poly-fil
--3 buttons (2 for the eyes and 1 for the nose)
--black embroidery thread
--tapestry needle 

U.S. Stitch Abbreviations:
Ch:  chain
Sl st:  slip stitch
St:  stitch(es)
SC:  single crochet
SC2tog:  single crochet 2 stitches together
DC:  double crochet
HHDC:  herringbone half double crochet

Rep:  repeat
MR:  magic ring
FO:  fasten off

Special Stitch:
Herringbone Half Double Crochet Stitch:  Yarn over, insert hook into next stitch or chain, yarn over, draw through stitch or chain and first loop on hook; yarn over and pull remaining two loops on hook through.

Here is the link to my video tutorial for the Herringbone Half Double Crochet Stitch.

Directions:
Lovey:
1.  With 6.0mm hook and peach yarn, ch 39.  HHDC in 2nd ch from hook and across.  Ch1 and turn.  (38)
2-6.  HHDC in each st across.  Ch1 and turn.  At the end of Row 6, FO peach and join white yarn.  Ch1.  (38)
7.  With white yarn, *SC in the first st, DC in the next st.* Rep from * to * across.  Ch1 and turn.
8-9.  Rep #7.  At the end of Row 9, FO white and join gray yarn.  Ch1.  (38)
10.  With gray yarn, HHDC in each st across.  Ch1 and turn.  (38)
11-15.  Rep #10.  At the end of Row 11, FO gray and join white yarn.  Ch1.  (38)
16-18.  With white yarn, Rep #7.  At the end of Row 18, FO white and join peach yarn.  Ch1.  (38)
19-24.  HHDC in each st across.  Ch1 and turn.  At the end of Row 24, FO and join white yarn.  Ch1.  (38)
25-27.  White white yarn, *SC in the first st, DC in the next st.* Rep from * to * across.  Ch1 and turn.  At the end of Row 27, FO white and join gray yarn.  Ch1.  (38)
28-33.  With gray yarn, HHDC in each st across.  Ch1 and turn.  (38)
Border:
34.  With gray yarn, SC in each st around, placing 3 SC in each corner.  Sl st join to first st and FO.  Weave ends.


Mouse Head:
The mouse head is worked in the round.  So, use a stitch marker to keep track of the first/last stitch of each round.  
1.  With 4.5mm hook and gray yarn, 6 SC into MR. (6)
2.  2 SC in each st around.  (12)
3.  2 SC in first st, 1 SC in next st.  (18)
4.  2 SC in first st, 1 SC in next 2 st.  (24)
5.  2 SC in first st, 1 SC in next 3 st.  (30)
6-10.  1 SC in each st around.  (30)
11.  *SC2tog, 1 SC in next 3 st.* Rep from * to * around.  (24)
12.  *SC2tog, 1 SC in next 2 st.*  Rep from * to * around.  (18)
13.  Firmly stuff head with Poly-fil
14.  *SC2tog, 1 SC in next st.*  Rep from * to * around.  (12)
15.  SC2tog.  Rep around.  Sl st join to first st and FO.  Leave a long tail.  (6)
16.  Weave tail in and out of last round to close up opening.  Leave a long tail for attaching to the Lovey.   

Ears (make 2):
1.  With 4.5mm hook and peach yarn, 6 SC into MR.  (6)
2.  2 SC in each st around.  FO peach and join gray yarn.  (12)
3.  With gray yarn, 2 SC in first st, 1 SC in next st.  Rep around.  Sl st join to first st and FO.  Leave a long tail for attaching.
4.  Attach ears on each side between Rounds 4-6.  

Arms (make 2):
1.  With 4.5mm hook and white yarn, 6 SC into MR.  (6)
2.  2 SC in first st, 1 SC in next 2 st.  Sl st join to first st and FO white yarn.  (9)
3.  Join gray yarn in any st and ch 1.  1 SC in each st around.  (9)
4-7.  1 SC in each st around.  At the end of Round 7, sl st join to first st and FO.  Leave a tail for attaching.
8.  Attach arms at the center bottom of the Mouse's head.  (Note:  you can attach arms either before or after attaching the head to the blanket portion)

Hair:
With gray yarn, I joined strands to the center top and tied in a double knot.  I then used the tapestry needle to fray yarn.  I then trimmed to make sure all of the strands were equal in height.

Facial features:
I used 2 peach buttons for the eyes and 1 black button for the nose.  I attached the buttons first.  I then used embroider yarn to make the whiskers and the mouth.

Hairbow:
1.  With 4.5mm hook and peach yarn, I made a MR and ch3.  2 DC into MR.  Sl st join into MR.  Ch3.  2 DC into MR.  Sl st join into MR.  I then pulled tail to close.  FO and leave a long tail.  I used the tail to wrap around the center of the bow.  Make sure to leave enough tail for attaching to the Mouse's head.  I just attached mine in front of one of the ear's.   

Attaching Mouse Head:
Now you are ready to attach your head to the center of your blanket (Rows 16-18).

And, that's it for this super cute "Everything Is Peachy" Mouse Lovey!!!

Enjoy...

Happy Crocheting...

Legal:
--don't use/claim my design as your own
--don't use/claim my pics as your own
--okay to make and sale your finished work
--don't share my pattern electronically or in print format (without prior consent) but provide a link to my blog

Social Media:
If you are on the following sites, let's connect and hook up...
  • Instagram:  Rilla2u
  • Pinterest:  Rilla2u
  • Twitter:  Rilla2u
  • Facebook:  /rilla.edwards