Saturday, September 30, 2017

Ginger Spice Hooded Cowl

"Ginger Spice Hooded Cowl" I made today with one skein (Caron Teacakes) of yarn and a 10mm hook. This super bulky yarn works up quickly.  It's so soft and I'm sure will keep me warm and cozy in the months ahead.  I actually had a small amount of yarn leftover.


Ginger Spice Hooded Cowl Pattern
Difficulty Level:  Easy

Size: Cowl portions measures 27" long and 8" wide; this will fit most

Materials:
--10.0mm hook
--1 Tea Cake by Caron in Ginger Spice (#6 Super Bulky yarn; 80% acrylic and 20% wool; 204 yds) - you will have a small amount of yarn leftover
--(3) 1 1/4" buttons
--small amount of coordinating embroidery thread and needle for attaching buttons
--tapestry needle for weaving

U.S. Stitch Abbreviations:
Ch:  chain
Sl st:  slip stitch
St:  stitch(es)
HDC:  half double crochet
FO:  fasten off

Special stitch:
Starting in Row 2, when it calls for the HDC stitch, unless otherwise noted, you will be working the HDC stitch into the 3rd loop that was created from the previous row and not into the stitch itself; this creates the beautiful texture for this!!!  Now, of course, you can just work the HDC into the stitch itself, but I'm not certain what the texture will be if doing it this way...

Directions:
Cowl:
1.  Ch16.  HDC 2nd st from hook and across.  Ch1 and turn.  (15)
2.  HDC in the 3rd loop of each st across.  Ch1 and turn.  (15)
Repeat step #2 until your cowl measures 27" long.  You can make this shorter or longer, if so desired.

Hoodie (optional):
1.  Working on the long end, I skipped 8 st.  Joined yarn with a Ch1 into the next st.  I worked HDC stitches across, leaving the last 8 st unworked.  Ch1 and turn.
2-14.  HDC in third loop of each st across.  Ch1 and turn.  At the end of Row 14, FO and leave a long tail for whipstitching Row 14 together to form hood.  Fold hoodie portion in half, and whipstitch Row 14 together.  FO and weave ends.

Buttons:
Attach buttons on one side of the short end, vertically and enjoy your new "Ginger Spice Hooded Cowl...."
 Happy Crocheting...
Legal:
--don't claim my pattern/design as your own
--don't use my pics as your own
--don't share my pattern electronically or in print format but provide a link to my blog

Thursday, September 28, 2017

Creativity vs Procrastination...

Have you ever found yourself working on too many projects at one time?  I think Crocheters may be notorious for doing this.  I know I'll be working on one thing, an idea strikes and I get so excited that I have to immediately start working on the new project.  I routinely justify this by telling myself, "it's good to change out and work on different yarn/colors...lol". I'm not sure if that is a good explanation or if I'm procrastinating a project that is seemingly taking too long to complete.

It seems, though, I always have 8-10 projects that's at different stages of completion.  I have several new projects I'm really excited about and can't wait to share with you all once I get a little more of it completed.  And, then I have a blanket I'm on deadline to complete before October 10.  The blanket isn't my pattern but a commissioned project I was asked to make -- and, in all honesty, this blanket is more time consuming than any blanket I've designed.  But, it's what the customer wants!!!

So, the question begs are we (Crocheters) so full of creativity that our mind explodes or do we get bored and procrastinate?  Sometimes, I think I may fall into each category....

Here's a peek at 2 of my projects...


Happy Crocheting...


Boy's Pompom Hat

Cute Boy's Pompom Hat made using Caron Cupcakes Yarn in Nougat.  This will comfortably fit up to a 21" head circumference...
Boy's Pompom Hat Pattern
Difficulty Level:  Intermediate
(since the pattern does call for post stitches)

Size:  6 1/2" diameter x 7" height
(This will comfortably fit up to a 21" head circumference)

Materials:
--4.5mm hook
-- 1 cake of Caron Cupcakes Yarn in Nougat
--tapestry needle for weaving

U.S. Stitch Abbreviations:
Ch:  chain
Sl st:  slip stitch
St:  stitch(es)
HDC:  half double crochet
FPHDC:  front post half double crochet
BPHDC:  back post half double crochet
MR:  magic ring
FO:  fasten off
Rep:  repeat

Directions:
1.  10 HDC st into MR.  Sl st join and Ch1.  (10)
2.  2 HDC in each st around.  Sl st join and Ch1.  (20)
3.  2 HDC in first st, 1 HDC in next st.  Rep around.  Sl st join and Ch1.  (30)
4.  2 HDC in first st, 1 HDC in next 2 st.  Rep around.  Sl st join and Ch1.  (40)
5.  2 HDC in first st, 1 HDC in next 3 st.  Rep around.  Sl st join and Ch1.  (50) 
6.  2 HDC in first st, 1 HDC in next 4 st.  Rep around.  Sl st join and Ch1.  (60) 
7.  2 HDC in first st, 1 HDC in next 5 st.  Rep around.  Sl st join and Ch1.  (70)
8.  2 HDC in first st, 1 HDC in next 12 st.  Rep around.  Then 1 HDC in each of the last 5 st.  Sl st join and Ch1.  (75)  
9-18.  1 HDC in each st around.  Sl st join and Ch1.  (75)
19-20.  FPHDC in first st, BPHDC in next st.  Rep around.  Sl st join and Ch1.   At the end of Round 20, FO and weave ends.  (75)

Attach included pompom to the top of the hat.   
 
 
Happy Crocheting...
Legal:
--don't claim my pattern/design as your own
--don't use my pics as your own
--don't share my pattern electronically or in print format but provide a link to my blog

Monday, September 25, 2017

Simple Candy Corn Keychain

I made this Candy Corn Keychain as a thank you gift.  I spent less than 30 minutes from start to finish.

I used very small amounts of Bernat Softee Chunky Yarn in:
--Neutral
--Glowing Gold
--Pumpkin

The only other items needed were an 8mm hook, 2 small black eyes, a keyring, black thread to embroider mouth, small amount of polyfil and a tapestry needle for weaving in ends.


U.S. Stitch Abbreviations:
Ch: chain
St:  stitch(es)
SC:  single crochet

Directions:
Make 2:
1.  With neutral yarn, Ch2.  SC in 2nd ch from hook.  Ch1 and turn.  (1)
2.  2 SC in st.  Ch1 and turn.  (2)
3.  2 SC in first st, 1 SC in next.  Fasten off neutral yarn and join Pumpkin.  Ch1 and turn.  (3)
4.  1 SC in each st across.  Ch1 and turn.  (3)
5.  2 SC in first st, 1 SC in next st, 2 SC in last.  Ch1 and turn.  (5)
6.  1 SC in each st across.  Fasten off Pumpkin and join Glowing Gold.  Ch1 and turn.  (5)
7.  2 SC in first st, 1 SC in next 3 st, 2 SC in last st.  Ch1 and turn.  (7)
8.  1 SC in each st across.  Ch1 and turn.  (7)
9.  1 SC in each st across.  Fasten off and leave a long tail for attaching.  (7)

Assembly:
1.  Place eyes and embroider mouth in the center, right side, Pumpkin section of one piece.
2.  Place right sides together and whipstitch together.  Before finishing, turn right sides out and lightly stuff with polyfil.  Finish off and weave ends.
3.  Attach keyring to top.

Happy Crocheting....

Legal:
--don't claim my pattern/design as your own
--don't use my pics as your own
--don't share my pattern electronically or in print format but provide a link to my blog


Sunday, September 24, 2017

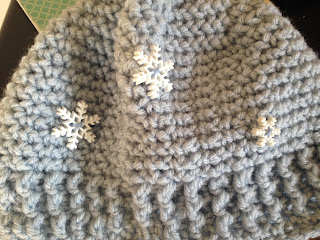
Snowflake Hat

This Snowflake Hat was made using a combination of Herringbone Half Double Crochet and Single Crochet stitches to create a beautiful, textured hat.  It was rounded off by completing 3 rows of FPDC and BPDC stitches and then a final row of slip stitches.  Top off with a cute pompom, a snowman button and a few snowflake buttons and you have a gorgeous hat for the fall and winter months ahead.  It was made using Vanna's Choice Yarn by Lion Brand in Silver Blue.

Snowflake Hat Pattern

Difficulty Level:  Intermediate

Size:  Average-sized Woman's Head (20-22"); with instructions for sizes between 14" - 19" circumference head

Materials:
--5mm hook
--1 skein of Vanna's Choice by Lion Brand in Silver Blue
--snowman and snowflake buttons (optional)
--coordinating thread, if using buttons
--tapestry needle for weaving

U.S. Stitch Abbreviations:
Ch:  chain
Sl st:  slip stitch
St:  stitch(es)
SC:  single crochet
HHDC:  Herringbone Half Double Crochet
FPDC:  front post double crochet
BPDC:  back post double crochet
MR:  magic ring
FO:  fasten off

Note:  Depending on how tight or loose your tension is, the hat size can vary slightly; so, a good rule of thumb would be after Round 5, place on head to see if you need more increase rounds or not....continue to check after each round until you are satisfied with size and then just complete rounds without increasing.   

Directions:
1.  10 HHDC into MR.  Sl st join to first st and Ch1.  (10)
2.  HHDC and SC in each st around.  Sl st join and Ch1.  (20)
3.  HHDC and SC in first st, HHDC in next st.  Repeat around.  Sl st join and Ch1.  (30)
4.  HHDC and SC in first st, HHDC in next 2 st.  Repeat around.  Sl st join and Ch1.  (40)
5.  HHDC and SC in first st, HHDC in next 3 st.  Repeat around.  Sl st join and Ch1.  (50)

6.  HHDC and SC in first st, HHDC in next 4 st.  Repeat around.  Sl st join and Ch1.  (60)
(At the end of Round 6, your diameter will be 5"; which will fill fit a 14-16" circumference head; so, you could stop increase rounds - skip rounds 7 and 8 - and make 6 rounds of #9)

7.  HHDC and SC in first st, HHDC in next 5 st.  Repeat around.  Sl st join and Ch1.  (70)
(At the end of Round 7, your diameter will be 6"; which will fit a 17-19" circumference head; so you could stop increase rounds - skip round 8 - and make 7 rounds of #9)

8.  HHDC and SC in first st, HHDC in next 6 st.  Repeat around.  Sl st join and Ch1.  (80)
(At the end of Round 8, your diameter will be 7"; which will fit a 20-22" circumference head)

9-16.  HHDC in first st, SC in next st.  Repeat around.  Sl st join and Ch1.
17-19.  FPDC, BPDC.  Repeat around.  Sl st join and Ch1.
20.  Loosely Sl st in each st around.  FO and weave ends.

Pompom:
I wrapped yarn around 4 of my fingers around 50 times.  Tied a double knot in the center, leaving tail for attaching to hat.  Then used scissors to cut/trim and shape.  Attach to hat at center top.

Optional:
1.  Use a matching thread and attach buttons of your choice.  I attached 1 snowman and 6 snowflakes.

Happy Crocheting...

Legal:
--don't claim my pattern/design as your own
--don't use my pics as your own
--okay to make and sale your finished work
--don't share my pattern electronically or in print format (without my consent) but provide a link to my blog

Friday, September 22, 2017

Snowflake Ponytail Headband/Ear Warmer

Happy Friday, All!!!  I'm super-excited that my blog is about to hit 100k view mark.  This is so humbling and I truly appreciate and thank each and every one of you who take the time to visit my little corner of the world.

Today, I worked on a video tutorial for my Ponytail Headband/Ear Warmer.  I used Vanna's Choice by Lion Brand in Silver Blue and just thought this color is perfect for snowflakes and a couple snowmen....

Snowflake Ponytail Headband/Ear Warmer


Difficulty Level:  Easy 

Materials:
--5.0mm hook
--Vanna's Choice by Lion Brand in Silver Blue (approx 60-70yds)
--ponytail holder 
--2 stitch markers 
--tapestry needle for weaving
--optional buttons (I used 2 snowmen and several small snowflakes) 

U.S. Stitch Abbreviations:
Ch:  chain
Sl st: slip stitch 
St:  stitch(es)
SC:  single crochet
HDC:  half double crochet 
HDC2tog: half double crochet 2 stitches together 
FO:  fasten off 

Directions:
1.  Sl st join yarn to ponytail holder and ch1.  24 SC around ponytail holder.  Sl st to first st and ch1.
(24)
2-3.  1 HDC in each st around.  Sl st to join and ch1.  (24)
4.   1 HDC in the first 8 st.  Ch1 and turn.  (8)

Stitch Marker Placement:
Before continuing with Row 5, you will want to place 2 stitch markers on the opposite side of the ponytail holder.  So, from row 4, count over 5 stitches from the 8th st you just made and place stitch marker.  Count over 7 more stitches and place the 2nd stitch marker.

Now, you're ready to continue with making your rows.
5.  2 HDC into the first st, 1 HDC into the next 6 st and 2 HDC in the last st.  Ch1 and turn.  (10)
6.  2 HDC into the first st; 1 HDC into the next 8 st and 2 HDC into the last st.  Ch1 and turn.  (12)
7-44.  1 HDC in each st.  Ch1 and turn.  (12)
45.  HDC2tog; 1 HDC in the next 8 st; HDC2tog.  Ch1 and turn.  (10)
46.  HDC2tog; 1 HDC in the next 6 st; HDC2tog.  Ch1 and turn.  (8)

Now, FO; leaving a long tail to attach Row 46 to Row 3 (the 8 stitches from stitch marker to stitch marker) of the opposite side of the ponytail holder; you can either slip stitch or whipstitch 8 stitches together.

Optional:
Attach buttons using a matching thread.
***************
Here's my updated video tutorial.  It's in 2 parts.  I had to use my cell phone to record; so, my apologies...

***************
Happy Crocheting.... 
Legal:
--don't claim my pattern as your own
--don't use my pics as your own
--don't share my patterns electronically or in print format but provide a link to my blog

Wednesday, September 20, 2017

Hanging Scarecrow

I made this cute and whimsical 19" tall Scarecrow this afternoon using #4 worsted weight yarn.  You can hang him in the house, on your door, attach to a wreath or to a garden stake to place at the entrance to your home....several possibilities for this cute and easy Scarecrow.

Hanging Scarecrow
Hanging Scarecrow Pattern 
Difficulty Level:  Easy

Size:  Approximately 19" tall

Gauge:  I did not gauge this project

Materials:  
--2.5mm, 4.0mm and 5.0mm hooks
--#4 worsted weight yarn (I used Red Heart Super Saver in red, orange, burnt pumpkin/terra cotta, black, brown yellow, green, pink and an ivory/off-white)
--tapestry needle for weaving

U.S. Stitch Abbreviations:
Ch:  chain
Sl st:  slip stitch
St:  stitch(es)
SC:  single crochet 
HDC:  half double crochet 
SC2tog:  single crochet 2 stitches together (decrease) 
SC3tog:  single crochet 3 stitches together (decrease)
HDC2tog:  half double crochet 2 stitches together (decrease)
MR:  magic ring
FO:  fasten off. 

Directions:
A.  Head:
1.  With 5.0mm hook and ivory, 10 HDC st into MR.  Sl st join to first st and Ch1.  (10)
2.  2 HDC in each st around.  Sl st join to first st and Ch1.  (20)
3.  2 HDC in first st, 1 HDC in next st.  Repeat around.  Sl st join to first st and Ch1.  (30) 
4.  2 HDC in first st, 1 HDC in next 2 st.  Repeat around.  Sl st join to first st and Ch1.  (40)
5.  2 HDC in first st, 1 HDC in next 3 st.  Repeat around.  Sl st join to first st and Ch1.  (50)
6.  2 HDC in first st, 1 HDC in next 4 st.  Repeat around.  Sl st join to first st.  FO and weave ends.  (60)

Eyes (make 2)
1.  With 4.0mm hook and black yarn, 6 SC into MR.  Sl st join to first st and FO.  Leave tail for attaching.  (6)

Nose:
1.  With 5.0 mm hook and orange yarn, Ch4.  SC in 2nd ch and across.  Ch1 and turn.  (3)
2.  SC2tog, SC in next st.  Ch1 and turn.  (2)
3.  SC2tog.  FO.  Leave tail for attaching.  (1)

Mouth:
1.  With black yarn, embroider.  

Cheeks (make 2):
1.  With 2.5mm hook and pink yarn, 6 SC into MR.  Sl st join to first st and FO.  Leave tail for attaching. (see pics for placement)

B.  Hat:
1.  With 5.0mm hook and brown yarn, Ch21.  HDC in 2nd ch from hook and across.  Ch1 and turn.  (20)
2-3.  1 HDC in each st across.  Ch1 and turn.  At the end of Row 3, do NOT Ch1, but FO brown yarn.
4.  Skip 4 st, and join red yarn into the 5th st.  Ch1.  Into same st, 1 HDC.  1 HDC in the next 11 st.  FO and weave ends.  (12)
5.  Re-join brown yarn, 1 HDC in each st across.  Ch1 and turn.  (12)
6-10.  1 HDC in each st across.  Ch1 and turn.  (12)
At the end of Row 10, do NOT Ch1, but FO and leave a long tail for attaching to the head.   (I had to work my brown yarn in and out of stitches to get it back down to the initial rows for attaching the hat to the head - I hope this makes sense)

Sunflower:
1.  With 5.0mm hook and black yarn, 6 HDC into MR.  Sl st to first st to join and FO.  (6)
2.  Join yellow yarn and Ch1.  3 HDC in the first st; *sl st into next st AND 3 HDC into same st* repeat from * to * around.  Sl st to first st and FO.  Leave tail for attaching.  

Hair:
I joined 3 strands of yarn to each side of the hat (skipped 1st 2 stitches on each side), tied in a double knot and used my tapestry needle to fray. 

C.  Body/Feet:


1.  With 5.0mm hook and green yarn, Ch17.  SC in 2nd ch from hook and across.  Ch1 and turn.  (16)
2-8.  1 HDC in each st across.  Ch1 and turn.  (16)
9.  HDC2tog, 1 HDC in next 12 st, HDC2tog.  Ch1 and turn.  (14)
10.  HDC2tog, 1 HDC in next 10 st, HDC2tog.  Ch1 and turn.  (12)
11.  2 HDC in first st, 1 HDC in next 10 st, 2 HDC in last st.  Ch1 and turn.  (14)
12.  2 HDC in first st, 1 HDC in next 12 st, 2 HDC in last st.  Ch1 and turn.  (16)
13.  2 HDC in first st, 1 HDC in next 14 st, 2 HDC in last st.  Ch1 and turn.  (18)
14-17.  1 HDC in each st across.  Ch1 and turn.  (18)
Forming the first leg:
18.  1 HDC in the first 7 st and 2 HDC in next st.  Ch1 and turn.  (9)
19.  1 HDC in each st across.  Ch1 and turn.  (9)
20.  1 HDC in the first 7 st, HDC2tog.  Ch1 and turn.  (8)
21-26.  1 HDC in each st across.  Ch1 and turn.  (8)
At the end of Row 26, FO and weave ends.
For the second leg:
27.  Join green yarn on opposite end of Row 17 and repeat steps #18-26.

Feet (make 2)
1.  With 5.0mm hook and a burnt pumpkin/terra cotta shade of yarn, Ch9.  HDC in 2nd ch from hook and across.  Ch1 and turn.  (8)
2.  1 HDC in each st across.  FO and join yellow yarn.  Ch1 and turn.  (8)
3.  With yellow yarn, 1 HDC in each st across.  Ch1 and turn.  (8)
4.  1 HDC in each st across.  Do not Ch1.  Turn.  (8)
5.  *Sl st into first st, Ch3.  Sl st into 2nd ch from hook and next ch.* Repeat this for a total of 8 times. (I attached the feet by whipstitching the burnt pumpkin/terra cotta shade to the last 2 rows of the body)

Mock Shirt:
1.  With 5.0mm hook and orange yarn, Ch8.  HDC in 2nd ch from hook and across.  Ch1 and turn.  (7)
2-8.  1 HDC in each st across.  Ch1 and turn.  (7)
At the end of Row 8, FO and leave a tail for attaching to the top, center of the body.  

Mock Buttons (make 2):
1.  With 2.5mm hook and black yarn, 6 SC into MR.  Sl st join to first st and FO.  Leave a tail for attaching.  (I attached mine 2 stitches over from each side of the bottom of the mock shirt)

Center Pocket:
1.  With 4.0mm hook and brown yarn, Ch6.  SC in 2nd ch from hook and across.  Ch1 and turn.   (5)
2-4.  1 SC in each st across.  Ch1 and turn.  (5)
At the end of Row 4, FO and leave tail for attaching.  (I attached mine under my mock shirt, by leaving/skipping one row between the two)

Side Pockets (make 2):
1.  With 4.0mm hook and brown yarn, Ch6.  SC in 2nd ch from hook and across.  Ch1 and turn.  (5)
2.  1 SC in each st across.  Ch1 and turn.  (5)
3.  SC2tog, SC in next st, SC2tog.  Ch1 and turn.  (3)
4.  SC3tog.  FO and leave tail for attaching.  (I attached mine 2 rows down from the center pocket to make a left and right side pockets)

D:  Arms/Hands (make 2):
 Arms:
1.  Leave a long tail before you start this row (this will be for attaching the arm to the body.  With 5.0mm hook and orange yarn, Ch6.  HDC in 2nd ch from hook and across.  Ch1 and turn.  (5)
2-13.  1 HDC in each st across.  Ch1 and turn.  (5)
At the end of Row 13, do NOT Ch1.  Turn.
14.  Sl st into first st, 3 HDC in next st, sl st in next st, 3 HDC in next st and sl st into the last st.  FO and weave ends.

Hands: 
1.  With 5.0mm hook and yellow yarn, Ch6.  HDC in 2nd ch from hook and across.  Ch1 and turn.  (5)
2.  1 HDC in each st across.  Do NOT Ch1 and turn.  (5)
3.  *Sl st into first st, Ch3.  Sl st into 2nd ch from hook and next ch.* Repeat this for a total of 5 times. (I attached the hands by whipstitching to the backside of Rows 13 and 14 of each arm.)

Assembly:
1.  Attach all facial features to head first. 
2.  Attach hat to center, top of head. 
3.  Attach the mock shirt, buttons and pockets to the body.  
4.  Attach head to center, top of body.  
5.  Attach arms to each side of body, under the head.  
6.  Attach feet.  

Hanger:
I just tied a piece of yarn to the back side of the hat to use as a hanger.  

I haven't decided yet if I'm going to keep mine in the house or use craft glue and attach to a garden stake to put beside my front doorsteps, along with my Ghostly Boo Garden Stake. 

 Happy Crocheting...

Legal:
--don't claim my pattern as your own
--don't use my pics as your own
--don't share my patterns electronically or in print format but provide a link to my blog

Monday, September 18, 2017

ABC Carrying Case/Wall Mat

How cute and functional is this ABC Carrying Case/Wall Mat for the Toddler to the First Grader?  Carry it around, hang on the wall or lie it down on the floor - teach colors, ABC's and counting (up to 26).  There's 26 pockets.  I plan to make 26 animals - one for each letter to help with phonetics by relating initial sound to animal!

Once I get my animals made for each letter, I will add a separate post.

ABC Carrying Case/Wall Mat Pattern

Difficulty Level:  Intermediate

Gauge:  11 HDC stitches x 10 rows = 4"

Size:  Approximately 15 1/2" wide x 30 1/2" long (opened)

Materials:
--6mm hook for the mat, handles and pockets
--5mm hook for the appliques (bottle of glue, eraser and crayon)
--1 skein of Red Heart Super Saver Yarn in Grey Heather for case/mat
--Red Heart Super Saver Yarn in colors of choice for the pockets, abc's and appliques (I used scrap yarns I had)
--tapestry needle for weaving

U.S. Stitch Abbreviations:
Ch:  chain
Sl st:  slip stitch
St:  stitch(es)
SC:  single crochet
HDC:  half double crochet
FLO:  front loops only
BLO:  back loops only
SC2tog:  single crochet 2 stitches together
SC3tog:  single crochet 3 stitches together
FO:  fasten off

Special Stitch:
Picot Stitch:  Ch3, sl st into 1st ch

Directions:
Mat:
1.  Ch41.  HDC in 2nd ch from hook and across. Ch1 and turn.  (40)
2-35.  1 HDC in each st across.  Ch1 and turn.  (40)
36.  Working in FLO, 1 HDC in each st across.  Ch1 and turn.  (40)
37.  Working in the BLO, 1 HDC in each st across.  Ch1 and turn.  (40)
38-73.  Working in both loops again, 1 HDC in each st across.  Ch1 and turn.  (40)
74-75.  1 SC st in each st around the perimeter of the Carrying Case with 3 SC st in each corner.  Sl st join and Ch1.  At the end of #75, FO and weave ends.  

Handles (make 4):
 1.  Ch16.  SC in 2nd ch from hook and across.  Ch1 and turn.  (15)
2-3.  1 SC in each st across.  Ch1 and turn.  (15)
4.  1 SC in the first 3 st.  Ch1 and turn.  (3)
5-8.  1 SC in each st across.  Ch1 and turn.  (3)

At the end of Row 8, FO and join yarn on the opposite end (last st of row 3).  Repeat #4-8.  

Assembly of Handles (make 2):
1.  Whipstitch 2 handles together to make into 1 handle.  Before finishing off, you may want to add a very small amount of polyfil.  Attach the handles in the center.  (see pics) 

Pockets:
I made 2 pockets (ABC and the XYZ):
1.  Ch36.  HDC in 2nd ch from hook and across.  Ch1 and turn.  (35)
2-7.  1 HDC in each st across.  Ch1 and turn.  (35)

I made 4 pockets (DEFGH, IJKLM, NOPQR, STUVW):
1.  Ch42.  HDC in 2nd ch from hook and across.  Ch1 and turn.  (41)
2-7.  1 HDC in each st across.  Ch1 and turn.  (41)

At the end of Row 7, FO and leave a long tail for attaching to the mat.  

Assembly of Pockets:
1. For each pocket, you will first whipstitch down the side, across the bottom and up the other side.  
2.  For ABC and XYZ pockets, I used my ruler to measure and whipstitch the strip into 3 sections.  
3.  For the remaining strips, I used my ruler to measure and whipstitch the strip into 5 sections. 
 
ABC's:
I made my own alphabet for this project.  There are numerous sites on the internet with the ABC's.  (I may add mine later on.)  

Appliques:
(5mm hook)
I placed the following 3 appliques on the front side of the Carrying Case/Wall Mat.

Bottle of Glue:
1.  With white yarn, Ch9.  SC in 2nd ch from hook and across.  Ch1 and turn.  (8)
2.  2 SC in first st, 1 SC in next 6 st, 2 SC in last st.  Ch1 and turn.  (10)
3.  2 SC in first st, 1 SC in next 8 st, 2 SC in last st.  Ch1 and turn.  (12)
4.  1 SC in each st across. Ch1 and turn.  (12)
5-13.  With white yarn, 1 SC in first 2 st, then with blue yarn, 1 SC in next 8 st, and then with white yarn 1 SC in last 2 st.  Ch1 and turn.  (12)
14-16.  With white yarn, 1 SC in each st across.  Ch1 and turn.  (12)
17.  SC2tog, 1 SC in next 8 st, SC2tog.  Ch1 and turn.  (10)
18.  SC2tog, 1 SC in next 6 st, SC2tog.  FO.  Leave long tail for attaching.  Turn.  (8)
19.  With orange yarn, skip 1st st and join into 2nd st with a Ch1.  Into same st, SC.  Then 1 SC in next 5 st.  Ch1 and turn.  (6)
20-21.  1 SC in each st across. Ch1 and turn.  (6)
22.  SC2tog, 1 SC in next 2 st, SC2tog.  Ch1 and turn.  (4)
23.  SC2tog, 1 SC in next 2 st.  Ch1 and turn.  (3)
24.  1 SC in each st across.  Ch1 and turn.  (3)
25.  SC3tog.  FO.  Leave tail for attaching.

Now, either embroider or surface crochet "GLUE" with black yarn.  (see pics)

Crayon:
1.  With dark shade of blue, Ch 9.  SC in 2nd ch from hook and across.  Ch1 and turn.  (8)
2.  1 SC in each st across.  FO.  Turn.  (8) 
3.  Switch to light blue yarn and Ch1.  1 SC in each st across.  FO.  Turn.  (8)
4.  Switch to black yarn and Ch1.  1 SC in each st across.  FO.  Turn.  (8)
5.  Switch to light blue yarn and Ch1.  1 SC in each st across.  FO.  Turn.  (8)
6.  Switch to black yarn and Ch1.  1 SC in each st across.  FO.  Turn.  (8)
7-15.  In light blue yarn, Ch1.  1 SC in each st across.  Ch1 and turn.  (8)
16.   Switch to black yarn and Ch1.  1 SC in each st across.  FO.  Turn.  (8)
17.  Switch to light blue yarn and Ch1.  1 SC in each st across.  FO.  Turn.  (8)
18.  Switch to black yarn and Ch1.  1 SC in each st across.  FO.  Turn.  (8)
19.  In light blue yarn, Ch1.  1 SC in each st across.  Ch1 and turn.  (8)
20-21.  In dark blue, 1 SC in each st across.  Ch1 and turn.  (8)  
22.  SC2tog, 1 SC in next 4 st, SC2tog.  Ch1 and turn.  (6)
23.  SC2tog, 1 SC in next 2 st, SC2tog.  Ch1 and turn.  (4)
24.  SC2tog, 1 SC in next st.  Ch1 and turn.  (3)
25.  SC3tog.  Ch1.  (1)
26.  Work 1 SC in each st around the perimeter of the crayon.  FO and leave tail for attaching. 

Eraser: 
1.  With dark shade of pink, Ch6.  SC in 2nd ch from hook and across.  FO and join light pink yarn.  Ch1 and turn.  (5)
2-11.  With light pink, 1 SC in each st across.  At the end of Row 11, FO and join dark pink yarn.  (5)
12.  With dark shade of pink, 1 SC in each st across.  FO.  Leave tail for attaching.  (5)

Now, with dark shade of pink, join yarn to work 1 SC in each end of the light shade pink.  (10)
Repeat on opposite side.  (Do not work a stitch into the dark shade of pink - see pics)


 Happy Crocheting...

Legal: 
--don't claim my pattern as your own
--don't use my pics as your own
--don't share my pattern electronically or in print format but provide a link to my blog 
--okay to make and sale your finished work