Showing posts with label Sports. Show all posts

Sunday, February 2, 2020

Twin-Sized Baseball Blanket

My grandson, Gabriel, asked me to make him a “Baseball Blanket.”  He was getting a new bed and said he needed a new handmade blanket from his mamaw.

So, in the Fall of 2019, I started on his blanket with the colors Red, White and Blue for the base of the blanket itself.  I used Green and Tan for the field and on the border.  The yarn is Hobby Lobby’s, “I Love This Yarn.”  You can use your favorite yarn brand; just note the overall size may vary slightly.

Initially, I designed this pattern on a graph to complete as a graphgan but later decided to make the blanket first and then make the baseball and field as appliqués.  I will include my graph for those who want to complete this project as one piece.

I’m including general directions below in how I made this blanket.  I will follow-up with detailed instructions as soon as I have a chance to type it up.

Gabriel’s Baseball Blanket

Below is an upclose picture of the border.  I absolutely loved how it turned out.  I think it really adds to the beauty of this blanket.

Here is an upclose picture of the baseball and field.  I was extremely pleased with the end result of this.

And, a picture of the completed blanket.  It measures Twin-sized.  I debated back and forth on whether or not to add my baseball bat appliqué pattern to this blanket (you can find this freebie by typing “Play Ball” in my search engine).  Gabriel, however, was happy with it, as is.


Here is my original graph design.  Please note, 1 white and 1 blue section is not showing on the graph.  The pattern is as follows:
15 Rows Red
10 Rows White
15 Rows Blue 

You will repeat pattern a total of 4 times.  Or, to your desired size.  As you can see in the above picture, I appliquéd the field in the center of section 2 and section 3 of the red, white and blue.  

Here is how I made the appliqué sections:
1.  First, I crocheted the green portion of my field;
2.  Next,  I crocheted the brown portion; I made the bases and appliqued to create first, second, third and home base;
3.  Then, I crocheted the baseball;
4.  Now, I attached the brown section to the field then the baseball above;
5.  Last I attached to the center of the blanket.  

Border:
I used brown, white and green to create my border.  

Happy Crocheting...

Legal:
--don't use/claim my design as your own
--don't use/claim my pics as your own
--okay to make and sale your finished work
--don't share my pattern electronically or in print format (without prior consent) but provide a link to my blog

Social Media:
If you are on the following sites, let's connect and hook up...
  • Instagram:  Rilla2u
  • Pinterest:  Rilla2u
  • Twitter:  Rilla2u
  • Facebook:  /rilla.edwards 

Saturday, March 9, 2019

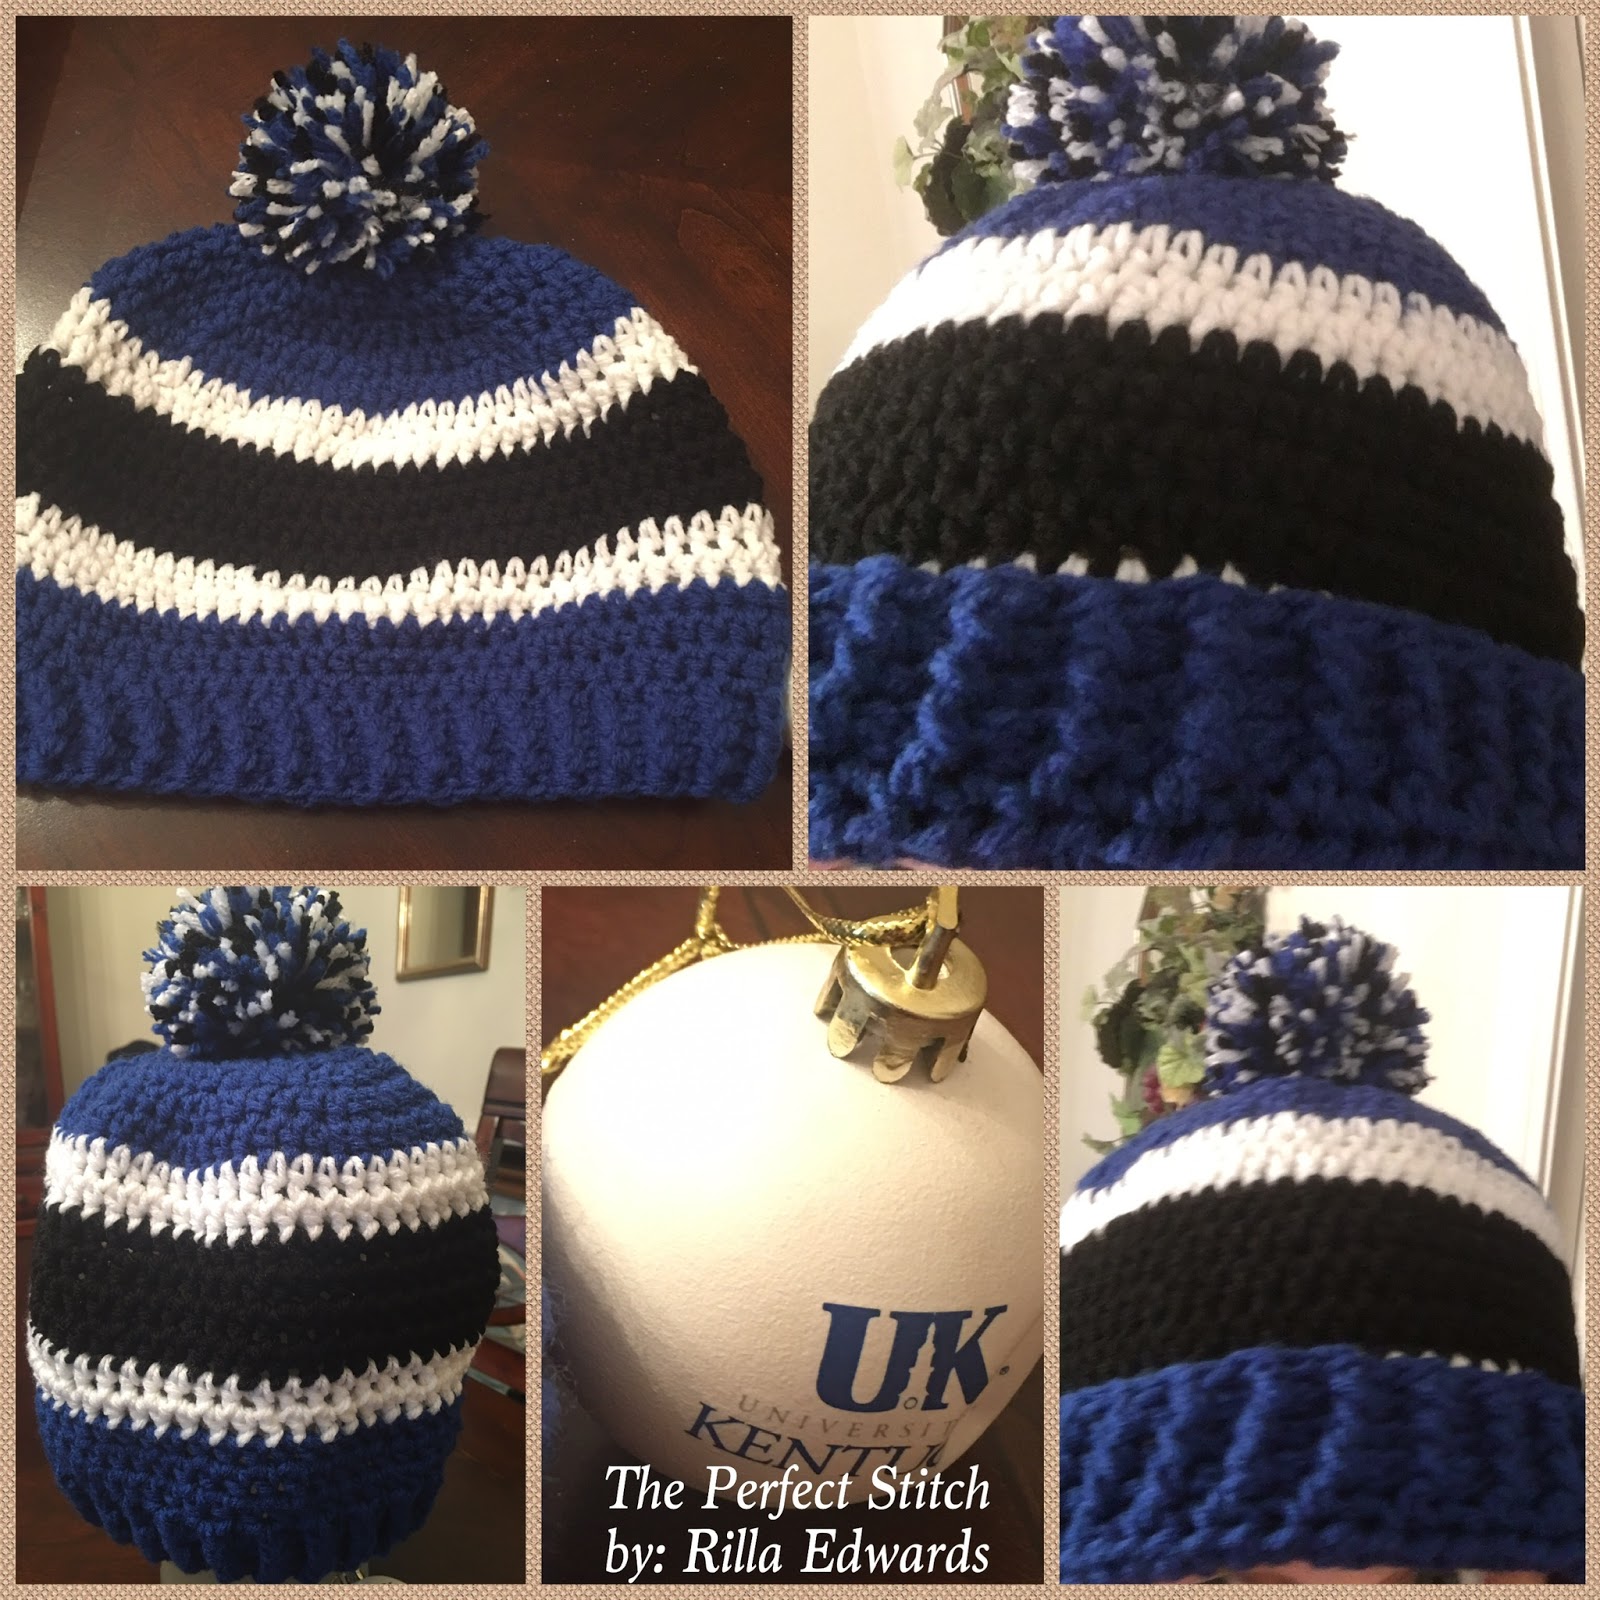
Men's "UK Wildcats" Hat

This hat was inspired by my love for the "UK Wildcats" Men's Basketball program.  My hubby and youngest brother are also big UK fans.  We love watching and playing basketball.

The pattern is enough to alter the colors to into your favorite team.  I used Red Heart Super Saver yarn for this project.  However, you can use any #4 worsted weight yarn; just note there may be a slight variation in overall size.

So, enjoy the pattern and support your favorite team!!!!

Men's "UK Wildcats" Hat

Size: 22" - 24" head circumference

Gauge:  I did not gauge pattern

Materials:
--6.0mm hook
--RHSS yarn in Royal, Black and White
--tapestry needle for weaving ends

U.S. Stitch Abbreviations:
Ch:  chain
St:  stitch(es)
Sl st:  slip stitch
HDC:  half double crochet
FPHDC:  front post half double crochet
BPHDC:  back post half double crochet
Rep:  repeat
MR:  magic ring
FO:  fasten off

Note:
I worked the first 6 rounds of this hat in the round.  Thereafter, I sl st join to the first st and Ch1. 

Directions:
1.  With Royal yarn, 10 HDC into MR.  (10)
2.  2 HDC into each st around.  (20)
3.  2 HDC into first st, 1 HDC in next st.  Rep around.  (30)
4.  2 HDC into first st, 1 HDC in next 2 st.  Rep around.  (40)
5.  2 HDC into first st, 1 HDC in next 3 st.  Rep around.  (50)
6.  2 HDC into first st, 1 HDC in next 4 st.  Rep around.  (60)
-- NOTE:  at the end of Round 6, your diameter will be 6.5" (this is the right diameter for a 19" - 21" head circumference) --
7.  2 HDC into first st, 1 HDC in next 5 st.  Rep around.  Sl st join to first st and FO.  Weave ends.  (70)
8.  Join White yarn into any st and Ch1.  1 HDC into each st around.  Sl st join and Ch1.  (70)
9.  1 HDC in each st around.  Sl st join to first st and FO.  Weave ends.  (70)
10.  Join Black yarn into any st and Ch1.  1 HDC into each st around.  St st join and Ch1.  (70)
11-13.  1 HDC into each st around.  Sl st join and Ch1.  At the end of Round 13, FO and weave ends.  (70)
14.  Rep #8.
15.  Rep #9.
16.  Join Royal yarn into any st and Ch1.  1 HDC into each st around.  Sl st join and Ch1.  (70)
17-19.  1 HDC into each st around.  Sl st join and Ch1.  (70)

At the end of Round 19, your hat will measure approximately 8" in length.  If desired, you can FO at the end of Round 19 and weave ends.  However, if you would like to add a band to flip up, then proceed below.

Band:
20-22.  FPHDC around first post, BPHDC around next post.  Rep around.  Sl st join and Ch1.  At the end of Round 22, FO and weave ends.  (70)

Pompom (optional):
I held all 3 color strands together.  I wrapped around 4 of my fingers 50 times.  I then tied a double knot in the center to secure.  I then trimmed the ends, fluffed and attached to the center top of the hat.
I hope you will enjoy this easy pattern.  Support your favorite team by making this in their team colors.
 Happy Crocheting...

Legal:
--don't use/claim my design as your own
--don't use/claim my pics as your own
--okay to make and sale your finished work
--don't share my pattern electronically or in print format (without prior consent) but provide a link to my blog

Social Media:
If you are on the following sites, let's connect and hook up...
  • Instagram:  Rilla2u
  • Pinterest:  Rilla2u
  • Twitter:  Rilla2u
  • Facebook:  /rilla.edwards 


Tuesday, November 27, 2018

Dallas Cowboys Hat & Pant Set - 0-3 months

I made this adorable hat and pant set for my newest little cousin, Kaden.  He is Texan-born, so I'm sure he's going to find himself a Dallas Cowboys fan when he gets older.

I used  Red Heart Super Saver, #4 worsted weight yarn, in grey, blue and white.  I also added a decorative button to the hat and pants. 

Dallas Cowboys Hat & Pant Set 
Size:  0-3 months
Size:  0 - 3 months old (18" round waist and 12" total length - 5" from waistband to crotch and 7" from crotch to ankle)

You can easily customize to the size of your liking:
1.  For the hat, add additional increase rounds;
2.  For the pants, start with more chains to reach the size you need, just make sure you have an odd number.

Materials:
--4.0mm hook
--#4 yarn in grey, blue or white
--(2) decorative buttons (optional)
--tapestry needle for weaving

U.S. Stitch Abbreviations:
Ch:  chain
Sl st:  slip stitch
St:  stitch(es)
SC:  single crochet
HDC:  half double crochet
FPHDC:  front post half double crochet
BPHDC:  back post half double crochet
Rep:  repeat
MR:  magic ring
FO:  fasten off

Directions:


Hat:

1.  With grey yarn, 8 HDC into MR.  Sl st join to first st and Ch1.  (8)
2.  2 HDC in each st around.  Sl st join to first st and Ch1.  (16)
3.  2 HDC in first st, 1 HDC in next st.  Rep around.  Sl st join to first st and Ch1.  (24)
4.  2 HDC in first st, 1 HDC in next 2 st.  Rep around.  Sl st join to first st and Ch1.  (32)
5.  2 HDC in first st, 1 HDC in next 3 st.  Rep around.  Sl st join to first st and Ch1.  (40)
6.  2 HDC in first st, 1 HDC in next 4 st.  Rep around.  Sl st join to first st and Ch1.  (48)
     48 HDC stitches = 5" diameter
     5" diameter x 3.14 = 15.7 head circumference  
7-10.  1 HDC in each st around.  Sl st join to first st and Ch1.  At the end of Round 10, FO and weave ends.  Join white yarn.  (48)
11.  With white yarn, 1 HDC in each st around.  Sl st join and FO.  Weave ends.  (48)
12.  Join blue yarn in any st and Ch1.  FPHDC around the first post st, then BPHDC around the next post st.  Rep around.  Sl st join to first st and Ch1.  (48)
13-15.  Rep #12.  At the end of Round 15, FO and weave ends.  (48)
16.  Join grey yarn.  1 SC in each st around.  Sl st join to first st.  FO and weave ends.

Pom:
1.  With blue and white yarn held together, wrap 15-20 times around 3 of your fingers.  Tie a secure knot in the center.  Trim and fluff pom.  Attach to top center of hat.  
Star:
I made a simple star with blue yarn.  I then used white yarn and the tapestry needle to embroider the star shape.  I then added a football button to the center of the star.  I then attached the star to the hat.
There are lots of free star patterns listed on Pinterest.  Mine is just a simple pattern.
Pants:
Waistband:
1.  With grey yarn, Ch45.  Sl st join to the first ch and Ch1 to form a ring.  Keeping the ring from twisting, you will want to place 1 HDC in each ch around.  Sl st join to first st and Ch1.  (45)
2-4.  For these rounds, you will work *FPHDC around the post of the first st, then BPHDC around the post of the next st.*  Rep from * to * around.  Sl st join to first st and Ch1.  (45)

At the end of Round 4, FO grey yarn and weave ends.  Your waistband is complete.  Now, to move on to the body portion:

5.  Join white yarn with a sl st, Ch1.  1 HDC in each st around.  Sl st join to first st and FO.  Weave ends.  (45)
6.  Join blue yarn with a sl st, Ch1.  1 HDC in each st around.  Sl st join to first st and Ch1.  (45)
7.  Rep #6.
8.  Rep #6.  At the end of this round, you will FO yarn and weave ends.  (45)
9.  Join white yarn with a sl st, Ch1.  1 HDC in each st around.  Sl st join to first st and FO.  Weave ends.  (48)
10-12.  For the next 3 rounds, with gray yarn, 1 HDC in each st around.  Sl st join to first st and Ch1.  (48)

Forming the first leg:
13.  1 HDC in each of the first 22 st.  Then you will sl st join to the first st.  This is the start of the first leg.  
14-25.  These rounds will be completed as follows:  1 HDC in each st around.  Sl st join to first st and Ch1.  (22)

     At the end of Round 25, you will slip st join and FO yarn.  Weave ends.  

26.  With white yarn, 1 HDC in each st around. Sl st join and FO.  Weave ends.  (22)
27.  With blue yarn, 1 HDC in each st around.  Sl st join to the first st and Ch1.  (22)
28.  With blue yarn, 1 HDC in each st around.  Sl st join to the first st and FO.  Weave ends.  (22)
29.  With white yarn, 1 HDC in each st around.  Sl st join and FO.  Weave ends.  (22)  
30.  With grey yarn, 1 HDC in each st around.  Sl st join and FO.  Weave ends.  (22)

Forming the second leg:
Rep steps 13 through 30 to make the second leg.  You may notice a very small opening in the crotch area.  No worries.  Once you have completed with making both of the legs, turn wrong side out and use your tapestry needle to whipstitch close the small opening.

Belt (optional):
1.  With blue yarn, I chained 75.  I SC in the 2nd ch from the hook and into each ch around.  FO.
2.  I then weaved the belt in and out of Round 2.  I secured each ends of the belt with double-knots.  

Button:  (optional)
I added a blue decorative button to the front center of the pants. 

And, that just about sums up my version of a Dallas Cowboys Hat and Pant Set.  Below, is my super adorable little cousin, Kaden, wearing his Dallas Cowboys Hat and Pants.  And I have one word to sum this up -- ADORABLE!!!!!!!!

 Happy Crocheting...
Legal:
--don't use/claim my design as your own
--don't use/claim my pics as your own
--okay to make and sale your finished work
--don't share my pattern electronically or in print format (without prior consent) but provide a link to my blog

Social Media:
If you are on the following sites, let's connect and hook up...
  • Instagram:  Rilla2u
  • Pinterest:  Rilla2u
  • Twitter:  Rilla2u
  • Facebook:  /rilla.edwards 


Wednesday, October 17, 2018

Basketball in a Hoop Costume

Basketball has always been my favorite sport. I love it as a fan and a participator. Hubby and I love watching college basketball, especially the UK Wildcats and WV Mountaineers.

My grandson had dismantled (aka tore up...lol) one of those stick up basketball hoops for inside use. I think it may have come from the Dollar Tree or Dollar General Store ($1-$2).  The hoop frame measures approximately 9 1/2" in diameter.  Instead of tossing in the trash, I decided to re-purpose it by making it into a usable costume idea for toddlers and making it functional again as a basketball hoop.


"Basketball in a Hoop" Toddler Costume

Size:  The hoop's diameter is approximately 9 1/2" and will fit most toddlers as a costume

Gauge:  Is not important

Materials:
For the Hat and Hoop Costume:
--6.0mm hook
--#4 worsted weight yarn in white, orange and brown (I used ILTY and Crafter's Secret)
--(1) plastic hoop
--tapestry needle for weaving

For the Basketball:
--4.5mm hook
--#4 worsted weight yarn in orange and brown
--(2) small eyes (optional); you could make crocheted eyes
--Polyfil
--tapestry needle for weaving

U.S. Stitch Abbreviations:
Ch:  chain
Sl st:  slip stitch
St:  stitch(es)
SC:  single crochet
HDC:  half double crochet
SC2tog:  single crochet 2 stitches together (creates a decrease)
Rep:  repeat
Sk:  skip
MR:  magic ring
FO:  fasten off

Directions:
Hat:
  • There are 2 ways you can work this hat - 1.) in the round; if so, use a stitch marker to keep track of the beginning and ending stitch and move the stitch marker up as you start each new round; or 2.) slip stitch join to the first stitch and chain 1.
  • To altar the overall size of your hat, you will need to know the diameter.  To find this, you will first use a tape measure around a child, teen or adult's head.  Now, divide this number by 3.14.  This will give you the diameter of your circle you will need to achieve before you stop with increase rounds and start working repeat rounds. 

1.  With 6.0mm hook and orange yarn, 10 HDC into MR.  (10)
Increase Rounds:
2.  2 HDC in each st around.  (20)
3.  2 HDC in first st, 1 HDC in next st.  Rep around.  (30)
4.  2 HDC in first st, 1 HDC in next 2 st.  Rep around.  (40)
5.  2 HDC in first st, 1 HDC in next 3 st.  Rep around.  (50)
6.  2 HDC in first st, 1 HDC in next 4 st.  Rep around.  (60)
Repeat Rounds:
7-16.  1 HDC in each st around.  At the end of Round 16, FO orange yarn and weave ends.  (60)
17.  With brown yarn, sl st join into any st of Round 16 and Ch1.  SC in same st and each st around.  Sl st join and FO.  Weave ends.  (60)

Stripes (make 3):
1.  Leave a starting tail.  With 6.0mm hook and brown yarn, Ch50.  FO and leave a long tail for attaching to the hat.

Assembly:
1.  See pics for help with placement of stripes:  1 is middle center and the 2 remaining stripes are placed to the left and to the right of the center stripe.  I placed each of mine 5 stitches over on each side from the center with each touching Round 6.

Hoop:

1.  With a 6.0mm hook, plastic hoop and white yarn, you will want to join yarn around hoop and work 56 SC stitches.  I put 3 SC stitches at the beginning, and then 10 SC between each of the notches on the hoop and then 3 SC at the end.  Sl st join to first st and Ch1.  (56)
2.   SC in first st.  Ch9, Sk 3 st.  SC in next st.  Rep around.  Sl st join to first st and Ch1.  (14 SC and 14 Ch9)
3-9.  Rep #2.
10.  Same as #2, except you will Ch7 (not Ch9).
11-12.  Rep #10.  At the end of Round 12, FO and weave ends.

Hoop Straps (make 2):
1.  With 6.0mm hook and white yarn, I chained 75.  FO and left a tail to attach to the side of the hoop.
Attach the second strap to the opposite side of the hoop.  Make sure to really secure the straps.  
2.  The straps can either be left visible and tied in a bow around the neck or you can weave under the shirt and then tie in a bow around the heck.  
  

Basketball:
Follow same principle as hat for working in the round; see above note:

1.  With 4.5mm hook and orange yarn, 6 SC into MR.  (6)
2.  2 SC in each st around.  (12)
3.  2 SC in first st, 1 SC in next st.  Rep around.  (18)
4.  2 SC in first st, 1 SC in next 2 st.  Rep around.  (24)
5.  2 SC in first st, 1 SC in next 3 st.  Rep around.  (30)
6-10.  1 SC in each st around.  (30)
11.  SC2tog, 1 SC in next 3 st.  Rep around.  (24)
12.  SC2tog, 1 SC in next 2 st.  Rep around.  (18)
13.  SC2tog, 1 SC in next st.  Rep around.  (12)

If using safety eyes, add them now at Round 10, with 3 stitch spaces between them.  Stuff with polyfil.

14.  SC2tog.  Rep around.  FO and leave a tail for closing up last 6 stitches.  (6)

Assembly:
1.  Using the tail, weave yarn in and out of the last 6 stitches and pull to close up opening.
2.  I used brown yarn and added a smile 3 rows down from the eyes.
3.  For the stripes, I used my tapestry needle and brown yarn and just embroidered around the center of the ball for the center stripe and then worked a circular stripe for each side 4 stitches over from the center on each side.

Frayed Hair:
1.  I used the tapestry needle to weave and knot yarn at the top of the ball.
2.  I then used the needle to fray the yarn.
3.  I made 5 for the top of my ball.

This is a super cute, quick and simple project to make.  The hat and hoop can be worn as a costume for Halloween (or dress-up) with the ball to carry as an accessory.  AND, then, afterwards, can be used to play ball indoors during the coming winter months...

Inexpensive costume with a little versatility...I hope ya'll will enjoy this.


 Happy Crocheting...


Legal:
--don't use/claim my design as your own
--don't use/claim my pics as your own
--okay to make and sale your finished work
--don't share my pattern electronically or in print format (without prior consent) but provide a link to my blog


Tuesday, September 25, 2018

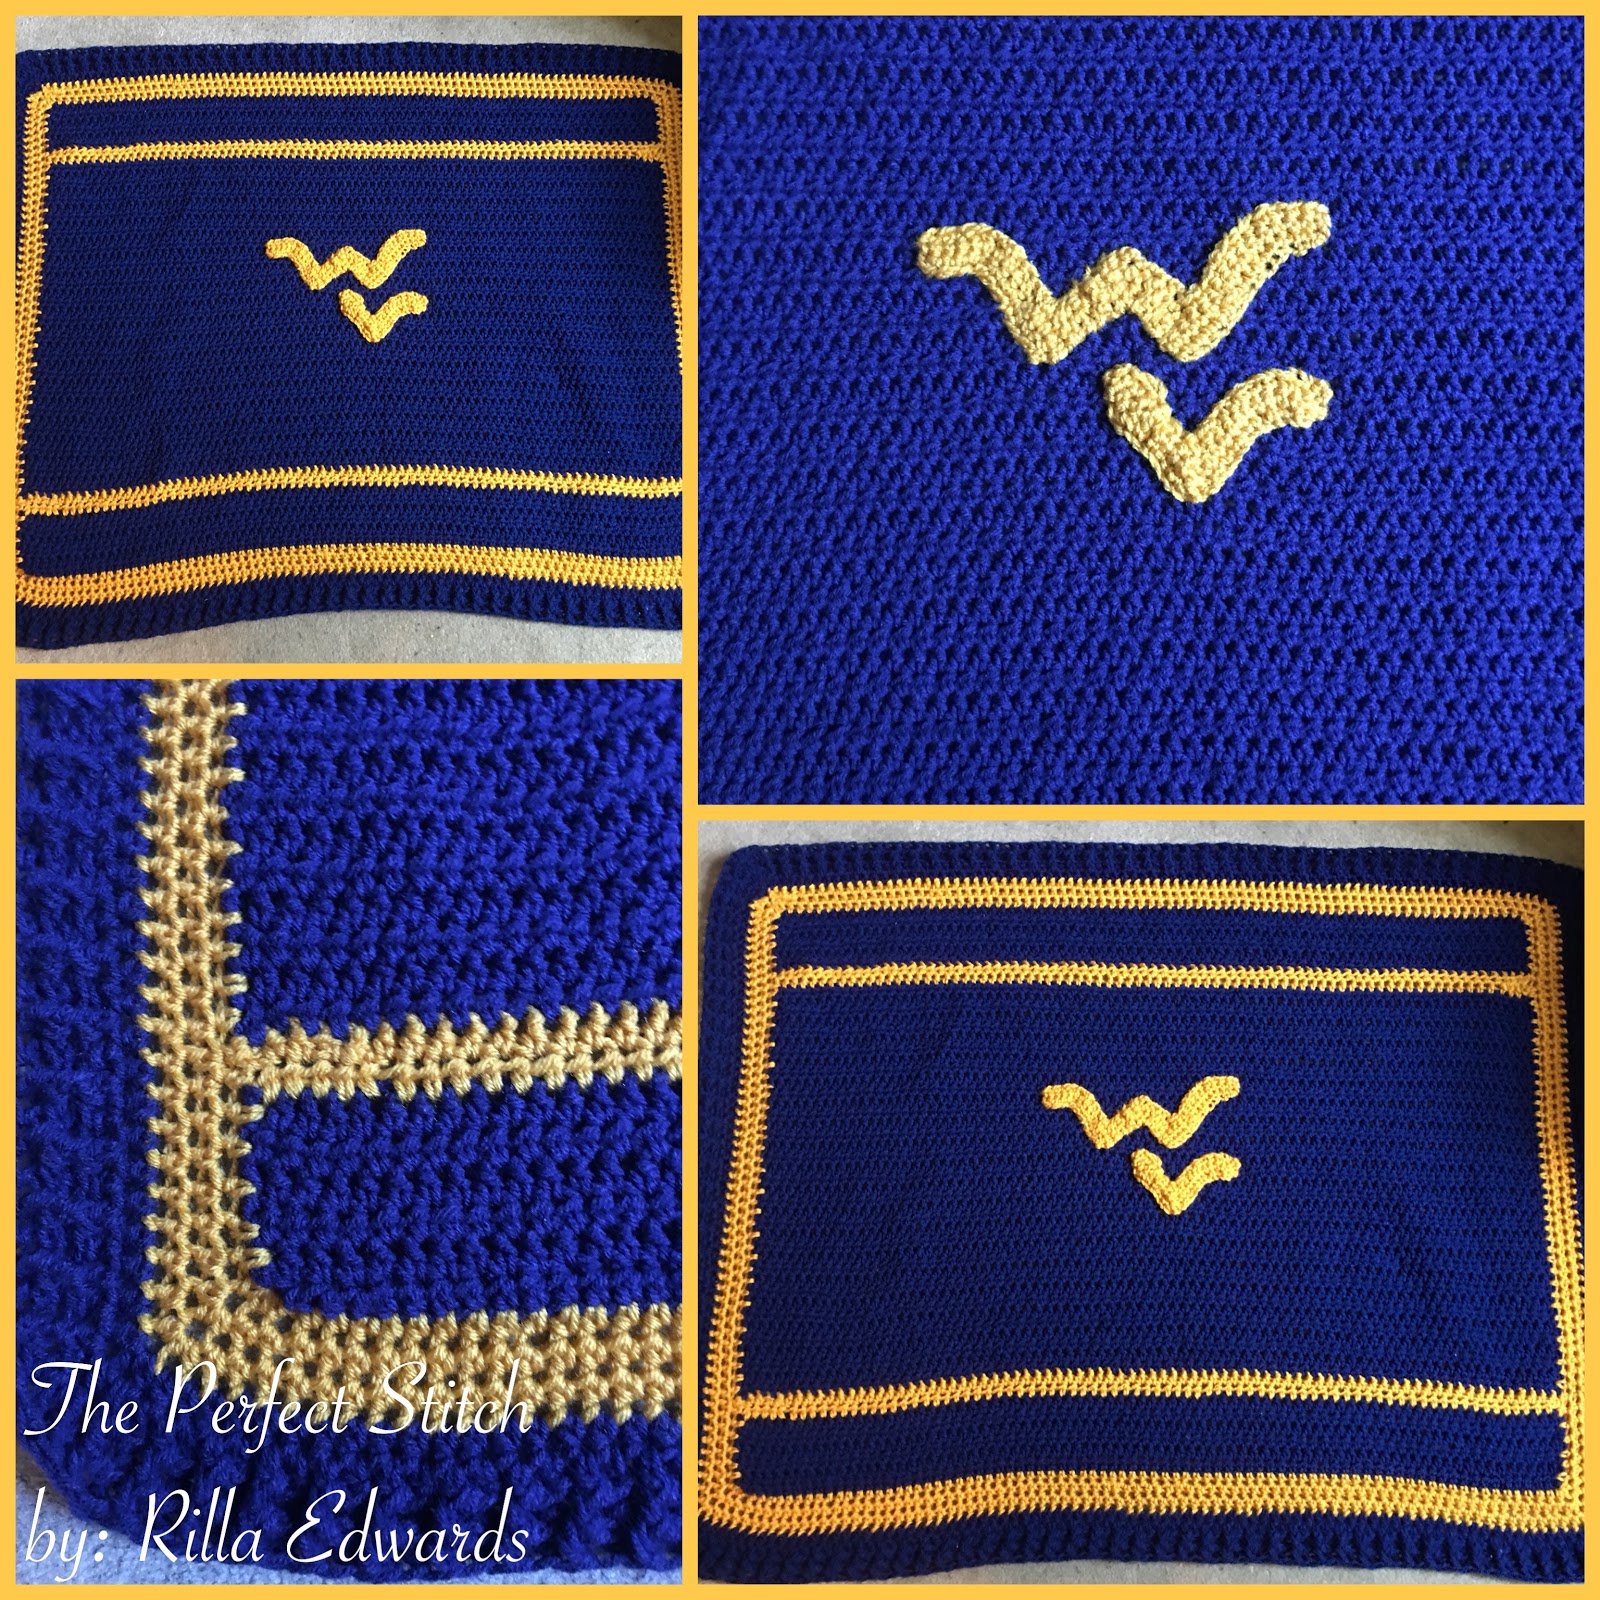
WV Baby Blanket

I made this WV Baby Blanket for my little cousin, Elijah.  He’s 6 months old and lives in Ohio but his daddy grew up in WV.

I used RHSS yarn and a 6.0mm hook to complete this project.  It measures approximately 33” x 33”.

WV Baby Blanket


Happy Crocheting...
Legal:
--don't use/claim my design as your own
--don't use/claim my pics as your own
--okay to make and sale your finished work 
--don't share my pattern electronically or in print format (without prior consent) but provide a link to my blog

Monday, July 16, 2018

WV Baby Blanket

I was asked by my hubby's coworker to make a baby blanket for a WV fan.  Of course, I said yes.  I grew up in WV.  I've lived in NC for the past 24 years but I still call WV home.  So, this was exciting for me...

While John and I were at the beach last week, I started on this project.  I had received a 7.0mm hook for Christmas and decided to use it for my hook size.  Of course, you can easily change up the hook size to what you have readily available.  My son ordered the 7.0mm size on Amazon.  I hadn't seen this size in my local craft stores.

I hope crocheters who are also WV residents (former or current) and/or fans will enjoy this blanket.  I used HDC, DC and post stitches for this project.

The blanket measures approximately 30" x 38".

WV Baby Blanket

Size: 30" x 38"

Materials:
--7.0mm hook (or whatever size hook you have available; just note that different hook size will yield a different blanket size) 
--RHSS Yarn - 2 skeins Soft Navy and 1 skein of Gold
--tapestry needle for weaving

U.S. Stitch Abbreviations:
Ch:  chain
Sl st:  slip stitch
St:  stitch(es)
HDC:  half double crochet
FPHDC: front post half double crochet
BPHDC:  back post half double crochet
FO:  fasten off

Directions:  
1.  Ch81.  HDC in 2nd ch from hook and across.  Ch1 and turn.  (80)
2-5.  1 HDC in each st across.  Ch1 and turn.  (80)
6.  1 HDC in each st across.  FO and weave ends.  (80) 
7.  Join Gold yarn in first st and Ch1.  HDC in same st and across.  Ch1 and turn.  (80)
8.  1 HDC in each st across.  FO and weave ends.  (80) 
9.  Join Soft Navy yarn in first st and Ch1.  HDC in same st and across.  Ch1 and turn.  (80)
10-44.  1 HDC in each st across.  Ch1 and turn.  (80)
45.  1 HDC in each st across.  FO and weave ends.  (80)
46.  Join Gold yarn in first st and Ch1.  HDC in same st and across.  Ch1 and turn.  (80)
47.  1 HDC in each st across.  FO and weave ends.  (80) 
48.  Join Soft Navy yarn in first st and Ch1.  HDC in same st and across.  Ch1 and turn.  (80)
49-52.  1 HDC in each st across.  Ch1 and turn.  (80)
53.  1 HDC in each st across.  FO and weave ends. (80)

Border:
54.  Join Gold yarn in first st and Ch1.  HDC in same st and around, placing 3 HDC st in each corner. Sl st join to first st and Ch1.  
55-56.  1 HDC in each st around.  Sl st join to first st and Ch1.  At the end of Round 56, FO and weave ends.
57.  Join Soft Navy yarn in first st and Ch1.  HDC in same st and around.  Sl st join to first st and Ch1.  
58-59.  For the last 2 rounds, I alternated between FPHDC and BPHDC st and placing 3 HDC st in each corner.  However, if you're not familiar/comfortable with making post stitches, then you can simply complete the last 2 rounds with HDC stitches.  Once you complete the 2 rounds, FO and weave ends.  

If you want to make this blanket bigger, then simply increase your starting chain with your desired length and/or make more rows before you start working on the border.  

For the letters, here's the link:

See my pics, for help with how I positioned my letters before I whipstitched them to the center of the blanket.  
Happy Crocheting...

Legal:
--don't use/claim my design as your own
--don't use/claim my pics as your own
--okay to make and sale your finished work 
--don't share my pattern electronically or in print format (without prior consent) but provide a link to my blog

Thursday, May 17, 2018

"Play Ball" Toddler Blanket

Last week, I base umpired my first 10 and under baseball game with my hubby behind the plate.  It was fun and exhilarating -- and I was a little nervous 'cause parents seem to really get into the games...lol.  Anyway, in honor of my induction into the world of umpiring, I wanted to make a simple blanket design that could be worked up quickly.

Using the pattern instructions from my previous post, "Simple Block Pattern," I made (20) 8" x 8" blocks.  Here's the Pattern LINK to make the blocks.

If you would like to purchase the Ad-free, PDF version of this pattern, here is the link:  


"Play Ball" Toddler Blanket Free Pattern
Size:  Approximately 35" x 45"

Gauge:  12 HDC x 10 Rows = 4"

Materials:
--4.5, 5.0 and 5.5mm hooks
--RHSS Yarn #4 in red, white, navy, light blue and brown
--tapestry needle for weaving

U.S. Stitch Abbreviations:
Ch:  chain
Sl st:  slip stitch
St:  stitch(es)
SC:  single crochet
SC2tog:  single crochet 2 stitches together (creates a decrease)
HDC: half double crochet
DC:  double crochet
Rep:  repeat
Sk:  skip
FO:  fasten off
MR:  magic ring

Directions:
1.  Once you have your 20 blocks with the border constructed, then you are ready to lay out your pieces in your desired pattern,

2.  To join your blocks together there are a couple options:
A.  Whipstitching.  Example:  I joined the top Row together by whipstitching each block to each other. I then continued to whipstitch the remaining 4 horizontal rows.  And last, I whipstitched the completed rows together.
OR

B.  Single crochet or slip stitch.  You can join 2 block sides together and either, use a single crochet stitch or a slip stitch to join together.  And, then complete rows first.  And, then complete, completed rows to completed rows.

Here's a pic of my blocks joined together.  As you can see, I worked my colors diagonally.


Blanket Border:
1.  With light blue, I SC in each st around, placing 3 SC in each corner.  Sl st join to first st and FO yarn.
2.  Join navy yarn and Ch1.  SC in same st as Ch1.  SC in next 4 st.  *In the next st, you will create a "spike stitch" by dropping down to first Border row and make a HDC st.  Then, SC in next 5 st.*. Rep  around, placing 3 SC in each corner.  (If you have to manipulate your number of SC stitches versus the spike stitch, then that's fine.) Sl st join to first st and Ch1.  
3.  HDC in each st around.  Sl st join to first st and FO.  Weave ends.

If desired, you can add additional border rows.  

Appliqués:
For my appliqués, I made 2 balls, 2 bats and 4 stars.  

1.  Baseball (make 2):
--4.5mm hook
--white yarn
--red or blue yarn for stripes 

1.  6 SC to MR.  Sl st join to first st and Ch1.  (6)
2.  2 SC in each st around.  Sl st join to first st and Ch1.  (12)
3.  2 SC in first st, 1 SC in next st.  Rep around.  Sl st join to first st and Ch1.  (18)
4.  2 SC in first st, 1 SC in next 2 st.  Rep around.  Sl st join to first st and Ch1.  (24)
5.  2 SC in first st, 1 SC in next 3 st.  Rep around.  Sl st join to first st and Ch1.  (30)
6.  2 SC in first st, 1 SC in next 4 st.  Rep around.  Sl st join to first st and Ch1.  (36)
7.  2 SC in first st, 1 SC in next 5 st.  Rep around.  Sl st join to first st and FO.  (42)
8.  Use contrast color and embroider stripes.  (See pics) 

I made 2 circles and whipstitched together but you can just make one circle and then embroider the stripes.  

2.  Bat (make 2):
--4.5mm hook 
--brown yarn 

1.  Ch8.  1 SC in 2nd ch from hook and across.  Ch1 and turn.  (7)
2.  1 SC in each st across.  Don't Ch1.  Turn.  (7)
3.  Sl st in the first 2 st.  Ch1.  1 SC in next 3 st.  Ch1 and turn.  (3)
4-9.  1 SC in each st across.  Ch1 and turn.  (3)
10.  2 SC in first st, 1 SC in next st, 2 SC in last st.  Ch1 and turn.  (5) 
11-14.  1 SC in each st across.  Ch1 and turn.  (5)
15.  2 SC in first st, 1 SC in next 3 st, 2 SC in last st.  Ch1 and turn.  (7)  
16-19. 1 SC in each st across.  Ch1 and turn.  (7) 
20.  2 SC in first st, 1 SC in next 5 st, 2 SC in last st.  Ch1 and turn.  (9)  
21-24. 1 SC in each st across.  Ch1 and turn.  (9) 
25.  2 SC in first st, 1 SC in next 7 st, 2 SC in last st.  Ch1 and turn.  (11)
26-31. 1 SC in each st across.  Ch1 and turn.  (11)
32.  SC2tog, 1 SC in next 7 st, SC2tog.  Ch1 and turn.  (9)
33.  SC2tog, 1 SC in next 5 st, SC2tog.  Ch1 and turn.  (7)
34.  1 SC in each st across.  Ch1 and turn.  (7) 
35.  SC2tog, 1 SC in next 3 st, SC2tog.  Ch1 and turn.  (5)
36.  1 SC in each st around.  FO and leave a long tail for attaching.  
3.  Star (make 4):
--5.0mm hook 
--navy yarn 

1.  6 HDC into MR.  Sl st join to first st and Ch1.  (6)
2.  2 HDC in each st around.  Sl st join to first st and Ch1.  (12)
3.  2 HDC in first st, 1 HDC in next 3 st.  Rep around.  Sl st join to first st.  (15)
4.  *Ch5.  SC in 2nd ch from hook, HDC in next ch, DC in next 2 ch.* Sl st to 3rd st of Round 3.  First point is made.  Sl st into next st.  Rep from * to *.  Sl st to 5th st of Round 3.  Sl st into next st.  Rep from * to *.  Sl st to 8th st of Round 3.  Sl st into next st.  Rep from * to *.  Sl st to 11th st of Round 3.  Sl st into next st.  Rep from * to *.  Sl st to 14th st.  Sl st to next st.  FO and leave a long tail for attaching.  

I placed the stars in each corner.  Then I attached a bat and ball on blocks 2 and 3 of Row 2 and then a ball and bat on blocks 2 and 3 of Row 4.  

Happy Crocheting 

Legal:
--don't use/claim my design as your own
--don't use/claim my pics as your own
--okay to make and sale your finished work
--don't share my pattern electronically or in print format (without prior consent) but provide a link to my blog


Sunday, February 11, 2018

UNC Ramses Mascot

I was asked to make/design the UNC Mascot Ramses...this is to place on top of a diaper cake for a baby shower...and, then afterward, will make a great toy for the baby.

He measures approximately 8" long by 6" tall.  I used worsted weight yarn and a 5.0mm hook.

PATTERN:  I will add the free pattern this week....

UNC Ramses Mascot 


Happy Crocheting...
Legal:
--don't use/claim my design as your own
--don't use/claim my pics as your own
--okay to make and sale your finished work
--don't share my pattern electronically or in print format (without prior consent) but provide a link to my blog