

"Animal Blanket" Series...
Puppy, Polar Bear & Lion

*************************************************************
Pattern Designed
By: Rilla Edwards
Blog: rilla2u.blogspot.com
Email: rilla2u@gmail.com
Pinterest: rilla2u
Instagram: rilla2u
Facebook Page: Crocheting & Crafting (@rilla2u)
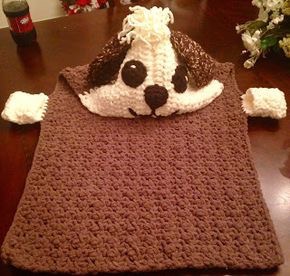
I so much enjoyed designing this blanket. It's cute, warm, thick and cozy. It's made with Bernat Blanket. There are paws on each side for your little
one to slide his hands in to stay warm.
And, best of all, the blanket can be converted to a triangle pillow for
the bed, crib, pack-n-play, the couch or the car....The completed blanket from
the top of the hood to the bottom measures approximately 34" long and
18" wide -- this is the perfect size for a little one.
This will be your go-to blanket when you're on
the go to spring baseball, softball and soccer games, fall football season,
winter parades and outdoor activities.
It is sure to keep your little one comfortably warm.
Below are a couple pics of my grandsons, Luke and
Gabriel, trying on the blanket. Each
were battling sinuses at the time so my apologies for the poor quality of the
picture.
Puppy Blanket/Pillow Pattern

Difficulty Level: Easy
Size: 18" x 34" (this size is suitable for a 6/9 month old - 18 month old); the pattern can easily be adjusted to a bigger size by increasing the number of the starting chain and adding more rows.
Materials
Size: 18" x 34" (this size is suitable for a 6/9 month old - 18 month old); the pattern can easily be adjusted to a bigger size by increasing the number of the starting chain and adding more rows.
Materials
--Bernat Blanket yarn, taupe 220 yards
--Bernat Blanket yarn, vintage white 108 yards
--small amount of #4 worsted weight yarn in brown
and white to make the ears
--small amount of #5 bulky yarn in black for the
eyes, nose and mouth and paw prints
--small amount of polyfil for the nose
--8mm hook
--tapestry needle for weaving
Abbreviations:
Ch: chain
HDC: half
double crochet
Sl st:
slip stitch
St: stitch
Sc: single
crochet
MR: magic
ring
FO: fasten
off
Directions:
Blanket Portion:
With taupe yarn:
1. Ch
56.
2. HDC in
2nd chain from hook and each ch across.
Ch 1. Turn. (55)
3. *1 HDC
and 1 SC in the first st, skip a st.*
Repeat across and into the last st, 1 HDC. Ch 1.
Turn. (28 HDC and 27 SC = 55)
4-29.
Repeat row 3. At the end of row
29, FO and weave ends. (55)
At this point, you
will have used almost the entirety of the taupe yarn.
Your piece will
measure approximately 18" x 26 1/2"
Hood Portion:
With the vintage white yarn, join in the corner,
chain 1 and turn your piece to work across the shorter end.
1. Across
the short end, work 40 HDC st evenly across.
(This means you have 29 rows, so you will have to evenly spread out an
additional 11 stitches to equal 40). Ch
1. Turn.
2. 1 HDC
in each st across. (40)
3-12.
Repeat row 2. At the end of row
12, you will fasten off. Leave a long
tail to whipstitch the hood together.
Fold the last row in half, join together and whipstitch to make the
hood.
Now, your piece
should measure approximately 34" long from the top of the hood to the
bottom of the blanket.
From the top of the hood, I measured down
17" on each side and placed a marker for the "paws."
Paws:
1. Join
the vintage white yarn into the marker and ch 1. Sc in the same st as the ch 1. Sc in the next 6 st. Ch 1.
Turn. (7)
2. 1 sc in
each st across. Ch 1. Turn.
(7)
3-14.
Repeat row 2. At the end of row
14, fasten off and leave a tail for sewing.
(7)
At this point, you will fold the 14 rows in half
and whipstitch each side together, leaving the opening for the hands to go in
(forming a glove-like opening). Repeat
on opposite side at the stitch marker for the other paw.
Paw prints:
1. Using
the black bulky yarn, 5 sc st into a MR.
Sl st to first sc to join and fasten off, leaving a tail for
attaching. Make 6. (3 paw prints for the top, front of each paw.
Facial features:
Eyes (make 2):
1. Using
the black bulky yarn, 6 HDC into a MR.
Sl st to first HDC to join. Ch
1. (6)
2. 2 HDC
into each st around. Fasten off, leaving
a long tail for attaching. (12)
Note: I used the tapestry needle
to weave a small piece of vintage white yarn onto each eye.
Nose:
1. Using
the black bulky yarn, ch 2. Sc in 2nd ch
from hook. Ch 1. Turn.
(1)
2. 2 sc in
the first st. Ch 1. Turn.
(2)
3. 2 sc in
the first st; 1 sc in the 2nd st. Ch
1. Turn.
(3)
4. 1 sc in
the first st, 2 sc in the 2nd st and 1 sc in the third st. Ch 1.
Turn. (4)
5. Work 1
sc evenly around the nose. Fasten
off. Leave a long enough tail to
attach.
Ears (make 2):
1. Holding
my #4 worsted weight brown and white yarn together, ch 7. Sc in the 2nd ch from the hook and
across. Ch 1. Turn.
(6)
2. 2 sc in
the first st, 1 sc in the next 4 st and 2 sc in the last st. Ch 1.
Turn. (8)
3. 1 sc in
each st across. Ch 1. Turn.
(8)
4-12.
Repeat row 3. Ch 1. Turn.
(8)
13. Sc
first 2 st together, 1 sc in the next 4 st, and sc the last 2 st together. Ch 1.
Turn. (6)
14. 1 sc
in each st across. Ch 1. Turn.
(6)
15. SC
first 2 st together, 1 sc in the next 2 st, and sc the last 2 st together. Ch 1.
Turn. (4)
16. 1 sc
in each st across. Ch 1. Turn. (4)
17. SC
around the entire ear. Fasten off,
leaving a tail to attach.
Assembly:
***For the eyes and nose, see my pics for
placement.***
Note: With the nose, before I
finished attaching it, I added a small amount of polyfil inside it. Just enough to make it "pop"
out.
--For the mouth, see my pics. I used the bulky black yarn and tapestry
needle to freestyle embroider. --For the paw prints, see my pic on where I
placed them (I placed 2 up front across from each other and 1 back
center).
--For the ears, I attached the last row to the
head, making them approximately 2" apart.
I pinned each ear to the head first to make sure I got them even.
--For the hair between the 2 ears, I attached
strands of the vintage white yarn with the tapestry needle and tied each strand
into a knot. I think the addition of the
"hair" gives him that scruffy little pup look.
To make into a pillow:
Flip the paw prints inward, fold bottom end of
blanket just up over the paw prints.
Then fold up each bottom corner to the center of the blanket edge (like
when you would make a paper airplane).
Now the bottom half will mirror the shape of the top, slip the bottom under
the top (hood) part, and you have a simple triangle-shaped pillow to sit on the
bed or for your little one to rest his or her head on.
Optional:
Adding a simple little pink, red or yellow bow, would make this little
puppy just as suitable for a girl as it is for a boy. Or, as is, it is fine for a girl.
I hope you enjoy this. If you decide to make it, please share your
pics, either on my blog, @ Ravelry (rilla2u) or on Instagram (#rilla2u). I would love to see your take on
this. If you have any questions,
please feel free to email me at: rilla2u@gmail.com.


Happy Crocheting!!!!
Legal:
--please do not claim this pattern as your own
--please use your own pics unless you are using
my pic to link to my blog
--please credit me as the designer and link to my
blog
--make and sale freely
**********************************************************


