Showing posts with label Baby/Toddler Clothing. Show all posts

Sunday, December 2, 2018

Buffalo Plaid Pajamas - 3T

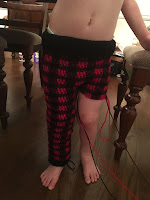
I think I’m a little like “plaid gone wild” lately...lol!!!  I’m loving the color combo of red, claret (burgundy) and black.  I used worsted weight yarn to make my grandson, Luke, a pair of 3T plaid pajamas.  I think he looks super cute and the pants turned out really well.

Now, if you are intimidated with trying plaid - don't be.  It's actually much easier than you even realize.  It's just a matter of working with 2 colors (black and claret) in a round/row, and then dropping the black yarn for the next round/row and picking up red yarn to work with the claret.  And, you just continue this simple pattern back and forth with whatever you are making.  So, pick up hook and yarn and give plaid a try - you are going to love the results.    

To date, I only have the pattern for the one size - 3T.  I may make a few more sizes later on...

For other sizes:
You can adjust the starting number of chains to get the waist size you need.  Just keep in mind that you need to work in multiples of 6 to make the plaid pattern work.
 Buffalo Plaid Pajamas Pattern


Size:  3T
Gauge:  6 DC st x 3 rows = 2"

Materials:
--6.0mm hook
--1 skein each of Red Heart Super Saver yarn in Cherry Red, Black and Claret
--tapestry needle for weaving
U.S. Stitch Abbreviations:
Ch:  chain
Sl st:  slip stitch
St:  stitch(es)
DC:  double crochet
FPDC:  front post double crochet
BPDC:  back post double crochet
Rep:  repeat
FO:  fasten off

Plaid Stitch:
1.  With the first round of plaid pattern, we will be working with the black and claret yarns.  Once the first row is complete, we will just move the black yarn behind the hook and leave it (don't cut the yarn; just let it rest to the side until we pick it up again.
2.  For the second round of plaid pattern, we will be working with claret and red yarns.  Claret will be worked into the previous rounds' stitches that are black; red will be worked into the previous rounds' stitches that are claret.  Once round is completed, you will pick black yarn back up and leave red yarn behind the hook to the side.  
Claret is used on every round.  You will rotate between using black or red with the claret yarn.  

Directions:
First, we are going to be making the waistband.  My grandson, Luke, has a 21" round waist.  
1.  With black yarn, Ch60.  Sl st join to first ch to form ring, without twisting.  Ch3 (counts as first DC stitch).  DC in each remaining ch around.  Sl st join to the top of Ch3.  (60)
2.  Ch3 (counts as first FPDC stitch),  BPDC around next post st.  *FPDC, then BPDC.*  Rep from * to * around.  Sl st join to the top of Ch3.  (60)
3-4.  Rep #2.  Sl st join to first st.  (60)
Now, we are ready to start working the plaid pattern. You will be working with 2 yarn colors in each round.  As you work the round, you will be rotating between the 2 colors, so you will want to carry over the yarn. 
5.  With black yarn, Ch3 (counts as first DC stitch).  DC in each of the next 2 st.  Before completing the 2nd stitch, join claret yarn and complete stitch.  Now, with claret yarn, DC in the next 3 st.  Before completing the last st, switch back to the black yarn and complete stitch.  Continue doing this all the way around.  Sl st join claret yarn to the top of the Ch3.  Set black yarn behind the hook to the side since you will not use it in the next round.  (60)
6.  With claret yarn, Ch3 (counts as first DC stitch).  DC in each of the next 2 st.  Before completing the 2nd stitch, join red yarn and complete stitch.  Now, with red yarn, DC in the next 3 st.  Before completing the last st, switch back to claret yarn and complete stitch.  Continue doing this all the way around.  Sl st join to the top of the Ch3.  Set red yarn behind the hook to the side since you will not be using it in the next round.  Pick black yarn back up.  (60)
7-12.  Rep #5 and #6.  (60)
Forming the first leg:
13.  Rep #5, but only complete 30 stitches.  Sl st join to the top of Ch3.  (30)
14.  Rep #6, but only complete 30 stitches.  Sl st join to the top of Ch3.  (30)
15-32.  Rep #13 and #14.  (30)
33.  With black yarn, Ch3 (counts as first DC st).  Then continue with 1 DC in each st around.  Sl st join to the top of the Ch3.  (30)
34.  Ch3 (counts as first FPDC st), then BPDC.  FPDC, BPDC.  Rep around.  Sl st join to the top of the Ch3.  (30)
35.  Rep #34.  Sl st join to the top of the Ch3.  FO and weave ends.
Forming the second leg:
Join yarn in the crotch area of an un-worked stitched in round 13 and rep as above from #13-35 to complete the second leg.  Once you complete the second leg, you will need to use your tapestry needle and a small piece of yarn to whipstitch any center crotch opening.  Mine was very small. 

Drawstring (optional):
1.  With black yarn, Ch101.  Sl st in 2nd ch from hook and across.  FO.  With tapestry needle, weave drawstring through the first row of the waistband.  
2.  To the ends, make a small pompom by wrapping around 3 fingers 30 times.  Tie in a double knot, trim with scissors and add to each end of the drawstring.     

Happy Crocheting...

Legal:
--don't use/claim my design as your own
--don't use/claim my pics as your own
--okay to make and sale your finished work
--don't share my pattern electronically or in print format (without prior consent) but provide a link to my blog

Social Media:
If you are on the following sites, let's connect and hook up...
  • Instagram:  Rilla2u
  • Pinterest:  Rilla2u
  • Twitter:  Rilla2u
  • Facebook:  /rilla.edwards 


Tuesday, November 27, 2018

Dallas Cowboys Hat & Pant Set - 0-3 months

I made this adorable hat and pant set for my newest little cousin, Kaden.  He is Texan-born, so I'm sure he's going to find himself a Dallas Cowboys fan when he gets older.

I used  Red Heart Super Saver, #4 worsted weight yarn, in grey, blue and white.  I also added a decorative button to the hat and pants. 

Dallas Cowboys Hat & Pant Set 
Size:  0-3 months
Size:  0 - 3 months old (18" round waist and 12" total length - 5" from waistband to crotch and 7" from crotch to ankle)

You can easily customize to the size of your liking:
1.  For the hat, add additional increase rounds;
2.  For the pants, start with more chains to reach the size you need, just make sure you have an odd number.

Materials:
--4.0mm hook
--#4 yarn in grey, blue or white
--(2) decorative buttons (optional)
--tapestry needle for weaving

U.S. Stitch Abbreviations:
Ch:  chain
Sl st:  slip stitch
St:  stitch(es)
SC:  single crochet
HDC:  half double crochet
FPHDC:  front post half double crochet
BPHDC:  back post half double crochet
Rep:  repeat
MR:  magic ring
FO:  fasten off

Directions:


Hat:

1.  With grey yarn, 8 HDC into MR.  Sl st join to first st and Ch1.  (8)
2.  2 HDC in each st around.  Sl st join to first st and Ch1.  (16)
3.  2 HDC in first st, 1 HDC in next st.  Rep around.  Sl st join to first st and Ch1.  (24)
4.  2 HDC in first st, 1 HDC in next 2 st.  Rep around.  Sl st join to first st and Ch1.  (32)
5.  2 HDC in first st, 1 HDC in next 3 st.  Rep around.  Sl st join to first st and Ch1.  (40)
6.  2 HDC in first st, 1 HDC in next 4 st.  Rep around.  Sl st join to first st and Ch1.  (48)
     48 HDC stitches = 5" diameter
     5" diameter x 3.14 = 15.7 head circumference  
7-10.  1 HDC in each st around.  Sl st join to first st and Ch1.  At the end of Round 10, FO and weave ends.  Join white yarn.  (48)
11.  With white yarn, 1 HDC in each st around.  Sl st join and FO.  Weave ends.  (48)
12.  Join blue yarn in any st and Ch1.  FPHDC around the first post st, then BPHDC around the next post st.  Rep around.  Sl st join to first st and Ch1.  (48)
13-15.  Rep #12.  At the end of Round 15, FO and weave ends.  (48)
16.  Join grey yarn.  1 SC in each st around.  Sl st join to first st.  FO and weave ends.

Pom:
1.  With blue and white yarn held together, wrap 15-20 times around 3 of your fingers.  Tie a secure knot in the center.  Trim and fluff pom.  Attach to top center of hat.  
Star:
I made a simple star with blue yarn.  I then used white yarn and the tapestry needle to embroider the star shape.  I then added a football button to the center of the star.  I then attached the star to the hat.
There are lots of free star patterns listed on Pinterest.  Mine is just a simple pattern.
Pants:
Waistband:
1.  With grey yarn, Ch45.  Sl st join to the first ch and Ch1 to form a ring.  Keeping the ring from twisting, you will want to place 1 HDC in each ch around.  Sl st join to first st and Ch1.  (45)
2-4.  For these rounds, you will work *FPHDC around the post of the first st, then BPHDC around the post of the next st.*  Rep from * to * around.  Sl st join to first st and Ch1.  (45)

At the end of Round 4, FO grey yarn and weave ends.  Your waistband is complete.  Now, to move on to the body portion:

5.  Join white yarn with a sl st, Ch1.  1 HDC in each st around.  Sl st join to first st and FO.  Weave ends.  (45)
6.  Join blue yarn with a sl st, Ch1.  1 HDC in each st around.  Sl st join to first st and Ch1.  (45)
7.  Rep #6.
8.  Rep #6.  At the end of this round, you will FO yarn and weave ends.  (45)
9.  Join white yarn with a sl st, Ch1.  1 HDC in each st around.  Sl st join to first st and FO.  Weave ends.  (48)
10-12.  For the next 3 rounds, with gray yarn, 1 HDC in each st around.  Sl st join to first st and Ch1.  (48)

Forming the first leg:
13.  1 HDC in each of the first 22 st.  Then you will sl st join to the first st.  This is the start of the first leg.  
14-25.  These rounds will be completed as follows:  1 HDC in each st around.  Sl st join to first st and Ch1.  (22)

     At the end of Round 25, you will slip st join and FO yarn.  Weave ends.  

26.  With white yarn, 1 HDC in each st around. Sl st join and FO.  Weave ends.  (22)
27.  With blue yarn, 1 HDC in each st around.  Sl st join to the first st and Ch1.  (22)
28.  With blue yarn, 1 HDC in each st around.  Sl st join to the first st and FO.  Weave ends.  (22)
29.  With white yarn, 1 HDC in each st around.  Sl st join and FO.  Weave ends.  (22)  
30.  With grey yarn, 1 HDC in each st around.  Sl st join and FO.  Weave ends.  (22)

Forming the second leg:
Rep steps 13 through 30 to make the second leg.  You may notice a very small opening in the crotch area.  No worries.  Once you have completed with making both of the legs, turn wrong side out and use your tapestry needle to whipstitch close the small opening.

Belt (optional):
1.  With blue yarn, I chained 75.  I SC in the 2nd ch from the hook and into each ch around.  FO.
2.  I then weaved the belt in and out of Round 2.  I secured each ends of the belt with double-knots.  

Button:  (optional)
I added a blue decorative button to the front center of the pants. 

And, that just about sums up my version of a Dallas Cowboys Hat and Pant Set.  Below, is my super adorable little cousin, Kaden, wearing his Dallas Cowboys Hat and Pants.  And I have one word to sum this up -- ADORABLE!!!!!!!!

 Happy Crocheting...
Legal:
--don't use/claim my design as your own
--don't use/claim my pics as your own
--okay to make and sale your finished work
--don't share my pattern electronically or in print format (without prior consent) but provide a link to my blog

Social Media:
If you are on the following sites, let's connect and hook up...
  • Instagram:  Rilla2u
  • Pinterest:  Rilla2u
  • Twitter:  Rilla2u
  • Facebook:  /rilla.edwards 


Sunday, November 19, 2017

Fox Hoodie Bathrobe - 2T - 3T

Here's the PDF PATTERN available for $1.99...

I was wanting to use up the Pumpkin Spice Bernat Blanket Yarn I had so I decided to make a Fox Hoodie Bathrobe, size 2T - 3T and could fit a 4T, depending on size of child.  I used a 10mm hook so it was a quick project to make.

Amazon is an amazing resource for Bernat Blanket Yarn.  If you have a prime account, you can get a 220 yd ball for 8.00 with free shipping by clicking on this link:
https://www.amazon.com/Bernat-Blanket-Ounce-Lilac-Single/dp/B00KIFBIIU/ref=as_sl_pc_qf_sp_asin_til?tag=6045781042223-20&linkCode=w00&linkId=f45417dd74244f1e52e77b79cb7b2661&creativeASIN=B00KIFBIIU

A wide variety of colors are available!!!

My grandson, Gabriel, enjoyed modeling this for me.

Fox Hoodie Bathrobe Pattern
Size:  2T-3T (it may fit a 4T, depending on size of child)

Gauge:  4 HDC stitches x 3 rows = 2"

Materials:
--10.0mm hook
--Bernat Blanket Yarn:  2 skeins of Pumpkin Spice (220 yds/sk), 1 skein of Black (79 yds/sk) and 1 skein of White (79 yds/sk)
--(3) 3/4" Black buttons
--stitch markers
--tapestry needle for weaving

U.S. Stitch Abbreviations:
Ch:  chain
Sl st:  slip stitch
St:  stitch(es)
SC:  single crochet 
SC2tog:  single crochet 2 stitches together (creates decrease)
HDC:  half double crochet
HDC2tog:  half double crochet 2 stitches together (creates decrease) 
Rep:  repeat
FO:  fasten off

Directions:
Back Panel:
1.  With Pumpkin Spice, Ch31.  HDC in 2nd ch from hook and across.  Ch1 and turn.  (30)
2-22.  1 HDC in each st across.  Ch1 and turn.  (30)
23.  HDC2tog, 1 HDC in next 26 st, HDC2tog.  Ch1 and turn.  (28)
24.  HDC2tog, 1 HDC in next 24 st, HDC2tog.  Ch1 and turn.  (26)
25.  HDC2tog, 1 HDC in next 22 st, HDC2tog.  Ch1 and turn.  (24)
26.  HDC2tog, 1 HDC in next 20 st, HDC2tog.  Ch1 and turn.  (22)
27.  HDC2tog, 1 HDC in next 18 st, HDC2tog.  Ch1 and turn.  (20)
28.  HDC2tog, 1 HDC in next 16 st, HDC2tog.  Ch1 and turn.  (18)
29.  HDC2tog, 1 HDC in next 14 st, HDC2tog.  Ch1 and turn.  (16)
30.  HDC2tog, 1 HDC in next 12 st, HDC2tog.  FO and weave ends.  (14)

Back Panel:

Front Panels (make 2):
1.  With Pumpkin Spice, Ch16.  HDC in 2nd ch from hook and across.  Ch1 and turn.  (15
2-22.  1 HDC in each st across.  Ch1 and turn.  (15)
--at the end of Row 22, place a stitch marker at each end--
23.  HDC2tog, 1 HDC in next 11 st, HDC2tog.  Ch1 and turn.  (13)
24.  HDC2tog, 1 HDC in next 9 st, HDC2tog.  Ch1 and turn.  (11)
25.  HDC2tog, 1 HDC in next 7 st, HDC2tog.  Ch1 and turn.  (9)
26.  HDC2tog, 1 HDC in next 5 st, HDC2tog.  Ch1 and turn.  (7)
27.  HDC2tog, 1 HDC in next 3 st, HDC2tog.  Ch1 and turn.  (5)

28.  HDC2tog, 1 HDC in next st, HDC2tog.  Ch1 and turn.  (3)
29.  1 HDC in each st across.  Ch1 and turn.  (3)
30.  1 HDC in each st across.  FO and weave ends.  (3)

Front Panels: 
Assembly:
1.  You will lie the front panel on top of the back panel with the right sides together.
2.  Whipstitch the last row of the top panel to the back panel.
3.  Whipstitch the outside together from Row 22 (stitch marker) to Row 1 of the top panel to the back panel.  Now turn the right sides out.  
4.  Repeat 1-3 for the second front panel.

Neck/Hoodie:

     Special Note:  I was low on Pumpkin Spice yarn (my second skein had less than 220 
     yds from using it on a previous project).  Therefore, I started this portion with black yarn.  
     Of course, you can choose to start with Pumpkin Spice. 
1.  With black yarn, 1 HDC in each st across.  Ch1 and turn.
2.  1 HDC in each st across.  Ch1 and turn.

3.  1 HDC in each st across.  FO and weave ends.
4.  Join Pumpkin Spice, 1 HDC in each st across.  Ch1 and turn.
5-8.  1 HDC in each st across.  Ch1 and turn.  At the end of Row 8, FO and leave a long tail.
9.  Fold Hood in half and whipstitch Row 8 together.

Hoodie Border:
1.  Join White yarn with sl st and Ch1, 1 HDC in same st as Ch1 and across.  Ch1 and turn.
2.  1 HDC in each st across.  Ch1 and turn.
3.  1 HDC in each st across.  FO and weave ends.

Panel Border:
1.  I joined the black yarn to the inside stitch marker of one side of the panel at Row 22 with a Ch1.  Into same st, HDC.  I then HDC in each st down the panel.  Ch1 and turn.  (22)
2.  1 HDC in each st across.  FO and weave ends.

Repeat on the opposite side.

Bottom Border:
1.  Now, join yarn in the bottom corner of one side with a Ch1.  Work 1 HDC st across the bottom.  Ch1 and turn.
2.  1 HDC in each st across.  FO and weave ends.

Arms (make 2):
1.  Join Pumpkin Spice in any edge stitch from Rows 22-30 and Ch1.  HDC in same st and evenly around.  I added an extra HDC in 2 of the stitches so I would have 20 stitches.  (20)
2-8.  1 HDC in each st around.  Sl st join and Ch1.  (20)
--at the end of Round 8, FO and weave ends.
9.  Join black yarn, 1 HDC in each st around.  Sl st join and Ch1.  (20)
10.  1 HDC in each st around.  Sl st join and FO.  Weave ends.  (20)
11.  Join white yarn, 1 SC in each st around.  Sl st join and FO.  Weave ends.  (20)
12.  With black yarn, 1 SC in each st around.  Sl st join and FO.  Weave ends.  (20)

Eyes:
I used (2) 3/4" buttons for the eyes; if desired, you can use black yarn and make your eyes.

Nose:
1.  With Pumpkin Spice yarn, Ch5.  SC in 2nd ch from hook and next 3 ch.  Ch1 and turn.  (4)
2.  SC2tog, 1 SC in next 2 st.  Ch1 and turn.  (3)
3.  SC2tog, 1 SC in next st.  Ch1 and turn.  (2)
4.  SC2tog.  FO and leave a long enough tail for attaching.  (1)
5.  Attach (1) 3/4" black button to tip.

Ears (make 2):
1.  With white yarn, Ch6.  SC in 2nd ch from hook and across.  Ch1 and turn.  (5)
2.  1 SC in each st across.  Ch1 and turn.  (5)
3.  SC2tog, 1 SC in next st, SC2tog.  Ch1 and turn.  (3)
4.  SC2tog, 1 SC in next st.  Ch1 and turn.  (2)
5.  SC2tog.  FO and weave ends.  (1)
6.  With black yarn, 1 SC in each st around perimeter.  FO and leave a long enough tail for attaching.

Hair:
At the top center, I weaved Pumpkin, Black and White yarn and tied in a knot - 3 times for each color.  Trimmed excess.  

Strap:
1.  With white yarn, Ch81.  HDC in 2nd ch from hook and across.  FO and weave ends.  (80)
2.  I placed the center of the strap to the center back (13" up from the bottom) and whipstitched it into place about 1-2" wide to keep the strap attached to the robe. 

See pics for where I placed ears, nose and buttons.

Happy Crocheting...
Legal:
--don't claim my pattern/design as your own
--don't use my pics as your own
--don't share my pattern/design electronically or in print format but provide a link to my blog
--okay to make and sale your finished work