Showing posts with label Scarves. Show all posts

Wednesday, July 31, 2019

Unisex Scarf & Hat...

I came across this gorgeous Premier Puzzle yarn in “Backgammon” last week in Oklahoma at Hobby Lobby and fell in love with it.  From the moment it caught my eye, I knew it would make the most perfect winter projects for men and women.

So, here ya go!!!  Here’s the FREE patterns for my beautifully textured, flowing “Unisex Scarf and Hat(s).”  I added fringe to the ends but it looks just as good without the fringe.

Unisex Scarf & Hat Pattern
Size:
Scarf - 60” in length before fringe added
Hats:  Average Adult-Sized

Materials:
—6.0mm hook
—#5 Premier Puzzle yarn in “Backgammon” (328 yds/skein) = 1 skein is enough for 1 Scarf and 1 Hat 
—tapestry needle for weaving

U.S. Stitch Abbreviations:
Ch:  chain
St:  stitch(es)
Sl St:  slip stitch 
SC:  single crochet
DC:  double crochet 
BLO:  back loops only
FLO:  front loops only
FPDC:  front post double crochet
BPDC:  back post double crochet
MR:  magic ring
Rep:  repeat
FO:  fasten off 

Directions:
Unisex Scarf:

1.  Ch21.  SC in 2nd chain from hook.  *DC in next ch.  SC in next.* Rep across.  DC in last ch.  Ch1 and turn.  (20) 
2.  Working in BLO, *SC in first st, DC in next st.* Rep across.  DC in last st.  Ch1 and turn. (20)
Now, continue to Rep #2 until your scarf measures 60” in length OR your desired length.  

Optional:
If desired, add fringe in each stitch across the short ends.  I cut strands of yarn about 6-8” long.  I put my hook through each stitch, grabbed the center of the strand, pulled through, removed hook and pulled two ends of strand through the strand hole to secure.  Once I completed this for each stitch on both ends, I then aligned my scarf ends and trimmed ends to match in fringe length.

Special Note:  Each hat is worked in the round, unless otherwise specified.  Be sure to use a stitch marker to keep track of your first/last stitch of each round.  Move the stitch marker up after each round.  

Beanie Hat:
  
1.  10 DC in MR.  (10)
2.  2 DC in each st around.  (20)
3.  *2 DC in first st, 1 DC in next st.* Rep around.  (30)
4.  *2 DC in first st, 1 DC in next 2 st.* Rep around.  (40)
5.  *2 DC in first st, 1 DC in next 3 st.* Rep around.  For this round, Sl St join to the first st and Ch1.  (50)
6.  *Working in BLO, SC in first st, DC in next st.* Rep around.  (50)
7.  *Working in BLO, DC in first st, SC in next st.* Rep around.  (50)
8.  Rep #6.
9.  Rep #7.
10.  Rep #6.
11.  Rep #7.
12.  Rep #6.
13.  Rep #7.  
14.  1 DC in each st around.  Sl St join to the first st.  (50)
15.  Ch3.  This counts as the FPDC.  *Next, BPDC, then FPDC.*  Rep around.  Sl St join to first st.  (50)
16.  Rep #15.  
17.  Loosely Sl St join in each st around.  Sl St join to first st and FO.  Weave ends.  
Pom (optional): 
For the pom, I wrapped yarn around 4 of my fingers, 75 times.  I then tied a secure double knot in the center.  Trimmed ends and attached to the center top of the hat.  

Brimmed Hat: 
  
1-13.  Repeat steps 1-13 for the Beanie Hat Pattern above.  At the end of Round 13, Sl St join to first st.  (50)
14.  Ch3 (counts as first st), DC in same st as the Ch3.  *DC in next st.  2 DC in next st.*  Rep around.  Sl St join to first st.  (75) 
15.  Ch3 (counts as first st).   DC in same st as the Ch3.  *DC in next 2 st.  2DC in next st.* Rep around.  Sl St join to first st.  (100) 
16.  Ch3 (counts as first st).  DC in each of the remaining st.  Sl St join to first st.  (100)
17.  Loosely Sl St in each st around.  Sl St join to first st.  FO.  Weave ends.  
 
And, that’s it for this very stylish and beautiful Unisex Scarf & Hat Set.  I hope you all will enjoy this pattern. 
  
Happy Crocheting...

Legal:
--don't use/claim my design as your own
--don't use/claim my pics as your own
--okay to make and sale your finished work
--don't share my pattern electronically or in print format (without prior consent) but provide a link to my blog

Social Media:
If you are on the following sites, let's connect and hook up...
  • Instagram:  Rilla2u
  • Pinterest:  Rilla2u
  • Twitter:  Rilla2u
  • Facebook:  /rilla.edwards 


Saturday, October 13, 2018

Fox Hat and Scarf Set...

I know I’ve said this so many times in the past - and it still remains the same - there’s just something about foxes that just fascinates me.  I love the majestic creature from its look to its colors and everything in-between.

This project was easy to complete and the perfect colors for the fall season.  I used “I Love This Yarn” from Hobby Lobby in Terra Cotta and White.

I hope you all will enjoy this project as much as I enjoyed designing it.

Fox Hat and Scarf Pattern
Size:
Hat:  19” - 21” Head Circumference
Scarf: 39” in length x 4” wide

Materials:
—5.0mm hook
—(1) skein each of “I Love This Yarn” in Terra Cotta and White (or any #4 worsted weight yarn in your colors of choice); just note different yarn brand can cause slight variation in overall size
—(2) 3/4” black buttons for eyes
—(1) 1/2” black button for the nose
—(1) 1/2” black button for the back side of the scarf for securing the tail end (optional)
—stitch marker
—tapestry needle for weaving

U.S. Stitch Abbreviations:
Ch:  chain
Sl St:  slip stitch
St:  stitch(es)
SC:  single crochet
HDC:  half double crochet
DC:  double crochet
FPDC:  front post double crochet
BPDC:  back post double crochet
SC2tog:  single crochet 2 stitches together (creates a decrease)
Rep:  repeat
Sk:  skip
FO:  fasten off

Special Stitch:
1.  Cluster Stitch:  yarn over and insert hook into stitch; yarn over and come back thru the stitch; yarn over and pull thru 2 loops on stitch; yarn over and insert hook into same stitch; yarn over and pull back thru stitch; yarn over and pull thru 2 loops on stitch; yarn over and insert hook into same stitch; yarn over and pull back thru stitch; yarn over and pull thru 2 loops on hook; yarn over and pull thru remaining 4 loops on hook.

Directions:
The hat is worked in the round, unless otherwise stated; so use your stitch marker to keep track of the first and last stitch of each round.  If desired, you can slip stitch join to first stitch and chain 1.

Hat:
Cluster Side
Reverse Side

1.  With Terra Cotta yarn, 10 HDC in MR.  Pull to tighten center.  (10)
2.  2 HDC in each st around.  (20)
3.  2 HDC in first st, 1 HDC in next st.  Rep around.  (30)
4.  2 HDC in first st, 1 HDC in next 2 st.  Rep around.  (40)
5.  2 HDC in first st, 1 HDC in next 3 st.  Rep around.  (50)
6.  2 HDC in first st, 1 HDC in next 4 st.  Rep around.  (60)
7.  2 HDC in first st, 1 HDC in next 5 st.  Rep around.  (70)
8.  Cluster stitch in first st, SC in next st.  Rep around.  (70)
9-10.  SC in each st around.  (70)
11.  Rep #8.  (70)
12-13.  SC in each st around.  (70)
14.  Rep #8.  (70)
15-16.  SC in each st around.  (70)
17.  Rep #8.  (70)
18-19.  SC in each st around.  (70)
20.  SC in each st around.  Sl st join to first st and FO Terra Cotta yarn.  Weave ends.  Join White yarn in any st with a sl st and Ch1.  (70)
21.  SC in each st around.  Sl st join to first st.  (70)
22.  Ch3 (counts as first DC).  DC in each st around.  Sl st join and Ch1.  (70)
23.  Work a FPDC around the first DC post st of the previous round, BPDC around the next DC post st of the previous round.  Rep around.  Sl st join to first st and Ch1.  (70)
24-25.  Rep #23.  (70)
26.  Loosely sl st in each st around.  Sl st join to first st and FO.  Weave ends.

Pompom:
I used the White yarn and wrapped around 4 of my fingers approximately 50 times.  I then tied a double-knot in the center and trimmed the ends.  Shape pompom and attach to top of hat.

You can wear the hat on either side.  One side the cluster stitches puff out; on the inside the stitches do not puff out.  The hat looks great both ways.  If so desired, make a 2nd pompom to attach to the opposite side so you will have a pom on both sides.
 Either side of the hat can be worn and both sides look great to me!!!

Scarf:
 
1.  With White yarn, Ch3.  HDC in 2nd ch from hook and next ch.  Ch1 and turn.  (2)
2.  2 HDC in first st, 1 HDC in next st.  Ch1 and turn.  (3)
3.  2 HDC in first st, 1 HDC in next st, 2 HDC in last st.  Ch1 and turn.  (5)
4.  1 HDC in each st across.  Ch1 and turn.  (5)
5.  2 HDC in first st, 1 HDC in next 3 st, 2 HDC in last st.  Ch1 and turn.  (7)
6.  1 HDC in each st across.  Ch1 and turn.  (7).
7.  2 HDC in first st, 1 HDC in next 5 st, 2 HDC in last st.  Ch1 and turn.  (9)
8.  1 HDC in each st across.  Ch1 and turn.  (9)
9.  2 HDC in first st, 1 HDC in next 7 st, 2 HDC in last st.  Ch1 and turn.  (11)
10.  1 HDC in each st across.  Ch1 and turn.  (11)
11.  1 HDC in each st across.  FO White yarn and join Terra Cotta yarn.  Ch1 and turn.  (11)
12.  1 HDC in each st across.  Ch1 and turn.  (11)
13.  Cluster st in first st, SC in next st.  Rep across, ending with a cluster st in the last st.  Ch1 and turn.  (11)
14-15.  SC in each st across.  Ch1 and turn.  (11)
16.  Rep #13.  (11)
17-18.  SC in each st across.  Ch1 and turn.  (11)
19.  Rep #13.  (11)
20-21.  SC in each st across.  Ch1 and turn.  (11)
22.  SC2tog, 1 SC in next 7 st, SC2tog.  Ch1 and turn.  (9)
23-30.  SC in each st across.  Ch1 and turn.  (9)
31.  2 SC in first st, 1 SC in next 7 st, 2 SC in last st.  Ch1 and turn.  (11)
32.  Rep #13.  (11)
33-34.  SC in each st across.  Ch1 and turn.  (11)
35.  Rep #13.  (11)
36-37.  SC in each st across.  Ch1 and turn.  (11)
38.  Rep #13.  (11)
39-40.  SC in each st across.  Ch1 and turn.  (11)
41.  Rep #13.  (11)
42-43.  SC in each st across.  Ch1 and turn.  (11)
44.  Rep #13.  (11)
45-46.  SC in each st across.  Ch1 and turn.  (11)
47.  Rep #13.  (11)
48-49.  SC in each st across.  Ch1 and turn.  (11)
50.  Rep #13.  (11)
51-52.  SC in each st across.  Ch1 and turn.  (11)
53.  Rep #13.  (11)
54-55.  SC in each st across.  Ch1 and turn.  (11)
56.  Rep #13.  (11)
57-58.  SC in each st across.  Ch1 and turn.  (11)
59.  Rep #13.  (11)
60-61.  SC in each st across.  Ch1 and turn.  (11)
62.  Rep #13.  (11)
63-64.  SC in each st across.  Ch1 and turn.  (11)
65.  Rep #13.  (11)
66-67.  SC in each st across.  Ch1 and turn.  (11)
68.  Rep #13.  (11)
69-70.  SC in each st across.  Ch1 and turn.  (11)
71.  Rep #13.  (11)
72-73.  SC in each st across.  Ch1 and turn.  (11)
74.  Rep #13.  (11)
75-76.  SC in each st across.  Ch1 and turn.  (11)
77.  Rep #13.  (11)
78-79.  SC in each st across.  Ch1 and turn.  (11)
80.  Rep #13.  (11)
81-82.  SC in each st across.  Ch1 and turn.  (11)
83.  Rep #13.  (11)
84-85.  SC in each st across.  Ch1 and turn.  (11)
86.  Rep #13.  (11)
87-88.  SC in each st across.  Ch1 and turn.  (11)
89.  Rep #13.  (11)
90-91.  SC in each st across.  Ch1 and turn.  (11)
92.  Rep #13.  (11)
93-94.  SC in each st across.  Ch1 and turn.  (11)
95.  Rep #13.  (11)
96-97.  SC in each st across.  Ch1 and turn.  (11)
98.  Rep #13.  (11)
99-100.  SC in each st across.  Ch1 and turn.  (11)

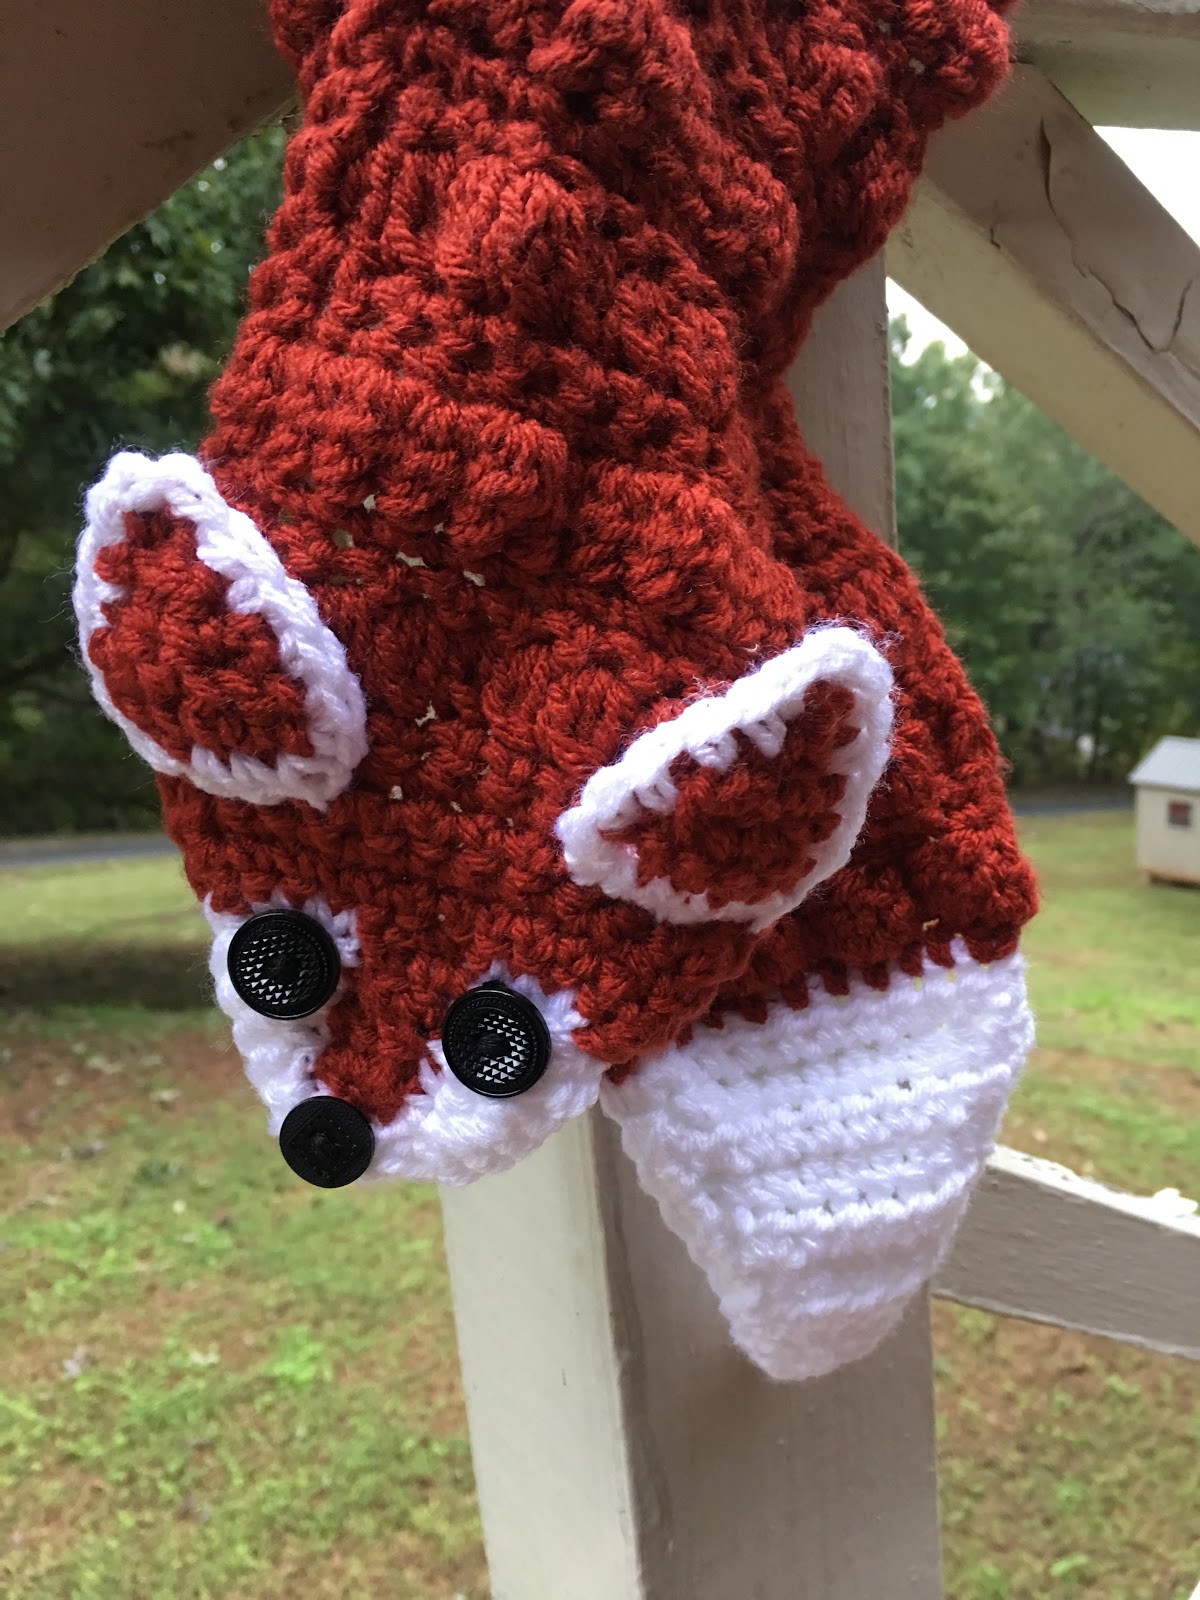
Here's a pic of the "tail" end of the scarf:  
Forming the Face:
101-103.  SC in each st across.  At the end of Row 103, join White yarn and Ch1.  Do not FO Terra Cotta yarn, but you will want to carry over the yarn to use to form the nose stripe.  (11)
104.   With White yarn, SC2tog, 1 SC in next 2 st.  Before completing the last st, switch to Terra Cotta yarn, SC in next 3 st.  Before completing the last st, switch back to White yarn, SC in next 2 st and then SC2tog.  Ch1 and turn.  (9)
105.  SC in each st across - 3 SC in White, 3 SC in Terra Cotta and 3 SC in White.  Ch1 and turn.  (9)
106.  In White, SC2tog, SC in next st.  3 SC in Terra Cotta.  In White, SC in next st, SCtog.  Ch1 and turn.  (7)
107.  SC in each st across - 2 SC in White, 3 SC in Terra Cotta and 2 SC in White.  Ch1 and turn.  (7)
108.  In White, SC2tog, 3 SC in Terra Cotta. In White, SC2tog.  Ch1 and turn.  (5)
109.  SC in each st across - 1 SC in White, 3 SC in Terra Cotta and 1 SC in White.  Ch1 and turn.  (5)
110.  In White, 1 SC.  With Terra Cotta, SC3tog.  In White, 1 SC.  Ch1 and turn.  (3)
111.  With White yarn, SC3tog.  FO and weave ends.  (1)
112.  Join Terra Cotta with sl st and Ch1 in any st.  SC in each st around scarf.  Sl st join to first st and FO.  Weave ends.

NOTE:  if you want your scarf longer than 49", then complete more repeat rows of 13-15 before you start forming the face!!!

Ears:
1.  With Terra Cotta, Ch6.  SC in 2nd ch from hook and across.  Ch1 and turn.  (5)
2.  SC across.  Ch1 and turn.  (5)
3.  SC2tog, SC in next 2 st, SC2tog.  Ch1 and turn.  (3)
4.  SC3tog.  FO Terra Cotta yarn and join White yarn.  Ch1.  (1)
5.  White White yarn, SC in each st around.  Sl st join to first st and FO.  Leave a tail for attaching each ear to your scarf.  I attached my ears at Row 102.  (see pics)

Attach buttons for the eyes and nose.  (see pics)

Loop:

1.  Ch9.  SC in 2nd ch from hook and across.  Ch1 and turn.  (8)
2-4.  SC in each st across.  At the end of Row 4, FO and leave a tail for attaching.

Attach the Loop to the back side of your scarf at Row #92.

Optional:
Prior to attaching my Loop to Row 92, I added a 1" black button in the center of the Loop.  This way, I can either slip the "Tail End" of my scarf into the Loop OR I can use the button and button it up through one of the cluster stitches.

Here's my granddaughter, Miss Arielle, donning the "Fox Hat and Scarf" set:


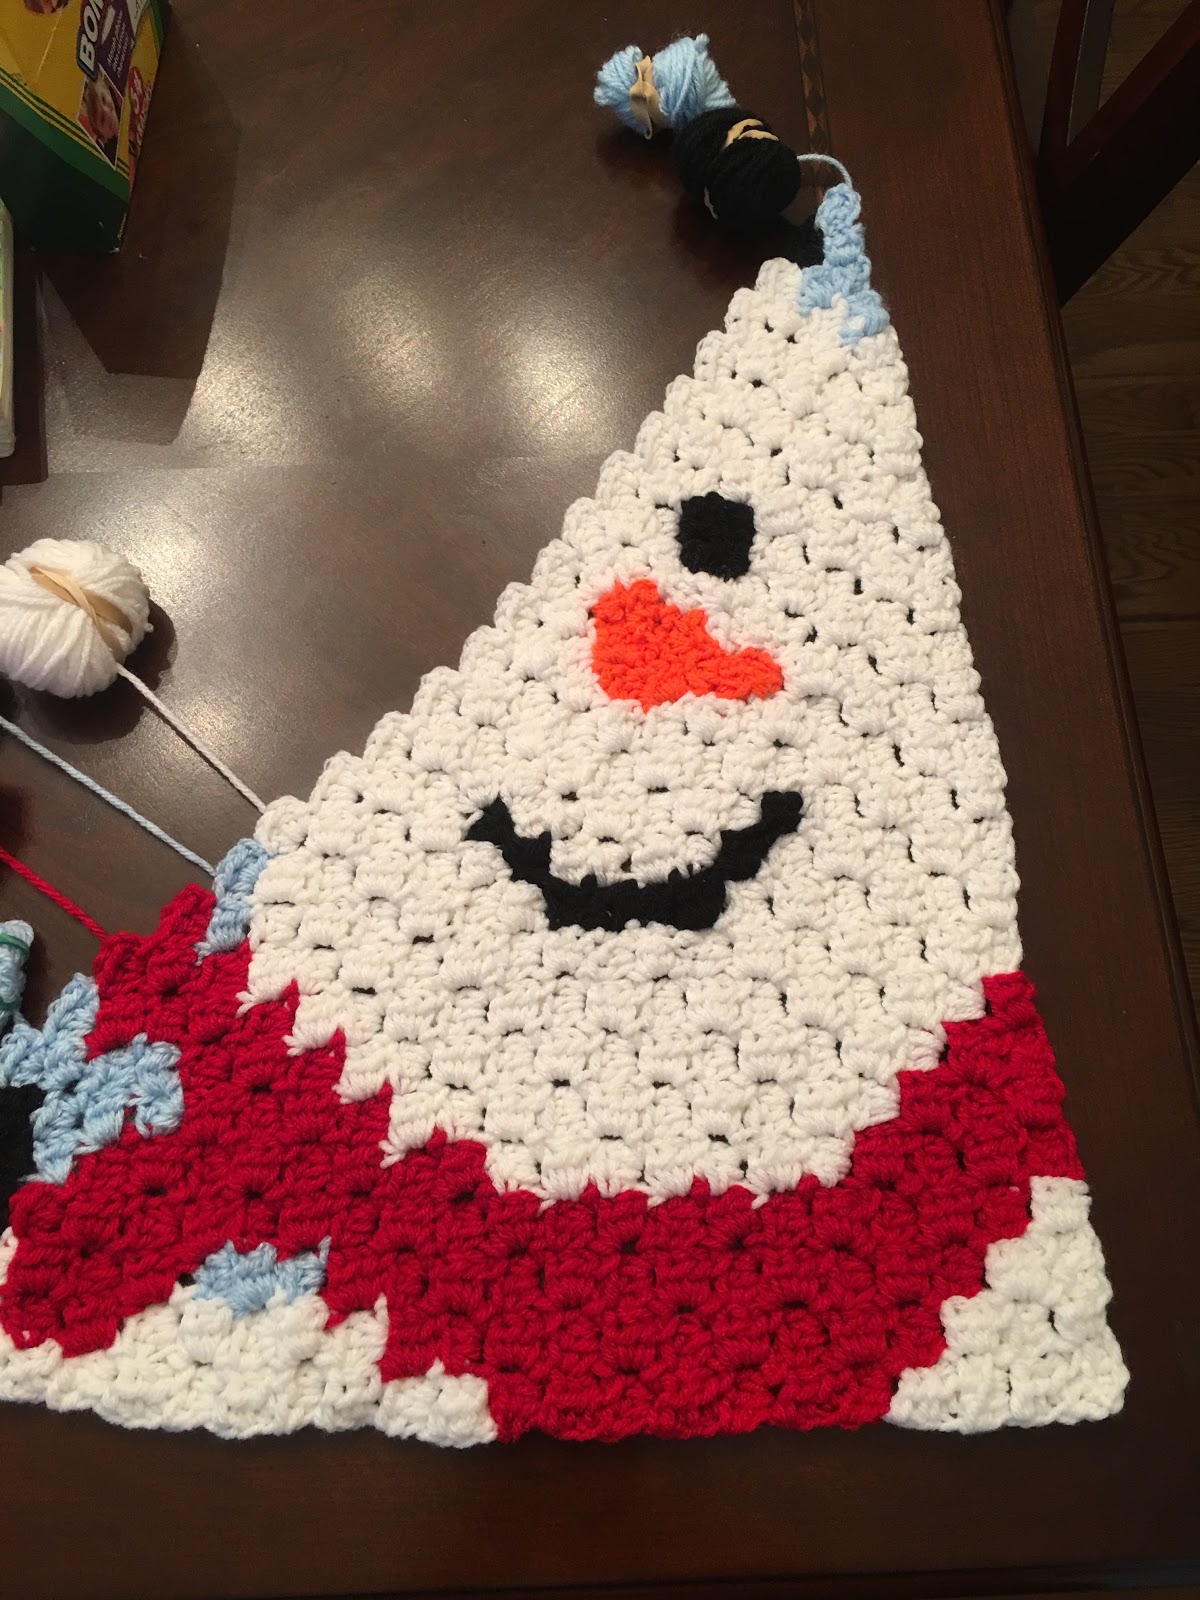
And, here is a SNEAK PEEK at two projects I'm currently working on:
Noah's Ark Quiet Book:

"Let It Snow" C-2-C Blanket:
Happy Crocheting...
Legal:
--don't use/claim my design as your own
--don't use/claim my pics as your own
--okay to make and sale your finished work
--don't share my pattern electronically or in print format (without prior consent) but provide a link to my blog





Friday, December 8, 2017

All-In-One Hat Set...

An All-In-One Colonial Blue hat, face mask and scarf with pockets made with Lion Brand's Vanna's Choice Yarn and a 6.0mm hook.  I used less than 2 skeins of yarn.  

Hopefully this will help shield my grandson, Jacob, from cold weather and snow in NYC this weekend.  

All-In-One Hat Set


Happy Crocheting...

Thursday, November 30, 2017

Gingerbread All-In-One Hat & Neckwarmer...

After spending days lying in bed, I finally had to do something creative with my hands and came up with this design.  It's cute, efficient, requires minimal yarn and so versatile.

This project works up fairly quickly.  3-in-1:
1.  It's a Gingerbread Messy Bun/Ponytail Hat;
2.  Close the top and it's a Gingerbread Hat;
3.  Open the top and button around your neck for a Gingerbread Neckwarmer.

Gingerbread All-In-One Hat & Neckwarmer Pattern

Size:  3 months - Adult

Gauge:  6 HDC st x 5 rows = 2"

Materials:
--5.5mm hook
--#4 Red Heart Super Saver Yarn in Cafe Latte, Red and White (approx 60 - 80 yds) - yardage will vary slightly depending on the size you are making
-(5) 1/2" holiday buttons (I bought mine at Hobby Lobby)
--tapestry needle for weaving

U.S. Stitch Abbreviations:
Ch:  chain
Sl st:  slip stitch
St:  stitch(es)
SC:  single crochet
SC2tog:  single crochet 2 stitches together (creates a decrease)
HDC:  half double crochet
FHDC:  foundation half double crochet
DC:  double crochet
Rep:  repeat
FO:  fasten off

Special Note:  you will be making a rectangle-shaped piece.

Special Stitch:
FHDC:  this creates the chain and stitch at the same time and is easy to achieve.
1.  Start with a chain 3.
2.  Yarn over and insert hook into the 3rd ch from the hook.  Yarn over and pull through the first loop on the hook.  You will have 3 loops on your hook.
3.  Yarn over and pull through the 1st loop on the hook - this creates the chain stitch.
4.  Yarn over and pull through 3 loops - this creates the HDC stitch.
5.  Now continue making HDC stitches.  Yarn over and insert hook into the chain stitch created in step #3.  Repeat steps 3-5 to continue making the chain and HDC stitches,

Directions:
Adult (21" head circumference):
1.  With Cafe Latte, FHDC 51.  Or you can ch 52.  HDC into 2nd ch from hook and across.  Ch1 and turn.  (51)
2.  1 HDC in each st across.  Ch1 and turn.  (51)
3-11.  Rep #2.  (51)
12.  1 HDC in each st across.  FO and weave ends.  (51)
13.  Join white yarn and Ch1.  1 SC in each of the first 3 st.  1 HDC in each of the next 3 st.  1 DC in each of the next 3 st.  Rep this pattern across.  FO and weave ends.  (51)
14.  Re-join Cafe Latte, 1 HDC in each st across.  Ch1 and turn. (51)
15.  1 HDC in each st across.  Ch1 and turn.  (51)
16.  SC2tog, 1 SC in next st.  Rep across.  Ch1 and turn.  (34)
17.  SC2tog, 1 SC in next 2 st.  Rep across ending with SC2tog.  FO and weave ends.  (25)

Border:
1.  Now, you will join red yarn in the first base chain of Row 1 and Ch1.  1 HDC in each base ch across.  Ch1 and turn.  (51)
2.  1 HDC in each st across.  FO and weave ends.  (51)
3.  Join white yarn and Ch1.  1 SC in each of the first 3 st.  1 HDC in each of the next 3 st.  1 DC in each of the next 3 st.  Rep this pattern across.  FO and weave ends.  (51)
4.  Re-join red yarn 1 HDC in each st across.  Ch1 and turn.  (51)
5.  1 HDC in each st across.  FO and weave ends.  (51)
6.  Re-join white yarn, 1 SC in each st across.  FO and weave ends.  (51)

Button Placement:
1.  Attach 5 buttons on one side of the vertical end, spacing them approximately 1 1/2" - 2" apart.
Strap:
1.  With red yarn, ch100.  FO and double knot each end to secure.
2.  Using your tapestry needle, weave the strap in and out of Row 16.
Alternate Sizes:
Pre-teen/Teen Size (20" head circumference):
1.  49 FHDC.
2.  Repeat pattern as above.
*Note:  the last 2 rows for the top of the hat will work as follows:
1.  SC2tog, SC next st.  Rep across, ending with 1 SC in each of the last 2 st.  (33)
2.  SC2tog, SC in next 2 st.  Rep across, ending with 1 SC in each of the last 3 st.  (25)

Toddler/Kid (18" head circumference):
1.  45 FHDC.
2.  Repeat as above, except omit Rows 11 and 12 and then continue with pattern as above.
*Note:  the last 2 rows for the top of the hat will work as follows:
1.  SC2tog, SC next st.  Rep across.  (30)
2.  SC2tog, SC in next 2 st.  Rep across, ending with SC2tog.  (22)

6-12 Month Size (16" head circumference):
1.  41 FHDC.
2.  Repeat as above, except omit Rows 10 thru 12 and then continue with pattern as above.
*Note:  the last 2 rows for the top of the hat will work as follows:
1.  SC2tog, SC next st.  Rep across, ending with SC2tog.  (27)
2.  SC2tog, SC in next 2 st.  Rep across, ending with 1 SC in Last st.  (20)

3-6 Month Size (14" head circumference):
1.  37 FHDC.
2.  Repeat as above, except omit Rows 9 thru 12 and then continue with pattern as above.
*Note:  the last 2 rows for the top of the hat will work as follows:
1.  SC2tog, SC next st.  Rep across, ending with 1 SC in each of the last 2 st.  (25)
2.  SC2tog, SC in next 2 st.  Rep across, ending with 1 SC in each of the last 3 st.  (19)

Assembly/Use:
1.  To use as a Messy Bun/Ponytail Hat:  pull strap but don't close completely and secure strap into a bow;

2.  To use as a Hat:  pull strap and close opening completely and secure strap into a bow;

3.  To use as a Neckwarmer:  leave top open and unbutton 1 or 2 buttons to pull over head and around neck.  Secure buttons and strap into a bow.


And, that's it!!!  Gingerbread All-In-One Hat & Neckwarmer....

Variations:
1.  Make in your favorite seasonal characters by color choices;
2.  Use a solid yarn for a basic version.

A few more pics:

Happy Crocheting...

Legal:
--don't claim my pattern as your own
--don't use my pics as your own
--okay to make and sale your finished work
--don't share my pattern electronically or in print format but provide a link to my blog

Thursday, November 9, 2017

Ashes Hat & Neckwarmer Set....

While in Greensboro this past Tuesday, I had to stop by Michael's since they are having a huge yarn sale....and, of course, what crocheter can resist a sale?!

I bought 2 skeins of Charisma Yarn (#5 bulky) in Ashes for $2.00 per skein.  Wow, what a deal?  I debated several hours on what I wanted to make with this gorgeous color,  Finally, I settled on my "Ashes Hat & Neckwarmer" set....I didn't want my hat to be "slouchy" per se but I didn't want it to be a tight-beanie type fit neither.  I wanted a sorta loose, comfortable hat and I think I really achieved that with this pattern design.  It is super soft, cozy and warm all entangled together.  I hope
you will enjoy this set.

Ashes Hat & Neckwarmer Set...
 Ashes Hat & Neckwarmer Pattern

Size:
Hat:  Will comfortably fit an adult woman's head
Neckwarmer:   Approximately 5 1/2" wide x 19" long

Gauge:  I did not gauge this pattern

Materials:
--10mm hook
--2 skeins of Charisma Yarn (Michael's); or your fav #5 bulky yarn; it uses 1 whole skein and less than a 1/3 of the second skein
--(2) 1" black buttons
--tapestry needle for weaving

U.S. Stitch Abbreviations:
Ch:  chain
Sl st:  slip stitch
St:  stitch(es)
Rep:  repeat
MR:  magic ring
SC:  single crochet
SC2tog:  single crochet 2 stitches together (creates a decrease)
HDC:  half double crochet
BLO:  back loops only
FO:  fasten off

Optional:  make or add a pre-made Pompom; I'm waiting on my fur pompoms to be delivered from Amazon; this is completely optional

Directions:


Hat:
1.  10 HDC into MR.  Sl st join and ch1.  (10)
2.  2 HDC in each st around.  Sl st join and ch1.  (20)
3.  2 HDC in first st, 1 HDC in next st.  Rep around.  Sl st join and ch1.  (30)
4.  2 HDC in first st, 1 HDC in next 2 st.  Rep around.  Sl st join and ch1.  (40)
--this makes a 6" diameter hat (which will 17-19" head circumferences)-- if this is the size you desire, then skip step #5 and move on to #6.
5.  Working in the BLO, 2 SC in first st, 1 SC in the next 3 st.  Rep around.  Sl st join and ch1.  (50) 
6.  In both loops, HDC in each st around.  Sl st join and ch1.  (50)
7.  Working in the BLO, SC in each st around.  Sl st join and ch1.  (50)
8.  In both loops, HDC in each st around.  Sl st join and ch1.  (50)
9.  Working in the BLO, SC in each st around.  Sl st join and ch1.  (50)
10.  In both loops, HDC in each st around.  Sl st join and ch1.  (50)
11.  Working in the BLO, SC in each st around.  Sl st join and ch1.  (50)
12.  In both loops, HDC in each st around.  Sl st join and ch1.  (50)
13.  Working in the BLO, *SC2tog, 1 SC in next 3 st.*  Rep around.  Sl st join and ch1.  (40)
14.  In both loops, HDC in each st around.  Sl st join and ch1.  (40)
15.  Working in the BLO, SC in each st around.  Sl st join and ch1.  (40)
16.  Loosely sl st in each st around.  Sl st join and FO.  Weave ends.

Optional:  if so desired, make or add a pre-made pompom to top center of hat


Neckwarmer:
1.  Ch7.  HDC in 2nd ch from hook and across.  Ch1 and turn.  (6)
2.  HDC in each st across.  Ch1 and turn.  (6)
3-30.  Repeat #2.  At the end of Row 30, Ch1 and rotate to work on the long horizontal side.  (6)
31.  Work a SC in each end st evenly across.  Ch1 and turn.  (30)
32.  Working in the BLO, SC in each st across.  Ch1 and turn.  (30)
33.  Working in the BLO, *2 SC in first st, 1 SC in next st,* rep across.  Ch1 and turn.  (45)
34.  Working in the BLO, *2 SC in first st, 1 SC in next 2 st,* rep across.  Ch1 and turn.  (60)
35.  Working in the BLO, 1 SC in each st across.  FO and weave ends.

Buttons:
See my pics for button placement.
Happy Crocheting...
Legal:
--don't claim my pattern/design as your own
--don't use my pics as your own
--don't share my patterns electronically or in print format but provide a link to my blog
--okay to make and sale your finished work; just credit me as the designer