My second “Veggie Pal” Kawaii is an Eggplant. Quick, easy and super cute project to complete in no time at all!!!
Eggplant Veggie Pal


Pattern coming SOON....
Happy Crocheting....

My blog is about crocheting & crafting. You can find PDF files, completed projects and bath & body products in my Etsy Shop at: https://www.etsy.com/shop/Rilla2u Occasionally, I may share my passion for cooking, gardening & canning! I hope you will stop by often to check out free patterns. Subscribe, comment and follow me on my journey...

My second “Veggie Pal” Kawaii is an Eggplant. Quick, easy and super cute project to complete in no time at all!!!
Eggplant Veggie Pal
Carrot Kawaii Pattern

Binge watching Grimm, I wanted to work with Orange yarn for some reason (lol) and I decided to design my own version of a “Carrot Kawaii.” Mine measures approximately 4” wide and 8” tall (but just over 10” tall if you include the leaves/stem).
This project was SO easy to make and SUPER quick. I mean literally less than an hour from start to finish on the entire project!!!! How awesome is that?
I had bought all the available colors of Wal-Mart’s Mainstays brand to test out and so far I’ve been happy with the yarn and the finished outcome of my projects. Plus, the cost is very affordable.
So, let's get started on this cutie!!!!

Carrot Kawaii Free Pattern
Materials:
--5.0mm hook
--#4 Worsted weight yarn in Orange and Green; I used Mainstays yarn brand
--Polyfil
--(2) 15mm black eyes
--a small amount of black thread for the mouth
--needle for weaving ends and making mouth
U.S. Stitch Abbreviations:
Ch: chain
St: stitch
Sl st: slip stitch
SC: single crochet
HDC: half double crochet
FO: fasten off
Directions:
I made two identical pieces and a stem for the top.


Happy Crocheting...
Leprechaun Handbag Kawaii

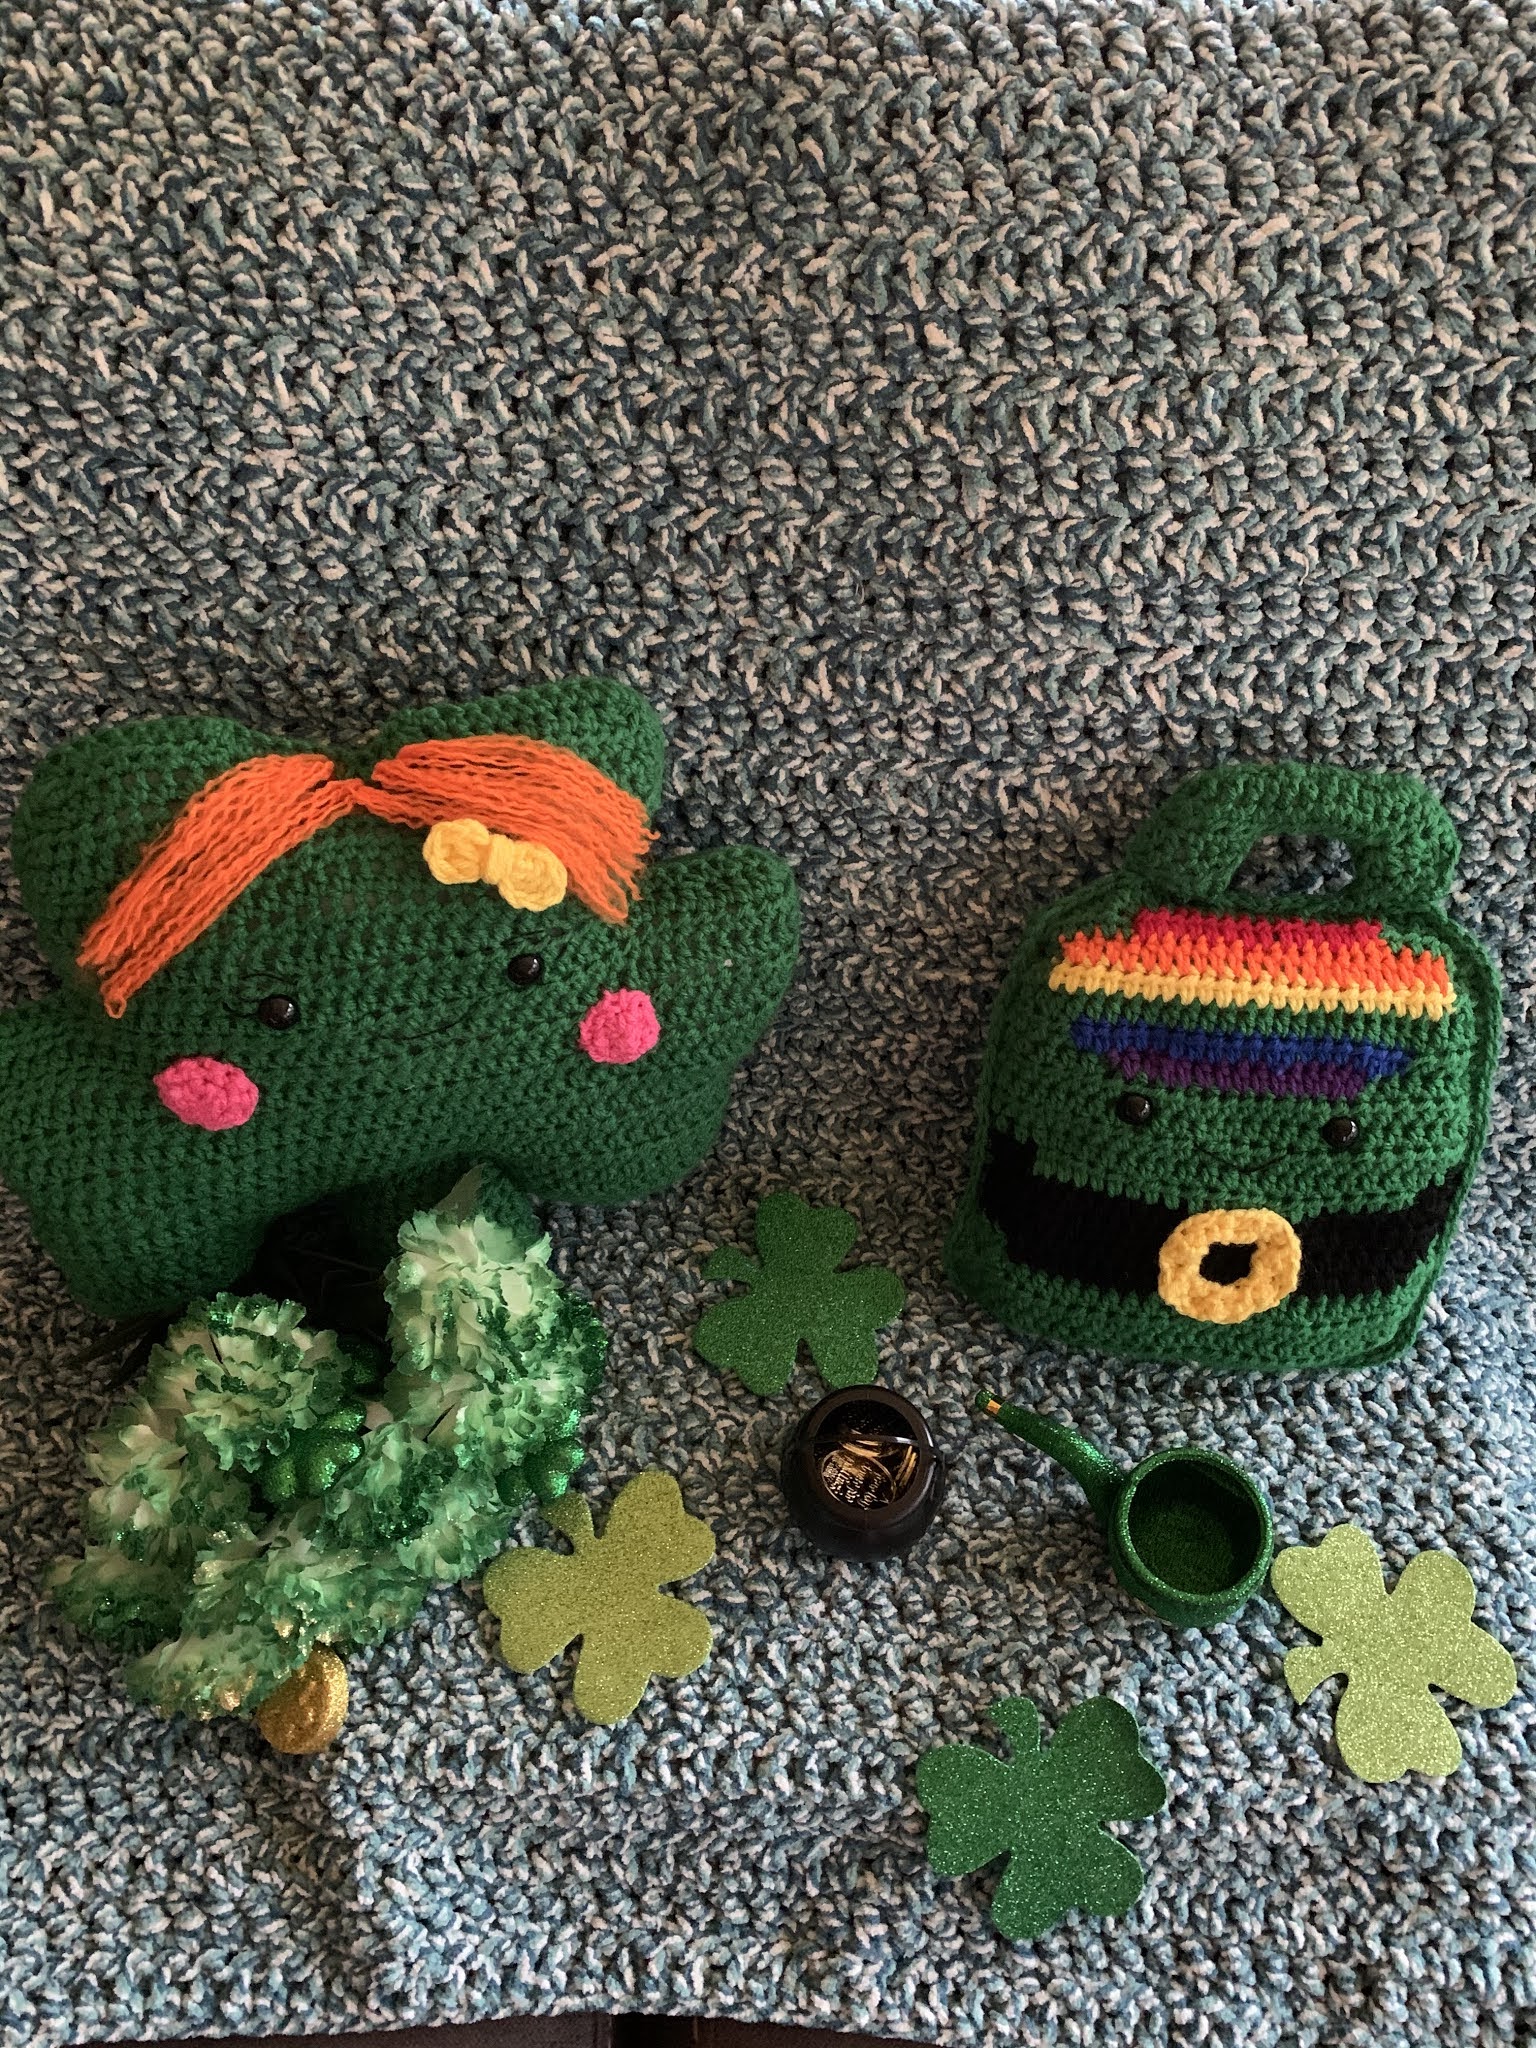

Pattern details coming SOON!!!
So, check back frequently....
Easter Tabletop Decor


I’m in love with this Easter project I’m working on. It’s a mixture of crocheting, painting, and just crafting. And, I think it’s absolutely gorgeous. Best of all, I spent less than $10.00 on the whole project.
Pattern and instructional info coming SOON....
What do you all think of this? I love using all mediums for my artistic outlets. What about you?
Happy Crocheting & Crafting...
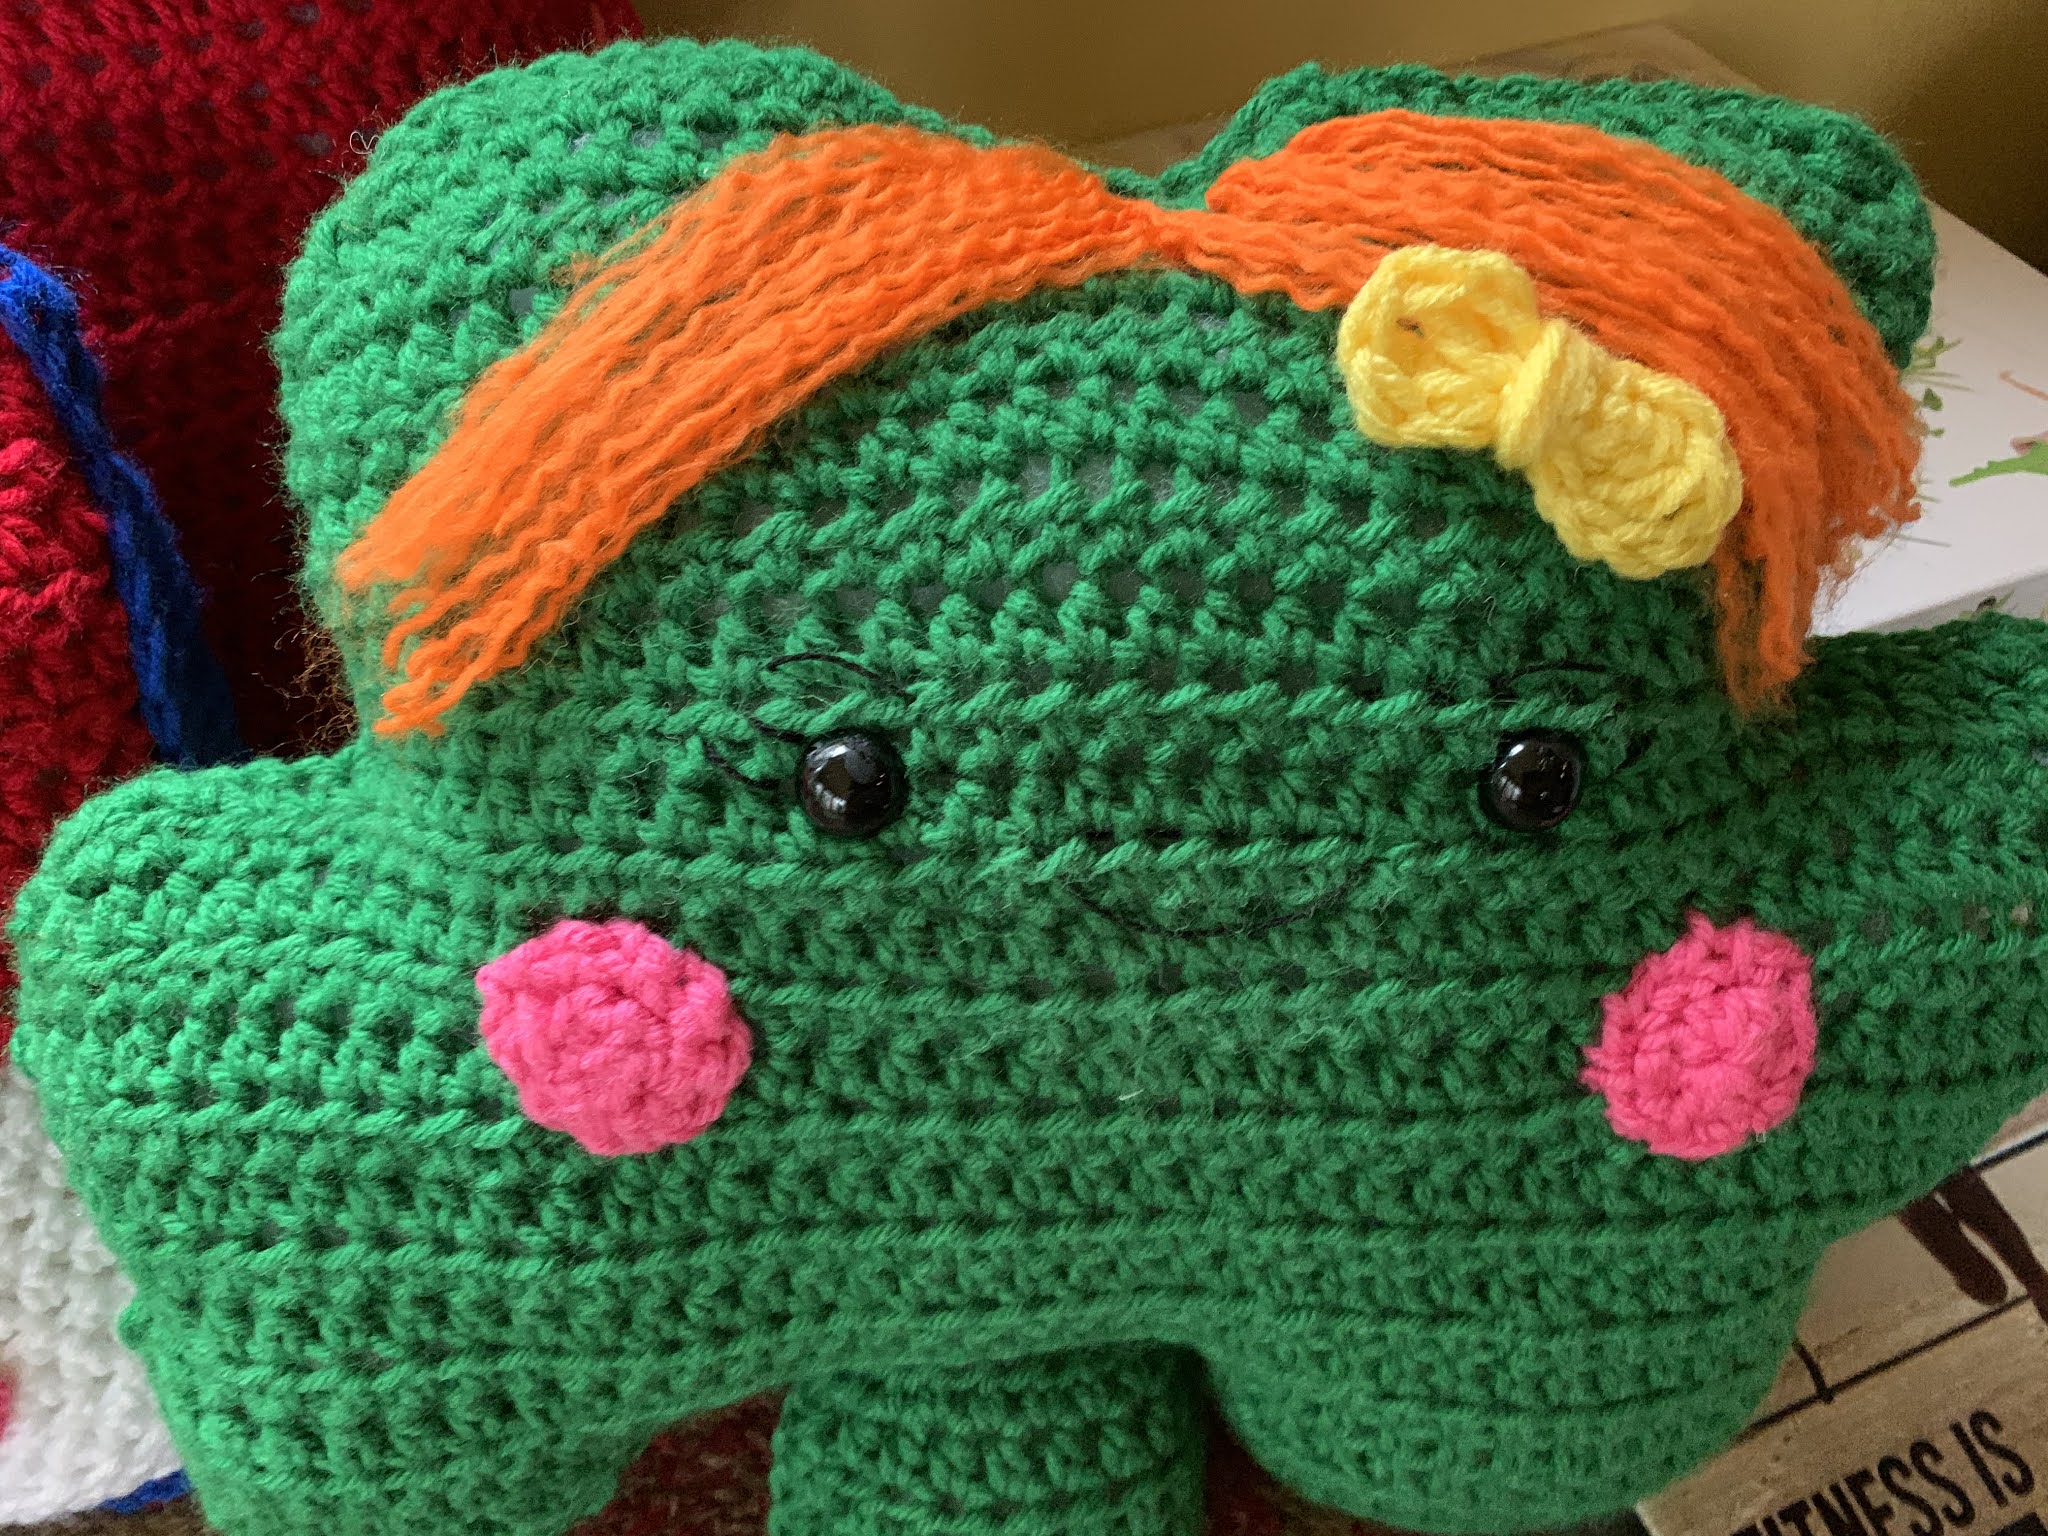
Here’s another one of my newest designs, a “Shamrock Kawaii Pillow.” I think it’s super cute, especially with the hair (optional).
I used Main Stays Acrylic yarn from Wal-Mart for this project.
Shamrock Kawaii Pillow

With a little hat on...

If you would like to purchase the Ad-free, PDF version, here is the link to my Etsy Shop:
Size: 14 1/2" x 13"
Materials:
--5.0mm hook
--#4 worsted weight yarn in green (1 skein), pink (2-3 yds) and orange (2-3 yds); I used Mainstays Yarn (Wal-Mart)
--2 (15mm) black eyes
--small amount of black embroidery thread
--Polyfil
--tapestry needle for weaving
U.S. Stitch Abbreviations:
Ch: chain
St: stitch(es)
Sl st: slip stitch
SC: single crochet
HDC: half double crochet
HDC2tog: half double crochet 2 stitches together (decrease stitch)
TC: triple crochet
Rep: repeat
FO: fasten off
MR: magic ring
Directions:
Special Note: if making for a child, you may want to crochet the eyes for safety reasons.
For this project, you will be making a front and back identical piece and then single crocheting the two pieces together. You can slip stitch or whipstitch the two pieces together, if so desired. The hair is optional. I used black safety eyes, but you can opt to make crocheted eyes instead. As you can see, at the bottom of this post, I decided after I completed this project to add a small yellow bow. This is optional, as well.
To start we will be making the stem first:
1. Ch10. HDC in the second ch from the hook and across. Ch1 and turn. (9)
2-7. HDC in each st across. Ch1 and turn. (9)
8. HDC in each st across. FO and set aside. (9)
Now, we are going to start on the lower right lobe:
1. Ch9. HDC in second ch from hook and across. Ch1 and turn. (8)
2. 2 HDC in the first st, 1 HDC in the next 6 st, 2 HDC in the last st. Ch1 and turn. (10)
3. 2 HDC in the first st, 1 HDC in the next 8 st, 2 HDC in the last st. Ch1 and turn. (12)
4. 2 HDC in the first st, 1 HDC in the next 10 st, 2 HDC in the last st. Ch1 and turn. (14)
5. 1 HDC in each st across. Ch1 and turn. (14)
6. 1 HDC in the first 13 st. 2 HDC in the last st. Now, pick up stem and sl st join to stem. 1 HDC in the same st as the sl st. Then 1 HDC in each st across. (24)
Now, we are going to be adding the lower left lobe to the piece:
7. Ch16. HDC in second ch from hook and across. Turn. (15)
You are going to turn your piece and work the next row in the base chains. This way your 15 HDC stitches will stay even with Row 8 of your stem.
8. Sl st into each of the first four ch. Ch1. HDC in each of the remaining 11 ch. Ch1 and turn. (11)
9. HDC in the first 9 st, HDC2tog. Ch1. Turn. (10)
10. HDC2tog, HDC in the next 8 st. FO and weave ends. (9)

Now, you have your right lower lobe of 15 stitches, your stem of 9 stitches and your left lower lobe of 15 stitches for a total of 39 stitches. Join yarn in the last stitch on the right side with a sl st and ch1.
The Body:
1. HDC in each st across. Ch1 and turn. (39)
2. HDC in each st across. Ch 1 and turn. (39)
3. HDC2tog, HDC in the next 35 st, HDC2tog. Ch1 and turn. (37)
4. HDC2tog, HDC in the next 35 st. Ch1 and turn. (36)
5. Ch3. HDC in the second ch from the hook and the next ch. HDC in the next 35 st. 2 HDC in the last st. Ch1 and turn. (39)
6. 2 HDC in the first st, HDC in the next 37 st, 2 HDC in the last st. Ch1 and turn. (41)
7. 2 HDC in first st, HDC in the next 40 st. Ch1 and turn. (42)
8-10. 1 HDC in each st across. Ch1 and turn. (42)
11. HDC in the first 40 st, HDC2tog. Ch1 and turn. (41)
12. HDC2tog, HDC in the next 39 st. Ch1 and turn. (40)
13. HDC2tog, HDC in the next 33 st. Leave remaining unworked. Ch1 and turn. (34)
14. 2 HDC in first st, HDC in the next 25. Ch1 and turn. (27)
15. 2 HDC in first st, HDC in the next 26 st. Ch1 and turn. (28)
16. HDC in the first 27 st, 2 HDC in the last st. Ch1 and turn. (29)
17. 2 HDC in first st, HDC in the remaining st. Ch1 and turn. (30)
18-19. 1 HDC in each st across. Ch1 and turn. (30)
20. HDC2tog, HDC in the next 13 st. Ch1 and turn. (14)
21. HDC2tog, HDC in the next 10 st, HDC2tog. Ch1 and turn. (12)
22. HDC2tog, HDC in the next 7 st. FO and weave ends. (8)
Now, join yarn on opposite side of last stitch of Row 19 with a sl st and ch1.
23. 1 HDC in same st as sl st and next 13 st. Ch1 and turn. (14)
24. HDC2tog, HDC in the next 10 st, HDC2tog. Ch1 and turn. (12)
25. HDC2tog, HDC in the next 8 st, HDC2tog. FO and weave ends. (10)

Repeat to make the second piece.
Now, once you have two identical pieces made, you will want to go ahead and add the facial features to one of your completed pieces before we join them together.


For the eyes, I placed them at approximately the 13th or 14th row of the body portion, with a space of 9 stitches between them. I then added lashes, brows and a mouth with black embroidery thread.
For the cheeks, I used pink yarn:
1. 6 SC in to MR. Sl st join and Ch1.
2. *2 SC in first st, 1 SC in next st.* Complete from * to * around. FO and leave a long tail for attaching. (see pic for placement)
For the hair, I used orange yarn:
1. At the top center, I joined 6 pieces of orange yarn and secured with a double knot. This made 12 pieces. I then used my tapestry needle to fray the yarn.
For the bow, I used yellow yarn:
1. I started with a MR. Ch4. 7 TC into MR. Sl st join to top of Ch4. Then I sl st to center. FO and leave a long tail. Pull tail to tighten the center. Then wrap yarn several times around the center and then join to the top right or left, just under the hair.
Now, align your two pieces together. Join yarn with a sl st and Ch1. SC around. Before closing piece, stuff firmly with Polyfil. Then, complete SC. Sl st join to first st. FO and weave ends.
That's it. You're ALL DONE...


NC State Flag Kawaii Pillow


Happy Crocheting...

I decided to paint a new canvas to put on display for the month of February. I settled on simply painting my white canvas a shade of pink first. I made a heart for the letter “O”.
Simple and pretty to add to my seasonal decor...
Happy Crafting...
Face Mask Ornament

Face Mask Ornament Pattern
The Face Mask Ornaments were made for Jacob and Arielle to include with their yearly ornaments I either make or buy them. With the pandemic, going to school, having to wear masks everywhere we go, I thought this was a fitting ornament for each of them to represent 2020.
Fun and easy pattern. The embroidery portion is optional. I did it freehand. I'm not great at doing embroidery but I try...
Enjoy this freebie...
Face Mask Ornament Free Pattern:
Materials:
--#4 worsted weight yarn
--2.5 mm hook
--black embroidery thread (optional)
--needle for weaving ends & embroidery
U.S. Stitch Abbreviations:
Ch: chain
St: stitch
Sl st: slip stitch
SC: single crochet
BLO: back loops only
FO: fasten off
Directions:
1. Ch 10. Sl st in 2nd Ch from hook and next Ch. SC in the next 5 Ch. Sl st in last 2 Ch. across. Turn. (9)
2-6. Working in BLO. Sl st in first 2 st. SC in next 5 st. Sl st in last 2 st. At the end of Row 6, SC in the first 4 st, Sl st in the next st. Ch 12. Sl st back into the same st (this makes the loop for hanging). SC in the remaining 4 st. Ch12. Sl st to the bottom last st to create the first loop. SC across the bottom. Ch12. Sl st to the top first st to create the second loop. FO and weave ends.
The applique portion is optional. I used black embroidery thread and embroidered '20 to the corner of each Face Mask Ornament to denote the year...
And be sure to check out my Super-cute, Toilet Paper Roll Ornament. Here is the LINK to the free pattern....

Happy Crocheting...
Toilet Paper Roll Ornament

I had a lot of fun making these cuties for my two grandsons, Gabriel and Luke!!!! I like to make or purchase an ornament each year for my grandchildren that sums up the year for them. And, I think, the toilet paper roll fits each of them perfectly. They each are 5; started Kindergarten (home-schooled) and learned to go to the potty on their own. Using and minimizing toilet paper...lol!!!
Toilet Paper Roll Ornament Pattern
Materials:
--#4 worsted weight yarn (Mainstays Yarn from Walmart in white)
--2.5mm hook
--Polyfil
--small black eyes
--black embroidery thread
--needle
U.S. Stitch Abbreviations:
Ch: chain
St: stitch
Sl st: slip stitch
SC: single crochet
FO: fasten off
MR: magic ring.
BLO: back loops only
Directions:
Toilet Paper Roll:
I started with a Magic Ring. Use a stitch marker to keep up with the first stitch and move up each round accordingly. You will not be joining stitches and chain 1 at the end of each round.
1. 6 SC st
2. 12 SC st
3. 18 SC st
4. 24 SC st
5-8. 24 SC st
9. 18 SC st
Add eyes. Add mouth. Stuff with Polyfil. (see my pic for placement)
10. 12 SC st
11. 6 SC st
12. Ch 24. Sl st directly across from the beginning chain. FO and weave ends to make sure the top is closed.
Toilet Paper Sheet:
1. Ch 7. SC in 2nd chain and across. (6)
2-6. Working in the BLO, SC in each st. At the end of each row, Ch1 and turn. At the end of Row 6, FO and leave a tail long enough to attach the sheet to the roll. (see my pic for placement)
Applique (optional):
1. I used black embroidery thread and embroidered '20. I did this freehand.
Simple and cute...

Here's the Face Mask Ornament Link!!!!
Happy Crocheting...

Teal Twist Throw Blanket
I made this super soft and cozy throw blanket using Bernat Blanket yarn. It is a super easy pattern and works up really fast!!!
Size: 41” Width x 60” Length

I made these super quick, like 3 minutes tops for each one, and easy hearts to hang on my artificial tree in my sunroom. I love seasonal decorating and these hearts take literally no time at all to make!!!
Size:


I wanted a big “Heart-Shaped Pillow” to put out on display for the month of February and for personal use anytime of the year. I didn’t want a small pillow.
I set out to design a pillow that’s quick, easy, pretty and BIG. After I stuffed my finished pillow with Polyfil, it measured 19” x 15.”
Heart-Shaped Pillow

Materials:
—5.0mm hook
—#4 worsted weight yarn in color of choice; I used RHSS yarn
—Polyfil
—needle for weaving

Notes:
—you will be making 2 panel pieces and joining them together;
—you can make this in any color you like;
—you can include or omit the border;
—if you want to add a face or lettering then I recommend this to be done before joining the 2 panels together

U.S. Stitch Abbreviations:
Ch: chain
St: stitch
Sl st: slip stitch
SC: single crochet
HDC: half double crochet
HDC2tog: HDC 2 stitches together (decrease)
HDC Inc: 2 HDC stitches in the same stitch (increase)
FO: fasten off

Directions:
1. Ch2.

