Wednesday, January 31, 2018

Spearmint Baby Blanket

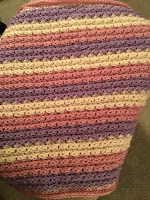
I made this "Spearmint Baby Blanket" for an upcoming baby shower, using Premier Yarns Sweet Roll in Spearmint Pop and a 6.0mm hook.  I love the colors and the texture created using basic crochet stitches.

This blanket size is perfect to keep your baby warm while in a car seat or a stroller.

Spearmint Baby Blanket Pattern
Size:  Measures approximately 24" x 35"

Materials:
--6.0mm hook
--3 Premier Yarns Sweet Roll in Spearmint Pop (245 yds/roll)
--tapestry needle for weaving

U.S. Stitch Abbreviations:
Ch:  chain
Sl st:  slip stitch
St:  stitch(es)
SC:  single Crochet
HDC:  half double crochet
DC:  double crochet
Sk:  skip
Rep:  repeat
FO:  fasten off

Special Note:
1.  This blanket is worked by placing 3 stitches (SC, HDC, DC) into the same stitch, then skip 2 stitches.
2.  Your foundation chain needs to be a multiple of 3.  For example, make sure you can evenly divide 3 into the number of chains you start with.

Directions:
1.  Ch99.  HDC & DC into the 3rd ch from the hook.  *Sk 2 ch, [SC, HDC & DC] into the next ch,* rep across.  SC in last ch.  Ch1 and turn.
2.  *[SC, HDC & DC] into the first st, sk 2 st,* rep to the end.  SC in last st.  Ch1 and turn.
3-61.  Rep #2.  At the end of Row 61 (or your desired number of rows), Ch1 and turn.

Border:
1.  SC evenly around the blanket, placing 3 SC st in each corner.
2.  Rep #1.  At the end of Round 2, (or your desired number of rounds), FO and weave ends.

Now, of course, it's easy to adjust to make this bigger.  I only had 3 rolls of this yarn in Spearmint Pop to work with so I chose to make my blanket for a car seat/stroller.  But, you can easily increase the foundation chain by multiples of 3 and add more border rounds.

3 simple stitches as the SC, HDC, & DC into the same stitch creates a beautiful texture that really "pops".

And, here it is in Birthday Cake Pop:

Happy Crocheting...

Legal:
--don't use/claim my design as your own
--don't use/claim my pics as your own
--okay to make and sale your finished work
--don't share my pattern electronically or in print format (without prior consent) but provide a link to my blog


Saturday, January 27, 2018

Sweetie Ponytail/Messy Bun Hat

Here's my "Sweetie" Ponytail/Messy Bun Hat made from Premier Yarns, Sweet Roll, in the color, Birthday Cake and a 5.0mm (H) hook.

I will try to get the pattern added in the next day or so....

Sweetie Ponytail/Messy Bun Hat 
Size: Fits average-sized adult head

Materials:
--5.0mm hook
--1 Premier Yarns Sweet Roll in Birthday Cake (245 yds/roll)
--ponytail holder
--tapestry needle for weaving

U.S. Stitch Abbreviations:
Ch:  chain
Sl st:  slip stitch
St:  stitch(es)
SC:  single Crochet
HDC:  half double crochet
FLO:  front loops only
BLO:  back loops only
MR:  magic ring
Rep:  repeat
FO:  fasten off

Directions:
1. Work 24 HDC around ponytail holder.  Sl st join to first st and Ch1.  (24)
2.  2 HDC in first st, 1 HDC in next st.  Rep around.  Sl st join to first st and Ch1.  (36)
3.  2 HDC in first st, 1 HDC in next 2 st.  Rep around.  Sl st join to first st and Ch1.  (48)
4.  2 HDC in first st, 1 HDC in next 3 st.  Rep around.  Sl st join to first st and Ch1.  (60)
5.  2 HDC in first st, 1 HDC in next 4 st.  Rep around.  Sl st join to first st and Ch1.  (72)
6.  1 HDC in the FLO of the first st, 1 HDC in the BLO of the next st.  Rep around.  Sl st join to first st and Ch1.  (72)
7.  1 HDC in the first st, sl st into the next st.  Rep around.  Sl st join to first st and Ch1.  (72)
8-21 Rep rounds #6 and 7.  At the end of Round 21, sl st join to first st.  Do not fasten off.

Border:
(the border is going to be made by starting with a row of 4 SC horizontal stitches and sl st to the last round of the hat; you are going to create 72 rows of 4 SC stitches)
1.  Ch5.  SC in 2nd ch from hook and across.  Ch1 and turn.  (4)
2.  SC in the BLO of each st across.  Sl st to the next st of Round 21.  Sl st into the next of Round 21 and Ch1.
3.  SC in the BLO across.  Ch1 and turn.  
4.  SC in the BLO across.  Sl st to the next st of Round 21.  Sl st into the next st of Round 21 and Ch1.
Rep #3 and #4 until you have created 72 rows of 4 SC st.  Sl st join the sides of the last row to the first row and FO.  Weave ends.


Happy Crocheting...
Legal:
--don't use/claim my design as your own
--don't use/claim my pics as your own
--okay to make and sale your finished work
--don't share my pattern electronically or in print format (without prior consent) but provide a link to my blog

Valentine's Apron

With February approaching, I wanted to design a cute Apron in pinks and red.  I used Hobby Lobby's, Crafter's Secret, yarn (#4 worsted weight yarn).  I used a 6.0mm hook for the apron itself, the straps and 2 of the hearts; and a 3.5mm hook for 2 hearts.

For this apron, I used a combination of HHDC, HDC and SC stitches.  It measures approximately 25" in length.

Valentine's Apron
Valentine's Apron Pattern

Size:  Approximately 25" length

Gauge:  Not important

Materials:
--6.0mm (for the apron, straps and 2 hearts) and 3.5mm (for the 2 smaller hearts) hooks
--1 skein of Crafter's Secret yarn each in Passion, Red and Pink (or #4 worsted weight yarn of your choice)
--tapestry needle for weaving ends

U.S. Stitch Abbreviations:
Ch:  chain
Sl st:  slip stitch
St:  stitch(es)
SC:  single crochet
HDC:  half double crochet
HHDC:  herringbone half double crochet
DC:  double crochet
TC:  triple crochet
SC2tog:  single crochet 2 stitches together (creates a decrease) 
HDC2tog:  half double crochet 2 stitches together (creates a decrease)
MR:  magic ring
Rep:  repeat
Sk:  skip
FO:  fasten off

Special Stitch:
1.  HHDC:  Yarn over and insert hook into next stitch; yarn over and pull through stitch and first loop on the hook.  Yarn over and pull through 2 remaining loops on hook.

Special Note:  
1.  The apron is worked from the bottom up. 
2.  I made the top portion of my apron to taper to 8" wide.  
3.  If you want the top portion of your apron to be wider, then do not complete as many decrease rows as I did.  

Directions:
1.  With Passion yarn and 6.0mm hook, Ch61.  HDC in 2nd ch from hook and across or you can complete 60 FHDC.  Ch1 and turn.  (60)
2.  HHDC in each st across.  Ch1 and turn.  (60)
3.  SC in first st, HHDC in next st.  Rep across.  Ch1 and turn.  (60)
4-29.  Rep rows #2 and #3.
30.  HHDC in each st across.  Ch1 and turn.  (60)

Decrease rows:
31.  HDC2tog, HDC in each of the next 56 st, HDC2tog.  Ch1 and turn.  (58)
32.  HDC2tog, HDC in each of the next 54 st, HDC2tog.  Ch1 and turn.  (56)
33.  HDC2tog, HDC in each of the next 52 st, HDC2tog.  Ch1 and turn.  (54)
34.  HDC2tog, HDC in each of the next 50 st, HDC2tog.  Ch1 and turn.  (52)
35.  HDC2tog, HDC in each of the next 48 st, HDC2tog.  Ch1 and turn.  (50)
36.  HDC2tog, HDC in each of the next 46 st, HDC2tog.  Ch1 and turn.  (48)
37.  HDC2tog, HDC in each of the next 44 st, HDC2tog.  Ch1 and turn.  (46)
38.  HDC2tog, HDC in each of the next 42 st, HDC2tog.  Ch1 and turn.  (44)
39.  HDC2tog, HDC in each of the next 40 st, HDC2tog.  Ch1 and turn.  (42)
40.  HDC2tog, HDC in each of the next 38 st, HDC2tog.  Ch1 and turn.  (40)
41.  HDC2tog, HDC in each of the next 36 st, HDC2tog.  Ch1 and turn.  (38)
42.  HDC2tog, HDC in each of the next 34 st, HDC2tog.  Ch1 and turn.  (36)
43.  HDC2tog, HDC in each of the next 32 st, HDC2tog.  Ch1 and turn.  (34)
44.  HDC2tog, HDC in each of the next 30 st, HDC2tog.  Ch1 and turn.  (32)
45.  HDC2tog, HDC in each of the next 28 st, HDC2tog.  Ch1 and turn.  (30)
46.  HDC2tog, HDC in each of the next 26 st, HDC2tog.  Ch1 and turn.  (28)
47.  HDC2tog, HDC in each of the next 24 st, HDC2tog.  Ch1 and turn.  (26)
48.  HDC2tog, HDC in each of the next 22 st, HDC2tog.  Ch1 and turn.  (24)
49-64.  SC in each st across.  Ch1 and turn.  (24)
65.  HDC in the first 11 st.  SC2tog.  HDC in the last 11 st.  Ch1 and turn.  (23)
66.  HDC in the first 11 st.  Sl st in next st.  HDC in the last 11 st.  Ch1 and turn.  (23)
67-69.  Rep #66.  At the end of Row 69, FO and weave ends.  

Neck Strap:
(note:  it's a good idea to measure as you go; you may not require as many rows as I did for my strap or you may require more rows)
1.  Join Red yarn in the first st of Row 69 and ch1.  HDC in same st and into the next 2 st.  Ch1 and turn.  (3)
2.  HDC across.  Ch1 and turn.  (3)
3-55.  Rep #2.  At the end of Row 55, FO and leave a long enough tail to attach the end to the opposite side of Row 69 of the apron.  

Border:
1.  Join Red yarn on the side of Row 69 of the apron and Ch1.  *4 HDC in same st, Ch1, sk 3 st,* rep from * to * around the apron until you reach the opposite side of Row 69.  (you may have to manipulate this by skipping an extra stitch or 2 to get this to work out evenly and that's okay)  FO and weave ends.
2.  Join Pink yarn and Ch1.  *SC in the middle of the previous row's 4 HDC cluster, then 3 HDC st in the 2nd st of the sk 3,* continue to rep this around.  FO and weave ends.

Side Straps (make 2):
(note:  it's a good idea to measure as you go; you may not require as many rows as I did for each side strap or you may require more rows) 
1.  With Red yarn, Ch4.  HDC in 2nd ch from hook and across.  Ch1 and turn.  (3)
2.  HDC in each st across.  Ch1 and turn.  (3)
3-50.  Rep #2.  At the end of Row 50, FO and leave a long enough tail for attaching to the side of the apron at Rows 28-30.  

Repeat for 2nd strap.  

Hearts:
2 small (3.5mm hook) and 2 large (6.0mm hook) - the hearts are made the same way, with the exception of the hook size

1.  9 DC into MR.  Pull to tighten center and sl st join to first st. 
2.  Ch3.  2 TC into same st as Ch. 3 DC into next st.  1 HDC into next 2 st.  Ch1, TC, Ch1 into the next st.  1 HDC into next 2 st.  3 DC into next st.  3 TC into last st.  Sl st to first DC st of Round 1.  FO and leave a long tail for attaching to apron.  (see pics for placement or place where you desire)

 And, that's it for this simple Valentine's Apron that can be made with love and used year round.  I hope you all will enjoy this pattern....

Happy Crocheting...

Legal:
--don't use/claim my design as your own
--don't use/claim my pics as your own
--okay to make and sale your finished work
--don't share my pattern electronically or in print format (without prior consent) but provide a link to my blog

Friday, January 19, 2018

Trolls - Branch Hand Puppet

With all the snow and ice here in North Carolina, I've stayed inside and keeping myself busy working on crochet projects. So, here is my second Trolls Hand Puppet - Branch!!!  I used #4 worsted weight yarn.  This pattern works up fairly quick.

Trolls - Branch Hand Puppet Pattern

Size:  Approximately 14" tall from top of hair to bottom and 7 1/2" across from finger placement to finger placement

Gauge:  I did not gauge this pattern

Materials:
--6.0mm hook (puppet)
--3.0mm (for ears and facial features)
--#4 worsted weight yarn in blue, purple, white and black
--a pinch of polyfil (for the nose)
--hair brush or comb for making the hair 
--tapestry needle (for weaving)

U.S. Stitch Abbreviations:
Ch:  chain
Sl st:  slip stitch
St:  stitch(es)
SC:  single crochet
SC2tog:  single crochet 2 stitches together
HDC:  half double crochet 
DC:  double crochet 
TC:  triple crochet
Rep:  repeat
Sk:  skip 
MR:  magic ring
FO:  fasten off

Directions: 
Note:  the front and back pieces are made exactly the same

Puppet (make 2):
1.  With blue yarn, Ch16.  SC in 2nd ch from hook and across.  Ch1 and turn.  (15)
2-10.  1 SC in each st across.  Ch1 and turn.  (15)
11.  2 SC in first st, 1 SC in each of the next 13 st and 2 SC in the last st.  Ch1 and turn.  (17)
12.  1 SC in each st across.  Ch1 and turn.  (17)
13.  2 SC in first st, 1 SC in each of the next 15 st and 2 SC in the last st.  Ch1 and turn.  (19)
14.  1 SC in each st across.  Ch1 and turn.  (19)
15.  2 SC in first st, 1 SC in each of the next 17 st and 2 SC in the last st.  Ch1 and turn.  (21)
16.  1 SC in each st across.  Ch1 and turn.  (21)
17.  2 SC in first st, 1 SC in each of the next 19 st and 2 SC in the last st.  Ch1 and turn.  (23)
18.  1 SC in each st across.  Ch1 and turn.  (23)
19.  2 SC in first st, 1 SC in each of the next 21 st and 2 SC in the last st.  Ch1 and turn.  (25)
20.  1 SC in each st across.  Turn.  (25)
21.  Sl st in each of the first 6 st.  Ch1.  SC in each of the next 13 st.  Leave the last 6 st unworked.  Ch1 and turn.  (13) 
22-27.  1 SC in each st across.  Ch1 and turn.  (13)
28.  SC2tog, 1 SC in each of the next 9 st, SC2tog.  Ch1 and turn.  (11)
29.  1 SC in each st across.  Ch1 and turn.  (11)
30.  SC2tog, 1 SC in each of the next 7 st, SC2tog.  Ch1 and turn.  (9)
31.  1 SC in each st across.  Ch1 and turn.  (9)
32.  SC2tog, 1 SC in each of the next 5 st, SC2tog.  Ch1 and turn.  (7)
33.  1 SC in each st across.  FO and leave a long tail for attaching front and back pieces together.

Repeat for second piece.  

Before you whipstitch the front and back together, make and attach the facial features to one piece.

Eyes (make 2):
--The eyes are made in 2 parts--
First part:
1.  With white yarn and 3.0mm hook, 6 SC into MR.  Sl st to join to first st and Ch1.  Pull to tighten the center.  (6)
2.  2 SC in each st around.  Sl st to join and Ch1.  (12)
3.  2 SC in the first st, 1 SC in the next 3 st.  Rep around.  FO and leave tail for attaching.  (15) 

Second part:
1.  With black yarn and 3.0mm hook, 6 SC into MR.  FO black yarn and join blue yarn.  Sl st to join and Ch1.  (6)
2.  With blue yarn, 2 SC in the first st, 1 SC in the next st.  Rep around.  Sl st to join and FO.  Leave a tail for attaching.   

Repeat for second eye. 

Eyelids (make 2):
1.  With black yarn and 3.0mm hook, Ch7.  SC in 2nd ch from hook and across.  Ch1 and turn.  (6)
2.  1 SC in each st across.  FO and leave tail for attaching.  (6)

Eyebrows (make 2):
1.  With black yarn and 3.0mm hook, Ch8.  SC in 2nd ch from hook, SC in next ch, HDC in each of the next 3 ch, and SC in each of the last 2 ch.  FO and leave a tail for attaching.  (7)

Assembly of eyes:
1.  Attach second part to first part.  
2.  Then attach to the right side of one of the puppets.  I attached mine at rows 25-27.
3.  Attach eyelids above eyes.
4.  Attach eyebrows above eyelids.  (See pics for guidance) 

Nose:
1.  With purple yarn and 3.0mm hook, 6 SC into MR.  Sl st to join to first st and Ch1.  Pull to tighten the center.  (6)
2.  *2 DC in the 1st st, 2 DC in the next st, 2 SC in the following st,* rep around.  Sl st to join to first st and Ch1.
3.  *1 DC in the first 4 st, 1 SC in the next 2 st,* rep around.  Sl st to join and FO.  Leave a long enough tail for attaching the nose.  

Assembly of nose:
1.  Attach nose in the center, below the eyes, at rows 20-24. 
2.  Whipstitch to close.  Before closing off, add a very small amount of polyfil (or you could use yarn) for the filling.  Weave ends.
3.  I also added a couple stitches on each side of the nose, about 1/2" inward on each side to create an indentation.  

Mouth:
1.  For the mouth, I used black yarn and embroidered it.  However, you could make a chain of stitches, if so desired.

At this point, you will now, whipstitch the sides together, with right sides facing each other.
Whipstitch around the puppet, leaving the bottom open.  Now, turn right side out.

Ears (make 2):
1.  With blue yarn, 8 SC into MR.  Pull to tighten but do not join.  Ch1 and turn.  (8)
2.  2 SC in the first st, 1 SC in the next 6 st and 2 SC in the last st.  Ch1 and turn.  (10)
3.  2 SC in the first st, 1 SC in the next 8 st and 2 SC in the last st.  FO and leave a tail for attaching.  (12)

Assembly:
1.  First, I folded each ear inward.  
2.  Then, I attached to each side of the puppet.  (See pics for placement) 

Hair:
1.  For the hair, I used purple yarn.  I used my 6.0mm hook to attach the yarn in each st of the rows above the eyebrows all the way around.  I also placed hair in the stitches on each side (from the top side to the ear).  I worked the yarn into a stitch, pulled yarn through and tied into a knot (approximately 4 1/2 - 5" long).  I continued to do this until I was satisfied with the amount of yarn used. 
2.  Now, I used a hair brush to continually brushing through the yarn until the "hair" was achieved.  It takes a little time and patience to complete this, but it will happen.

And, that's it for my Branch Troll...

Here's my link to my Poppy Hand Puppet:
Trolls - Poppy Hand Puppet Pattern

Happy Crocheting...
 Legal:
--don't use/claim my design as your own
--don't use/claim my pics as your own
--okay to make and sale your finished work
--don't share my pattern electronically or in print format (without prior consent) but provide a link to my blog

Thursday, January 18, 2018

Valentine Pillow Cover/Sham C2C Graph....

To celebrate and honor my relationship and love for my hubby, here's my FREE graph of hearts I designed to make now so I can display it for the entire month of February.  It's going to be a Valentine Pillow Cover/Sham, using the C2C (corner-to-corner) Crochet method.

I plan to use a 5.0 (H) hook and #4 worsted weight yarn, likely Red Heart Super Saver.  I'm also going to do an altered C2C by starting with a chain 5 (instead of 6) and then use HDC stitches with chain 2 (instead of DC with chain 3).

The back panel will be made in one solid color, of choice.

If you want to tackle this project on your own, please feel free to use my graph.

And, remember, this pillow/sham can be displayed/used for more than just Valentine's Day.  Hearts are really pretty with country-themed decor; it would be pretty in any guest bedroom.  The possibilities are endless and not limited to just one specific day/holiday..

Valentine Pillow Cover/Sham 
C2C Graph....

Front Panel

U.S. Stitch Abbreviations:
Ch:  chain
Sl st:  slip stitch
St:  stitch(es)
SC:  single crochet
HDC: half double crochet
FO:  fasten off

Materials:
--5.0mm hook
--#4 worsted weight yarn in pink, red and white (I used RHSS)
--tapestry needle for weaving

Directions:
1.  For the front panel, follow the C2C method, starting in the lower right corner.  I used a Ch5 and HDC st with Ch2.  
2-3.  Once, I completed my front panel, I then used pink yarn and completed 2 rounds of SC stitches for the border, placing 3 SC stitches in each corner.  Sl st join to first st and FO.  Weave ends.  

Here's a pic just over halfway completed...

And, here's a pic of my completed front panel...
Back Panel
The back panel is completed the same way as the front panel.  The only exception is that the back panel is completed in one color.  And, then 2 rounds of SC st for the border.

Here's a pic of my completed back panel: 
To complete my pillow cover, I placed the right sides together and whipstitched across the top, down the side and across the bottom.  I left one side open.  Then, turn right sides out and add a standard-sized pillow.  At this point, you can whipstitch close the end if you'd like, but I left my end open.  


Hope you all will enjoy this pattern.  Have fun and show someone some love....

Happy Crocheting...

Legal:
--don't claim my pattern/design as your own
--don't use my pics as your own
--don't share my patterns electronically or in print format (without my consent) but provide a link to my blog
--it's okay to make and sale your finished work


Tuesday, January 16, 2018

Snowdrift Hat Pattern

I'm in love with the look, texture and feel of my newest hat design, Snowdrift.  This hat was designed using Lion Brand's Vanna's Choice in Colonial Blue.  It uses a variety of different stitches to make this hat a real beauty to have.

If you would like to purchase the Ad-free PDF version, then it is listed in my Etsy Shop for $1.99.  Here is the link:

Snowdrift Hat

 Snowdrift Hat Pattern
 Size:
1.  The directions given will comfortably fit a 19" - 21" head circumference.
2.  If you want a 4" diameter, then you will stop increase rounds after round #4.
3.  If you want a 5" diameter, then you will stop increase rounds after round #5.

Materials:
--5.0mm hook
--1 skein of Vanna's Choice Lion Brand yarn in Colonial Blue (it only uses approximately 1/2 a skein)
--faux fur pompom or you can make your own (optional)
--tapestry needle for weaving

U.S. Stitch Abbreviations:
Ch:  chain
Sl st:  slip stitch
St:  stitch(es)
Rep:  repeat
Sk:  skip
SC:  single crochet
HDC:  half double crochet
DC:  double crochet
FPDC:  front post double crochet
BPDC:  back post double crochet
FLO:  front loops only
BLO:  back loops only
MR:  magic ring
FO:  fasten off

Special Stitches:
1.  PS:  Popcorn Stitch - 4 single crochet stitches into the same stitch; remove hook from last loop and insert hook (front to back) into the first of the four stitches made, then re-join hook back into the fourth stitch loop and pull through.
2.  HDC Crossover:  Skip first stitch and place half double crochet into the next stitch.  Then, place half double crochet into the skipped stitch.  Continue to repeat around.

Special Note:
1.  If you work this in the round, then use a stitch marker to keep track of the beginning/ending stitches.
2.  If you work this by joining a slip stitch to the first stitch at the end of each round, then you will chain 1.

Directions:
1.  Create a MR.  Ch1.  10 HDC into MR.  (10)
2.  2 HDC st into each st around.  (20)
3.  2 HDC in first st, 1 HDC in next st.  Rep around.  (30)
4.  2 HDC in first st, 1 HDC in next 2 st.  Rep around.  (40)
5.  2 HDC in first st, 1 HDC in next 3 st.  Rep around.  (50)
6.  2 HDC in first st, 1 HDC in next 4 st.  Rep around.  (60)
7.  2 HDC in first st, 1 HDC in next 5 st.  Rep around.  (70)
8-9.  1 HDC in FLO of first st, 1 HDC in BLO of next st.  Rep around.  (70)
10.  PS in the first st, 1 SC in next 2 st.  Rep around.  1 SC in last st.  (70)
11.  1 HDC in each st around.  (70)
12-13.  Rep #8-9.  (70)
14.  Rep #10.
15-16.  Rep #8-9.
17.  HDC Crossover around.  (70)
18-19.  1 SC in BLO of each st around.  (70)
20-21.  FPDC around the post of the first st, BPDC around the post of the next st.  Rep around.  (70)
At the end of Round #21, FO and weave ends.

Pompom (optional):
I added a gray, faux fur pompom to the center top of my hat by weaving yarn through the pompom and the top of my hat.  Then weaved ends. 

If you want to make a yarn pompom and don't have a pompom maker, then you can simply wrap yarn color of your choice around 4 of your fingers 50-60 times (or more, if so desired), use a long piece of yarn to secure a double knot at the center and then cut and trim to shape into a pompom.

And, that's it for my Snowdrift Hat!!!  It has a beautiful texture, sure to keep your head/ears warm and fits great...

And here it is in the color, Peacock:


Check out my above video wearing my Snowdrift Hat on a very cold and snowy day!!!!

Happy Crocheting...
Legal:
--don't claim my pattern/design as your own
--don't use my pics as your own
--don't share my patterns electronically or in print format (without my consent) but provide a link to my blog
--it's okay to make and sale your finished work

Saturday, January 13, 2018

"The Anchor Holds" Blanket

I finished up the border tonight for my "The Anchor Holds" Throw Blanket I have been working on.  I'm happy with the end result and love the little ripple-like waves for the border.

This throw blanket was made using "I Love This Yarn" from Hobby Lobby and a 6.0mm hook.  It measures approximately 40" x 58".

January 28, 2018:
The PDF pattern is now available in my Etsy Shop for $5.00.  Here is the LINK to the pattern:

The Anchor Holds - In Spite of the Storm...


Happy Crocheting... 

Legal: 
--don't claim my pattern/design as your own
--don't use my pics as your own
--don't share my patterns/designs electronically or in print format, without my prior consent, but provide a link to my blog 
--it is okay to make and sale your finished work, just credit me as the designer

Wednesday, January 10, 2018

Trolls - Poppy Hand Puppet

Here's the first of my Troll Puppets I'm currently working on.  I thought I'd start with Poppy.  All of my grandchildren seem to really love watching the Trolls movie -- and, as you can see below, Gabriel, was really enjoying himself playing with Poppy.  

This hand puppet works up fairly quick.  I completed it in one evening using worsted weight yarn and a 6mm hook.

Trolls - Poppy Hand Puppet


"Poppy" Trolls Hand Puppet Pattern

Size:  Approximately 14" tall from top of hair to bottom and 7 1/2" across from finger placement to finger placement

Gauge:  I did not gauge this pattern

Materials:
--6.0mm hook (puppet)
--3.0mm and 4.5mm hook (for ears and facial features)
--#4 worsted weight yarn in pink, bright/darker pink, blue, turquoise, white and black
--a pinch of polyfil (for the nose)
--hair brush or comb for making the hair
--tapestry needle (for weaving)

U.S. Stitch Abbreviations:
Ch:  chain
Sl st:  slip stitch
St:  stitch(es)
SC:  single crochet
SC2tog:  single crochet 2 stitches together
HDC:  half double crochet
DC:  double crochet 
TC:  triple crochet
Rep:  repeat
Sk:  skip
MR:  magic ring
FO:  fasten off

Directions:
Note:  the front and back pieces are made exactly the same

Puppet (make 2):
1.  With pink, Ch16.  SC in 2nd ch from hook and across.  Ch1 and turn.  (15)
2-10.  1 SC in each st across.  Ch1 and turn.  (15)
11.  2 SC in first st, 1 SC in each of the next 13 st and 2 SC in the last st.  Ch1 and turn.  (17)
12.  1 SC in each st across.  Ch1 and turn.  (17)
13.  2 SC in first st, 1 SC in each of the next 15 st and 2 SC in the last st.  Ch1 and turn.  (19)
14.  1 SC in each st across.  Ch1 and turn.  (19)
15.  2 SC in first st, 1 SC in each of the next 17 st and 2 SC in the last st.  Ch1 and turn.  (21)
16.  1 SC in each st across.  Ch1 and turn.  (21)
17.  2 SC in first st, 1 SC in each of the next 19 st and 2 SC in the last st.  Ch1 and turn.  (23)
18.  1 SC in each st across.  Ch1 and turn.  (23)
19.  2 SC in first st, 1 SC in each of the next 21 st and 2 SC in the last st.  Ch1 and turn.  (25)
20.  1 SC in each st across.  Turn.  (25)
21.  Sl st in each of the first 6 st.  Ch1.  SC in each of the next 13 st.  Leave the last 6 st unworked.  Ch1 and turn.  (13) 
22-27.  1 SC in each st across.  Ch1 and turn.  (13)
28.  SC2tog, 1 SC in each of the next 9 st, SC2tog.  Ch1 and turn.  (11)
29.  1 SC in each st across.  Ch1 and turn.  (11)
30.  SC2tog, 1 SC in each of the next 7 st, SC2tog.  Ch1 and turn.  (9)
31.  1 SC in each st across.  Ch1 and turn.  (9)
32.  SC2tog, 1 SC in each of the next 5 st, SC2tog.  Ch1 and turn.  (7)
33.  1 SC in each st across.  FO and leave a long tail for attaching front and back pieces together.

Before you whipstitch the front and back together, make and attach the facial features to one piece.

Eyes (make 2):
--The eyes are made in 2 parts--
First part:
1.  With white yarn and 3.0mm hook, 6 SC into MR.  Sl st to join to first st and Ch1.  Pull to tighten the center.  (6)
2.  2 SC in each st around.  Sl st to join and FO white yarn.  Join black yarn and Ch1.  (12)
3.  With black yarn, SC in the first 5 st.  FO and leave tail for attaching.  (5)

Second part:
1.  With black yarn and 3.0mm hook, 3 SC into MR.  Sl st to join and FO black yarn.  Join bright/dark pink and Ch1.  (3)
2.  2 SC in each st around.  Sl st to join to first st.  FO and leave a tail for attaching this piece to the first one.  Use white yarn to embroider dot at center of eye.

Repeat for second eye.

Assembly of eyes:
1.  Attach second part to first part.  
2.  Then attach to the right side of one of the puppets.  I attached mine at rows 25-27.

Nose:
1.  With bright/dark pink and 3.0mm hook, 6 SC into MR.  Sl st to join to first st and Ch1.  Pull to tighten the center.  (6)
2.  *2 DC in the 1st st, 2 DC in the next st, 2 SC in the following st,* rep around.  Sl st to join to first st and Ch1.
3.  *1 DC in the first 4 st, 1 SC in the next 2 st,* rep around.  Sl st to join and FO.  Leave a long enough tail for attaching the nose.  

Assembly of nose:
1.  Attach nose in the center, below the eyes, at rows 20-24. 
2.  Whipstitch to close.  Before closing off, add a very small amount of polyfil (or you could use yarn) for the filling.  Weave ends.  

Mouth:
1.  For the mouth, I used black yarn and embroidered it.  However, you could make a chain of stitches, if so desired.

At this point, you will now, whipstitch the sides together, with right sides facing each other.  Whipstitch around the puppet, leaving the bottom open.  Now, turn right side out.

Ears (make 2):
1.  With pink yarn and 4.5mm hook, Ch7.  HDC in 2nd ch from hook and next ch.  SC in the next 2 ch.  HDC in the last 2 ch.  FO.  Leave a long enough tail for attaching.

Assembly:
1.  First, I folded each ear inward and added a few whipstitches in the center.
2.  Then, I attached to each side of the puppet.

Hair:
1.  For the hair, I used the bright/dark pink yarn.  I used my 6.0mm hook to attach the yarn in each st of the top 2 rows.  I worked the yarn into a stitch, pulled yarn through and tied into a knot (approximately 4 1/2 - 5" long).  I continued to do this around the top 2 rows.  I then worked a few strands on each side of the front side (to make the bangs) in the 4th row down -- on 1 side I made 2 strands; on the other side, I made 3 strands.
2.  Now, I used a hair brush to continually brushing through the yarn until the "hair" was achieved.  It takes a little time and patience to complete this, but it will happen.

Hairband:
1.  With turquoise yarn and a 4.5mm hook, Ch30.  HDC in the 2nd ch from the hook and across.  Ch1 and turn.  (29)
2.  1 SC in each st across.  FO and leave a long tail for attaching.

Attaching Hairband:
1.  I attached the hairband between the hair and the bangs to hide the rows where the "hair" was made.

Flowers (make 3):
1.  With blue yarn and 4.5mm hook, make a MR and Ch4.  3 TC.  Sl st into MR.  Ch4.  3 TC.  Sl st into MR.  Ch4.  3 TC.  Sl st into MR.  Pull tail to tighten center and FO.  Leave a long enough tail for attaching to the hairband.  

Attaching Flowers:
1.  I attached the flowers so that one was in the front center and the remaining two were on each side.  
And, that's it for my Poppy Trolls Hand Puppet!!!  I hope you all will enjoy this pattern.

 Happy Crocheting...
 Legal:
--don't use/claim my design as your own
--don't use/claim my pics as your own
--okay to make and sale your finished work
--don't share my pattern electronically or in print format (without prior consent) but provide a link to my blog