Monday, November 28, 2016

Volunteer Work -- Salvation Army...

This morning my grandson, Jacob, donned his crocheted Christmas hat and we volunteered for the Salvation Army.  I used this time to talk with Jacob about giving, being kind and helping others.   I shared a story of a dear Christian friend, Brother Wes, who left an impact on my life.  He was always so kind and generous.  He made me want to be a better person.

Before we started aggressively ringing our bells, Jacob offered a prayer over the kettle that people would donate money to help others.

With our noses red, shivering bodies and freezing hands & feet, we kept a smile on our faces, wished everyone who walked by us a good morning, a Merry Christmas and a thank you to those who so generously gave.

What a wonderful feeling to give of our time to help others.  It was a sacrifice well worth making.  Find your local Salvation Army and give the gift of your time....


Sunday, November 20, 2016

Christmas Tree Skirt...

I worked up two of these beautiful Tree Skirt patterns for my daughters-in-law.  I just altered the pattern to what I wanted and it didn't really take long to complete.  I crocheted both within a 5 day time period while working on other projects (but I'm not exact on the number of hours.)

Check out this link for the FREE pattern.  http://www.momsloveofcrochet.com/hollytreeskirt.html


Crochet Snowman Tissue Box Cover...

Tissue Covers are quick seasonal projects to complete and affordably use around the house throughout the year.  It doesn't take a lot of yarn and you can make some really cute covers.

The Snowman Cover took less than 2 hours to complete - start to finish.  Now, there's a lot of different ways to decorate the Snowman's face:
1.  Crochet the eyes, nose and mouth;
2.  Use buttons;
3.  Use felt;
4.  Use foam;
5.  Use the small pompoms;
5.  Or a mixture of the above.

In the pics below you will see 2 different versions.
1.  Button eyes with pompoms for the nose and mouth;
2.  Crochet eyes and nose with embroidered mouth, holly and berries.

Snowman Tissue Box Cover


Snowman Tissue Box Cover Pattern

Materials:
--#4 worsted weight yarn in black and white
--5mm hook
--Tissue Box, size 4.5"x 5"
--facial features (optional:  crochet eyes, nose and mouth; or use buttons, felt, foam, pompoms)
--tapestry needle
U.S. Stitch Abbreviations:
Ch: chain
Sl st:  slip stitch
St:  stitch(es)
SC:  single crochet
SC3tog:  single crochet 3 stitches together
HDC:  half double crochet
HHDC:  Herringbone half double crochet
Rep:  repeat
Sk:  skip 
MR:  magic ring
FO:  fasten off

Special Note:
You can use either the HHDC or the HDC stitch.   I like the texture that the HHDC creates but you can opt to just use the HDC stitch. 

Directions:
Side:
(This makes all 4 sides in one piece...)

1.  Starting with white yarn, ch 56.  HHDC or HDC in 2nd ch from hook and across.  Ch 1.  Turn.  (55)
2.  HHDC or HDC in each st across.  Ch 1.  Turn.  (55)
3-10.  Rep # 2.  At the end of Row 10, FO white yarn and leave a long enough tail to whipstitch the 10 rows of white together later on.  Join the black yarn.  (55)
11-13.  Rep # 2.  At the end of Row 13, FO.  Leave a long enough tail to whipstitch the 3 rows of black together later on.  Set aside.   

Top:
1.  With black yarn, ch 15.  HHDC or HDC in 2nd ch from hook and across.  Ch 1. Turn.  (14)
2-5.  HHDC or HDC in each st across.  Ch 1.  Turn.  (14)
6.  HHDC or HDC in first 4 st, ch 6, sk 6 st, HHDC or HDC in last 4 st.  Ch 1.  Turn.  (8 st & 6 ch)
7.  HHDC or HDC in first 4 st, 6 HHDC or HDC st in ch st, HHDC or HDC in last 4 st.  Ch 1.  Turn.  (14)
8-12.  HHDC or HDC in each st across.  FO and leave a long enough tail for attaching the top. (14)

Assembly:
1.  Whipstitch the ends together of the side piece.  Use black yarn to join the black rows together; use white yarn to join the white rows together.
2.  Place the side piece on the tissue box cover.  Now, place the top piece and whipstitch to the sides.  Weave ends.  
3.  Now, you are ready to add your facial features.  You can make crocheted pieces or you can use pompoms, buttons, felt, foam or anything else you can think of...


For crocheted eyes:
1.  With black yarn 6 SC into a MR.  Pull tail to tighten center.  Sl st join to first st and FO.  (6)

For crocheted nose:
1.  Ch4.  SC in 2nd ch from hook and across.  Ch1 and turn.  (3)
2.  SC across.  Ch1 and turn.  (3)
3.  SC3tog.  Ch1 and turn.  (1)
4.  SC.  Ch1 and turn.  (1)
5.  Sl st around nose.  Sl st to first sl st and FO.  Leave a long enough tail for attaching.

Check out my LINK for Santa's Tissue Box Cover...

Happy Crocheting...

Saturday, November 19, 2016

Crochet Snowman Basket....

Whipped up this cute crochet Snowman Basket with some yarn from my stash....I think he turned out pretty cute...


Sunday, November 13, 2016

Crochet Cozy Carolina Panthers -- 24 oz cans...Free pattern

Carolina Panthers football cozy for a 24 oz Monster can.

Materials:
--5.5 mm hook
--#4 worsted weight yarn in turquoise, gray, black and white
--tapestry needle

Special Note:  If you're not familiar or comfortable with the Herringbone Half Double Crochet (HHDC) stitch, you can easily just use the Half Double Crochet (HDC) stitch.  The website, newstitchaday, has a wonderful tutorial on HHDC. I love the texture and look of the HHDC stitch so much more than the HDC stitch.


Pattern:
1.  I started with turquoise.  First row, 12 HHDC into a magic ring.
2.  Second row, I worked 2 HHDC into each stitch around.
3.  Third row, I worked *2 HHDC in first stitch, then 1 HHDC in the next 3 stitches*...repeat around.  4.  Fourth & fifth rows, 1 HHDC in each stitch around.  Last stitch, switch to black.
5.  Sixth row, 1 HHDC in each stitch around.  Last stitch, switch to gray.
6.  Seventh row, 1 HHDC in each stitch around. Switch back to turquoise.
7.  Eighth thru fourteenth row, 1 HHDC in each stitch around.  Last stitch, switch to gray.
8.  Fifteenth row, 1 HHDC in each stitch around.  Last stitch, switch to black.
9.  Sixteenth row, 1 HHDC in each stitch around.  Switch back to turquoise.
10.  Last row, 1 HHDC in each stitch around.  Weave ends.

In white yarn, use tapestry needle to embroider football stitches.

Enjoy!!!

Crochet Elsa Doll & Hat...

Happy "8th" Birthday to my beautiful little niece, Miss Chloe.  She loves the movie, Frozen, so, of course, I had to whip up a couple items to include with her birthday gift...Elsa Doll and a Hat!!!!


Happy Crocheting…

Crochet Cardigan & Hats -- 18 months size...

I made this Elsa-inspired Cardigan and hats for a  little toddler on a feeding tube (as a resesult of a mom on drugs during pregnancy).  "Frozen" is the only movie she will watch.  Looking forward to giving these handmade gifts to her...


The cardigan was made using Bernat Satin yarn (#4 worsted weight), 5.5 mm hook and the Herringbone HDC stitch.  I loved the snowflake and snowman buttons.  

The hats were done in DC crossover and SC in back loops (pink), Herringbone HDC (turquoise) and DC (white)...a nice little mix...

Happy Crocheting…

Saturday, November 5, 2016

Snowman Mesh Wreath...

Christmas season is almost upon us and what is more welcoming at the front door than a cute snowman?  Lol

I just love the way this Snowman Mesh Wreath turned out.  All supplies were bought at Hobby Lobby...my go-to store for all of my crafting needs...and from start to finish was less than two hours.


Friday, November 4, 2016

Bottle Cozies....bottle wraps, sports-themed, football cozies

A few of the cozies I've continued working on through today in the Herringbone stitch.
--Cowboys
--Steelers
--Panthers
--Dolphins
--Redskins
--Broncos
--Minion
--Grinch
--Football
--Basketball
--Breast Cancer Awareness


Here’s the Link to my basic football pattern:
https://rilla2u.blogspot.com/2016/11/crochet-bottle-cozy-football-pattern.html

Special Note:  for the sports themed, I changed colors on Row 5 & 6 and then again at Row 15 & 16...

For the Breast Cancer Awareness, I just made in a solid color and then a ribbon in a darker shade.  For Grinch, I made him in green and then freestyle facial features and a small Pompom for his hair.  For the Minion, I used blue, yellow and black yarn and then freestyle facial features.

For the ones that are not football-themed, you should be able to look at my pics and make them.

Thursday, November 3, 2016

Crochet Bottle Cozy -- Football Pattern...

Crocheted up this bottle cozy for the football fans out there.


Materials:
--5.5 mm hook
--#4 worsted weight yarn in brown and white
--tapestry needle

Special stitch:
Herringbone Half Double Crochet (HHDC):  YO and insert hook into ring, stitch or chain.  YO, bringing hook through loop and 1 chain on hook.  YO and bring hook through remaining two loops on hook.  (Alternately, you could use the half double crochet stitch...)

Abbreviations:
--YO= yarn over
--MR= magic ring
--Ch= chain
--Sl st= slip stitch
--St= stitch
--FO= fasten off

Directions:
With brown yarn, make a MR and ch 1.
1.  12 HHDC into MR.  Sl st to join to first st.  Ch 1.  (12)
2.  2 HHDC into each st around.  Sl st to join to first st.  Ch 1.  (24)
3.-5.  1 HHDC into each st around.  In the last st, join with white yarn and sl st to first st.  Ch 1.  (24)
6.  With white yarn, complete one round of 1 HHDC into each st around.  Re-join brown yarn.   Sl st to join to first st and ch 1.  (24)
7.-15. 1 HHDC into each st around.  At end of round 15, rejoin white yarn.  Sl st to first st.  Ch 1.  (24)
16.  Repeat round #6. (24)
17.  1 HHDC into each st around.  Sl st to first st and FO.  Weave ends.  (24)

Use a small amount of white yarn to embroider football stitches.  (See pic to help.)

Tuesday, November 1, 2016

Crochet Christmas Stocking....

With Christmas season approaching, way too quickly it seems, I had to crochet up a stocking. I couldn’t find a free pattern I liked so I decided to design my own.  

I absolutely love the Herringbone half double crochet stitch. I think the texture it creates it’s just gorgeous.  

So, to make:
1. The stocking itself was done in the HHDC stitch in red.
2. At the top, I completed 5 rounds of Bobble Stitches in white.  
3. I made the loop by making a chain and then using single crochet stitch, then attached it.  

I used Red Heart Super Saver #4 worsted weight acrylic yarn in Cherry Red and White and a 6.0mm hook.  

If you would like more info, please just comment or email me.

Christmas Stocking


Happy Crocheting...

Crochet Frozen Elsa Apron...Elsa-Inspired Costume...

Elsa Apron


Apron Pattern 2T - 3T:

1.  Materials:  #4 Worsted Weight yarn.  I used "I Love This Yarn" in turquoise from Hobby Lobby; small amount of white yarn.  5mm hook.  Tapestry needle.  Tulle and elastic sequined strip in turquoise -- both from Hobby Lobby.  I used less than one roll of tulle (see pic below for the tulle I used) and a 10 1/2" sequined strip...

Special Note:  I used the Herringbone Half-double crochet (HHDC) stitch however if you're more comfortable with just using the half-double crochet (HDC) stitch then that's fine...

There's a great tutorial for the Herringbone Half-double crochet stitch at:  newstitchaday.com.

2.  Abbreviations:
Sc = single crochet
HDC = half-double crochet
HHDC = Herringbone Half-double crochet
Sl st = slip stitch
Ch = chain
HHDC2tog = Herringbone Half-double crochet 2 together
HHDC3tog = Herringbone Half-double crochet 3 together
SC2tog = single crochet 2 together
WS = wrong side
FLO = front loops only
BLO = back loops only

3.  Pattern:
(worked from bottom up)
--Row 1.  I worked 40 foundation half-double crochet stitches to start; or you can chain 41, and starting in 2nd chain from hook then across work HDC into each chain.  Ch 1.  Turn. (40)

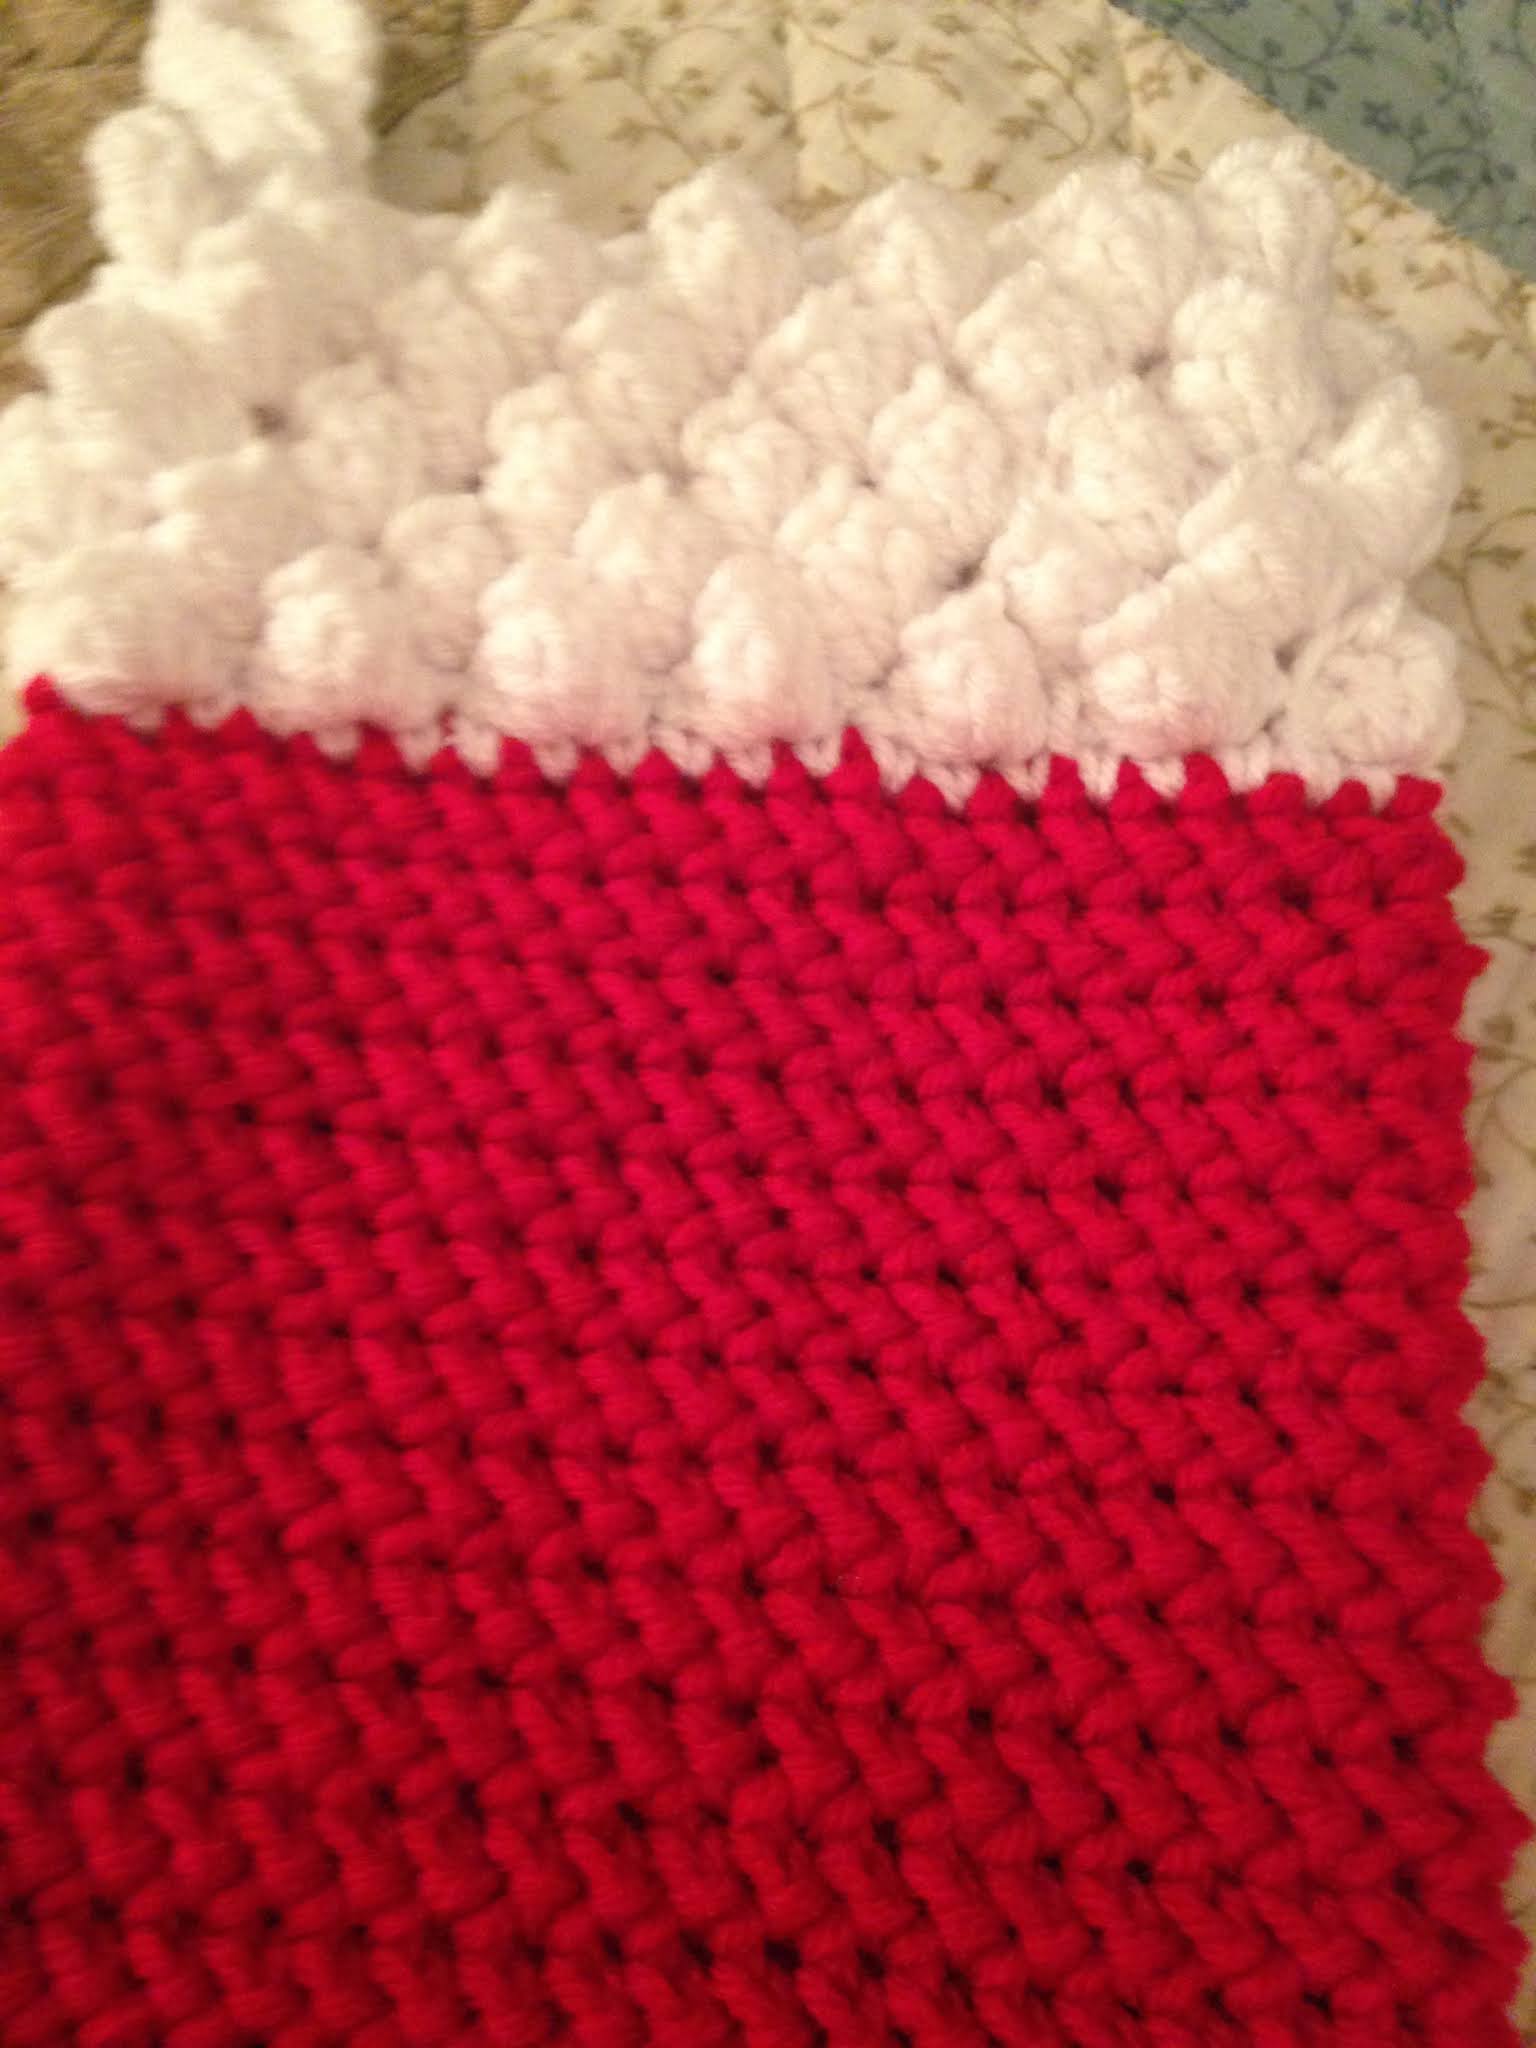
--Row 2-28:  Work 1 HHDC into each stitch across.  Ch 1. Turn.  (40)

--Row 29:  Working on wrong side (WS) in front loops only (FLO), HHDC2tog in first two stitches and the last two stitches and 1 HHDC in remaining stitches.  Ch 1.  Turn.  (38)

--Row 30-34: these are decrease rows;  HHDC2tog in first two stitches and the last two stitches and 1 HHDC in remaining stitches.  Ch 1.  Turn.  (36; 34; 32; 30; 28)

--Row 35-44:  1 HHDC in each stitch across.  Ch 1. Turn.  (28)

--Row 45-47:  1 HHDC in each of the first 8 stitches, 1 single crochet in each of the next 5 stitches, 1 slip stitch in each of the next 2 stitches, 1 single crochet in each of the next 5 stitches and 1 HHDC in each of the last 8 stitches.  Ch 1. Turn.  (28)

--Row 48:  1 HHDC in first 6 stitches, HHDC2tog, sc2tog, sc, sc2tog, sl st in next 2 stitches, sc2tog, sc, sc2tog, HHDC2tog and 1 HHDC in last 6 stitches. Ch 1.  Turn.  (22)

--Row 49:  1 HHDC in first 4 stitches, HHDC2tog, sc2tog 2 times, sl st in next 2 stitches, sc2tog 2 times, HHDC2tog and 1 HHDC in last 4 stitches.  Switch to white yarn.  Ch 1.  Turn.  (16)

--Row 50:  With white yarn, working in the back loops only (BLO), 1 HHDC in the first 6 stitches, 1 TC in the next 4 stitches, 1 HHDC in the last 6 stitches. Ch 1.  Turn.  (16)

--Row 51:  2 HHDC in the first stitch, 1 HHDC in the next 14 stitches and 2 HHDC in the last stitch. Ch 1.  Turn.  (18)

--Row 52:  repeat Row 51.  Ch 1.  Turn.

--Row 53:  1 HHDC in the first 2 stitches only.  Ch 1.  Turn.  (2)

--Row 54-78:  1 HHDC in each stitch.  Ch 1. Turn.  (2)
***this is making the strap to go around the neck so adjust number of rows accordingly to fit around your child's neck comfortably***. At the end of Row 78, leave a tail long enough to attach the neck strap to the other side of the front top.  Weave ends.

--
To make the side straps:
Row 1:  join the white yarn on the end stitch of Row 30.  Ch 1.  1 HHDC in the same stitch as the ch 1 stitch.  1 HHDC in the next 2 end stitches from Row 31 and 32.  Ch 1. Turn.  (3)

Row 2:  1 HHDC in each stitch across.  Ch 1. Turn.  (3)

Row 3-12:  repeat row 2.  (At the end of Row 12, do not ch 1.)

Row 13:  HHDC3tog.  Ch 50.  SC in 2nd chain from hook and remaining chains.  Sl st to join and fasten off.  Repeat on opposite side. 

Tulle:
1.  I cut each tulle strip approx 19" long.  I used my crochet hook and inserted it into each stitch of the front loops of Row 29.  I held the mid-section of each tulle strip and pulled it through the stitch and made a knot.  I repeated across the apron. 


Sequined Elastic Strip:
I used a 10 1/2" long strip.  I laid the bottom edge across Row 29, and used a pointed tapestry needle and matching craft thread to attach to the apron. 

Snowflake:

I made the snowflake appliqué with SC stitches in the magic ring and then just HDC stitches, chains and picots.  There's tons of free snowflake patterns on the internet so just find one that you like or create your own. 


Happy Crocheting…

Legal:
—don’t share my pattern but provide a link to my blog
—don’t claim my pictures as your own 
—it’s okay to make and sale this; just credit me as the designer