Tuesday, May 30, 2017

"Sunny" Sunglass Case...

Whipped up this cute sunglass case this evening, using cotton yarn.  I think the little sun appliqué is adorable.  Free pattern below....


Sunglass Case Pattern

Difficulty Level:  Easy

Materials:  
--4mm and 2mm hook
-- #4 cotton yarn in red, white, blue and yellow (I used, I Love This Cotton, from Hobby Lobby)

--small button
--tapestry needle for weaving
--sewing needle with coordinating thread to sew button

Abbreviations:
Ch: chain
Sl st: slip stitch
St: stitch(es)
Sc: single crochet
Dc: double crochet
SC2tog: single crochet 2 stitches together 
FO: fasten off
MR: magic ring

Special Stitch:  Picot - for my picots, ch5 and slip stitch into first chain

Directions:
1. With red yarn and 4mm hook, ch6.  1Sc in 2nd ch from hook and into the next 3 ch.  3sc in the next ch.  Rotate and work around the base.  1sc in the next 3 ch, 2sc in the last ch.  Sl st to first st and Ch1.  (12)
2.  Sc in same st as Ch1 and into the next 4 st, 3sc in the next st, 1Sc in each of the next 5 st, 2sc in last.  Sl st to join to first st and Ch1.  (15)
3.  Sc in same st as Ch1 and into the next 5, 3sc in the next st, 1Sc in each of the next 7 st, and 2sc in the last.  Sl st to join to first st and Ch1.  (18)
4.  Sc in same st as Ch1 and into the next 6, 3sc in the next st, 1Sc in each of the next 9 st, and 2sc in the last.  Sl st to join to first st and Ch1.  (21)
5.  Sc in same st as Ch1 and into the next 7, 3sc in the next st, 1Sc in each of the next 11 st, and 2sc in the last.  Sl st to join to first st and Ch1.  (24)
6-10. 1Sc in each st around.  Sl st to join to first st and Ch1.  (24)
*On the last st, of Round 10, join white yarn and FO red yarn.*
11-20.  With white yarn, continue with 1Sc in each st around.  Sl st to join to first st and Ch1.  (24)
*On the last st, of Round 20, join blue yarn and FO white yarn.*
21-27.  With blue yarn, continue with 1Sc in each st around.  Sl st to join to first st and Ch1.  At the end of Round 27, FO and weave ends.  (24)

Closure Flap:
1.  Join white yarn in any st of Round 27 and Ch1.  1Sc into same st as ch1.  Sc into the next 11 st.  Ch1 and turn.  (12)
2-4.  Sc across.  Ch1 and turn.  (12)
5.  SC2tog, sc in the next 8 st, SC2tog.  Ch1 and turn.  (10)
6.  SC2tog, sc in the next 6 st, SC2tog.  Ch1 and turn.  (8)
7.  SC2tog.  Repeat 3 more times.  Ch1 and turn.  (4)
8.  Sl st in first st.  Sl st into next st, and into this same st, (ch3, 2dc, picot).  Into the next st, 3dc.  Sl st into last st.  FO.  Weave ends.

Assembly:  fold flap down to pin where your button will go.  The buttonhole was made between the two sets of Dc stitches.

Sunny Appliqué
1.  With 2mm hook and yellow (buttercup) yarn, work 6 sc into a MR.  Sl st to join to first st and Ch1.  (6)
2.  2sc in each st around.  Sl st to join to first st.  (12)
3.  You will be making the first picot into the first st. *ch5 and Sl st into first ch (picot made), Sl st into the next 2 st* repeat from * to * until 6 picots are made.  FO. Leave a long tail for attaching.

I used blue cotton for the eyes and red cotton for the mouth.


Happy Crocheting!!!!

Legal:
--don't claim my pattern as your own
--don't use my pics without express permission
--don't copy/post my pattern to any social media site
--provide a link to my blog
--make and sale your finished product (s)

Monday, May 29, 2017

Starburst Poncho...FREE PATTERN

I finished my Poncho today.  I initially started working on it on my trip to Oklahoma.  I'm happy with the end result.  I love the blend of colors,.  This is a size large.  So check out my pics...

Starburst Poncho


Starburst Poncho Pattern

This Poncho came about while en route to Oklahoma.  I was playing around with the Mandala yarn.  So, I made this in one piece.  I used the C2C (corner-2-corner) method of making a blanket...with just a few tweaks.  Anyway, I ended completing this (front and back) as one piece.  

This pattern hasn't been tested and was just an idea I had to help pass along my 18 hour ride (one way) to see my aunt and uncle.  And, I didn't write the pattern as I worked it.  But, I'm going to tell you exactly how I did it.  I plan to make another one before fall and will tweak this, if needed then.  

Size:  This will fit a Small to Large.  I'm currently a large (but trying to lose weight...lol)!!!  Of course, as you make this, you may need more or less increase rows to get the fit and length that you desire but the principle of the pattern you will see is the same.  

Now, here is a pic of me that I had my grandson snap just now with the Poncho on while I'm typing up this pattern for you all.  So, please ignore my state of disarray...lol.

Materials:
--6mm hook
--2 Lionbrand Mandala yarns (each cake is 590 yards) 
--#4 worsted weight yarn in a solid color (color is optional)
--tapestry needle for weaving

Abbreviations:
Ch:  chain
Sl st: slip stitch
St: stitch(es)
Sc: single crochet
HDC: Half Double crochet
FO:  fasten off 

C2C (Corner-2-Corner):  I used HDC stitches and chain 5.  If you are not familiar with the C2C process, then you will need to get acquainted with it to make this.  There are some great tutorials on the internet - written instructions, audio and diagrams.  My personal favorite, from which where I learned it from, was with Mikey at The Crochet Crowd.  I had watched and read several procedures from others, but he made it so simple for me to grasp and understand.  So, check out his site.  He has lots of great tutorials and patterns.  

Picot Stitch (chain 3, Sl st into first ch):  I used this as the border for the arms.  

Directions:
Increase rows:
1-41.  First, I made 41 increase rows using C2C with chain5 and HDC stitches - just as if I was making a blanket.  
Neck region and opening: 
42-43:  In these rows, I only did HDC st in each st across.  Now, each cluster made in the previous rows are 3 HDC stitches and I made 41 rows.  So, 3 x 41 = 123.  Therefore, Rows 42-43, will have 123 HDC stitches per row.  At the end of each row, make a Ch1 for turning.  
44.  This row is where I made my neck opening.  Feel free to adjust this according to what you want. But, I worked 1 HDC stitch in the first 45 stitches, then make a ch33 and skip 33 stitches, and then 1 HDC stitch in each of the last 45 stitches.  
45.  1 HDC stitch in each stitch across with 33 HDC stitches into the chain space made in previous row.
46.  1 HDC stitch in each st across.  
Decrease rows:
47. Now,  for the decrease rows.  To go back to doing C2C process, Sl st into the first 5 HDC st.  Into the next st, *ch2 and 3 HDC stitches, then skip 2 stitches,* repeat this across.  You will make 40 clusters of HDC stitches.  This is your first decrease row to put you back on track.  
48-87.  Continue to decrease one cluster each row.  At the end of Row 87, FO and weave ends.  

Neck:  
1.  I joined a solid-colored yarn for this.  Sc evenly around the neck opening.  
2-8.  Sc around.  FO.  Weave ends.  
Again, if you want a bigger collar for yours, then add more rows.  

Arms:
To make arms, I had right side of front and back facing each other and whipstitched across each end of Row 30.  Now, if you want to adjust where you want your arms, then that's fine, too.  

Border for arms:
1.  With right sides turned back out, I joined solid yarn into any stitch and Ch1.  Sc in same st as Ch1 and evenly around.  
2.  For this round, I started with a picot, then sc into each of the next 3 stitches, then picot in next stitch.  Repeat this around.  Mine worked out perfect on this, but if you have to adjust somewhat to make it work, then that's fine, too.  

Repeat on other side.  

Border for remainder of Poncho:
I made 2 rounds of sc stitches around entire lower portion of garment.  Join yarn under arm and just work completely around 2 times.  FO and weave ends.  

Fringe (optional):
I made a fringe for each sc st.  I've seen some garments with the fringe spaced out, but, I just cut 5-6" long strips of yarn (I eyeballed measured) and used my hook to pull yarn through each stitch and then tied a knot.  

And, that's it!!!!  I would love to hear your thoughts on this pattern or see your pics if you decide to give it a try....

Happy Crocheting!!!!

Legal:
--don't claim pattern as your own
--make and sale whatever you want from my patterns
--don't use my pics
--link back to my blog as credit for pattern design 


Sunday, May 28, 2017

Cool Midnight Handbag

I love looking at FREE patterns on allfreecrochet.com they have lots and lots of great patterns for the beginner to the advanced (so check their site out; a few of my patterns are on their site)!!!  Browsing their site, I've been seeing a lot of summer shawl patterns in the aqua, turquoise, teal shades -- so I got to initially thinking about designing a summer Tote bag.  So, to Hobby Lobby I go...lol.  Well, I find this Aqua Black in "I Love This Yarn" and just loved it.  I spent a day thinking about the yarn and finally decided on designing a handbag and I'm so pleased with the outcome.  I think it turned out so pretty.  And, I wanted to share my FREE pattern, for my "Cool Midnight" Handbag.


Cool Midnight Handbag FREE Pattern 

Materials: 
--6mm hook
--1 full skein and a small amount from a second skein for the flap and for attaching the straps in Aqua Black by I Love This Yarn (if you don't want to buy the second skein you can use a solid color that will go with it) 
--(1) 1 and 1/2" decorative button 
--Microfiber Flat Double Handles (black); you can use whatever handles you want or you can make them; I had these handles on hand and used them 
--1 fat quarter of fabric for liner (this is optional); I had a fat quarter on hand with dogs and decided to use it 
--tapestry needle for weaving
--sewing needle or machine for making liner, if making it 
--coordinating thread for liner, if making it 

Skill Level:  Easy 

Abbreviations: 
Ch: chain
Sl st: slip stitch
St: stitch(es)
SC: single crochet
DC: double crochet
SC2tog: single crochet 2 stitches together 
SC4tog: single crochet 4 stitches together 
FO: fasten off

Special note:  this Handbag is worked double-stranded; I held the beginning and ending strands together to make this and I used the whole skein on the bag itself.  It would've probably been simpler to hold the strands together using 2 skeins of yarn but one of my very active grandsons was here today so I just worked with the one skein... 

Directions:  
Handbag: 
1.  Holding 2 strands of yarn together, now and throughout the pattern, ch21.  SC in 2nd ch from hook and into the next 18 ch.  Into the last ch, you will do 3 SC.  Now, rotate and work on the opposite side of the base ch.  1 SC in each of the next 18 ch and then 2 SC in the last ch.  Sl st to join to first st and Ch1.  (42)
2.  2 SC in first st, 1 SC in the next 19 st, 3 SC in the next st, 1 SC in the next 20 st and 2 SC in the last st.  Sl st to join and Ch1.  (46) 
3.  2 SC in first st, 1 SC in the next 21 st, 3 SC in the next st, 1 SC in the next 22 st and 2 SC in the last st.  Sl st to join and Ch1.  (50) 
4.   2 SC in first st, 1 SC in the next 23 st, 3 SC in the next st, 1 SC in the next 24 st and 2 SC in the last st.  Sl st to join and Ch1.  (54)  
5.  1 SC in each st around.  Sl st to join and Ch1.  (54)
6-20.  *1 SC and 1 DC in first st, skip next st,* repeat around.  (27 SC & 27 DC) 
At the end of Round 20, FO and weave ends.  

Straps:
I attached my straps 2" in on each side.  I used my tapestry needle to whipstitch together.  

Closure Flap:
1.  I rejoined yarn on Round 20 between the straps on the backside of the handbag.  I had 12 st between my straps, so I skipped the first st and joined yarn with a sl st into the next st and Ch1.  1 SC in same st as Ch1 and into next 9 st.  Ch1 and turn. (10) 
2-4.  1 SC in each st across.  Ch1 and turn.  (10)
5.  SC2tog, 1 SC in next 6 st, SC2tog.  Ch1 and turn.  (8) 
6.  SC2tog, 1 SC in next 4 st, SC2tog.  Ch1 and turn.  (6) 
7.  SC2tog, 1 SC in next 2 st, SC2tog.  Ch1 and turn.  (4) 
8-9.  1 SC in each st across.  Ch1 and turn.  (4)
10.  1 SC in first st, ch3, skip 2 st and 1 SC in last st.  Ch1 and turn.  (2 SC, ch3)
11.  1 SC in first st, 2 SC into ch3 space and 1 SC in last st.  Ch1 and turn.  (4)
12.  1 SC in each st across.  Ch1 and turn.  (4)
13.  SC4tog.  Ch1 and FO.  Weave ends.  

Fold flap over to the front side so you can position button to attach.  

This handbag measures approximately 10 1/2" wide x 8 1/2" long.  

To make liner:
I cut my fabric the size of the handbag plus a 1/4" - 1/2" extra on each side.  Place right sides together and sew, leaving the opening at the top.  I turned up each bottom end, like a triangle and sewed across to give the bottom curve.  I turned down the top edges about 1/2" to give a clean edge.  Place inside purse and whipstitch around top edge to handbag.  This way the right side is showing when you open your handbag.  

That's it!!!!

Happy Crocheting!!!!

Legal:
--don't claim pattern as your own
--don't use my pics
--okay to make and sale your finished product
--link back to my blog to credit me as the designer; do not post my pattern to any social media sites but provide a link to my blog 


Chunky Basketweave Messy Bun Hat

Happy Sunday!!!  Hope everyone has had a blessed day.  Well, after church this morning, I've spent the day working on a couple projects.  I will share each pattern in separate posts.

First completion was my "Chunky Basketweave Messy Bun Hat" in black.


Chunky Basketweave Messy Bun Hat Pattern

Materials:
--8mm hook
--1 skein of Bernat Softee Chunky (black)
--#4 worsted weight yarn, double-stranded in contrasting color (I used Vanna's Choice in Charcoal Print) 
--ponytail holder 
--tapestry needle for weaving

Skill Level:  Intermediate 

Size:  Average Woman's Head (20-22" Circumference); for a tween/teen size that's a little smaller, stop increase row at 40 HDC and on the post stitches you will complete a repeat of 4, instead of 5.

Abbreviations:
MR: magic ring 
Ch: chain
Sl st: slip stitch
St: stitch(es)
SC: single crochet 
HDC: half double crochet
FPHDC: front post half double crochet
BPHDC: back post half double crochet
FO: fasten off

Directions:
1.  Join yarn with sl st to ponytail holder and Ch1.  20 HDC into ponytail holder.  Sl st to first st and Ch1.  (20) 
2.  2 HDC in first st, 1 HDC in next st.  Repeat around.  Sl st to join and Ch1.  (30)
3.  2 HDC in first st, 1 HDC in next 2 st.  Repeat around.  Sl st to join and Ch1.  (40)
4.  2 HDC in first st, 1 HDC in next 3 st.  Repeat around.  Sl st to join and Ch1.  (50)
5.  1 HDC in each st around.  Sl st to join and Ch1.  (50)
6.  *FPHDC around the posts of the first 5 stitches, BPHDC around the posts of the next 5 stitches,* repeat this pattern around.  Sl st to join and Ch1.  (25 FPHDC & 25 BPHDC) 
7-10.  Repeat #6.  
11.  1 sc in each st around. Sl st to join and FO.  (50)
12.  Holding 2 strands of worsted weight yarn together, join in any st and Ch1.  SC in same st and each st around.  Sl st to join and Ch1.  (50)
13.  Repeat #12.
14.  Sl st in each st around.  Sl st to join and FO.  Weave ends.  

Happy Crocheting!!!!

Legal:
--don't claim my pattern as your own
--don't use my pics
--okay to make and sale your finished products 
--link back to my blog as credit for pattern design 


Thursday, May 25, 2017

Crochet Nautical/4th of July Appliqués

Well, I'm back home from Oklahoma -- finally settled back into my "home" routine and caught up on much-needed sleep.  Last week flew by way too quickly.  I'm so thankful to have visited with my aunt and uncle and cousins.  I love spending time with family.

Anyway, I'm getting caught up on some projects/ideas that's been brewing in my head.  I keep a note pad near me to jot notes as an idea emerges to life...lol.  Anyone else do that?

Here is a project I completed today and wanted to share.  I found this 10x10 distressed white burlap frame at Wal-Mart and it just called for something summery.  And, beside the frame was this really cool anchor template that was perfect to go with it.  How cute is this for a nautical-themed nursery or for your 4th of July decor?  I think I may be going through a red, white and blue phase, too, since my last several completed projects have been nautical-inspired...lol.  Oh, well, that's okay, I guess!!!  Whatever inspires, create is my motto.  So, check out pics and FREE patterns below.

Nautical-Themed Appliqués Patterns

Difficulty Level:  Easy

Materials Needed:
--3mm hook
--red, white, blue and yellow cotton yarn (I used "I Love This Cotton" from Hobby Lobby)
--tiny button for sun's eye
-10x10 burlap frame
--anchor template 
--craft glue
--tapestry needle for weaving

Abbreviations:
Ch: chain
SC: single crochet
HDC:  half double crochet
Sl st: slip stitch
St:  stitch(es)
FO: fasten off
MR: magic ring 
RS:  right side 
SC2tog: single crochet 2 stitches together 
SC3tog:  single crochet 3 stitches together
HDC2tog: half double crochet 2 stitches together 
HDC3tog:  half double crochet 3 stitches together 

Special Stitch:
Picot Stitch - chain 4 and slip stitch into first chain

Directions:
Sailboat: 
1.  With red yarn, ch16.  SC in 2 ch from hook and across.  Ch1 and turn.  (15)
2.  2sc in first ch, 1 sc in next 13 st and 2sc in last st.  Ch1 and turn.  (17)
3.  2sc in first ch, 1 sc in next 15 st and 2sc in last st.  Ch1 and turn.  (19)
4.  2sc in first ch, 1 sc in next 17 st and 2sc in last st.  Ch1 and turn.  (21)
5-8.  1Sc in each st across.  Ch1 and turn.  (21)
9.  Sc evenly down the side, across the bottom and up the other side.  FO.  
10.  With RS facing you, skip 2 stitches and join white yarn in the 3 stitch with a sl st and Ch1.  Into the same st, 1Sc.  1 sc in the next 16 st.  Leave the last 2 st unworked.  Ch1 and turn.  (17)
11.  1Sc in each st across.  Ch1 and turn.  (17)
12.  SC2tog, 1Sc in the next 13 st and SC2tog.  Ch1 and turn.  (15)
13.  1Sc in each st across.  Ch1 and turn.  (15)
14.  SC2tog, 1Sc in the next 11 st and SC2tog.  Ch1 and turn.  (13)
15.  1Sc in each st across.  Ch1 and turn.  (13) 
16.  SC2tog, 1Sc in the next 9 st and SC2tog.  Ch1 and turn.  (11)
17.  1Sc in each st across.  Ch1 and turn.  (11)
18.  SC2tog, 1Sc in the next 7 st and SC2tog.  Ch1 and turn.  (9)
19.  1Sc in each st across.  Ch1 and turn.  (9)
20.  SC2tog, 1Sc in the next 5 st and SC2tog.  Ch1 and turn.  (7)
21.  1Sc in each st across.  Ch1 and turn.  (7) 
22.  SC2tog, 1Sc in the next 3 st and SC2tog.  Ch1 and turn.  (5)
23.  1Sc in each st across.  Ch1 and turn.  (5) 
24.  SC2tog, 1Sc in the next st and SC2tog.  Ch1 and turn.  (3)
25.  1Sc in each st across.  Ch1 and turn.  (3) 
26.  SC3tog.  Ch1 and turn.  (1)
27.  1Sc.  Ch1.  
28.  Work 1Sc evenly down the side.  FO.  Join yarn on opposite side and repeat.  FO and weave ends.  

With blue yarn, ch18 and FO, leaving a long tail.  Place center, vertical and weave tail to attach to the sail part.  

Flag:
1.  With blue yarn, ch6.  1HDC in 2nd ch from hook and across.  Ch1 and turn.  (5)
2.  HDC2tog, 1 HDC in next st and HDC2tog.  Ch1 and turn.  (3) 
3.  HDC3tog.  Ch1 and FO.  Leave a tail to attach to top portion of sail.  (see pic) 

With blue yarn, 6sc into MR.  Sl st to join and FO.  Leave tail to attach.  Make 3 and attach to red portion of boat.  (See pic)

I centered and attached to frame with craft glue.  

Half-Sun:
1.  With yellow yarn, 8 HDC into MR.  Pull to tighten, but don't join.  Ch1 and turn.  (8) 
2.  2 HDC in first st, 1 HDC in next st.  Repeat across.  Ch1 and turn.  (12)
3.  2 HDC in first st, 1 HDC in next 2 st.  Repeat across.  Turn.  Don't Ch1.  (16)
4.  Sl st in the first 4 st, then make a picot by making a ch 4 and Sl st into first ch.  Repeat 2 more times across.  Sl st in each of the last 4 st.  Then, 1Sc in each st across the bottom to level it out.  FO and weave ends.  

I used a very small button and used craft glue to attach for one eye.  For the mouth, I used red yarn and ch4.  Sc in 2nd ch and remaining 2 ch.  I then glued it to the sun.  (See pic on where I placed it in the frame.

Sea Gull:
1.  With white yarn, ch15.  Sc in 2nd ch from hook and next 5 ch.  3sc in next ch.  and 1Sc in each of the remaining 7ch.  FO.  Weave ends.  I shaped and glued to the frame.  (See pic) 

Anchor:  
First, I used blue yarn and wrapped around the anchor template.  I used craft glue to attach.  This was a little time consuming.  

Stars:
I made 2 white and 2 red and glued to the anchor.  I used my pattern from my Messy Bun/Sun Hat.  Only difference is that I used a 3mm hook.  The white stars were made using HDC stitches and the red stars with SC stitches.  Here's the link:  

Happy Crocheting....

Legal:  
--don't use my pics as your own
--you may sale what you make
--don't claim pattern as your own
--credit me as designer and link to my blog 


Wednesday, May 24, 2017

Patriotic Cozy....

The 3R's are a little different today than what it stood for in my school days.  It's - Recycle, Reuse, Repurpose!!!!  So, I set out to rid myself of one of the many large infant powder milk baby containers from storage into something usable and functional.  Multiple ususes.

Patriotic Cozy...


Patriotic Cozy Pattern
Skill Level:  Easy

Materials:
-- 5mm hook
-- tapestry needle for weaving
-- small amount of elastic 1/4" in width
-- red, white and blue cotton yarn (I used Hobby Lobby's, I Love This Cotton)
-- large, empty powder milk baby can (like Enfamil) 

Abbreviations:
-- MR:  magic ring
-- ch: chain
-- Sl st: slip stitch
-- st: stitch(es)
-- HDC:  half double crochet
-- sc: single crochet
-- BLO:  back loops only
-- FO:  fasten off

Directions:
1.  With red yarn, 10 HDC into MR.  Sl st to first st and Ch1.  (10)
2.  2 HDC in each st around.  Sl st to first st and Ch1.  (20)
3.  *2 HDC in first st, 1 HDC in next,* repeat around.  Sl st to first st and Ch1.  (30)
4.  *2 HDC in first st, 1 HDC in the next 2 st,* repeat around.  Sl st to first st and Ch1.  (40)
5.  *2 HDC in first st, 1 HDC in the next 3 st,* repeat around.  Sl st to first st and Ch1.  (50)
6.  1 HDC in each st around.  Sl st to first st and Ch1.  (50)
7.  1 HDC in the BLO of each st around.  Sl st to first st and Ch1. (50)
8.  *1 HDC and 1 sc in first st, skip next st,* repeat around. Sl st to first st and Ch1. (50)
9-11.  Repeat #8. At the end of Round 11, switch to white yarn.  (50)
12-15.  With white yarn, repeat #8. At the end of Round 15, switch to blue yarn.  (50)
16-20.  With blue yarn, repeat #8. At the end of Round 20, FO, leaving a long tail.

Stars:
I used white yarn and tapestry needle, to make small and large star-like appliqués.  I placed each star in the blue section.  I just simply made  x's sporadically around.

Elastic Band:
I measured around the container and cut the elastic.  I used the tapestry needle to weave in and out by attaching the last row to row 19.  As I weaved, I worked my elastic into it.  Once around, I joined the flat ends together, pulled and sewed the elastic ends together.  Then closed up what was left.

That's it!!!
Happy Crocheting!!!

Legal:
--don't claim pic or pattern as your own
--don't use my pics
-- you may make and sell any finished product
--link back to my blog

Saturday, May 20, 2017

Good Samaritan -- Still Lives On...

I wanted to share the following letter I submitted to the "Lawton Constitution" - the local paper in Lawton, OK.  What a week I've had thus far!!!!  I've worked on several projects and will share once I arrive back in North Carolina.  So, check this out:

"I want to give an amazing, kind and a beyond and above shout out to a resident of your great city of Lawton, Oklahoma.  I arrived in town earlier in the week with 6 other family members from North Carolina just so we could see our family member, Skyler Miller, graduate from Eisenhower High School.  Well, I feel really compelled to share my Good Samaritan, my God-sent angel story.  I was shopping in Hobby Lobby with my aunt, 2 cousins and grandson.  Somehow, my black and white cosmetic bag fell out of my purse unbeknownst to anyone in my group.  I get up to the checkout line and I whisper to my aunt that I don't have my cash or my Mother's Day gift from my son (a Hobby Lobby gift card).  My aunt paid for the purchases and we come home to look for my bag with no luck.  Thankfully, a different cousin, called Hobby Lobby and asked if a black and white bag was turned in.  The security guard, said, "yes, m'am, and you can pick it up after 9 am the following morning since the store was closed."  I admit, I was worried that it was lost.  But, we prayed for God's will to be done.

The following morning, I can say with a sigh of relief my bag was returned -- with the $550.00 cash, and a $50.00 Hobby Lobby gift card.  I had no ID whatsoever inside my cute Penelope Ann bag.  How easy  it would've been for someone to have picked up and claimed as their own?!

I'm awed and amazed that in this day and time, there is a true, honest hero living and walking the shops of Lawton and that person deserves praise, gratitude and acknowledgement.  But, sadly, I have no idea who the person was but I'm forever and eternally grateful for your honesty.  My husband pastor's a small country church in North Carolina and we want to give all praise and a shout out to this truly special person.  May God bless, touch, keep and use you as a stepping stone to bring others to salvation.  You blessed me immeasurably by your shear honesty.

My visit proves to me that Lawton is a wonderful city, full of honest, ethical and moral people.  Kudos to my God-sent angel.  You are forever a blessing in my life."

Rilla Edwards
Rilla2u.blogspot.com

Sunday, May 14, 2017

Nautical-Themed Baby Blanket

Ahoy!!!  How cute is this baby blanket for the little sailor?  I made this for a baby shower gift and I hope the mom-to-be will love it as much as I do...

Nautical-Themed Baby Blanket


Nautical-Themed Baby Blanket Pattern

Finished Size:  24" x 38"

Difficulty Level:  Beginner/Intermediate

Materials:
--4mm and 6mm hook
--#4 Worsted Weight Yarn (light blue, dark blue, red, white and yellow); I used Red Heart Supersaver
--tapestry needle for weaving

Abbreviations:
Ch: chain
Sl st:  slip stitch
St:  stitch(es)
Sk:  skip
MR:  magic ring
FO:  fasten off
SC:  single crochet
HDC:  half double crochet
HHDC:  Herringbone half double crochet
DC:  double crochet
TC:  triple crochet
FPDC:  front post double crochet
BPDC: back post double crochet
SC2tog:  single crochet 2 stitches together
SC3tog:  single crochet 3 stitches together
HDC2tog:  half double crochet 2 stitches together
HDC3tog:  half double crochet 3 stitches together
Picot Stitch:  chain 4 and slip stitch into first chain

Special Stitch:  
1.  HHDC - Here's my youTube link for a short video tutorial on how to make the Herringbone Half Double Crochet stitch.  The video is just over a minute long...so, check it out!!!  This stitch gives such a pretty texture to baby blankets.  Now, if so desired, you can forego the HHDC stitch and just do the HDC stitch.  Here's my link:  https://youtu.be/w-rfkegEEfI

2.  For the FPDC and BPDC, I haven't made a video.  But, here's a link to a website that has wonderful stitch tutorials:  Newstitchaday.com

Directions:
Blanket
(light blue, dark blue, red and white)
6mm hook
1.  With light blue, ch101.  HHDC into 2nd st and across.  Ch1 and turn.  (100)
2-52.  HHDC in each st across.  Ch1 and turn.  (100)

At the end of Row 52, FO light blue yarn and weave ends.  Join white yarn in any st and ch1.  

Border:
1.  In white yarn, SC in same st as the ch1.  SC around blanket, placing 3 SC in each corner.  Sl st to join and FO.
2.  Join red yarn into any st and ch1.  SC in same st as ch1 and around, placing 3 SC in each corner.  Sl st to join and ch1.
3.  SC around again in red, placing 3 SC in each corner.  Sl st to join and FO red yarn.
4.  Join dark blue yarn and ch1.  DC around the blanket, placing 3 DC in each corner.  Sl st to join and ch1.  
5.  DC around again, placing 3 DC in each corner.  Sl st to join and ch1.
6.  On the last row of the border, you will work FPDC and BPDC around the post stitches of the previous row.  Sl st to join and FO.  Weave ends.
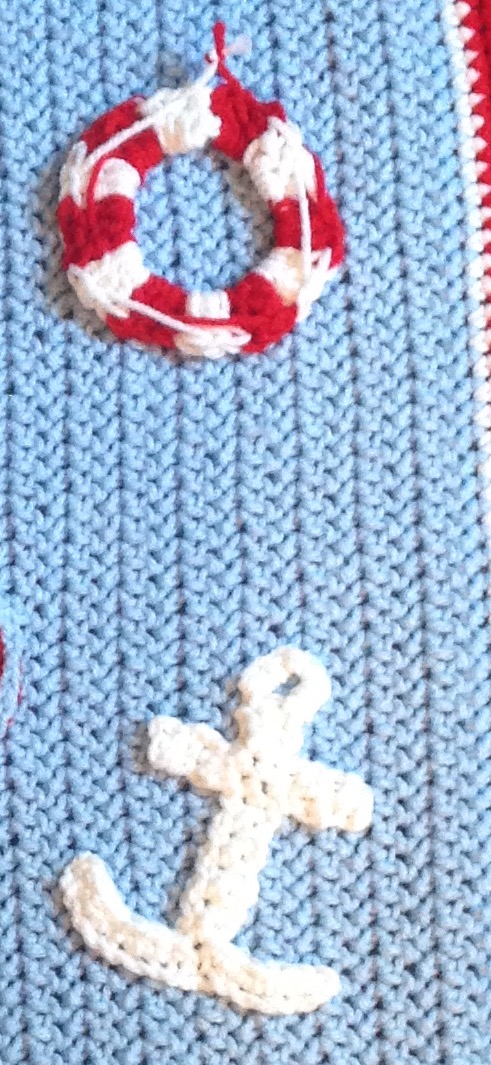
For the lettering, I didn't have enough time to design my own letters so I used the patterns from:  http://www.mooglyblog.com/the-moogly-crochet-alphabet/

Lifesaver:
(red and white yarn)
6mm hook
1.  With white yarn, ch24 and sl st to first ch to form a ring.  Ch1.
2.  Make 3 DC in white, 3 DC in red.  Continue with this until you have 6 sets of each color.  I just carried my yarn over.  FO each color.  Leave a long tail for attaching.  (as you can see in pics, I also weaved the red and white yarn around the lifesaver)
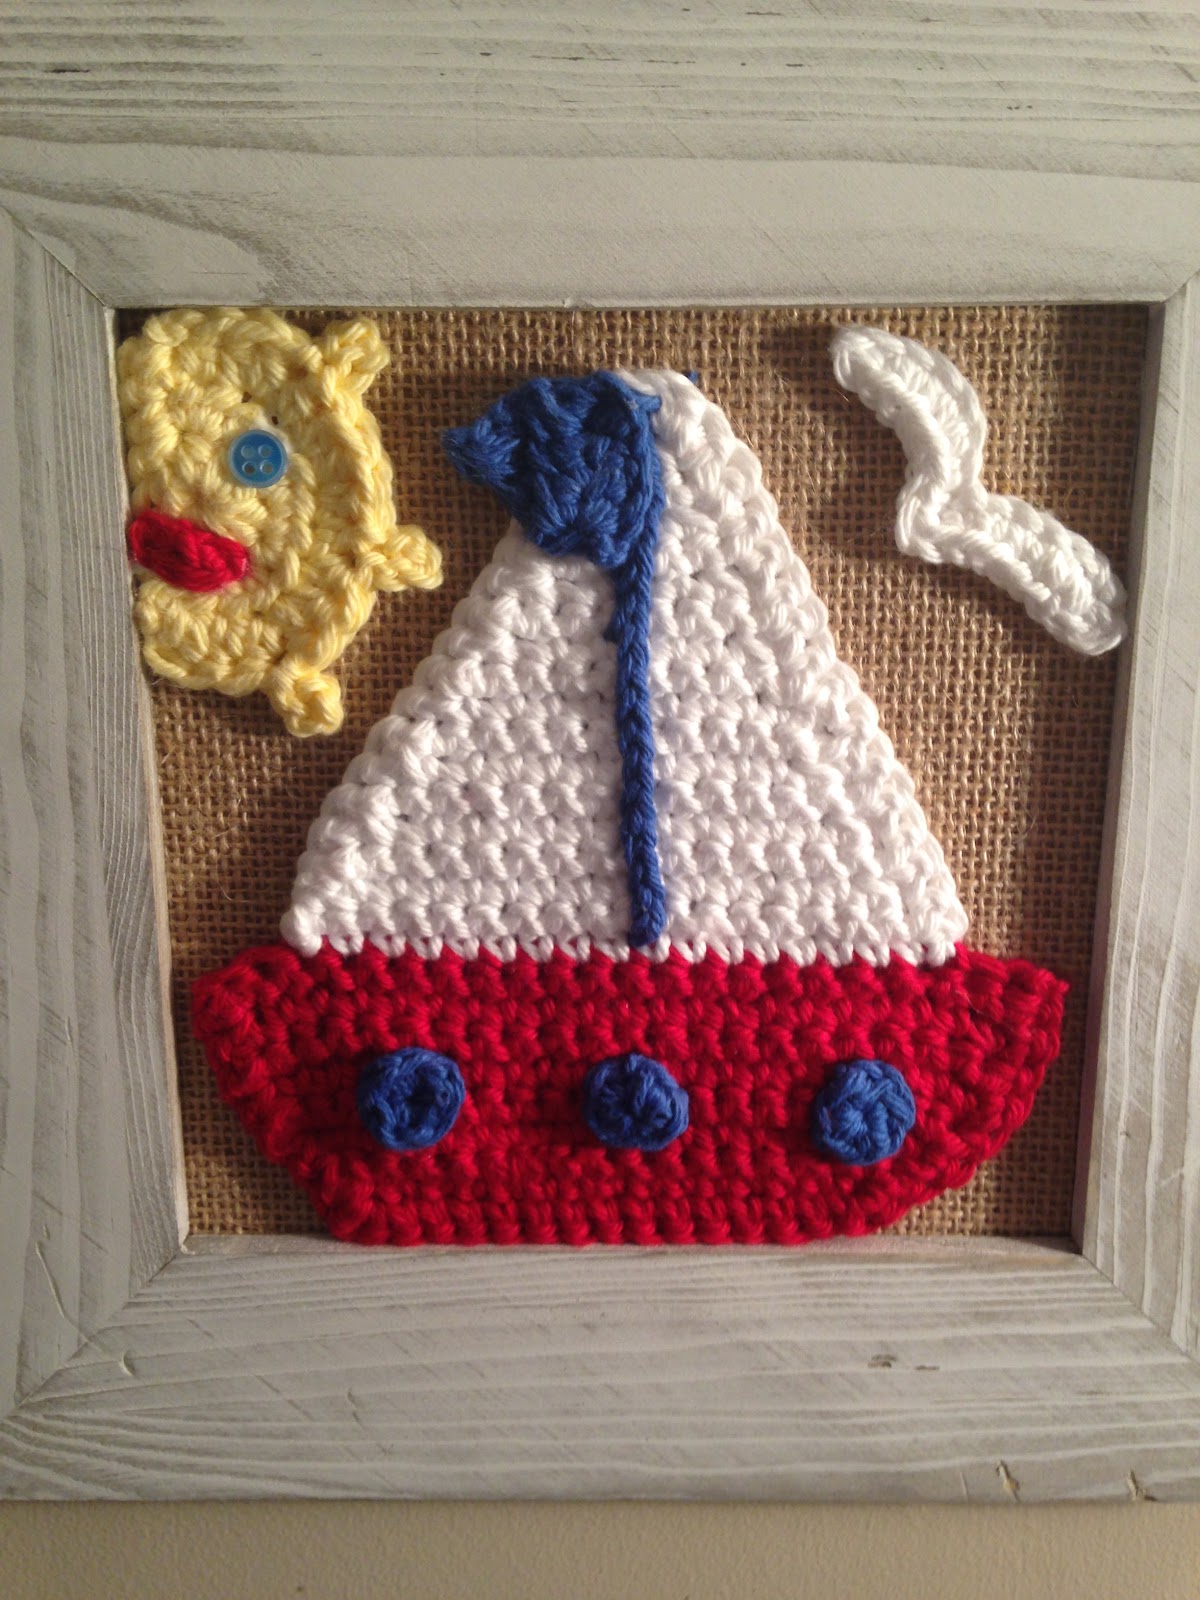
Sailboat:
(red, white, dark blue and light blue)
6mm hook
1.  With red, ch16.  SC in 2nd ch and across.  Ch1 and turn.  (15)
2.  2 SC in first st, SC in next 13 st, 2 SC in last.  Ch1 and turn.  (17)
3.  2 SC in first st, SC in next 15 st, 2 SC in last.  Ch1 and turn.  (19)
4.  2 SC in first st, SC in next 17 st, 2 SC in last.  Ch1 and turn.  (21)
5-8.  SC in each st across.  Ch1 and turn.  (21)
At the end of row 8, FO and weave ends.
9.  Skip first 2 st of last row, and join white yarn in 3rd st, ch1.  SC in same st and next 16 st.  Ch1 and turn.  (17)
10.  SC across.  Ch1 and turn.  (17)
11.  SC2tog, SC in next 13 st, SC2tog.  Ch1 and turn.  (15)
12.  SC across.  Ch1 and turn.  (15)
13.  SC2tog, SC in next 11 st, SC2tog.  Ch1 and turn.  (13)
14.  SC across.  Ch1 and turn.  (13)
15.  SC2tog, SC in next 9 st, SC2tog.  Ch1 and turn.  (11)
16.  SC across.  Ch1 and turn.  (11)
17.  SC2tog, SC in next 7 st, SC2tog.  Ch1 and turn.  (9)
18.  SC across.  Ch1 and turn.  (9)
19.  SC2tog, SC in next 5 st, SC2tog.  Ch1 and turn.  (7)
20.  SC across.  Ch1 and turn.  (7)
21.  SC2tog, SC in next 3 st, SC2tog.  Ch1 and turn.  (5)
22.  SC across.  Ch1 and turn.  (5)
23.  SC2tog, SC in next st, SC2tog.  Ch1 and turn.  (3)
24.  SC across.  Ch1 and turn.  (3)25.  SC3tog.  Ch1 and turn.  (1)
26.  SC.  Ch1 and turn.  Work SC evenly down the side.  FO.  Join yarn on opposite side and work SC evenly down the side.  Leave a tail long enough for attaching.
27.  In light blue, ch18.  FO.  Attach this to the center of the sail, vertically.
28.  In light blue, ch 60.  FO.  Attach this around the perimeter of the bottom portion of the boat.  (make sure, however, that your ch60 fits around your boat, depending if your stitches are tight or loose you may have to adjust by a few chains)

Flag:
(light blue)
6mm hook
1.  Ch6, HDC in 2nd ch and across.  Ch1 and turn.  (5)
2.  HDC2tog, HDC, HDC2tog.  Ch1 and turn.  (3)
3.  HDC3tog.  FO.  Leave a long enough tail for attaching.  (1)

Faux Porthole (make 3):
(white, light blue and dark blue)
4mm hook
1.  With each color, 6 SC into MR.  Sl st to join and FO, leaving a long enough tail for attaching.

Ship's Wheel:
(dark blue)
6mm hook
1.  14 SC into MR.  Sl st to join and ch1.  (14)
2.  Ch6 (this counts as the first TC and Ch3), *sk next st, TC next st and ch3,* repeat from * to * around.  Sl st to top of ch3.  (7 TC)
3.  Ch4 and sl st into 1st ch - first picot stitch is made, then 3 SC into the ch3 space.  *Sl st in top of TC, make a picot stitch, then 3 SC into the ch3 space.*  Repeat from * to * around.  Sl st to join and FO.  Leave a long enough tail to attach.

Anchor:
(white yarn)
6mm hook
1.  Ch18.  SC in 2nd ch from hook and into the next 6 chs.  SC2tog over the next 3 ch (skipping over the 2nd ch), SC in remaining chs.
2.  Turn, don't ch1.  Sl st into first st and next 6 st.  Into same st as last sl st, 1 SC.  1 SC in next st.  Ch1 and turn.
3-12.  SC across.  Ch1 and turn.  (2)
13.  Ch6.  Sl st into first ch to make a ring and ch1.
14.  6 SC into ring.  Sl st ring to Row 12.  FO, leaving a long enough tail to attach to blanket.

Crossbar for Anchor:
1.  Join white yarn with sl st and ch1 on the each side of the anchor at Row 9 and 10 and make 2 SC stitches.  Make 4 rows.  FO and repeat on other side.

Sun:
(Yellow and red yarn)
6mm hook
I did not create this pattern.  But, I used the pattern from the following link:
http://cre8tioncrochet.com/2014/04/you-are-my-sunshine/

And, that's it!!!!  If you like this baby blanket, but don't have time to make it just yet.  Well, then, just Pin now and make later...

Happy Crocheting!!!   
Legal:
--don't claim my pattern as your own
--don't use my pics
--okay to make, sale, and/or give away your finished projects
--credit me as the designer by providing a link to my blog; please do not distribute my pattern in electronic or written form


Friday, May 12, 2017

Messy Bun/Sun Hat...Red, White and Blue


Messy Bun/Sun Hat

How cute is this hat?  It's a Messy Bun/Ponytail Hat and a Sun Hat all wrapped up into one!!!  So, ponytail gals like myself can wear this all through the summer...you can wear it plain, add stars to celebrate the 4th of July or add an anchor for the nautical-themed, boat riding, fishing gal in you....OR, choose a pastel color for a softer look.  I just designed this hat so I haven't tried it out in other colors yet, but I'm sure it will be pretty in any color, plus provide shade from the glowing sun.

Messy Bun/Sun Hat Pattern

Gauge:  7 DC (double crochet) = 2"

Size:  Teen - Adult (19" - 22" head circumference); go down a hook size for a tween or up a size for a bigger Head Circumference

Materials:
--5.5mm hook
--#4 worsted weight yarn in red, white and blue (less than 200 yards combined colors)
--tapestry needle for weaving
--ponytail holder

Abbreviations:
Ch:  chain
Sl st: slip stitch
St: stitch
Sk: skip
SC: single crochet
HDC: half double crochet
DC: double crochet
FO: fasten off
MR: magic ring

Directions:
1.  With blue yarn, Sl st onto ponytail holder and complete 24 DC.  Sl st to join to first st and Ch1.  (24)
2.  2 DC in each st around.  Sl st to join to first st and Ch1.  (48) 
3.  *2 DC in first st, 1 DC in next 3 st,* repeat around.  Sl st to join to first st and Ch1.  (60)
4-6.  1 DC in each st around.  Sl st to join to first st and Ch1.  At the end of Round 6, FO and weave ends.
7.  Join red yarn in any st and Ch1.  1 SC in same st as Ch1 and around.  Sl st to join to first st and Ch1.  (60)
8.  *SC and HDC in the first st, sk next st,* repeat around.  Sl st to join to first st and Ch1.  FO and weave ends.  (30 SC & 30 HDC).  
9.  Join white yarn in any st and Ch1.  1 SC in same st as Ch1 and around.  Sl st to join to first st and Ch1.  (60)
10.  *SC and HDC in the first st, sk next st,* repeat around.  Sl st to join to first st and Ch1.  FO and weave ends.  (30 SC & 30 HDC). 
11-14.  Repeat steps 7 through 10.  (60)
15-16.  Repeat steps 7-8.  (60)

Brim:
17.  Join blue yarn in any st and Ch1.  *2 SC in the first st, 1 SC in the next st,* repeat around.  Sl st to join to first st and Ch1.  (90) 
18.  1 SC in each st around.  Sl st to join to first st and Ch1.  (90) 
19.  *2 SC in the first st, 1 SC in the next 2 st,* repeat around.  Sl st to join to first st and Ch1.  (120) 
20.   1 SC in each st around.  Sl st to join to first st and Ch1.  (120)
21.  To stiffen the brim edge, I worked another round of SC st.  BUT, I worked this round into Round 19 st (as if repeating Round 20).  FO and weave ends.


And, that's it!!!  

For the stars, I made 2 medium-sized and 2 small.  Here's what I did:
Medium-sized:
1.  With a 2.5mm hook and white yarn, I worked 15 HDC into a MR.  Pull end to tighten/close center hole.  Sl st to join to first st.  
2.  Sl st into the next st and ch2.  Into the same st as the ch2, *2 HDC, ch3, 3 HDC.  Sl st into the next 3 st,* then ch2 and repeat from * to *.  Repeat this until you have 5 points made.  Then Sl st into the last st and the first st.  FO.  Leave a long tail for attaching to hat.  
Small-sized:
1.  Repeat same steps as for the medium-sized with the only difference being:  replace HDC stitches with SC stitches.  


For the anchor:
I'm going to try to explain this as clear as possible.
1.  With a 4mm hook and white yarn, ch14.  SC in 2 ch from hook and into next 5 ch.  Into the next ch, 3 SC.  Then SC in the remaining 6 ch.  Rotate to work on opposite side of base ch.  
2.  Sl st into the first 6 ch.  Ch9.  SC in 2 ch from hook and the next 2 ch.  Ch5.  6 SC into the 2 ch from the hook.  Sl st into next ch.  SC in same st as in Sl st just made.  SC into next 2 ch.  Ch4 and SC in 2 ch from hook and next 2 ch.  And, then last, you will SC in the remaining 5 ch that was left unworked at the start of step 2.  FO.  Leave a long tail for closing small gap and for attaching to the hat.  (If you take your time on this part, you will be able to see how it comes together and all made in one piece.) 

Legal:
--this is my design; don't claim as your own
--make and sale whatever you make
--don't use my pics
--don't post my pattern on social media sites but link back to my blog

Happy Crocheting....