Friday, June 30, 2017

Owl Garden Flag

It's been a few days since I updated my Blog with a post.  I was out of town (in Williamsburg, VA) with my sons, daughters-in-law, 4 grandchildren and my mom.  It was not all play, I did manage to steal away a few hours each day to work on several projects/ideas that's been floating in my head.  As a result, here is one of my newest designs that I'm excited to share with each of you!!!  I hope you all will love this as much as I do -- an Owl Garden Flag.  It was a fairly quick project to work up.  I used Lion Brand's Vanna's Choice Yarn for this project.


Owl Garden Flag Free Pattern

Difficulty Level:  Easy

Measurements:  16" wide x 14" long

Materials:
--6.5mm hook for flag
--3.0mm, 4.0mm and 5.0mm hooks for the owl
--2.5mm, 3.0mm and 4.0mm hooks for leaves
--4.0mm hook for tree branch and letters
--1 skein Lion Brand's Vanna's Choice in Sweet Pea
--small amounts of Lion Brand's Vanna's Choice in:  Kelly Green, Aquamarine, Peacock, White, Barley, Chocolate and Terra Cotta
--tapestry needle for weaving

Stitch Abbreviations:
Ch:  chain
Sl st:  slip stitch
St:  stitch(es)
SC:  single crochet
SC2tog:  single crochet two stitches together
HHDC:  Herringbone half double crochet
MR:  magic ring
FO:  fasten off

Special Stitch:
1.  Herringbone Half Double Crochet:  I simply love the texture and look of this stitch.  However, you can use the HDC stitch, if you prefer.  To make the HHDC stitch:  yarn over and insert hook into stitch, yarn over and draw through stitch and first loop on hook; yarn over and draw through remaining loops on hook.  Here is a link to my short video tutorial for the HHDC stitch:

Directions:
1.  With 6.5mm hook and Sweet Pea yarn, Ch45.  HHDC in 2nd ch from hook and across.  Ch1 and turn.  (44)
2-37.  1 HHDC into each st across.  Ch1 and turn.  (44)

At the end of Row 37, FO and weave ends.

Border.
1.  Join Kelly Green yarn into any st and ch1.  SC in same st and evenly around the entire flag.  FO and weave ends.

Rod Opening:
I turned down 3 rows and whipstitched across on the wrong side to leave the opening for a rod/flag pole.

Owl Applique:
I used my owl applique from a previous post with a few minor adjustments.  Here is the link to the pattern for my owl applique:
1.  For the owl body, I used a 5.0mm hook.  I used Aquamarine Yarn for the body portion and then switched to Peacock Yarn for the wings and ears.
2.  For the feet, I used a 4.0mm hook and Barley Yarn.
3.  For the nose, I used a 4.0mm hook and Terra Cotta Yarn.
4.  For the eyes, I used a 3.0mm hook and Barley, White and Aquamarine Yarn.

Owl Placement:   See pics for placement.

Main Tree Branch:
1.  With a 4.0mm hook and Chocolate Yarn, Ch51.  SC in 2nd ch from hook and across.  Ch1 and turn.  (50)
2.  1 SC in each st across.  FO, leaving a long tail for attaching to the flag.

Small Tree Branch:
1.  With a 4.0mm hook and Chocolate Yarn, Ch7.  SC in 2nd ch from hook and across.  Ch1 and turn.  (6)
2.  1 SC in the first 4 st; SC2tog.  Ch1 and turn.  (5)
3.  1 SC in each st across.  Ch1 and turn.  (5)
4.  1 SC in the first 3 st; SC2tog.  Ch1 and turn.  (4)
5.  1 SC in each st across.  Ch1 and turn.  (4)
6.  1 SC in the first 2 st; SC2tog.  Ch1 and turn.  (3)
7.  1 SC in each st across.  Ch1 and turn.  (3)
8.  1 SC in the first st; SC2tog.  Ch1 and turn.  (2)
9.  1 SC in each st across.  Ch1 and turn.  (2)
10.  SC2tog.  Ch1 and turn.  (1)
11.  1 SC in st.  FO and leave a long tail to attach to flag.

Branch Placement:  See pics for Main and Small Branch placement.

Large Leaf:

1.  With 4.0mm hook and Kelly Green Yarn, Ch2.  SC in 2nd ch from hook.  Ch1 and turn.  (1)
2.  2 SC in st.  Ch1 and turn.  (2)
3.  2 SC in first st; 1 SC in next st.  Ch1 and turn.  (3)
4.  2 SC in first st, 1 SC in next st, 2 SC in last st.  Ch1 and turn.  (5)
5-7.  1 SC in each st across.  Ch1 and turn.  (5)
8.  SC2tog, 1 SC in next st, SC2tog.  Ch1 and turn.  (3)
9.  1 SC around entire outside edge.  Sl st to join to first st and FO.  Leave a long tail for attaching.


Medium Leaf:
1.  Follow instructions for the large leaf using a 3.0mm hook.

Small Leaf:
1. Follow instructions for the large leaf using a 2.5mm hook.  However, omit steps 6 and 7 (repeat row).  Complete steps 1-5, 8 and 9.

Leaf Placement:  I placed the large leaf on the main tree branch end.  I placed the small leaf on the left side of the small branch and the medium leaf on the right side of the small branch.

HOME:
(I used a 4.0mm hook and Terra Cotta Yarn)


For the "H":
1.  Ch18, SC in 2nd ch from hook and across.  Ch1 and turn.  (17)
2.  1 SC in each st across.  FO and re-join yarn with a ch1 at st #8.  (17)
3.  SC in same st as ch1 and the next st.  Ch1 and turn.  (2)
4-6.  1 SC in each st across.  Ch1 and turn.  (2)
At the end of row 6, FO and leave a long tail for attaching.  You have made the first vertical line and the horizontal bar.  Now, repeat steps 1 and 2 to make the second vertical line.  At the end of row 2, FO, leaving a long tail for attaching.  Now, whipstitch row 6 of the horizontal bar to the second vertical line at stitch 8 and 9.

For the "O":
1.  Ch36, SC in 2nd ch from hook and across.  Ch1 and turn.  (35)
2.  1 SC in each st across.  FO, leaving a long tail for attaching.  (35)
3.  Whipstitch the ends together.

For the "M":
1.  Ch51, SC in 2nd ch from hook and across.  Ch1 and turn.  (50)
2.  1 SC in each st across.  FO, leaving a long tail for attaching.  (50)

For the "E":
1.  Ch18, SC in 2nd ch from hook and across.  Ch1 and turn.  (17)
2.  1 SC in the first 2 st.  Ch1 and turn.  (2)
3-5.  1 SC in each st across.  Ch1 and turn.  (2)
6.  Sl st across row 5 and down the side.  Sl st into the base st #2.
7.  1 SC in the 3rd st and the next 7 st.  Ch1 and turn.  (7)
8.  1 SC in the first 2 st.  Ch1 and turn.  (2)
9-10.  1 SC in each st across.  Ch1 and turn.  (2)
11.  Sl st across row 10 and down the side.  Sl st into the base st #9.
12.  1 SC in the next st and the remaining st.  Ch1 and turn.  (8)
13.  1 SC in the first 2 st.  Ch1 and turn.  (2)
14-16.  1 SC in each st across.  Ch1 and turn.  (2)
At the end of row 16, FO and leave a long tail for attaching.

For the letters, I used pins to shape and place and then whipstitched to the flag.  (see pics)

  Happy Crocheting....

Legal:
--don't claim pattern/design as your own
--don't use my pics 
--okay to sale your finished work
--don't share my pattern in any form but reference me and a link to my blog. 


Tuesday, June 27, 2017

Key To My Heart Wall Hanging....

Well, while I'm on vacation with the grand babies in Williamsburg, VA, the idea of a "Key To My Heart" popped into my head.  So, I had to come back to the hotel and work up a pattern design...lol.

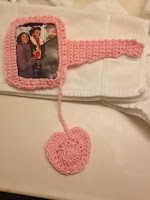
So, here it is!!!  "Key To My Heart" Photo Wall Hanging! I don't have any pics with me of myself and hubby - but, I cut a pic from a tourism brochure...lol. And, of course, I was running out of colors that I had on hand with me but I think pink works really well. 

Enjoy this cute and fun design...

"Key To My Heart" Photo Wall Hanging


Key To My Heart Photo Wall Hanging

Difficulty Level:  Easy

Measurement: 
The key measures 10" in width.  The photo frame portion measures 6" long.

Materials:
--4.5mm hook
--#4 worsted weight yarn (I used Red Heart's Soft in Pink); approximately 100 yds
--tapestry needle for weaving

Stitch Abbreviations:
Ch:  chain
Sl st:  slip stitch
St:  stitch(es)
SC:  single crochet
SC2tog:  single crochet two stitches together
DC:  double crochet
DC2tog:  double crochet two stitches together
TC:  triple crochet
MR:  magic ring
FO:  fasten off

Directions:
Front Portion:
1.  Ch18, SC in 2nd ch and across.  Ch1 and turn.  (17)
2.  2 SC in first st, 1 SC in next 15 st and 2 SC in last st.  Ch1 and turn.  (19)
3.  2 SC in first st, 1 SC in next 17 st and 2 SC in last st.  Ch1 and turn.  (21)
4-16.  1 SC in first 2 st.  Ch1 and turn.  (2)

At the end of row 16, FO and weave ends.  Join yarn on opposite side and Ch1.  Repeat rows 4-16 on the opposite side.

17.  1 SC in the first 2 st, Ch17 and skip 17 st, 1 SC in the last 2 st.  Ch1 and turn.
18.  SC2tog, 17 SC into the Ch17 space and SC2tog.  Ch1 and turn.  (19)
19.  SC2tog, 1 SC in next 15 st and SC2tog.  Do not Ch1.  Turn.  (17)
20.   Sl st into the first 5 st; 1 SC in the next 7 st.  Ch1 and turn.  (7)
21-24.  1 SC in each st across.  Ch1 and turn.  (7)
25.  1 SC in the first 5 st; SC2tog.  Ch1 and turn.  (6)
26.  SC2tog; 1 SC in the next 4 st.  Ch1 and turn.  (5)
27.  1 SC in the next 4 st; 2 SC in the last st.  Ch1 and turn.  (6)
28.  1 SC in each st across.  Ch1 and turn.  (6)
29.  1 SC in the next 4 st; SC2tog.  Ch1 and turn.  (5)
30.  1 SC in each st across.  Ch1 and turn.  (5)
31.  1 SC in the next 3 st; SC2tog.  Ch1 and turn.  (4)
32-34.  1 SC in each st across.  Ch1 and turn.  (4)
35.  1 SC in next 3 st; 2 SC in the last st.  Ch1 and turn.  (5)
36.  SC2tog; 1 SC in next 3 st.  Ch1 and turn.  (4)
37.  1 SC in next 2 st; SC2tog.  Ch1 and turn.  (3)
38.  1 SC in each st across.  Ch1 and turn.  (3)
39.  1 SC in next 2 st; 2 SC in last st.  Ch1 and turn.  (4)
40.  1 SC in each st across.  Ch1 and turn.  (4)
41.  1 SC in next 3 st; 2 SC in last st.  Do not ch1.  Turn.  (5)
42.  Sl st into the first st; 1 SC in the next 3 st.  Do not ch1.  Turn.  (3)
43.  Sl st into the first st; 1 SC in the next 2 st.  FO and weave ends.  (2)

Back Portion:
1.  Ch18, SC in 2nd ch and across.  Ch1 and turn.  (17)
2.  2 SC in first st, 1 SC in next 15 st and 2 SC in last st.  Ch1 and turn.  (19)
3.  2 SC in first st, 1 SC in next 17 st and 2 SC in last st.  Ch1 and turn.  (21)
4-16.  1 SC in each st across.  Ch1 and turn.  (21) 
17.  SC2tog; 1 SC in next 17 st; SC2tog.  Ch1 and turn.  (19)
18.  SC2tog; 1 SC in next 15 st; SC2tog.  FO and leave a long tail for attaching to the front portion.  (17)

Assembly:
With the key placed in a horizontal position, lie the front on top of the back.  Whipstitch across the bottom, up the right side and across the top.  Do not whipstitch down the left side - leave this open to insert photo. 

For the heart:
String Portion:
1.  Leave a tail for attaching to the heart.  Then, Ch 24.  FO, leaving a tail to attach to bottom right corner of the key.  

Heart:
1.  8 DC into MR.  Sl st to join to first st and ch1.  (8)
2.  2 DC in each st around.  Sl st to join.  (16)
3.  Ch4 (counts as first TC) and 3 TC into same st; 4 TC into next st; 1 DC in each of the next 5 st; DC2tog; 1 DC in each of the next 5 st; 4 TC in next st; 3 TC and Ch 4 in the last st; sl st into last st and FO.  Weave ends. 


And, that's it!!!  This would look great in so many different colors. 

Variations: 
1.  As a variation, you could work the front portion (the first 18 rows) as the back portion, omitting a photo to just make it as a wall hanging.

2.  Or, you could make 2 keys (using the back portion for the first 18 rows), stuff and make this into a pillow...

Lots of options with this pattern....

Enjoy!!!  Share your photos if you decide to make this...


Happy Crocheting....

Legal:
--don't claim pattern/design as your own
--don't use my pics 
--okay to sale your finished work
--don't share my pattern in any form but reference me and a link to my blog

Sunday, June 25, 2017

Cozy/Table Scarf....

Here's a super cute and quick project to add to your home decor or to give as a gift.  It took less than an hour to crochet.  You can use it as a Cozy or as a table scarf.  See pics below for the different ways I came up with.

Cozy/Table Scarf
 
Cozy/Table Scarf Pattern

Difficulty Level:  Easy

Materials:
--5mm hook
--Cotton yarn (approx 110 yds total) - I used Crafter's Secret in Buttercup and Brown Multi; and for the flower I used "I Love This Yarn" in Buttercup
--ponytail holder
--tapestry needle for weaving 

Stitch Abbreviations:  
Ch: chain
Sl st: slip stitch
St: stitch(es)
SC: single crochet
HDC: half double crochet
MR:  magic ring
FO: fasten off

For the Flower:
Puff Stitch - 3 double crochet into same st (yarn over, insert hook into stitch, yarn over, and draw back through the stitch, yarn over and draw through 2 loops on stitch.  Into the same stitch, repeat 2 more times.  Then, yarn over and draw the yarn through all 4 loops on hook.

Directions:
1.  With Buttercup yarn, sl st and ch1 to ponytail holder.  Make 30 HDC around ponytail holder.  Sl st to join to first st and ch1.  (30)
2.  2 HDC in each st around.  Sl st to join and ch1.  (60)
3.  2 HDC in first st; 1 HDC in next st.  Repeat around.  Sl st to join and ch1.  (90)
4.  2 HDC in first st; 1 HDC in next 2 st.  Repeat around.  Sl st to join and ch1.  (120)
5-6.  1 HDC in each st around.  Sl st to join and ch1.  At the end of row 6, FO and weave ends.  (120)
7.  Join Brown Multi yarn and ch1.  Into first st, SC and HDC.  *Sk next st.  SC and HDC in next st.*  Repeat from * to * around.  Sl st to join and ch1.  (60 SC & 60 HDC)
8-10.  SC and HDC in first st, sk next st.  Repeat around.  At the end of round 10, FO.  Weave ends.  (60 SC & 60 HDC)

Flower (optional):
1.  With "I Love This Yarn's" Buttercup, 8 HDC into MR.  Pull to tighten; sl st to join and ch1. 
2.  Make a puff stitch into each st around.  Sl st to join; FO and weave ends.  (8 puff stitches)

Lots of uses for this simple cozy/table scarf.

Happy Crocheting!!!

Legal:
--don't claim pattern as your own
--don't use my pics
--don't copy my pattern to any social media but provide a link to my blog

Pin now...make later....

Friday, June 23, 2017

Patriotic Decor magnets for Fridge...

Well, good evening all.  I want to share a few simple patterns I worked up this afternoon to add a magnet onto the backs and place on my fringe, of course. Just a touch of 4th of July in my kitchen.  Now, you can choose not to use magnets and use them as accessories on clothing, hats, etc.  So, several options -- and I love versatility.
Patriotic Appliqués for Frige


Patriotic Magnets 
Difficulty Level:  Easy

Materials:
--small amounts of red, white and blue cotton yarn, and a very tiny amount of yellow for the flame on the firecrackers (I used Crafter's Secret Cotton Yarn from Hobby Lobby)
--4. 0 mm hook
--tapestry needle for weaving

Stitch Abbreviations:
Ch: chain
St: stitch(es)
Sl st: slip stitch
SC: single crochet
HDC: half double crochet
Picot: ch3, Sl st into first ch
FO: fasten off
MR: Magic red

Firecrackers:
1.  With color of choice, and 4 mm hook, ch5.  Sc in 2nd ch and across.  Ch1 and turn.  (4)
2-8. 1 SC in east st across.  Ch1 and turn.  At end of Row 8, FO and weave ends.  (4)

I took a piece of yellow yarn and hooked it in a top stitch,  I then double knotted it.  And, last, I used my needle to fray the yellow.

On each firecracker you will see little things I did on mine, but choose what you would like to be on them.

Hat:
1. With blue yarn, Ch9, SC 2nd ch from hook and across.  (8)
2.  1 SC in each stitch across.  FO blue yarn. (8)
3.  Join red yarn, in 2nd st (skip first st), ch1. Sc in same st as ch1 and next st.  Join white yarn and sc in the next 2 st.  Join red yarn and sc in the last 2 st.  Ch1 and turn.
4-10. Repeat #3.  FO after 10th row.  Weave ends.

Star:
1.  6 HDC into MR.  Sl st to join.  Ch1. (6)
2.  2 HDC into each st around.  Sl st to join.  Ch1. (12)
3.  2 HDC in first st; 1 HDC in the next 3 st.  Repeat around.  Sl st to join.  (15)
4.  Sl st into next st.  And into this st add, *Ch3, 2DC, picot, 3 DC; Sl st into next 3 st.* Then, repeat from * to *.   You will repeat this until your 5-point star is made.  I then used red and embroidered eyes and a mouth.

Pennant:
1.  With red, Ch2.  Sc in 2nd ch.  Ch1 and turn.  (1)
2.  2 SC in st.  Ch1 and turn.  (2)
3.  2 SC in first; 2 SC in next.  Ch1 and turn.  FO red yarn.  (4)
4.  Join white yarn, 2 SC in first st, 1SC in next 2 st, 2 SC in last.  Ch1 and turn.  (6)
5.  In red, 2 SC in first st, 1SC in next 4 st, 2 SC in last.  Ch1 and turn.  (8)
6-8. 1 SC in each st across.  Ch1 and turn.  (Row 6 & 8 will be in white; Row 7 is in red)
9-12.  In these rows we will be making the blue portion, so from right to left - you will have 4 SC of red (row 9), then 4 SC of blue.  Ch1 and turn.  10.  4 SC of blue; then 4 SC of white.  Ch1 and turn.  11.  4 SC red; then 4 SC blue.  Ch1 and turn.  12.  4 SC blue; 4 SC white.  FO and weave ends.


I attached magnets to the back and placed on my fridge...

Happy Crocheting....
Legal:
--don't claim pattern as your own
--don't use my pics
--don't copy my pattern to any social media but provide a link to my blog

Pin now...make later....


Thursday, June 22, 2017

Weighted Blanket...

January 2018:
Here's a few updated pictures of this gorgeous blanket that can be used as the top cover to make a weighted blanket for kids and/or adults who suffer from Autism.  I used a myriad of colors, excluding red and black, and different crochet stitches/techniques for each color.  I love the color and texture that was created.  

I hope to set aside time this month to get the pattern instructions added to this blog.....


***************************
Crochet Weighted Blanket

I wanted to share a few pics of my current WIP (work in progress).  It's a "Weighted Blanket" for a therapist who treats children with Autism.

I'm so excited to work on this project.  Just the thought of potentially helping a child to relax and respond is humbling.  There's not a lot on Crochet Weighted Blankets out there so I'm hoping to do a tutorial on this.  One thing I will share with you is to avoid the colors red and black because it can be a trigger for some kids.  As I progress on this project, I will update this post with pics and the tutorial.

So far, each color change results in a different stitch.  I think the colors are coordinating quite well.

And, last, I will likely be blending my love of quilting into this project.  But, for the tutorial, I plan to hopefully offer a couple alternatives in completing this project.

So, PIN now, and continue to follow-up on this post for further details....

Happy Crocheting....

Tuesday, June 20, 2017

Can Toss Game - Woodland Animals...

Here's a quick and fun project for a kid's game.  Do you remember going to carnivals or festivals at school and throwing a bag at cans?  Well, over the weekend I bought a 6-pack of the V-8 Splash Tropical Blend and I just thought the cans were just so cute...lol.  And, the idea struck me to make covers for each of them.  I decided to make my set in Woodland Animals:  Owl, Wolf, Fox, Bear, Skunk and Beaver.

So, I'm doing the 3 R's on this project:
1.  Recycle
2.  Reuse
3.  Repurpose

If you don't want to use them as a game, as you can see in the pic below, they look super cute on my bedroom windowsill.  Or, how cute would these little critters be in a Nursery or little boy's room that's themed/geared toward the Woodland Animals???

This project would be super cute to make for Halloween decor, youth group, VBS, birthday parties, Christmastime games...lots of things you can do with the basis of the pattern and just change to suit your holiday/event need. 

Can Toss Game - Woodland Animals
 
Can Toss Game - Woodland Animals Pattern

Difficulty Level:  Easy
Materials:
--5.0mm hook
--(6) 5.5 fl oz cans
--6 pieces of felt cut into pieces (size of can top), craft glue and river stones (or you could use rice/beans - just something to add weigh to the can)
--#4 worsted weight yarn (I used scraps of I Love This Yarn and Redheart Supersaver)
--tapestry needle for weaving
--optional buttons for eyes/nose 
--polyfil for "bean" bag

Stitch Abbreviations:
Ch:  chain
Sl st:  slip stitch
St:  stitch(es)
SC:  single crochet
SC2tog:  single crochet 2 stitches together 
BLO:  back loops only
MR:  magic ring
FO:  fasten off

Directions:
Can Preparation:
First, I prepared the cans, I washed, rinsed and allowed them to air dry.  Remove the button tab.  I laid the can on top of the felt, and drew an outline.  Then, add 15-20 small river stone beads (or whatever you choose for weight) into the can.  Last, glue the felt to the top of the can.

  Basic Pattern for Cover:
1.  6 SC  into MR.
2.  2 SC in each st around.
3.  2 SC in first st, 1 SC in next st.  Repeat around.
4.  1 SC in the BLO around.
5-18.  1 SC in each st around.

For the Owl:
Rounds 1-8 in brown tweed.
Rounds 9-11 in light beige.
Rounds 12-18 in brown tweed.
Eyes:  I used buttons.  Or, if you want to crochet your eyes you could:  
1.  3 SC into a MR. Sl st to join, ch1.  
2.  1 SC around each st.  FO and leave long enough tail for attaching.
Ears:  I made 2 sets of tassel ears.  I used 4 different colors weaved onto each side and tied into a double knot.

Nose:  
1.  With yellow yarn, Ch2.  SC in 2nd ch from hook.  Ch1 and turn.
2.  2 SC in st.  Ch1 and turn.
3.  2 SC in first st; 1 SC in next st.  Ch1 and turn.
4.  1 SC in each st across.  FO and leave a long enough tail for attaching.


For the Wolf:
Rounds 1-8 in gray.
Rounds 9-11 in white.
Rounds 12-18 in gray.

Eyes (make 2):
1.  With black yarn, 3 SC into a MR. Sl st to join, ch1.  
2.  1 SC around each st.  FO and leave long enough tail for attaching.  Embroider white yarn into the center of the eyes.

Ears (make 2):
1.  With gray yarn, Ch2.  SC in 2nd ch from hook.  Ch1 and turn.
2.  2 SC in st.  Ch1 and turn.
3.  2 SC in first st; 1 SC in next st.  FO, weave ends.
4.  Join white yarn into any st, ch1 and SC around.  FO and leave a long enough tail for attaching.

Nose:  
1.  With gray yarn, Ch5.  SC in 2nd ch from hook and across.  Ch1 and turn.
2.  1 SC in st across.  Ch1 and turn.
3.  SC2tog; SC2tog.
4.  1 SC in each st across.
5.  SC2tog.  Ch1 and turn.
6.  1 SC in st.  FO and leave a long enough tail for attaching.

Nose Tip:
1.  With black yarn, 3 SC into MR.  Sl st to join.  FO and leave a long enough tail for attaching.


For the Fox:
Rounds 1-8 in burnt pumpkin/orange color.
Rounds 9-11 in white.
Rounds 12-18 in burnt pumpkin/orange color.

Eyes:  
I used buttons.  But, you can follow the same instructions for the Wolf to make your own.

Ears (make 2):
1.  With burnt pumpkin/orange color yarn, Ch2.  SC in 2nd ch from hook.  Ch1 and turn.
2.  2 SC in st.  Ch1 and turn.
3.  2 SC in first st; 1 SC in next st.  FO, weave ends.
4.  Join white yarn into any st, ch1 and SC around.  FO and leave a long enough tail for attaching.

Nose:  
1.  With burnt pumpkin/orange color yarn, Ch5.  SC in 2nd ch from hook and across.  Ch1 and turn.
2.  1 SC in st across.  Ch1 and turn.
3.  SC2tog; SC2tog.
4.  1 SC in each st across.
5.  SC2tog.  Ch1 and turn.
6.  1 SC in st.  FO and leave a long enough tail for attaching.

Nose Tip:
I used a button.  But, you can follow the same instructions for the Wolf to make your own.

For the Skunk:
Rounds 1-18 in black.

Eyes (make 2):
1.  With white yarn, 3 SC into a MR. Sl st to join, ch1.  
2.  1 SC around each st.  FO and leave long enough tail for attaching.  Embroider black yarn into the center of the eyes.

Ears (make 2):
1.  With black yarn, 6 SC into MR.  Sl st to join and Ch1.  
2-5.  SC in each st around.  Sl st to join and Ch1.  At the end of round 5, FO and leave a long enough tail for attaching.

Nose:  
1. With brown yarn, 6 SC into MR.  Sl st to join and Ch1.
2.  1 SC in each st around.  Sl st to join.  FO and leave a long enough tail for attaching.  


White stripe between ears:
I used Redheart Buttercup yarn.  You can use worsted weight white yarn.
1.  Ch2, 1 SC in 2nd ch from hook.  Ch1 and turn.
2.  2 SC in st.  Ch1 and turn.
3.  2 SC in first st; 1 SC in next st.  Ch1 and turn.
4.  1 SC in each st around.  FO and leave a long enough tail for attaching.


For the Beaver:
Rounds 1-18 in brown.

Eyes:
I used 2 small white buttons.  However, if you want to make your eyes, then follow the instructions under the Wolf.

Ears (make 2):
1.  With brown yarn, 6 SC into MR.  Sl st to join and Ch1.  
2-5.  SC in each st around.  Sl st to join and Ch1.  At the end of round 5, FO and leave a long enough tail for attaching.

Nose:  
1. With black yarn, 6 SC into MR.  Sl st to join and Ch1.
2.  1 SC in each st around.  Sl st to join.  FO and leave a long enough tail for attaching.  

Tooth:
1.  With white yarn, Ch3.  SC in 2nd ch and across.  Ch1 and turn.
2-3.  1 SC in each st across.  After row 3, FO and leave a long enough tail to attach.  (I attached my tooth first and then attached the nose over a portion of the tooth -- see pics)

 For the Bear:
Rounds 1-18 in a medium shade of brown.

Eyes:
I used 2 small black buttons.  However, if you want to make your eyes, then follow the instructions under the Wolf.

Ears (make 2):
1.  With brown yarn, 6 SC into MR.  Sl st to join and Ch1.  
2-3.  SC in each st around.  Sl st to join and Ch1.  At the end of round 3, FO and leave a long enough tail for attaching.  (I only made 3 rounds for my bear's ears, as opposed to 5 rounds on the beaver and skunk).

Nose:  
1. With light brown yarn, 3 SC into MR.  Sl st to join and Ch1.
2.  2 SC in each st around.  Sl st to join.  
3.  2 SC in first st; 1 SC in next st.  Repeat around.  FO and leave a long enough tail for attaching.  
I used black yarn and embroidered the nose tip and then a vertical line for the mouth.

Belly:
1.  With light brown yarn, Ch6.  SC in 2nd ch and across.  Ch1 and turn.
2-3.  1 SC in each st across.  Ch1 and turn.
4.  SC2tog, SC in next st, SC2tog.  Ch1 and turn.
5-6.  1 SC in each st across.  At the end of row 6, FO and leave a long enough tail for attaching.
  
Assembly:
See pics for help in placing facial features and ears!!!

"Bean" Bag:
1.  With green yarn, Ch10.  SC in 2nd ch and next 7.  Into last ch, 3 SC.  Rotate and work on opposite side of base ch.  SC in next 7 ch.  2 SC in last ch.  Sl st to join and ch1.  
2.  SC in first 9 st.  3 SC in next st.  SC in next 9 st.  2 SC in last st.  Sl st to join and ch1.
3-10.  1 SC in each st around.  Sl st to join and ch 1.  At the end of round 10, stuff with polyfil and slip stitch the top closed.  (Or, you can whipstich the top closed)

That's it for these little critters.  I think they turned out super cute and were fun to make.  I hope you will enjoy making them, too.  

And, remember, you are following the 3 R's for this project:

1.  Recycle
2.  Reuse
3.  Repurpose

 Happy Crocheting....

Legal:
--don't claim my pattern(s) as your own
--don't use my pics
--okay to make, sale, and/or give away your finished projects
--credit me as the designer by providing a link to my blog; please do not distribute my pattern in electronic or written form


You will notice affiliate link ads are now appearing more on my blog.  Clicking on the links and buying any supplies you may need helps me out in a small way so that I can continue posting my patterns for FREE....any help with this is much appreciated!!!

Skirt/Dress Convertible

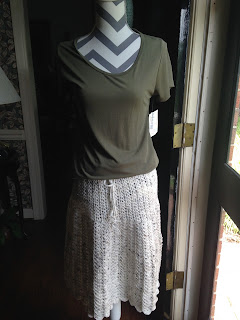
Okay, so how cute is this skirt that can also be worn as a dress/cover-up?  I made this during Fall 2016 so I will have to search through my pattern notes for the pattern.  Have you ever made something, set it to the side and then completely forgot about it?  Well, that's what happened here with this...lol.

This makes a great summer/fall accessory to have.  Wear over a bathing suit as a cover-up. Wear as a sun dress. Or add a top and wear it as a skirt....

Here are some pics taken today for your viewing/inspiration.