Tuesday, March 28, 2017

Crochet Little People Toy Sack...


With my colorful primary colors yarn, I decided to make Arielle a sack/satchel for her little people toys. She has Shopkins, Disney Princesses, animals and the list goes on.....

I used a #5.0 mm hook and #4 worsted weight yarn.

Pattern was fairly simple.
1.  8 sc into magic ring. Sl st to join.  Ch1. (8)
2.  2 sc in each st around.  Join.  Ch1.  (16)
3.  2sc in first st, then 1 sc in next st.  Repeat around.  Join.  Ch1. (24)
4.  2sc in first st, then 1 sc in next 2 st.  Repeat around.  Join.  Ch1. (32)
5.  2sc in first st, then 1 sc in next 3 st.  Repeat around.  Join.  Ch1. (40)
6. 2sc in first st, then 1 sc in next 4 st.  Repeat around.  Join.  Ch1. (48)
7-20.  1 sc in each st around.  Join.  Ch1. (48)
21.  1 sc in each st around.  Join.  Fasten off.  Weave ends.


Optional liner:
I measured the circumference of the sack and measured my fabric.  I placed right sides together and sewed the sides.  For the bottom, I turn up each corner into a small triangle and pinned in place, I then worked one running stitch to sew bottom part of triangle, then on across the bottom and then the bottom of the second triangle.  Trimmed excess yarn.

I turned the top of my liner down approx a 1/2" and then placed it inside the sack and sewed it to the sack with a coordinating color.

Now, I made a chain of 101.  I slipped stitches in 2nd chain from hook and across.  Fasten Off, leave a tail long enough to weave the cord in and out of the top row.

Use tapestry needle to weave chain cord in and out of the last row at the top of the sack.  Make sure once you complete this step, that the chain cords are even on each side.

I made a pompom for each end of the cord by wrapping the yarn 30 times around two of my fingers.  And, then tying a knot in the center and clip the ends.  Fluff out.  Attach each one to the end of the chain cord.


And that's it....a simple sack, satchel, bag....whatever you want to call it....

Happy Crocheting

Legal:
--dont claim pattern as your own
--credit me as the designer
--link to my blog
--don't use my pics
--make and sale your finished product but credit me as designer

Monday, March 27, 2017

Crochet "My Unicorn" Blanket/Pillow

This morning I finally completed "My Unicorn" Blanket/Pillow in soft/pastel colors.  I'm sure my little granddaughter, Miss Arielle, is going to enjoy her blanket.  And, I used Bernat Blanket Yarn so it's going to keep her super warm.  Now, I chose to do the blanket portion in multiple colors, however, you may do this in one color, if so desired, and it would still look pretty...

Size:  35" wide x 43" long; however this can easily be adjusted to be made bigger or smaller by increasing or decreasing the number of increase rows

Difficulty Level:  Intermediate

Materials:
--8mm hook
--3 skeins of the Bernat Blanket Yarn 72 yds/skein in Baby Teal
--2 skeins of the Bernat Blanket Yarn 72 yds/skein in Baby Pink
--1skein of the Bernat Blanket Yarn 220 yds/skein in White (I had a small amount of thus leftover)
--292 yds of the Bernat Blanket Yarn in Purple (I had bought a 220 yd skein and a 72 yd skein and if you look closely, you will see a slight variation in the color -- I think one was Baby Purple and the other Purple)
--small amount of worsted weight yarn for the eyes and black yarn for nostrils
--small amount of polyfil to stuff horn and for the pink nose portion
--tapestry needle
--optional button (I just crocheted a button but you can use a button or omit it)

Abbreviations:
Ch:  chain
Sl st:  slip stitch
St:  stitch
MR:  magic ring
SC:  single crochet
HDC:  half double crochet
Dec:  decrease
FO:  fasten off

Special Stitch:  The blanket portion was made using the Corner-2-Corner (C2C) method with HDC stitches and Ch5.  If you are not familiar with this procedure, you can make the blanket portion however you want.  Here is a link to a website that has a great tutorial on C2C.  This is by far the best video tutorial in learning to do it.

Directions:
Blanket:
1.  I completed the blanket portion as follows:
--12 rows Baby Teal
--7 rows Baby Pink
--1 row White
--19 rows Purple
--1 row White
--7 rows Baby Pink
--12 rows Baby Teal

--I worked my increase rows up to 30 ( 12 rows Baby Teal, 7 rows Baby Pink, 1 row White and 10 rows  Purple)
--Then, I started my decrease rows (9 rows Purple, 1 row White, 7 rows Baby Pink and 12 rows Baby Teal)

And, then with Baby Teal, I SC around the entire blanket, with 3 SC in each corner.  On the last stitch, before completing, I switched to white yarn.  I completed 2 rounds of SC in white.


Hood:
On a short side, I counted in 15 stitches and placed a stitch marker on each end.  The hood is worked in the stitches between the stitch markers and not the two stitches that has the stitch marker.

1.  Starting with stitch 16, sl st to join white yarn, Ch1.  HDC in same stitch as Ch1 and work across to the last stitch before the second stitch marker.  Ch1 and turn.  

2-12.  HDC in each stitch across.  Ch1 and turn.  At the end of Row 12, don't Ch1.  You can do one of two things:  you can leave a long tail and fold the rectangle shape you just made in half and whipstitch half of Row 12 to the other half of Row 12 to form the hood shape OR you can do what I did.  I folded it in half with RS facing each other and I slip stitched the half of Row 12 to the other half of Row 12.

Ears (make 2):
1.  With white yarn, 6 SC into MR.  Sl st to join.  Ch 1.  (6)
2.  2 SC in each st around.  Sl st to join.  Ch1.  (12)
3.  2 SC in first st, 1 SC in next.  Repeat around.  Sl st to join.  Ch1.  (18)
4-5.  1 SC in each st around.  Sl st to join.  Ch1.  (18)
6.  Dec, then 1 SC in next st.  Repeat around.  Sl st to join.  Ch1.  (12)
7.  1 SC in each st around.  Sl st to join.  FO, leaving a long tail for attaching.  (12)

Inner portion of Ear (make 2):
1.  With pink yarn, Ch2.  1 SC in second ch from hook.  Ch1 and turn.  (1)
2.  2 SC in st.  Ch1 and turn.  (2)
3.  2 SC in first st and 1 SC in next st.  Ch1.
4.  SC all around.  Sl st to first sc and FO.  Leave a long tail for attaching inner part to center of ear.

Curlicues:  
I used pink, white and teal colors.  
1.  Ch31.  2 SC in second chain from hook and into each ch across.  FO, leaving a long enough tail to attach to the top of the hood.  (60)

Horn:
1.  With teal yarn, 6 HDC into MR.  Sl st to join and Ch1.  (6)
2-8.  For remaining rows, you will add 1 additional HDC stitch (into any stitch of previous round) to each round (for example, round 2 will have 7 stitches and round 8 will have 13 stitches).  At the end of Round 8, FO, leaving a tail long enough for attaching.  Stuff with polyfil.

Nose:
1.  With pink yarn, Ch5.  1 SC into second chain from hook and into the next 2 chains, 3 SC into the last chain.  Turn and work on opposite side of base chain.  1 SC into the next 2 chains and 2 SC in the last chain.  Sl st to join to first SC and Ch1.  (10)
2.  2 SC in the first st, 1 SC in the next 2 st, 2 SC in next st, 3 SC in next st, 2 SC in next st, 1 SC in next 2 st, 2 SC in next st and 3 SC in last st.  FO.  Leave long tail for attaching.  (18)

For the nostrils, I used black yarn to embroider.  

Cheeks (make 2)
1.  With pink yarn, 6 SC into MR.  Tighten.  Sl st to join.  Ch1.  (6)
2.  2 SC in each st around.  Sl st to join.  FO, leaving a long tail to attach.  (12)

Eyes (make 2):
1.  With 5.5 hook, and black yarn, 6 SC into MR.  Before completing last st, switch to blue yarn.  Sl
st to join and Ch1.  (8)
2.  2 HDC in first st, 1 sc in next 2 st, 2 HDC in next st, 2 HDC in next st, 1 SC in next 2 st and 2 HDC in last st.  Before completing last st, switch to white yarn.  Sl st to join.  Ch1. (8 HDC & 4 SC)
3.  SC around.  Sl st to join.  FO, leaving a long tail to attach.  (12)

With white, I embroidered a small stitch into the black portion of the eye.  

Optional Button:  
I used white blanket yarn and 8mm hook and made 8 HDC into a MR.  FO, leaving a long tail to
\
attach to the top vertical side of the white yarn portion of the blanket so that my granddaughter could button her blanket and wear as a cape.  On the opposite side, I joined the white yarn, Ch1, SC in same st as Ch1, then Ch4 and sc in last st and FO.  Weave ends.  

Assembly:
See pics for placement of eyes, ears, horn, curlicues, cheeks and nose.  When I attached the nose, before completing, I added a small amount of polyfil.  


To make pillow:

Fold up about halfway, fold each side inward (like a paper airplane) so it will mirror the hood and slip under the hood.  

Hope you enjoy this.
Happy Crocheting...

Legal:
--don't claim pattern as your own; credit me as designer 
--don't use my pics
--make and sale/give away your finished product at will 
--link back to my blog 

My social media info:
--  Blog:  Rilla2u.blogspot.com 
--  Ravelry, Pinterest, Instagram:  Rilla2u 
--  Facebook:  /Rilla Edwards; also I have a page "Crocheting & Crafting"
--  email:  rilla2u@gmail.com 

Please follow me on my media sites and Re-pin my pins on Pinterest...thanks so much 


Saturday, March 25, 2017

Crochet Elephant Basket...

Cute, decorative and functional -- makes for a great combo.  Storage/hideaway for a boys toys...

And, here's another pic showing a great way to use the elephant basket.  Baby shower goodies for mom-to-be all inside a cute handmade elephant.  How cute and different would that be?  Or to give as a home-warming gift to a couple filled with goodies who loves safari home decor items...lots of ways to use this basket.  If you have safari decor in your bathroom, then get a trash can that fits inside and you have a unique place to store bathroom trash until it's ready to be emptied.  So, I hope y'all give it a try and share what you do with yours....


The storage basket measures just over 11" tall.  It's great for storing toys for kids, nursery items for a baby or yarn for the crafter...lots of options on where to use this.


Elephant Basket Pattern
Materials:
--8mm hook
--9mm hook
--Bernat Blanket Yarn - dark gray (approx 400 yds; I bought (2) 10.5 oz of the big skeins that is 220 yds per skein.  I did not use all of the second skein)
--small amount of white blanket yarn for the tusks
--(2) 15mm black eyes
--tapestry needle for weaving
--(2) sheets of plastic canvas
--small amount of polyfil

Abbreviations:
Ch:  chain
Sc:  single crochet
HDC: half double crochet
Sl st:  slip stitch
BLO:  back loops only
MR:  magic ring
HDC2tog:  half double crochet 2 stitches together
FO:  fasten off

Directions:
1.  With 9mm hook and yarn, 8HDC into MR.  Sl st to first stitch to join.  Ch1.  Pull end to tighten. (8)
2.  2HDC into each stitch around.  Sl st to first stitch to join.  Ch1.  (16)
3.  2HDC into first stitch, 1HDC in next stitch.  Repeat around.  Sl st to first stitch to join.  Ch1.  (24)
4.  2HDC into first stitch, 1HDC in next 2 stitches.  Repeat around.  Sl st to first stitch to join.  Ch1.  (32)
5.  2HDC into first stitch, 1HDC in next 3 stitches.  Repeat around.  Sl st to first stitch to join.  Ch1.  (40)
6.  2HDC into first stitch, 1HDC in next 4 stitches.  Repeat around.  Sl st to first stitch to join.  Ch1.  (48)
7.  2HDC into first stitch, 1HDC in next 5 stitches.  Repeat around.  Sl st to first stitch to join.  Ch1.  (56)
8.  2HDC into first stitch, 1HDC in next 6 stitches.  Repeat around.  Sl st to first stitch to join.  Ch1.  (64)
9.  2HDC into first stitch, 1HDC in next 7 stitches.  Repeat around.  Sl st to first stitch to join.  Ch1.  (72)
10.  In BLO, 1Sc in each stitch around.  Sl st to first stitch to join.  Ch1.  (72)

Bottom piece will measure approx 11" across
Switch to 8mm hook
11.  1HDC in each stitch around.  Sl st to first stitch to join.  Ch1.  (72)
12-13.  1HDC in each stitch around.  Sl st to first stitch to join.  Ch1.  (72)
14-15.  1Sc in each stitch around.  Sl st to first stitch to join.  Ch1.  (72)
16.  1HDC in the first stitch, then 1Sc in next stitch.  Repeat around.  Sl st to first stitch to join.  Ch1.  (72)
17.  1Sc in the first stitch, then 1HDC in next stitch.   Repeat around.  Sl st to first stitch to join.  Ch1.  (72)
18.  1HDC in the first stitch, then 1Sc in next stitch.  Repeat around.  Sl st to first stitch to join.  Ch1.  (72)
19.  1Sc in the first stitch, then 1HDC in next stitch.   Repeat around.  Sl st to first stitch to join.  Ch1.  (72)
20.  1HDC in the first stitch, then 1Sc in next stitch.  Repeat around.  Sl st to first stitch to join.  Ch1.  (72)
21.  1Sc in the first stitch, then 1HDC in next stitch.   Repeat around.  Sl st to first stitch to join.  Ch1.  (72)
22.  HDC2tog, then 1 HDC in next 7 stitches.  Repeat around.  Sl st to first stitch to join.  Ch1.  (64)
23.  HDC2tog, then 1 HDC in next 6 stitches.  Repeat around.  Sl st to first stitch to join.  Ch1.  (56)
24.  1HDC in the first stitch, then 1Sc in next stitch.  Repeat around.  Sl st to first stitch to join.  Ch1.  (56)
25.  1Sc in the first stitch, then 1HDC in next stitch.   Repeat around.  Sl st to first stitch to join.  Ch1.  (56)
26.  2HDC into first stitch, 1HDC in next 6 stitches.  Repeat around.  Sl st to first stitch to join.  Ch1.  (64)
27.  2HDC into first stitch, 1HDC in next 7 stitches.  Repeat around.  Sl st to first stitch to join.  Ch1.  (72)
28.  1Sc in each stitch around.  Sl st to first stitch to join.  Ch1.  (72)
29.  Sl st around.  FO.  Weave ends.

Lid:
1.  With 8mm hook and yarn, 8HDC into MR.  Sl st to first stitch to join.  Ch1.  Pull end to tighten. (8)
2.  2HDC into each stitch around.  Sl st to first stitch to join.  Ch1.  (16)
3.  2HDC into first stitch, 1HDC in next stitch.  Repeat around.  Sl st to first stitch to join.  Ch1.  (24)
4.  2HDC into first stitch, 1HDC in next 2 stitches.  Repeat around.  Sl st to first stitch to join.  Ch1.  (32)
5.  2HDC into first stitch, 1HDC in next 3 stitches.  Repeat around.  Sl st to first stitch to join.  Ch1.  (40)
6.  2HDC into first stitch, 1HDC in next 4 stitches.  Repeat around.  Sl st to first stitch to join.  Ch1.  (48)
7.  2HDC into first stitch, 1HDC in next 5 stitches.  Repeat around.  Sl st to first stitch to join.  Ch1.  (56)
8.  2HDC into first stitch, 1HDC in next 6 stitches.  Repeat around.  Sl st to first stitch to join.  Ch1.  (64)
9.  2HDC into first stitch, 1HDC in next 7 stitches.  Repeat around.  Sl st to first stitch to join.  Ch1.  (72)
10.  In BLO, 1Sc in each stitch around.  Sl st to first stitch to join.  Ch1.  (72)
11.  In BLO, 1HDC in each stitch around.  Sl st to first stitch to join.  Ch1.  (72)
12.  In both loops, 1Sc in each stitch around.  Sl st to first stitch to join.  FO.  Leave a long tail to attach lid to the basket.  (72)   *if you want to leave the lid detached then weave ends*

Lid Top:
1.  With 8mm hook, 6Sc into MR.  Pull to tighten.  Sl st to first stitch to join.  Ch1.  (6)
2.  2Sc in each stitch around.  Sl st to first stitch to join.  Ch1.  (12)
3-5.  1Sc in each stitch around.  Sl st to first stitch to join.  Ch1.  At the end of Round 5, do not ch1, but FO, stuff firmly with polyfil and attach to center of lid.
Trunk:
1.  With 8mm hook, Ch5.  HDC in 2nd chain from hook and across.  Ch1.  Turn.  (4)
2-15.  HDC in each stitch across.  Ch1.  Turn.  At the end of Row 15, FO and leave tail for attaching.

For the eyes, I used the 15mm black animal eyes.  You can simply make a MR and crochet your eyes.  See pic for eye placement.  I attached the trunk between the eyes and just below.

Ears (make 2):
1.  With 8mm hook, 8HDC into MR.  Pull to tighten but do not join.  Ch1.  Turn.  (8)
2.  2HDC in each stitch across.  Ch1.  Turn.  (16)
3.  2HDC in first stitch, 1HDC in next stitch.  Repeat across.  Ch1.  Turn.  (24)
4.  2HDC in first stitch, 1HDC in next 2 stitches.  Repeat across.  FO.  Leave a long tail for attaching the ears to each side of the basket.  (32)

Tail:
1.  With 8mm hook, Ch15.  HDC in 2nd ch from hook and across.  Ch1.  Turn.  (14)
2.  1HDC in each stitch across.  FO.  Leave a tail long enough to attach to the back of the basket.  See
pic for placement.  (14)

I added a pompom to the tail end.  I just wrapped the yarn around my 4 fingers 20-24 times.  I used a long piece of yarn to tie in the center and then trimmed and formed the pompom.  Attach to tail end with the long piece of yarn you used to tie in the center.

Tusk (make 2):
1.  With white yarn and 8mm hook, 4HDC into MR.  Pull to tighten.  Sl st to first stitch to join.  Ch1. (4)
2.  1HDC in each stitch around.  Sl st to first stitch to join.  Ch1. (4)
3.  2HDCtog and then 1HDC in the next 2 stitches.  FO.  Leave a tail long enough to attach.  See pic for placement.  (3)


To make the basket more sturdy:
I placed 2 pieces of plastic canvas on top of each other and whipstitched the short ends together to make a cylinder shape.  I then placed the canvas inside the basket and whipstitched it.


To attach the lid to the basket:
I placed the lid on the basket and then lifted it to the back and whipstitched 20 stitches of Round 12 of the lid to Round 29 of the basket.


Enjoy....

Happy Crocheting....

Legal:
--do not copy my pattern as your own
--do not use my pics as your own
--credit me as the designer of the pattern
--link back to my blog


Monday, March 20, 2017

Crochet Safari Animal Blanket....


Safari Animal Baby Blanket

Measures approx. 40 1/2" x 40 1/2"

Materials:
--#4 worsted weight yarn; I used "I Love This Yarn" from Hobby Lobby in the following colors:  Sea Blue, Mid-Green, Forest Green, Brown, Coffee, Toasted Almond, Light Taupe, Black, White, Red, Desert Glaze, Terra Cotta, Burnt Pumpkin, Sungold, Light Peach, Mango and Buttercup
--6mm hook
--tapestry needle for weaving

For each block:
1.  I used C2C method with HDC stitches and chain 5.
2.  I added 1 round of SC stitches in the background color after completing each block.  I put 3 SC stitches in each corner. 

For the border:
1.  I used white yarn and 6mm hook to do one round of HDC stitches around each block with 3 HDC stitches in each corner.
2.  I then whipstitched the blocks together to make the blanket.
3.  Now, 1 round of HDC stitches around the entire blanket.
4.  I switched to dark green yarn and completed 1 round of SC stitches.
5.  I switched yarn to a dark brown and completed 1 round of HDC stitches.
6.  For the final round, I used Mid Green yarn and made *5 DC into a stitch, skipped a stitch, SC in next stitch, skipped a stitch* repeat from * to * around.  Fasten off.  Weave ends.
                          
                             
Giraffe Pixel Graph


Lion Pixel Graph


Monkey Pixel Graph 


Turtle Pixel Graph


Happy Crocheting.... 


Legal:
--don't claim my pattern/design as own
--don't use my pics as your own
--okay to make and sale your finished work
--don't share my patterns/designs electronically or in print format but provide a link to my blog

Friday, March 17, 2017

Crochet Spring Wreath -- Bunny


Spring Bunny Wreath Pattern


Materials:
--5.5mm hook (for wreath cover)
--4.0mm hook (for the bunny rabbit, bowtie and pennants)
--3.5mm hook (for the eggs, carrots and flowers)
--Red Heart Gumdrop - Lemon
--#4 worsted weight yarn in blue, mango, white, green, yellow and orange
--11.8" wreath form
--polyfil
--2 (10mm) eyes
--tapestry needle for weaving

Abbreviations:
 Ch:  chain
Sl st:  slip stitch
St:  stitch
SC:  single crochet
HDC:  half double crochet
HDC2tog:  half double crochet 2 stitches together (decrease)
SC2tog:  single crochet 2 stitches together (decrease)
FO:  fasten off
MR:  magic ring

Directions:
Wreath Cover:
1.  With 5.5 mm hook and Red Heart Gumdrop yarn in Lemon, I started with a Ch20.  SC and HDC into the 2nd ch from the hook, *skip a stitch, then SC and HDC into the next st.*  Repeat across until the last stitch.  SC in the last st.  Ch1.  Turn.  (19 total st)
2.  SC and HDC into the first st, skip the next st.  Repeat across until the last stitch.  SC in the last st.  Ch1.  Turn.  (19)
3-75.  Repeat #2.   Leave a long tail to weave finished piece around the wreath form.  (19)

Rectangular piece will measure approx. 26" long and 5" wide.  


Bunny Rabbit:
4mm hook
Head:

1.  With blue yarn, 6 HDC into MR.  Sl st to join.  Ch1.  (6)
2.  2 HDC into each st around.  Sl st to join.  Ch1.  (12)
3.  2 HDC into first st, 1 HDC into next st.  Repeat around.  Sl st to join.  Ch1.  (18)
4.  2 HDC into the first st, 1 HDC into the next 2 st.  Repeat around.  Sl st to join.  Ch1.  (24)
5.  2 HDC into the first st, 1 HDC into the next 3 st.  Repeat around.  Sl st to join.  Ch1.  (30)
6-7.  1 HDC into each st around.  Sl st to join.  Ch1.  (30)
8.  HDC2tog, 1 HDC into the next 3 st.  Repeat around.  Sl st to join.  Ch1.  (24)
9.  HDC2tog, 1 HDC into the next 2 st.  Repeat around.  Sl st to join.  Ch1.  (18)
 --before starting round 10, I attached the 10mm eyes and then stuffed with polyfil--
10.  HDC2tog.  Repeat 8 more times.  Sl st to join.  Ch1.  Leave a long tail.  (9)
(weave tail in and out of row 10, add more polyfil, if needed, and then pull tail to close opening)

Body:

1.  With blue yarn, 6 HDC into MR.  Sl st to join.  Ch1.  (6)
2.  2 HDC into each st around.  Sl st to join.  Ch1.  (12)
3.  2 HDC into first st, 1 HDC into next st.  Repeat around.  Sl st to join.  Ch1.  (18)
4.  2 HDC into the first st, 1 HDC into the next 2 st.  Repeat around.  Sl st to join.  Ch1.  (24)
5-7.  1 HDC into each st around.  Sl st to join.  Ch1. 
8.  HDC2tog, 1 HDC into the next 2 st.  Repeat around.  Sl st to join.  Ch1.  (18)
 --before starting round 9, stuff with polyfil--
9.  HDC2tog, 1 HDC into the next st.  Repeat around.  Sl st to join.  Ch1. FO.  Leave a long tail.  (12)
(weave tail in and out of row 9, add more polyfil, if needed, and then pull tail to close opening)

Arms (make 2):
1.  With blue yarn, 6 HDC into MR.  Sl st to join.  Ch1.  (6)
2.  2 HDC into first st, 1 HDC into next st.  Repeat around.  Sl st to join.  Ch1.  (9)
3-6.  1 HDC into each st around.  Sl st to join.  Ch1.  (9)
 --before starting round 7, stuff with polyfil--
7.  HDC2tog, 1 HDC into next st.  Repeat around.  St st to join.  Ch1.  FO.  Leave a long tail.  (6) 
(weave tail in and out of row 7, add more polyfil, if needed, and then pull tail to close opening)

Legs (make 2):
1.  With blue yarn, 6 HDC into MR.  Sl st to join.  Ch1.  (6)
2.  2 HDC into each st around.  Sl st to join.  Ch1.  (12)
3-10.  1 HDC into each st around.  St st to join.  Ch1.  (12)
(At the end of round 10, stuff with polyfil.  FO and leave a long tail; weave tail in and out of row 10, add more polyfil, if needed, and then pull tail to close opening)

Ears (make 2):
1.  With blue yarn, 6 HDC into MR.  Sl st to join.  Ch1.  (6)
2.  2 HDC into each st around.  Sl st to join.  Ch1.  (12)
3.  2 HDC into first st, 1 HDC into next st.  Repeat around.  Sl st to join.  Ch1.  (18)
4-5.  1 HDC into each st around.  Sl st to join.  Ch1.  (18)
6.  HDC2tog, 1 HDC into the next st.  Repeat around.  Sl st to join.  Ch1.  (12)
7.  1 HDC in each st around.  Sl st to join.  (12)  
8.  HDC2tog.  Repeat 5 more times.  Sl st to join.  Ch1.  (6)
9.  1 HDC in each st around.  Sl st to join.  FO.  Leave a long tail; weave tail in and out of last row.  Do not stuff.

Bowtie:

1.  With lemon yarn and 4.0mm hook, make a MR and ch3.  5 DC into MR.  Ch3.  Sl st into MR.  Ch3.  5 DC into MR.  Ch3.  Sl st into MR.  Sl st to first ch.  FO.  Leave a long tail to wrap around the center of the bowtie and for attaching to the bunny. 

Assembly of Bunny Rabbit:
See pics for assembly.  I simply attached the ears to each side of the head, then attached the head to the body.  I then attached the legs and arms.  I used a small amount of white yarn to embroider nose/mouth.  I used one safety pin at the top of the head and one at the bottom of each leg to attach to the wreath so I could remove the bunny from the wreath, if I so decided.

Pennant (make 4):
1.  With mango, Ch8.  Sc in 2nd ch from hook and across.  Ch1.  (7)
2-3.  1 sc in each st across.  Ch1.  (7)
4.  Sc2tog, 1 sc in the next 3 st and sc2tog.  Ch1.  (5)
5-6.  1 sc in each st across.  Ch1.  (5)
7.  Sc2tog, 1 sc in next st, sc2tog.  Ch1.  (3)
8-9.  1 sc in each st across.  Ch1.  (3)
10.  Sc2tog, 1 sc in next st.  Ch1.  (2)
11.  Sc2tog.  Ch1.  (1)
12.  Sl st around pennant.

I used a small amount of white yarn and embroidered the letters "h, o, m, e" onto the pennants.  To make the garland, I started with a Ch5 of the mango yarn (leave a starting tail for attaching to the wreath), I then sl st across the top of the pennant, then Ch5, sl st across the top of the next pennant.  Repeat this across.  After the last pennant, Ch 5.  Leave a tail long enough to attach to the wreath. 

Eggs:

1.  With a 3.5mm hook and worsted weight yarn, 3 sc into a MR.  Sl st to join.  Ch1.  (3)
2.  2 sc in each st around.  Sl st to join.  Ch1.  (6)
3.  2 sc in first st, 1 sc in next.  Repeat around.  Sl st to join.  Ch1.  (9)
4.  2 sc in first st, 1 sc in the next 2 st.  Repeat around.  Sl st to join.  Ch1.  (12)
5-6.  1 sc in each st around.  Sl st to join.  Ch1.  (12)
7.  Sc2tog, 1 sc in the next 2 st.  Repeat around.  Sl st to join.  Ch1.  Lightly stuff with polyfil.   (9)
8.  Sc2tog, 1 sc in next st.  Repeat around.  Sl st to join.  Ch1.  (6)

I made 6 eggs for my wreath:  2 green, 2 white, 1 mango and 1 yellow

Carrots:

1.  With a 3.5mm hook and orange yarn, Ch2.  Sc in 2nd ch from hook.  Ch1.  (1)
2.  2 sc in st.  Ch1.  (2)
3.  2 sc in the first st, 1 sc in the next.  Ch1.  (3)
4.  2 sc in the first st, 1 sc in the next.  2 sc in the last st.  Ch1.  (5)
5.  2 sc in the first st, 1 sc in the next 3 st.  2 sc in the last st.  Ch1.  (7)
6.  2 sc in the first st, 1 sc in the next 5 st.  2 sc in the last st.  Ch1.  (9)
7.  2 sc in the first st, 1 sc in the next 7 st.  2 sc in the last st.  Ch1.  (11)

At the end of row 7, FO.  Leave a long tail.  I rolled up the carrot, like a tortilla, and then whipstitched it closed.  By doing this, I did not need to use any polyfil for stuffing. 

For the carrot top, I used the 3.5mm hook and green yarn and Ch4.  Sl st into the 2nd Ch from the hook, *Ch 4.  Sl st into the 2nd ch from hook and the remaining 2 Ch.  Then sl st into the 2nd ch of the base ch.*  Now, sl st into the next base ch and repeat process from * to *.  Repeat one more time.  FO.  Leave a tail long enough to attach to the top of the carrot.

Flowers:

I made 2 simple flowers for my wreath freestyle.  I may add the pattern for each later on.  There are a ton of free flower patterns available on the Internet.  However, if you are interested in my flower design, then please comment or email me and I will include the instructions.
 
Legal: 
--you may make, gift and/or sale this item; just credit  me as the designer
--don't use my pics on any social media platform without permission, unless you are using the pictures AND providing a link to my pattern
--don’t share my pattern but provide a link to my blog

Social Media:
Instagram:  rilla2u 
Pinterest:  rilla2u 
Ravelry:  rilla2u 
Facebook:  /Rillaedwards 
TikTok:  rillae2u

And, here’s a few more pictures!!!!! Enjoy…


Happy Crocheting…

Wednesday, March 15, 2017

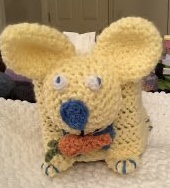
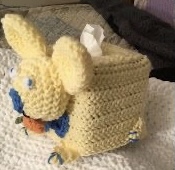
Crochet Easter Bunny Tissue Box Cover....

Here's a cute little Easter Bunny Tissue Box Cover I crocheted up last night.  I think it looks real springy with the "I Love This Yarn" from Hobby Lobby.

This was fun and quick to make...


Easter Bunny Tissue Box Cover

 Materials:
--5mm hook
--4mm hook (for eyes, nose and carrot)
--#4 worsted weight yarn; I used I Love This Yarn (yellow, blue, green, white and orange)
--tapestry needle for weaving
--tissue box (size approx. 4.5" x 5")
--small amount of polyfil

Abbreviations:
Ch:  chain
Sl st:  slip stitch
HHDC:  Herringbone Half Double Crochet
MR:  magic ring
SC:  single crochet
Dec:  decrease 

Special Stitch:  HHDC - yarn over, insert hook into next stitch, yarn over, draw through stitch and first loop on the hook, yarn over and draw through remaining two loops on hook

Directions:
Sides (made in 1 piece)
1.   With yellow yarn, ch 56.  HHDC into the 2nd st from the hook and across.  Ch1.  Turn.  (55)
2.  1 HHDC in each st across.  Ch1.  Turn.  (55)
3-13.  Repeat #2.  Fasten off.  Leave a long tail to attach the rectangle piece around the sides of the tissue box. (55)

Top
1.  Ch15.  HHDC into the 2nd st from the hook and across.  Ch1.  Turn.  (14)
2-5.  1 HHDC in each st across.  Ch1.  Turn.  (14)
6.  1 HHDC into the first 4 stitches, Ch6, skip 6, 1 HHDC into each of the last 4 stitches.  Ch1.  Turn.  (14)
7.  1 HHDC in first 4 stitches, 6 HHDC into the Ch6 and 1 HHDC into each of the last 4 stitches.  Ch1.  Turn.  (14)
8-12.  1 HHDC in each st across.  Ch1.  Turn.  At the end of Row 12, leave a long tail for attaching the top to the sides.  (14)

Bunny
Ears (make 2):
1.  6 HHDC into MR.  Sl st to join to first st.  Ch1.  (6)
2.  2 HHDC into each st around.  Sl st to join.  Ch1.  (12)
3.  2 HHDC into first st, 1 HHDC into the next st.  Repeat around.  Sl st to join.  Ch1.  (18)
4-6.  1 HHDC in each st around.  Sl st to join.  Ch1.  (18)
7.  HHDC2tog, 1 HHDC into next st.  Repeat around.  Sl st to join.  Ch1.  (12) 
8.  1 HHDC into each st around.  Sl st to join.  Fasten off.  Leave a long enough tail to attach to the bunny's head.  (12)

Face:
1.  6 HHDC into MR.  Sl st to join to first st.  Ch1.  (6)
2.  2 HHDC into each st around.  Sl st to join.  Ch1.  (12)
3.  2 HHDC into first st, 1 HHDC into the next st.  Repeat around.  Sl st to join.  Ch1.  (18)
4.  2 HHDC into first st, 1 HHDC into the next 2 st.  Repeat around.  Sl st to join.  Ch1.  (24)
5.  2 HHDC into the first st, 1 HHDC into the next 3 st.  Repeat around.   Sl st to join.  Ch1.  (30)
6-7.  1 HHDC in each st around.  Sl st to join.  Ch1.  (30)
8.  HHDC2tog, 1 HHDC into the next 3 st.  Repeat around.  Sl st to join.  Ch 1.  (24)
9.  HHDC2tog, 1 HHDC into the next 2 st.  Repeat around.  Sl st to join.  Ch1.  (18)
10.  HHDC2tog.  Repeat 8 more times.  Sl st to join.  Fasten off.  Leave a long tail for weaving the last row to close after stuffing with polyfil and for attaching to the side of the tissue box.  (9)

Eyes:  
1.  With 4mm hook and white yarn, 6 SC into MR.  Sl st to join.  Fasten off.  I used tapestry needle to thread through blue yarn for eye color.  (See pic)

Nose:
1.  With 4mm hook and blue yarn, Ch2.  Sc in 2nd Ch from hook.  Ch1.  Turn. (1)
2.  2 SC into st.  Ch1.  Turn.  (2)
3.  2 SC into first st.  1 SC in next next.  Ch1.  Turn.  (3)
4.  SC around the perimeter.  Fasten off.  Leave a tail for attaching to face.

Feet (make 4):
1.  With 5mm hook and yellow yarn, 3 HHDC into MR.  Sl st to join.  Ch1.  (3)
2.  2 HHDC into each st around.  Sl st to join.  Ch1.  (6)
3.  2 HHDC into first st, 1 HHDC into next st.  Repeat around.  Sl st to join.  Ch1.  (9)
4.  1 HHDC into each st around.  Sl st to join.  Fasten off.  Leave a long tail for attaching 2 feet at the front of the box and the other 2 will go on each side positioned at the back side. I weaved blue yarn in and out at the tips of the feet to make it look like toes.

Carrot:
1.  With 4mm hook and orange yarn, Ch2.  SC into 2nd Ch from hook.  Ch1.  Turn.  (1)
2.  2 SC into st.  Ch1.  Turn.  (2)
3.  2 SC into first st, 1 SC into the next st.  Ch1.  Turn.  (3)
4.  2 SC into first st, 1 SC into next st and 2SC in the last st.  Ch1.  Turn.  (5)
5.  2 SC into first st, 1 SC into the next 3 st and 2 SC in the last st.  Ch1.  Turn.  (7)
6.  2 SC into first st, 1 SC into the next 5 st and 2 SC in the last st.  Ch1.  Turn.  (9)
7.  2 SC into the first st, 1 SC into the next 7 st and 2 SC into the last st.  Fasten off.  Leave a long tail for weaving and attaching.  (11)

To form the carrot shape, I rolled the worked piece like a tortilla and then whipstitched it together.  It did not require any stuffing.  

Carrot top:
1.  With 4mm hook and green yarn, Ch4.  SC in 2nd Ch from hook and Ch4, sl st into 2nd Ch from hook and remaining 2 Ch; SC into the next base Ch and then Ch4, *sl st into the 2nd Ch from hook and remaining 2 Ch;* SC into the last base Ch and then Ch4, and repeat from * to *.  Fasten off and weave ends.  

Bowtie:
1.  With 5mm hook and blue yarn make a MR.  I worked 10 triple crochet stitches into the MR.  Fasten off leaving a tail long enough to whip around the center to form the bowtie shape and to attach to the tissue box.  

Tail:
I wrapped blue yarn around 3 of my fingers around 30 times.  I left a long tail to tie a knot in the center and then trimmed the ends and ruffled to make the pompom.  

Assembly:
See pics for how and where I placed my parts.  For the mouth, I just embroidered it.  I attached the carrot at the mouth.  

Overall, this was fairly simply to make.  I chose to make mine a yellow bunny but feel free to use whatever colors you want.  If you are not comfortable with the HHDC stitch, then you can simply replace it with the HDC stitch.  

Legal:
--feel free to use my pattern to make and sale your finished product(s)
--don't use my pics
--don't claim pattern as your own
--please link to my blog

If you use my pattern, please share your pics to either my blog, on Ravelry (rilla2u) or hashtag (#rilla2u) on Instagram.  Please Pin this to your board on Pinterest.  Thanks so much and blessings to you.

Happy Crocheting!!!