Sunday, December 30, 2018

Love Is In The Air Plaid Hat

Hello, everyone!!!  I hope each of you had a wonderful and blessed Merry Christmas.  With the new year upon us, I want to share my newest pattern, “Love Is In The Air” Plaid Hat. This is so perfect for women and girls alike.

I used Red Heart Supersaver yarn and a 6.0mm hook for the body of the hat and a 5.0mm hook for the border. So this hat was made in one evening fairly quickly. I used red, pink and white yarn but you can use any color you want.

I will explain below how to make this the size you want.

Enjoy!!!
"Love Is In The Air" Plaid Hat Pattern
Size:  Average-sized Adult Head (20"- 22" head circumference)

Materials:
--5.0mm & 6.0mm hook
-- 1 skein each of RHSS yarn in Cherry Red, White and Pretty 'N Pink (it takes a total of 100 -150 yds of yarn, depending on the size of your head)
--1 white faux fur pom (or you could opt to make your own pom or omit it)
--tapestry needle for weaving

U.S. Stitch Abbreviations:
Ch:  chain
Sl st:  slip stitch
St:  stitch(es)
SC:  single crochet
SC2tog:  single crochet 2 stitches together (creates a decrease)
DC:  double crochet
BLO:  back loops only
Rep:  repeat
Sk:  skip
FO:  fasten off

Plaid Stitch Note:
You will be carrying over the yarn as you work around the hat.  In each round, you will only be working with 2 colors so leave the third color to the back at the start of each round and then you will pick it back up on the next round and drop the unused color to the back.  
1.  First round is worked rotating between 3 DC of white yarn and then 3 DC of pink yarn all the way around.  Sl st join to the first stitch and ch1.
2.  Second round is worked rotating between 3 DC of pink yarn and then 3 DC of red yarn all the way around.  Sl st join to the first stitch and ch1.

Sizing:
To get the size you need this is what you will need to do.
1.  First, remember, you have to work in multiples of 6.
2.  Second, I used white yarn and the 6.0mm hook for the foundation and made 72 chains.  I then slipped stitched to the first chain to form a ring.
3.  Before joining to form the ring, you will want to make sure to make enough chains to reach around the head.  I did not place the chains around the center of my forehead but upward at my hairline to get the crown.

A couple of things to note if you are altering the size:
1.  If you are starting with less or more chains than the pattern calls for, then remember to work in multiples of 6.
2.  Your last round for the top of the hat will be half the number of chains you start with.
3.  Length of hat:  I made 10 rounds of plaid.  For a smaller-sized hat, you may only need 8-9 plaid rounds (or 11-12 rounds for larger).  You may also decrease the number of border rounds to 3-5 (or add 1-2 more rounds for larger). 

Directions:

Body of Hat:
--With 6.0mm hook and white yarn, Ch72.  Sl st join to first ch to form a circle.
1.  Ch1.  DC in the first and second chs.  DC in the third chain, however before you complete the st, drop the white yarn and pick up the pink yarn and complete the stitch.  Carry over the white yarn as you work your next 3 DC in pink yarn.  Remember, before you complete the 3rd DC st of each set, you will change the color.  Continue this pattern around.  Sl st join to first st.  (72)
2.  With pink yarn, Ch1.  3 DC in pink.  Before completing the 3rd DC stitch, drop the pink yarn and join the red yarn and complete the stitch.  Carry over the pink yarn as you work your next 3 DC st in red yarn.  Continue this pattern repeat around. (72)
3-10.  Rep steps 1 and 2.  At the end of Round 10, you can trim and weave the ends of the white and pink yarn.  (72)
11.  With red yarn, 1 SC in each st around.  Sl st join to the first st and Ch1.  (72)
12.  *1 SC in the first st, Sk the next st,* rep from * to * around.  Sl st join.  FO and leave a long tail to weave in and out of the last round.  Pull the tail to tighten the center and secure remaining tail by weaving in and out the stitches to make sure the hat center does not come undone.  (36)

Border:
1.  With 5.0mm hook and white yarn, join in any stitch of the foundation chain by sl st and ch1.  1 SC in each st around.  Sl st join to first st and Ch1.  (72)
2.  *SC2tog, 1 SC in the next 10 st,* rep from * to * around.  Sl st join to first st and Ch1.  (66)
3.  *In the BLO, SC2tog, 1 SC in the next 9 st,* rep from * to * around.  Sl st join to the first st and Ch1.  (60)
4-6.  In the BLO, 1 SC in each st around.  Sl st join to the first st and Ch1.  At the end of Round 6, sl st join and FO.  Weave ends.  (60)

Pom (Optional):
1.  Attach a white faux fur pom to the center top of hat.  You could add a crocheted pom or opt not to add a pom altogether.  Your choice...

And, that's it for this super cute "Love Is In The Air" Plaid Hat.
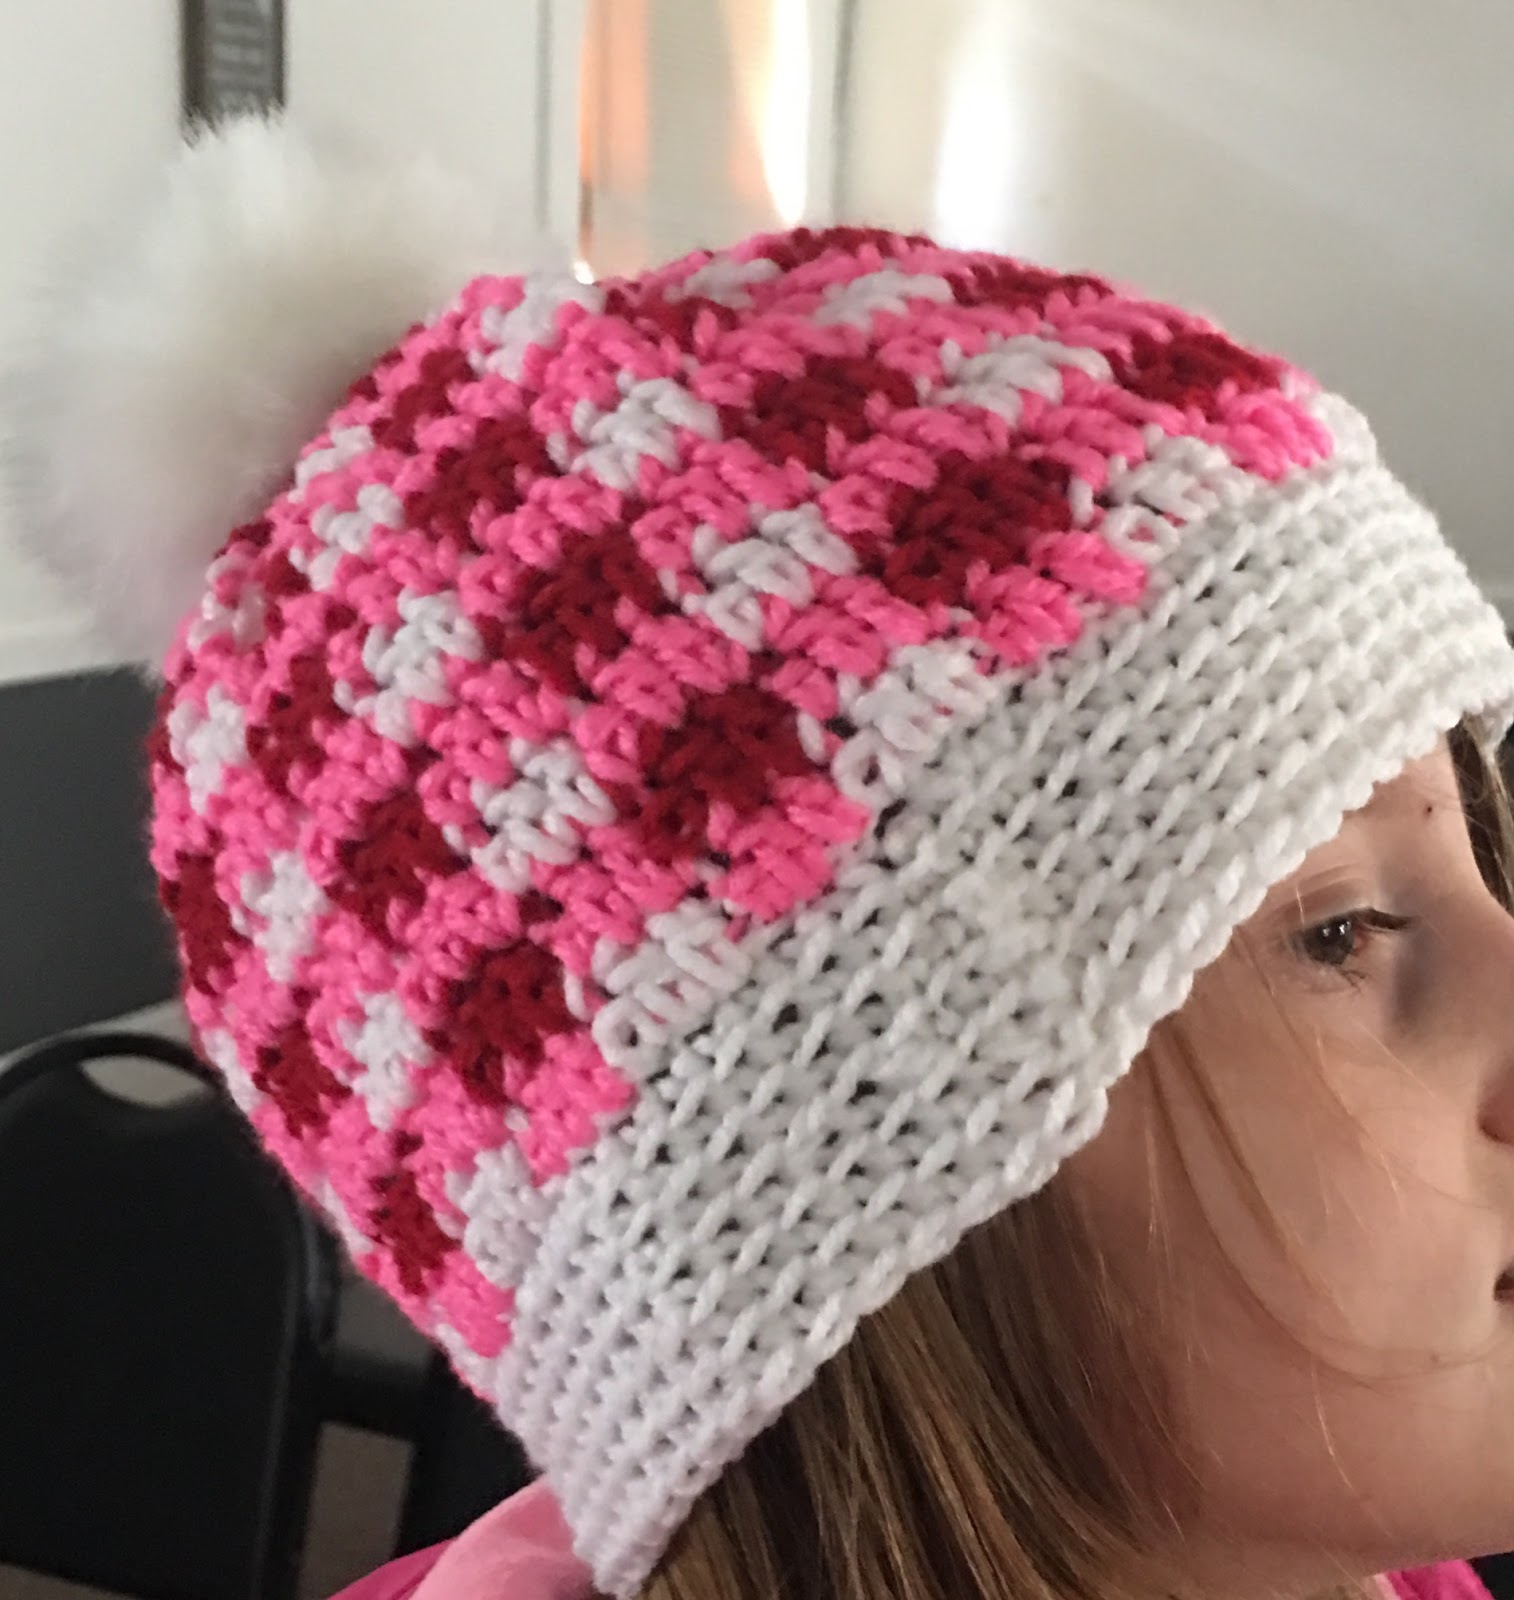
 Here is my 10-year-old niece, Chloe, wearing the hat...
 

And, here it is in Red, Burgundy and Black plaid... 


Happy Crocheting...

Legal:
--don't use/claim my design as your own
--don't use/claim my pics as your own
--okay to make and sale your finished work
--don't share my pattern electronically or in print format (without prior consent) but provide a link to my blog

Social Media:
If you are on the following sites, let's connect and hook up...
  • Instagram:  Rilla2u
  • Pinterest:  Rilla2u
  • Twitter:  Rilla2u
  • Facebook:  /rilla.edwards 

Sunday, December 9, 2018

The Woodsy Hat

"The Woodsy Hat" so aptly named by my son, Cory, is a beautiful, textured pattern.  I have designed this pattern in multiple sizes.

I used Lion Brand's Vanna's Choice #4 worsted weight yarn.  You can use any brand you so desire, just note there may be an overall size variation.

Enjoy!!!!


"The Woodsy Hat"
Size:
For the 0-3 months size, I used Chocolate yarn.
For the Adult size, I used Kelly Green yarn.

Gauge:  I did not gauge pattern.

Materials:
--6.0mm hook
--1 skein of Lion Brand's Vanna's Choice in color of choice 
--faux fur pompom or you can make a yarn pompom
--tapestry needle for weaving

U.S. Stitch Abbreviations:
Ch:  chain
St:  stitch(es)
Sl st:  slip stitch
SC:  single crochet
ESC:  extended single crochet
HDC:  half double crochet
FPHDC:  front post half double crochet
BPHDC:  back post half double crochet
BLO:  back loops only
MR:  magic ring
Rep:  repeat
FO:  fasten off 

Difficulty Level:  
Intermediate (requires knowledge of ESC and post stitches)

Directions:
Newborn:
1.  10 HDC into MR.  Sl st join to first st and Ch1.  (10)
2.  2 HDC into each st around.  Sl st join to first st and Ch1.  (20)
3.  2 HDC into first st, 1 HDC in next st.  Rep around.  Sl st join to first st and Ch1.  (30)
4.  2 HDC into first st, 1 HDC in next 2 st.  Rep around.  Sl st join to first st and Ch1.  (40)
5.  1 SC in BLO of each st around.  Sl st join to first st and Ch1.  (40)
6.  1 ESC in BLO of each st around.  Sl st join to first st and Ch1.  (40)
7-8.  FPHDC around first post st, BPHDC around next post st.  Rep around.  Sl st join to first st and Ch1.  (40) 
9.  Rep #6.
10.  Rep #5.  
11.  1 HDC in each st around.  Sl st join to first st and Ch1.  (40)
12-13.  Rep #8.
14.  1 SC in each st around.  Sl st join to first st and FO.  Weave ends.

0-3 months:
1.  10 HDC into MR.  Sl st join to first st and Ch1.  (10)
2.  2 HDC into each st around.  Sl st join to first st and Ch1.  (20)
3.  2 HDC into first st, 1 HDC in next st.  Rep around.  Sl st join to first st and Ch1.  (30)
4.  2 HDC into first st, 1 HDC in next 2 st.  Rep around.  Sl st join to first st and Ch1.  (40)
5.  2 HDC into first st, 1 HDC in next 9 st.  Rep around.  Sl st join to first st and Ch1.  (44)
6.  1 SC in BLO of each st around.  Sl st join to first st and Ch1.  (44)
7.  1 ESC in BLO of each st around.  Sl st join to first st and Ch1.  (44)
8-9.  FPHDC around first post st, BPHDC around next post st.  Rep around.  Sl st join to first st and Ch1.  (44) 
10.  Rep #7.
11.  Rep #6.  
12.  1 HDC in each st around.  Sl st join to first st and Ch1.  (44)
13-14.  Rep #8.
15.  1 SC in each st around.  Sl st join to first st and FO.  Weave ends.

3-6 months:
1.  10 HDC into MR.  Sl st join to first st and Ch1.  (10)
2.  2 HDC into each st around.  Sl st join to first st and Ch1.  (20)
3.  2 HDC into first st, 1 HDC in next st.  Rep around.  Sl st join to first st and Ch1.  (30)
4.  2 HDC into first st, 1 HDC in next 2 st.  Rep around.  Sl st join to first st and Ch1.  (40)
5.  2 HDC into first st, 1 HDC in next 3 st.  Rep around.  Sl st join to first st and Ch1.  (50)
6.  1 SC in BLO of each st around.  Sl st join to first st and Ch1.  (50)
7.  1 ESC in BLO of each st around.  Sl st join to first st and Ch1.  (50)
8-9.  FPHDC around first post st, BPHDC around next post st.  Rep around.  Sl st join to first st and Ch1.  (50) 
10.  Rep #7.
11.  Rep #6.  
12.  1 HDC in each st around.  Sl st join to first st and Ch1.  (50)
13-14.  Rep #8.
15.  Rep #7.
16.  Rep #6.
17.  1 SC in each st around.  Sl st join to first st and FO.  Weave ends.  (50)

6-12 months:
1.  10 HDC into MR.  Sl st join to first st and Ch1.  (10)
2.  2 HDC into each st around.  Sl st join to first st and Ch1.  (20)
3.  2 HDC into first st, 1 HDC in next st.  Rep around.  Sl st join to first st and Ch1.  (30)
4.  2 HDC into first st, 1 HDC in next 2 st.  Rep around.  Sl st join to first st and Ch1.  (40)
5.  2 HDC into first st, 1 HDC in next 3 st.  Rep around.  Sl st join to first st and Ch1.  (50)
6.  2 HDC into first st, 1 HDC in next 9 st.  Rep around.  Sl st join to first st and Ch1.  (55)
7.  1 SC in BLO of each st around.  Sl st join to first st and Ch1.  (55)
8.  1 ESC in BLO of each st around.  Sl st join to first st and Ch1.  (55)
9-10.  FPHDC around first post st, BPHDC around next post st.  Rep around.  Sl st join to first st and Ch1.  (55) 
11.  Rep #8.
12.  Rep #7.  
13.  1 HDC in each st around.  Sl st join to first st and Ch1.  (55)
14-15.  Rep #9.
16.  Rep #8.
17.  Rep #7.
18.  1 SC in each st around.  Sl st join to first st and FO.  Weave ends.  (55)

12-24 months: 
1.  10 HDC into MR.  Sl st join to first st and Ch1.  (10)
2.  2 HDC into each st around.  Sl st join to first st and Ch1.  (20)
3.  2 HDC into first st, 1 HDC in next st.  Rep around.  Sl st join to first st and Ch1.  (30)
4.  2 HDC into first st, 1 HDC in next 2 st.  Rep around.  Sl st join to first st and Ch1.  (40)
5.  2 HDC into first st, 1 HDC in next 3 st.  Rep around.  Sl st join to first st and Ch1.  (50)
6.  2 HDC into first st, 1 HDC in next 4 st.  Rep around.  Sl st join to first st and Ch1.  (60)
7.  1 SC in BLO of each st around.  Sl st join to first st and Ch1.  (60)
8.  1 ESC in BLO of each st around.  Sl st join to first st and Ch1.  (60)
9-10.  FPHDC around first post st, BPHDC around next post st.  Rep around.  Sl st join to first st and Ch1.  (60) 
11.  Rep #8.
12.  Rep #7.  
13.  1 HDC in each st around.  Sl st join to first st and Ch1.  (60)
14-15.  Rep #9.
16.  Rep #8.
17.  Rep #7.
18.  1 SC in each st around.  Sl st join to first st and FO.  Weave ends.  (60)

Toddler:
1.  10 HDC into MR.  Sl st join to first st and Ch1.  (10)
2.  2 HDC into each st around.  Sl st join to first st and Ch1.  (20)
3.  2 HDC into first st, 1 HDC in next st.  Rep around.  Sl st join to first st and Ch1.  (30)
4.  2 HDC into first st, 1 HDC in next 2 st.  Rep around.  Sl st join to first st and Ch1.  (40)
5.  2 HDC into first st, 1 HDC in next 3 st.  Rep around.  Sl st join to first st and Ch1.  (50)
6.  2 HDC into first st, 1 HDC in next 4 st.  Rep around.  Sl st join to first st and Ch1.  (60)
7.  2 HDC into first st, 1 HDC in next 9 st.  Rep 4 more times.  1 HDC in each of the last 10 st.  Sl st join to first st and Ch1.  (65)
8.  1 SC in BLO of each st around.  Sl st join to first st and Ch1.  (65)
9.  1 ESC in BLO of each st around.  Sl st join to first st and Ch1.  (65)
10-11.  FPHDC around first post st, BPHDC around next post st.  Rep around.  Sl st join to first st and Ch1.  (65) 
12.  Rep #9.
13.  Rep #8.
14.  1 HDC in each st around.  Sl st join to first st and Ch1.  (65)
15-16.  Rep #10.
17.  Rep #9.
18.  Rep #8.
19.  Rep #14.
20.  1 SC in each st around.  Sl st join to first st and FO.  Weave ends.  (65) 

Teen - Adult:
1.  10 HDC into MR.  Sl st join to first st and Ch1.  (10)
2.  2 HDC into each st around.  Sl st join to first st and Ch1.  (20)
3.  2 HDC into first st, 1 HDC in next st.  Rep around.  Sl st join to first st and Ch1.  (30)
4.  2 HDC into first st, 1 HDC in next 2 st.  Rep around.  Sl st join to first st and Ch1.  (40)
5.  2 HDC into first st, 1 HDC in next 3 st.  Rep around.  Sl st join to first st and Ch1.  (50)
6.  2 HDC into first st, 1 HDC in next 4 st.  Rep around.  Sl st join to first st and Ch1.  (60)
7.  2 HDC into first st, 1 HDC in next 5 st.  Rep around.  Sl st join to first st and Ch1.  (70) 
8.  1 SC in BLO of each st around.  Sl st join to first st and Ch1.  (70)
9.  1 ESC in BLO of each st around.  Sl st join to first st and Ch1.  (70)
10-11.  FPHDC around first post st, BPHDC around next post st.  Rep around.  Sl st join to first st and Ch1.  (70) 
12.  Rep #9.
13.  Rep #8.  
14.  1 HDC in each st around.  Sl st join to first st and Ch1.  (70)
15-16.  Rep #10.
17.  Rep #9.
18.  Rep #8.
19.  Rep #14.
20-21.  Rep #10.
22.  1 SC in each st around.  Sl st join to first st and FO.  Weave ends.  (70)

Pom (optional):
You can attach a faux fur pom to the center top of your hat or make your own with yarn.  To make your own with yarn, I wrapped yarn around 3 of my fingers 50 times, tied a double knot in the center, trimmed ends, fluffed and attached to center top of hat. 
 

Happy Crocheting...
Legal:
--don't use/claim my design as your own
--don't use/claim my pics as your own
--okay to make and sale your finished work
--don't share my pattern electronically or in print format (without prior consent) but provide a link to my blog

Social Media:
If you are on the following sites, let's connect and hook up...
  • Instagram:  Rilla2u
  • Pinterest:  Rilla2u
  • Twitter:  Rilla2u
  • Facebook:  /rilla.edwards 

Thursday, December 6, 2018

Buffalo Plaid Baby Blanket

In continuation with my recent craze of working on “Plaid” projects, I made this Buffalo Plaid Baby Blanket with Bernat Blanket yarn.  It’s super soft, warm and cozy.  And, the blanket itself works up  quickly.

My blanket measures 31" x 35" but you can easily adjust the size by starting with a larger or smaller number of chains.  

Buffalo Plaid Baby Blanket Pattern
Size:  approximately 31” x 35”

Gauge:  7 DC stitches x 4 rows = 4”

Materials:
—10mm hook
—1 each of Bernat Blanket yarn (220 yds/skein) in black, crimson and purple plum (this is a #6 super bulky yarn) 
—tapestry needle for weaving

U.S. Stitch Abbreviations:
Ch:  chain
Sl St:  slip stitch
St:  stitch(es)
SC:  single crochet
DC:  double crochet
Rep:  repeat
FO:  fasten off

Special Stitch:
1.  Plaid stitch:  
Row 1:  3DC st in black, then 3 DC st in purple plum.  You will repeat with these 2 colors across.  Now, remember:  1.  Before completing the 3rd DC st, you will want to join the next color.  2.  You will be carrying your yarn across since you are constantly rotating between the 2 colors.
Row 2:  same as #1 except you will be starting with purple plum (goes over previous row’s black) and then rotating this row with crimson (this color will go over previous row’s purple plum)

Special Notes:
1.  I carried over yarn for each row.  However, at the end of each row, I cut the yarn off that wasn't needed for the next row.  This caused me to have more ends to weave but I was trying to save on yarn since I'm using Bernat Blanket yarn on this project.  If you opt not to cut non-used yarn at the end of each row, then you will need more yarn than what the pattern calls for to adjust for carrying over.
2.  I use a Ch1 (doesn't count as a stitch) and place a DC in the first st.  This is my personal preference.  Of course, you can opt to Ch3 at the start of each row to count as your first DC. 
3.  To make this blanket bigger, then work the beginning Chain in multiples of 6 plus 2.  

Directions:
1.  With black yarn, ch47.  You will start the plaid stitch, as explained above in #1 notes, in the 3rd ch from the hook and across, using black and purple plum. Ch1 and turn.  (45)
2.  Repeat plaid stitch, as explained in #2 notes, using purple plum and crimson yarn.  Ch 1 and turn.  (45)
3-29.  Continue to rep rows 1-2.  

Border:
1.  At the end of Row 29,  you will use the purple plum yarn and DC around the blanket, placing 3 DC in each corner.  Working down and up the sides, I placed 2 DC in each side st.  Sl St join to first st and Ch1.  
2.  1 DC in each st around.  3 DC in each corner.  Sl St join to first st and FO.  Weave ends.
3.  Join crimson yarn, 1 SC in each st around.  3 SC in each corner.  Sl St join to first st and FO.  Weave ends.  
4.  Join black yarn, 1 DC in each st around.  3 DC in each corner.  Sl St join to first st and FO.  Weave ends.  

And, that’s it for this super cute, cozy and soft blanket.  You can easily adjust the size by starting with a larger number of chains and continuing to make more rows.

Please share pictures of your finished project.  I'd love to see and share your pictures on my blog.  If you have any questions, please feel free to message and/or email me.

Enjoy!!!
Happy Crocheting...

Legal:
--don't use/claim my design as your own
--don't use/claim my pics as your own
--okay to make and sale your finished work
--don't share my pattern electronically or in print format (without prior consent) but provide a link to my blog

Social Media:
If you are on the following sites, let's connect and hook up...
  • Instagram:  Rilla2u
  • Pinterest:  Rilla2u
  • Twitter:  Rilla2u
  • Facebook:  /rilla.edwards 


Sunday, December 2, 2018

Buffalo Plaid Pajamas - 3T

I think I’m a little like “plaid gone wild” lately...lol!!!  I’m loving the color combo of red, claret (burgundy) and black.  I used worsted weight yarn to make my grandson, Luke, a pair of 3T plaid pajamas.  I think he looks super cute and the pants turned out really well.

Now, if you are intimidated with trying plaid - don't be.  It's actually much easier than you even realize.  It's just a matter of working with 2 colors (black and claret) in a round/row, and then dropping the black yarn for the next round/row and picking up red yarn to work with the claret.  And, you just continue this simple pattern back and forth with whatever you are making.  So, pick up hook and yarn and give plaid a try - you are going to love the results.    

To date, I only have the pattern for the one size - 3T.  I may make a few more sizes later on...

For other sizes:
You can adjust the starting number of chains to get the waist size you need.  Just keep in mind that you need to work in multiples of 6 to make the plaid pattern work.
 Buffalo Plaid Pajamas Pattern


Size:  3T
Gauge:  6 DC st x 3 rows = 2"

Materials:
--6.0mm hook
--1 skein each of Red Heart Super Saver yarn in Cherry Red, Black and Claret
--tapestry needle for weaving
U.S. Stitch Abbreviations:
Ch:  chain
Sl st:  slip stitch
St:  stitch(es)
DC:  double crochet
FPDC:  front post double crochet
BPDC:  back post double crochet
Rep:  repeat
FO:  fasten off

Plaid Stitch:
1.  With the first round of plaid pattern, we will be working with the black and claret yarns.  Once the first row is complete, we will just move the black yarn behind the hook and leave it (don't cut the yarn; just let it rest to the side until we pick it up again.
2.  For the second round of plaid pattern, we will be working with claret and red yarns.  Claret will be worked into the previous rounds' stitches that are black; red will be worked into the previous rounds' stitches that are claret.  Once round is completed, you will pick black yarn back up and leave red yarn behind the hook to the side.  
Claret is used on every round.  You will rotate between using black or red with the claret yarn.  

Directions:
First, we are going to be making the waistband.  My grandson, Luke, has a 21" round waist.  
1.  With black yarn, Ch60.  Sl st join to first ch to form ring, without twisting.  Ch3 (counts as first DC stitch).  DC in each remaining ch around.  Sl st join to the top of Ch3.  (60)
2.  Ch3 (counts as first FPDC stitch),  BPDC around next post st.  *FPDC, then BPDC.*  Rep from * to * around.  Sl st join to the top of Ch3.  (60)
3-4.  Rep #2.  Sl st join to first st.  (60)
Now, we are ready to start working the plaid pattern. You will be working with 2 yarn colors in each round.  As you work the round, you will be rotating between the 2 colors, so you will want to carry over the yarn. 
5.  With black yarn, Ch3 (counts as first DC stitch).  DC in each of the next 2 st.  Before completing the 2nd stitch, join claret yarn and complete stitch.  Now, with claret yarn, DC in the next 3 st.  Before completing the last st, switch back to the black yarn and complete stitch.  Continue doing this all the way around.  Sl st join claret yarn to the top of the Ch3.  Set black yarn behind the hook to the side since you will not use it in the next round.  (60)
6.  With claret yarn, Ch3 (counts as first DC stitch).  DC in each of the next 2 st.  Before completing the 2nd stitch, join red yarn and complete stitch.  Now, with red yarn, DC in the next 3 st.  Before completing the last st, switch back to claret yarn and complete stitch.  Continue doing this all the way around.  Sl st join to the top of the Ch3.  Set red yarn behind the hook to the side since you will not be using it in the next round.  Pick black yarn back up.  (60)
7-12.  Rep #5 and #6.  (60)
Forming the first leg:
13.  Rep #5, but only complete 30 stitches.  Sl st join to the top of Ch3.  (30)
14.  Rep #6, but only complete 30 stitches.  Sl st join to the top of Ch3.  (30)
15-32.  Rep #13 and #14.  (30)
33.  With black yarn, Ch3 (counts as first DC st).  Then continue with 1 DC in each st around.  Sl st join to the top of the Ch3.  (30)
34.  Ch3 (counts as first FPDC st), then BPDC.  FPDC, BPDC.  Rep around.  Sl st join to the top of the Ch3.  (30)
35.  Rep #34.  Sl st join to the top of the Ch3.  FO and weave ends.
Forming the second leg:
Join yarn in the crotch area of an un-worked stitched in round 13 and rep as above from #13-35 to complete the second leg.  Once you complete the second leg, you will need to use your tapestry needle and a small piece of yarn to whipstitch any center crotch opening.  Mine was very small. 

Drawstring (optional):
1.  With black yarn, Ch101.  Sl st in 2nd ch from hook and across.  FO.  With tapestry needle, weave drawstring through the first row of the waistband.  
2.  To the ends, make a small pompom by wrapping around 3 fingers 30 times.  Tie in a double knot, trim with scissors and add to each end of the drawstring.     

Happy Crocheting...

Legal:
--don't use/claim my design as your own
--don't use/claim my pics as your own
--okay to make and sale your finished work
--don't share my pattern electronically or in print format (without prior consent) but provide a link to my blog

Social Media:
If you are on the following sites, let's connect and hook up...
  • Instagram:  Rilla2u
  • Pinterest:  Rilla2u
  • Twitter:  Rilla2u
  • Facebook:  /rilla.edwards 


Buffalo Plaid Ponytail Ear Warmer/Headband

In plaid-mode at the moment, I decided to make a “Buffalo Plaid Ponytail Ear Warmer/Headband.” Cute for my head, secures my ponytail and will definitely keep my ears toasty warm.  Plus, the plaid-look is so stylish and fashionable- I see it everywhere.

I hope you all will enjoy making this as much as I did in designing it.  I'd love to see your finished projects and share your pictures.

HERE is the LINK... to my Etsy Shop if you would like to purchase the PDF, Ad-Free Version of my Buffalo Plaid Ponytail Ear Warmer/Headband Pattern...


Buffalo Plaid Ponytail Ear Warmer/Headband Pattern
Size:  This will fit the average Teen - Adult.  It measures 4" wide.  To make smaller, adjust the number of rows you complete.  A good rule of thumb, is to test length as you go to make sure you get the right fit for your head. 

Gauge:  8 HDC st x 5 rows = 2"

Materials:
--5.0mm hook
--ponytail holder
--stitch markers
--RHSS yarn in red, black and claret (or any brand of #4 worsted weight yarn) - it takes a total of 100-130 yards
--small amount of #5 bulky yarn in white (I used Yarn Bee's Fleece Lite in Quartz) for the trim
--tapestry needle for weaving ends

U.S. Stitch Abbreviations:
Ch:  chain
Sl st:  slip stitch
St:  stitch(es)
SC:  single crochet
HDC:  half double crochet 
Rep:  repeat
Sk:  skip
FO:  fasten off

Special Note:
This is a variation to my Basic Ponytail Ear Warmer/Headband pattern.  If you are not familiar with it, you can check out the pattern HERE...  From there, you can also find the link to my video tutorial on Youtube.

Plaid Stitch:
1.  First row you will work HDC st with black and claret.
2.  Second row you will with HDC st with claret and red.  
3.  You will be carrying over your yarn so just keep the color not in use to the back as you carry it over and then just pick up when you are ready to use it. 
 
Directions: 
1.  Sl st join black yarn to the ponytail holder and Ch1.  Make 24 SC around holder.  (If you don't have a ponytail holder, you can Ch20, sl st join to first ch to form a ring and then make 24 SC st).  Sl st join to first st and Ch1.  (24)
2.  1 HDC in each st around.  Sl st join to first st and Ch1.  (24)
3.  Rep #2.  Sl st join to first st and stop for a moment. 
Stitch Marker Placement:
You will place a stitch marker at the following stitches:  #1, #9, #13 and #21.  You are going to be working between st markers #1 and #9 to make the band.  Once you make the numbered rows, you will join the last row at and between stitch markers #13 and #21.


Now, you are ready to continue crocheting.  From here forward, you will be working between stitch #1 and #9.

4. With black yarn, Ch2 (this counts as the first HDC st).  Make 2 more HDC st in the next 2 st.  Before completing the 2nd HDC st, you will want to switch to claret yarn and complete the stitch.  HDC in the next 3 st with the claret yarn.  Before completing the 3rd st, you will want to switch back to the black yarn to complete the 3rd st.  HDC in the next 3 st with black yarn. 
5.  With claret yarn, Ch2 (this counts as the first HDC st).  Make 2 more HDC in the next 2 st.  Before completing the 2nd HDC st, you will want to switch to red yarn and complete the stitch.  HDC in the next 3 st with red yarn.  Before completing the 3rd st, you will want to switch back to the claret yarn to complete the 3rd st.  HDC in the next 3 st with claret yarn.  

6-45.  You will continue repeating steps #4 and #5 until you have completed 45 rows (or the number of rows you need to fit your head)
46.  Now, you are ready to sl st join Row 45 to the stitches between stitch markers #13 and #21 of Round 3.  FO all yarn and weave ends.
47.  Join claret in the side stitch of Row 4 and Ch1.  Evenly SC from Row 4 to Row 45.  FO and weave ends.
48.  Rep #47 on opposite side.  
49.  With your bulky yarn, join in any stitch and Ch1.  HDC in same st and around.  Sl st join to first st and FO.  Weave ends.
50.  Rep #49 on opposite side.  


And, that completes your Buffalo Plaid Ponytail Ear Warmer/Headband.  I'm very pleased with the outcome of this project and hope you all will enjoy making this stylish and warm Ear Warmer for yourselves or to gift to others.

Please feel free to PIN and SHARE this pattern to your PINTEREST boards!!!!  I would love to hear your feedback and see your pictures...
 
Happy Crocheting...
Legal:
--don't use/claim my design as your own
--don't use/claim my pics as your own
--okay to make and sale your finished work
--don't share my pattern electronically or in print format (without prior consent) but provide a link to my blog

Social Media:
If you are on the following sites, let's connect and hook up...
  • Instagram:  Rilla2u
  • Pinterest:  Rilla2u
  • Twitter:  Rilla2u
  • Facebook:  /rilla.edwards 


Thursday, November 29, 2018

Easy Buffalo Plaid Hat...

I’ve got to admit, this was a fun project to work on. I didn’t know how it would turn out overall with me and plaid. And, surprisingly, I really love it.

I used worsted weight yarn in white, black, red and burgundy with a 6.0mm hook.

Buffalo Plaid Hat
Size:  Average-sized Adult Head (21"- 22" head circumference)

Materials:
--6.0mm hook
-- 1 skein each of #4 worsted weight yarn in Red, White, Burgundy and Black (it takes a total of 100 -150 yds of yarn, depending on the size of your head) -- I used "I Love This Yarn" from Hobby Lobby
--1 white faux fur pom (or you could opt to make your own pom or omit it)
--tapestry needle for weaving

U.S. Stitch Abbreviations:
Ch:  chain
Sl st:  slip stitch
St:  stitch(es)
SC:  single crochet
HDC:  half double crochet
DC:  double crochet
BLO:  back loops only
Rep:  repeat
Sk:  skip
FO:  fasten off

Plaid Stitch Note:
You will be carrying over the yarn as you work around the hat.  In each round, you will only be working with 2 colors so leave the third color to the back at the start of each round and then you will pick it back up on the next round and drop the unused color to the back.
1.  First round is worked rotating between 3 DC of Burgundy yarn and then 3 DC of Black yarn all the way around.  Sl st join to the first stitch and ch1.
2.  Second round is worked rotating between 3 DC of Red yarn and then 3 DC of Burgundy yarn all the way around.  Sl st join to the first stitch and ch1.

Sizing:
To get the size you need this is what you will need to do.
1.  First, remember, you have to work in multiples of 6 when doing the plaid stitch.
2.  Second, I used white yarn and the 6.0mm hook to make the ribbed band first.  I made 48 rows for the length of my band.  I made 18 stitches in BLO for the width.  I used HDC stitches.  I then slipped stitched  the short ends together to form a ring.  You will want to make sure that the length will comfortably fit around your forehead.

A couple of things to note if you are altering the size:
1.  If you are starting with less or more chains than the pattern calls for, then remember to work in multiples of 6.
2.  Your last round for the top of the hat will be half the number of chains you start with.
3.  Length of hat:  I made 10 rounds of plaid.  For a smaller-sized hat, you may only need 8-9 plaid rounds (or 11-12 rounds for larger).  You may also decrease the number of border rounds to 3-5 (or add 1-2 more rounds for larger). 

Directions:

Band of Hat:
--With 6.0mm hook and white yarn, Ch19.
1.  HDC in 2nd ch from hook and across.  Ch1 and turn.  (18)
2.  Working in the BLO, HDC in each st across.  Ch1 and turn.  (18)
3-48.  Rep #2.

At the end of Row 48, sl st the short ends together.  Now, you will be working in the round.

Body of Hat:
1.  With White yarn, 2 SC in first st, 1 SC in next st.  Rep around.  Sl st join to first st and FO.  Weave ends.  (72)
2.  Join Burgundy yarn and Ch1.  DC in the first and second st.  DC in the third st, however before you complete the st, drop the Burgundy yarn and pick up the Black yarn and complete the stitch.  Carry over the Burgundy yarn as you work your next 3 DC in Black yarn.  Remember, before you complete the 3rd DC st of each set, you will change the color.  Continue this pattern around.  Sl st join to first st.  (72)
3.  With Red yarn, Ch1.  3 DC in Red.  Before completing the 3rd DC stitch, drop the Red yarn and join the Burgundy yarn and complete the stitch.  Carry over the Red yarn as you work your next 3 DC st in red yarn.  Continue this pattern repeat around. (72)
4-11.  Rep steps 1 and 2.  At the end of Round 11, you can trim and weave the ends of the Red and Black yarn.  (72)
12.  With Burgundy yarn, 1 SC in each st around.  Sl st join to the first st and Ch1.  (72)
13.  *1 SC in the first st, Sk the next st,* rep from * to * around.  Sl st join.  FO and leave a long tail to weave in and out of the last round.  Pull the tail to tighten the center and secure remaining tail by weaving in and out the stitches to make sure the hat center does not come undone.  (36)

Pom (Optional):
1.  You can make a White Pom with yarn.  I wrapped white yarn around 4 of my fingers 60-70 times.  I then double-tied a center knot to secure.  I then trimmed the ends, fluffed and attached to the center top of the hat.
2.  Or, you can add a faux fur pom of your color choice.

Trim:
Once I complete the hat, I then like to go back to the band section to complete a smooth row of SC stitches for the final trim.  I join white yarn in any st and Ch1.  SC in same st and around.  Sl st join to first st.  FO and weave ends.  (48)

Here it is with a black band and pom:

Black or White band/pom - both are gorgeous!!!!
Happy Crocheting...

Legal:
--don't use/claim my design as your own
--don't use/claim my pics as your own
--okay to make and sale your finished work
--don't share my pattern electronically or in print format (without prior consent) but provide a link to my blog

Social Media:
If you are on the following sites, let's connect and hook up...
  • Instagram:  Rilla2u
  • Pinterest:  Rilla2u
  • Twitter:  Rilla2u
  • Facebook:  /rilla.edwards 


Tuesday, November 27, 2018

Dallas Cowboys Hat & Pant Set - 0-3 months

I made this adorable hat and pant set for my newest little cousin, Kaden.  He is Texan-born, so I'm sure he's going to find himself a Dallas Cowboys fan when he gets older.

I used  Red Heart Super Saver, #4 worsted weight yarn, in grey, blue and white.  I also added a decorative button to the hat and pants. 

Dallas Cowboys Hat & Pant Set 
Size:  0-3 months
Size:  0 - 3 months old (18" round waist and 12" total length - 5" from waistband to crotch and 7" from crotch to ankle)

You can easily customize to the size of your liking:
1.  For the hat, add additional increase rounds;
2.  For the pants, start with more chains to reach the size you need, just make sure you have an odd number.

Materials:
--4.0mm hook
--#4 yarn in grey, blue or white
--(2) decorative buttons (optional)
--tapestry needle for weaving

U.S. Stitch Abbreviations:
Ch:  chain
Sl st:  slip stitch
St:  stitch(es)
SC:  single crochet
HDC:  half double crochet
FPHDC:  front post half double crochet
BPHDC:  back post half double crochet
Rep:  repeat
MR:  magic ring
FO:  fasten off

Directions:


Hat:

1.  With grey yarn, 8 HDC into MR.  Sl st join to first st and Ch1.  (8)
2.  2 HDC in each st around.  Sl st join to first st and Ch1.  (16)
3.  2 HDC in first st, 1 HDC in next st.  Rep around.  Sl st join to first st and Ch1.  (24)
4.  2 HDC in first st, 1 HDC in next 2 st.  Rep around.  Sl st join to first st and Ch1.  (32)
5.  2 HDC in first st, 1 HDC in next 3 st.  Rep around.  Sl st join to first st and Ch1.  (40)
6.  2 HDC in first st, 1 HDC in next 4 st.  Rep around.  Sl st join to first st and Ch1.  (48)
     48 HDC stitches = 5" diameter
     5" diameter x 3.14 = 15.7 head circumference  
7-10.  1 HDC in each st around.  Sl st join to first st and Ch1.  At the end of Round 10, FO and weave ends.  Join white yarn.  (48)
11.  With white yarn, 1 HDC in each st around.  Sl st join and FO.  Weave ends.  (48)
12.  Join blue yarn in any st and Ch1.  FPHDC around the first post st, then BPHDC around the next post st.  Rep around.  Sl st join to first st and Ch1.  (48)
13-15.  Rep #12.  At the end of Round 15, FO and weave ends.  (48)
16.  Join grey yarn.  1 SC in each st around.  Sl st join to first st.  FO and weave ends.

Pom:
1.  With blue and white yarn held together, wrap 15-20 times around 3 of your fingers.  Tie a secure knot in the center.  Trim and fluff pom.  Attach to top center of hat.  
Star:
I made a simple star with blue yarn.  I then used white yarn and the tapestry needle to embroider the star shape.  I then added a football button to the center of the star.  I then attached the star to the hat.
There are lots of free star patterns listed on Pinterest.  Mine is just a simple pattern.
Pants:
Waistband:
1.  With grey yarn, Ch45.  Sl st join to the first ch and Ch1 to form a ring.  Keeping the ring from twisting, you will want to place 1 HDC in each ch around.  Sl st join to first st and Ch1.  (45)
2-4.  For these rounds, you will work *FPHDC around the post of the first st, then BPHDC around the post of the next st.*  Rep from * to * around.  Sl st join to first st and Ch1.  (45)

At the end of Round 4, FO grey yarn and weave ends.  Your waistband is complete.  Now, to move on to the body portion:

5.  Join white yarn with a sl st, Ch1.  1 HDC in each st around.  Sl st join to first st and FO.  Weave ends.  (45)
6.  Join blue yarn with a sl st, Ch1.  1 HDC in each st around.  Sl st join to first st and Ch1.  (45)
7.  Rep #6.
8.  Rep #6.  At the end of this round, you will FO yarn and weave ends.  (45)
9.  Join white yarn with a sl st, Ch1.  1 HDC in each st around.  Sl st join to first st and FO.  Weave ends.  (48)
10-12.  For the next 3 rounds, with gray yarn, 1 HDC in each st around.  Sl st join to first st and Ch1.  (48)

Forming the first leg:
13.  1 HDC in each of the first 22 st.  Then you will sl st join to the first st.  This is the start of the first leg.  
14-25.  These rounds will be completed as follows:  1 HDC in each st around.  Sl st join to first st and Ch1.  (22)

     At the end of Round 25, you will slip st join and FO yarn.  Weave ends.  

26.  With white yarn, 1 HDC in each st around. Sl st join and FO.  Weave ends.  (22)
27.  With blue yarn, 1 HDC in each st around.  Sl st join to the first st and Ch1.  (22)
28.  With blue yarn, 1 HDC in each st around.  Sl st join to the first st and FO.  Weave ends.  (22)
29.  With white yarn, 1 HDC in each st around.  Sl st join and FO.  Weave ends.  (22)  
30.  With grey yarn, 1 HDC in each st around.  Sl st join and FO.  Weave ends.  (22)

Forming the second leg:
Rep steps 13 through 30 to make the second leg.  You may notice a very small opening in the crotch area.  No worries.  Once you have completed with making both of the legs, turn wrong side out and use your tapestry needle to whipstitch close the small opening.

Belt (optional):
1.  With blue yarn, I chained 75.  I SC in the 2nd ch from the hook and into each ch around.  FO.
2.  I then weaved the belt in and out of Round 2.  I secured each ends of the belt with double-knots.  

Button:  (optional)
I added a blue decorative button to the front center of the pants. 

And, that just about sums up my version of a Dallas Cowboys Hat and Pant Set.  Below, is my super adorable little cousin, Kaden, wearing his Dallas Cowboys Hat and Pants.  And I have one word to sum this up -- ADORABLE!!!!!!!!

 Happy Crocheting...
Legal:
--don't use/claim my design as your own
--don't use/claim my pics as your own
--okay to make and sale your finished work
--don't share my pattern electronically or in print format (without prior consent) but provide a link to my blog

Social Media:
If you are on the following sites, let's connect and hook up...
  • Instagram:  Rilla2u
  • Pinterest:  Rilla2u
  • Twitter:  Rilla2u
  • Facebook:  /rilla.edwards