Sunday, September 30, 2018

"Be Still" Baby Blanket

I spent my Sunday afternoon working on this super soft, super cute, "Be Still" Baby Blanket.  I used "I Love This Yarn" (#4 worsted weight yarn) from Hobby Lobby.

This blanket has a 2 row repeat pattern.  Once you work a few rows, you can naturally work this pattern without much thought while watching TV - for me, I've been on an NCIS, Netflix kick...lol!!!

I used a combination of stitches to make this pattern between the main part and the border.  But, it's nothing hard, just a matter of knowing your stitches.

The finished sized measures approximately 35" x 40".

"Be Still" Baby Blanket Pattern

Size:  35" x 40"

Materials:
--6.0mm hook
--2 skeins each of ILTY in "Be Still" and "Dappled Wheat"
--tapestry needle for weaving

U.S. Stitch Abbreviations:
Ch:  chain
Sl st: slip stitch
St:  stitch(es)
Ch/St:  chain or stitch
SC:  single crochet
FPSC:  front post single crochet
HDC:  half double crochet
TC:  triple crochet
Rep:  repeat
Sk:  skip
FO:  fasten off

Pattern:
A.  Start with an odd number of chains, any length you desire.  I started with a 101 chains.
B.  Ch1 at the end of each row.

C.  Pattern scheme for main portion of the blanket:  2-row repeat pattern using "Be Still":
  1. HDC in 2nd ch from hook.  *Ch2, Sk 2 ch/st, HDC in next ch/st.*  Rep from *  to * across.  You will end with an HDC in the last stitch. 
  2. *SC in the first st.  TC and HDC into the Ch2 space.*  Rep from * to * across.  You will end with a SC stitch in the last stitch. This will create a beautiful, textured stitch to the front of your blanket.  (see pic above)
  3. Complete Rows 1 and 2 until you reach your desired length, ending with Row 1.  I completed 51 Rows.  
D.  Pattern scheme for border portion of the blanket:  border uses the "Dappled Wheat":
  1. I joined Dappled Wheat yarn into any st with a sl st and ch1.  SC in same st and around, placing 3 SC st in each corner. Sl st join to first st. 
  2. SC around.  3 SC in each corner.  Sl st join to first st. 
  3. Rep #2.
  4. Rep #2.
  5. Rep #2.
  6. HDC in st, Ch2, Sk2.  Rep around, placing 3 HDC in each corner.  Sl st join to first st. 
  7. Ch1, 3 HDC into the Ch2 space, Ch1.  Rep around, placing 3 HDC in each corner.  Sl st join to first st. 
  8. Rep #7.
  9. Rep #7.
  10. SC, Ch5, Sk 2, SC.  Rep around, placing 3 SC in each corner.  Sl st join to first st. 
  11.  SC in first st, Ch5.  FPSC around the SC of the previous round, Ch 5 and continue to rep around.  Place 3 SC in each corner.  Sl st join to first st.
  12. Rep #11.
  13. Sl st over to the Ch5 space.  5 HDC into the Ch5 space, SC into the next Ch5 space.  Rep around, placing 3 HDC into each corner.  Sl st join to first st and FO.  Weave ends.  
Something simple and different I was playing around with.  I'm really happy with the texture created in this blanket.  And, the yarn is so fitting for me since Psalm 46:10 is my favorite verse in the Bible:  "Be Still And Know I Am God..."

 Happy Crocheting...
Legal:
--don't use/claim my design as your own
--don't use/claim my pics as your own
--okay to make and sale your finished work 
--don't share my pattern electronically or in print format (without prior consent) but provide a link to my blog

Wednesday, September 26, 2018

The Woodsman Hat...

“The Woodsman Hat” is sure to keep ears toasty warm this fall and winter season.  It’s made with Bernat’s Chunky yarn - #6 super bulky.  And, it works up really fast.  This definitely will make my to-do list for last minute gifts since it took me less than 30 minutes to complete.

Cute, simple and fast = perfect project!!!

I used an 8.0mm hook and Bernat Soft Chunky yarn in White, Soft Taupe and Dark Taupe.  I did not have a full skein of any of the colors I used.  I worked my row colors based on my availability of how much of each yarn I had on hand.  I'm really happy with the end result of this hat.  The colors just reminded me of the woods/mountains - I grew up in the mountains.

I made my "Woodsman Hat" to fit a 19" - 21" head circumference.  You can adjust to any desired size. 

I started with Soft Taupe and made 10 DC stitches into a magic ring.  I continued making increase rounds until I reached the diameter I needed.  I then completed rounds of DC stitches until I was almost to my desired length.  I then used the White yarn and completed a round of Front Post Double Crochet stitches and Back Post Double Crochet stitches.  My final round was single crochet stitches.  Fasten off and weave ends.

For the pompom, I held all 3 color strands together and wrapped around 3 of my fingers 15-20 times, tied a double-knot in the center and trimmed the ends.  I used the tapestry needle to attach the pompom to the top of the hat. 

The Woodsman Hat
Happy Crocheting...

Legal:
--don't use/claim my design as your own
--don't use/claim my pics as your own
--okay to make and sale your finished work
--don't share my pattern electronically or in print format (without prior consent) but provide a link to my blog


Tuesday, September 25, 2018

WV Baby Blanket

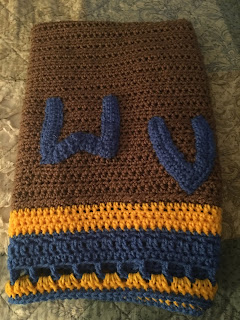
I made this WV Baby Blanket for my little cousin, Elijah.  He’s 6 months old and lives in Ohio but his daddy grew up in WV.

I used RHSS yarn and a 6.0mm hook to complete this project.  It measures approximately 33” x 33”.

WV Baby Blanket


Happy Crocheting...
Legal:
--don't use/claim my design as your own
--don't use/claim my pics as your own
--okay to make and sale your finished work 
--don't share my pattern electronically or in print format (without prior consent) but provide a link to my blog

Saturday, September 22, 2018

Woodland Pumpkins...

Here's a cute, Fall (seasonal) project I worked on yesterday.  I decided to "doll up" my faux pumpkins.  I bought all 3 of these pumpkins at Hobby Lobby - each 40% off.  They measure 3", 4" and 5" tall.

Joann’s also has a great selection of pumpkins AND at 60% off.  Click on the LINK on the sidebar for great deals on faux pumpkins...

I decided my pumpkins needed a Woodland Animal theme to them...lol.  So, I came up with: a Fox, a Deer and an Owl design for mine.

I supposed you could use real pumpkins, if you have them or find them cheap.

Each design was super simple and quick to make.

Woodland Pumpkins


Materials:
--3 pumpkins (3", 4" and 5")
--4.5mm hook
--#4 worsted weight yarn (Terra Cotta, Taupe, Black, White, Light & Dark Brown, Yellow, Orange)
--stick pins, craft glue, hot glue or Velcro (some form of medium for attaching features to each pumpkin
--tapestry needle for weaving

U.S. Stitch Abbreviations:
Ch:  chain
Sl st:  slip stitch
St:  stitch(es)
SC:  single crochet
HDC:  half double crochet
DC:  double crochet 
SC2tog:  single crochet 2 stitches together (creates a decrease)
SC3tog:  single crochet 3 stitches together (creates a decrease)
Picot:  chain 4 and sl st into first chain
Rep:  repeat
MR:  magic ring
FO:  fasten off

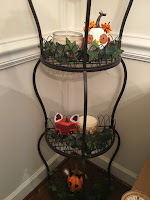
Here's a picture of the pumpkins I purchased at Hobby Lobby...
Directions:

Fox: 
I used the 3" tall pumpkin.

Head/Nose Strip:
1.  With Terra Cotta yarn, Ch3.  SC in 2nd ch from hook and next ch.  Ch1 and turn.  (2)
2.  2 SC in first st, 1 SC in next st.  Ch1 and turn.  (3)
3.  2 SC in first st, 1 SC in next st, 2 SC in last st.  Ch1 and turn.  (5)
4.  SC across.  Turn.  (5)
5.  Ch6.  SC in 2nd ch from hook and 4 remaining chs.  SC in each st across.  Ch6, SC in 2nd ch from hook and 4 remaining chs. Turn.  Sl st into each of the 5 SC st you just made.  Ch1 and turn.  (15)
6.  SC across.  FO and weave ends.  (15)

Nose Tip:
1.  With Black yarn, 3 SC into MR.  Sl st join to first st and FO.  Leave a tail to attach to the Head/Nose Strip.

Eyes (make 2):
1.  With Black yarn, 6 SC into MR.  Sl st join to first st.  FO and weave ends.  
2.  I used White yarn to embroider pupils.  

Ears (make 2):
1.  With Black yarn, Ch2.  1 SC in the 2nd ch from hook.  FO Black yarn and join Terra Cotta.  Ch1 and turn.  (1)
2.  With Terra Cotta yarn, 2 SC in stitch.  Ch1 and turn.  (2)
3.  2 SC in first st, 1 SC in next st.  Ch1 and turn.  (3)
4.  SC across.  Ch1 and turn.  (3)
5.  2 SC in first st, 1 SC in next st, 2 SC in last st.  FO Terra Cotta yarn and join White yarn.  Ch1 and turn.  (5)
6.  With White yarn, SC evenly around ear.  Sl st join to first st and FO.  Weave ends.  
Owl:
I used the 4" tall pumpkin.

Nose:
1.  With Yellow yarn, Ch2, 1 SC in 2nd ch from hook.  Ch1 and turn.  (1)
2.  2 SC in st.  Ch1 and turn.  (2)
3.  SC across.  FO and weave ends.  (2) 

Wings (make 2):
1.  Light Brown/Taupe yarn, Ch7.  SC in 2nd ch from hook, HDC in next ch, DC in the next 2 ch, HDC in next ch and 3 DC in last ch.  Rotate to work on opposite side of base chain.  HDC in next ch.  DC in the next 2 ch. HDC in next ch.  SC in last ch.  Sl st join to first st and FO.  Weave ends.  (13)
2.  With Terra Cotta yarn, join with a sl st and Ch1 into any stitch.  SC in same.  SC in each st around.  Sl st join and FO.  Weave ends.  (13)

Eyes (make 2):
1.  With Orange yarn, 6 SC into MR.  Sl st join and FO Orange yarn.  Join Light Brown/Taupe yarn and Ch1.
2.  2 SC in first st, 1 SC in next st.  Rep around.  Sl st join to first st.  FO and weave ends.  (9) 

Ears (make 2):
For the ears I made pompoms.  I used 3 colors - Terra Cotta, Orange and Yellow.  I held all 3 strands together and wrapped around 2 of my fingers 5 times.  I then tied the center into a double knot.  Trimmed ends and that's it.  You have a pom made.

Feet (make 2):
1.  With Yellow yarn, Ch4.  SC in 2nd ch from hook and across.  Ch1 and turn.  (3)
2.  SC across.  Turn.
3.  Picot (Ch4, sl st into first ch) and then sl st into first st of Row 2. Picot, then sl st into 2nd st of Row 2.  Picot, then sl st into 3rd st of Row 2.  FO and weave ends.  

Deer:

I used the 5" tall pumpkin.

Nose:
1.  With Light Brown/Taupe yarn, 6 SC into MR.  Sl st join to first st and Ch1.  (6)
2.  2 SC in first st, 2 HDC in each of the next 2 st, 2 SC in next st, 2 HDC in each of the next 2 st.  Sl st join to first st and Ch1.  (12)
3.  SC around.  Sl st join and FO.  Weave ends.  (12)

Nose Tip:
1.  With Black yarn, Ch2.  SC in 2nd ch from hook.  Ch1 and turn.  (1)
2.  2 SC in st.  Ch1 and turn.  (2)
3.  2 SC in first st, 1 SC in next st.  FO and leave tail to attach Tip to Nose.

Eyes (make 2):
1.  With Black yarn, 6 SC into MR.  Sl st join to first st and FO.  Weave ends.
2.  With White yarn, embroider pupils.  FO and weave ends.  

Ears (make 2):
1.  With White yarn, Ch3.  SC in 2nd ch from hook and next ch.  Ch1 and turn.  (2)
2.  2 SC in first st, 1 SC in next st.  Ch1 and turn.  (3)
3.  SC across.  Ch1 and turn.  (3)
4.  2 SC in first st, 1 SC in next st, 2 SC in last st.  Ch1 and turn.  (5)
5.  SC2tog, 1 SC in next st, SC2tog.  Ch1 and turn.  (3)
6.  SC3tog.  FO and weave ends.  (1)
7.  Join Light Brown/Taupe yarn, SC evenly around ear.  Sl st join to first st.  FO and weave ends.   

Antlers (make 2):
1.  With Dark Brown yarn, Ch8.  SC in 2nd ch from hook.  SC into each of the next 3 ch.  Ch4.  SC in 2nd ch from hook and next 2 ch.  SC in each of the 3 remaining base ch.  FO and weave ends.

Assembly:
You can use whatever medium you have to attach the features to your pumpkins - craft glue, hot glue gun, Velcro, pins.  At the time I took the pics, I had pins attaching my pieces so that I could opt to change out if I wanted.  But, I'm thinking of using Velcro circles or strips for mine. 

There's lots of different ways to use these cute Woodland Pumpkins in your home.  Check out my pictures below for ideas...

 I hope you all will enjoy this simple project to add a little "dress-up" to faux (or real) pumpkins for the fall season...

Happy Crocheting...
Legal:
--don't use/claim my design as your own
--don't use/claim my pics as your own
--okay to make and sale your finished work 
--don't share my pattern electronically or in print format (without prior consent) but provide a link to my blog


Scarecrow Doll

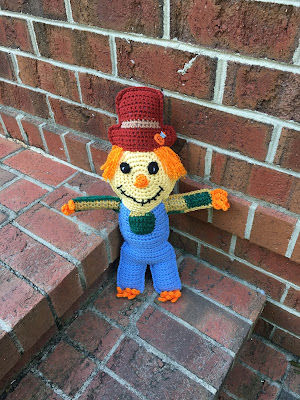
With Fall season here, I wanted to make a Scarecrow.  I've been days throwing ideas back and forth in my head until, finally, I settled on making a "Scarecrow Doll."  He measures approximately 19" long.  He's super cute and sure to please my grandchildren to hug up with when they take their afternoon naps.

I used "I Love This Yarn" from Hobby Lobby, polyfil to stuff, 1 button to accent the hat and a 4.5mm hook.  I started on him yesterday evening and finished him up earlier today.  So, this is a pretty quick and simple pattern.  You can use any #4 worsted weight stash yarn you have on hand.  It doesn't use a lot of any one color.

Scarecrow Doll

Size:  approximately 19" long

Materials:
--4.5mm hook
--#4 worsted weight yarn (Terra Cotta, Orange, Black, White, Medium Blue, Green/Gold, Taupe/Tan and a pale/light yellow skin color) -- not a lot of each color; the most used was the body/leg portion - approx. 110 - 150 yds and the face - 80 - 11 yds
--1 decorative button (on hat)
--tapestry needle for weaving

U.S. Stitch Abbreviations:
Ch:  chain
Sl st:  slip stitch
St:  stitch(es)
SC:  single crochet
SC2tog:  single crochet 2 stitches together (creates a decrease)
BLO:  back loops only
Rep:  repeat
MR:  magic ring
FO:  fasten off 

Directions:

Head (make 2):
(Note:  I used a pale yellow color.  Any skin color yarn will work just fine.  I worked the head portion in the round; so use a stitch marker to keep track of beginning/ending stitch)

1.  8 SC to MR.  (8)
2.  2 SC in each st around.  (16)
3.  2 SC in first st, 1 SC in next st.  Rep around.  (24)
4.  2 SC in first st, 1 SC in next 2 st.  Rep around.  (32)
5.  2 SC in first st, 1 SC in next 3 st.  Rep around.  (40)
6.  2 SC in first st, 1 SC in next 4 st.  Rep around.  (48)
7.  2 SC in first st, 1 SC in next 5 st.  Rep around.  (56)
8.  2 SC in first st, 1 SC in next 6 st.  Rep around.  (64)
9.  2 SC in first st, 1 SC in next 7 st.  Rep around.  Join to first st with a sl st and FO.  Weave ends.  (72)

Hat (make 2):
1.  With Terra Cotta yarn, Ch21.  SC in 2nd ch from hook and across.  Ch1 and turn.  (20)
2.  SC across.  Ch1 and turn.  (20)
3-5.  Rep #2.  At the end of Row 5, FO and weave ends.
6.  With Taupe/Tan yarn, join in the 5th st (Sk 4 st) with a sl st and ch1.  SC in same st and into the next 11 st.  Ch1 and turn.  (12)
7.  SC across.  FO and weave ends.  (12)
8.  Re-join Terra Cotta yarn.  SC across.  Ch1 and turn.  (12)
9-15.  SC across.  Ch1 and turn.  At the end of Row 15, FO and weave ends.
Body (make 2):
1.  Join Medium Blue yarn into any stitch with a sl st into the BLO of Round 9 of the Head.  Into the BLO, SC in same and into the back loops of the next 15 st.  Ch1 and turn.
2.  SC across.  Ch1 and turn.  (16)
3-13.  Rep # 2.  (16)
14.  SC2tog, 1 SC in the next 12 st, SC2tog.  Ch1 and turn.  (14)
15.  SC2tog, 1 SC in the next 10 st, SC2tog.  Ch1 and turn.  (12)
16.  2 SC in the first st, 1 SC in the next 10 st, 2 SC in the last st.  Ch1 and turn.  (14)
17.  2 SC in the first st, 1 SC in the next 12 st, 2 SC in the last st.  Ch1 and turn.  (16)
18.  2 SC in the first st, 1 SC in the next 14 st, 2 SC in the last st.  Ch1 and turn.  (18)
19.  SC across.  Ch1 and turn.  (18)
20-24.  Rep #19.
First Leg:
25.  SC in the first 7 st, 2 SC in the next st.  Ch1 and turn.  (9)
26.  SC across.  Ch1 and turn.  (9)
27.  SC across.  Ch1 and turn.  (9)
28.  SC2tog, 1 SC in the next 7 st.  Ch1 and turn.  (8)
29.  SC across.  Ch1 and turn.  (8)
30-36.  Rep #29.  At the end of Row 36, FO and weave ends.  (8)
Second Leg:
Join yarn at the other end of Row 24 and Rep steps #25 - 36 for the second leg.
Now, center hat at the top and whipstitch to attach.  I placed Row 1 of Hat to Round 7 of Head, with 2 stitches on each end of the hat hanging over.

By now, you should have 2 completed/attached Hat to Head to Body pieces (Front section and Back section) 

Arms:
1.  Join Green/Gold (or your color of choice) to the first side stitch of the body with a sl st and ch1.  SC in same st.  SC in the next 3 st.  Ch1 and turn.  (4)
2.  SC across.  Ch1 and turn.  (4)
3-16.  Rep #2.  At the end of Row 16, FO and weave ends.

Repeat on the opposite side of Body.  And, then repeat again on the second Body piece.

Now, that the arms are attached, you will be adding the facial features to only one of the Head sections.

Eyes:
1.  With Black yarn, 6 SC into MR.  Sl st join to first st and FO.  Leave a tail for attaching.  (6)
2.  I used White yarn to embroider a pupil.
3.  Attach eyes at Rounds 4-5 of the Head.

Nose:
1.  With Orange yarn, Ch4.  SC in 2nd ch from hook and across.  Ch1 and turn.  (3)
2.  SC2tog, SC in next st.  Ch1 and turn.  (2)
3.  SC2tog.  FO and leave a tail for attaching.
4.  Attach nose to center of Head at Round 1.

Mouth:
For the mouth, I used Black yarn and embroidered a smile, then continued to make the mouth to look like stitches.

Patch:
1.  With Green/Gold yarn, Ch7.  SC in 2nd ch from hook and across.  Ch1 and turn.  (6)
2.  SC across. Ch1 and turn.  (6)
3-6.  Rep #2.  (6)
7.  SC evenly around.  FO and leave a tail for attaching to center front of Body.
Now, you are ready to attach the Front and Back sections together.  With the Front section facing me, I joined Terra Cotta yarn on the right side, bottom of hat with a sl st and Ch1.  SC in same.  I then SC joined my 2 sections together, changing colors, where needed, to match up with each area.  As you join the 2 pieces together, add your polyfil (or your stuffing of choice).  For the arms, I had to stuff small amounts at a time to get it in. 

Finally, you are ready to attach hair, fingers and toes.

Hair:
For the hair, I joined yarn and tied into a double knot.  I then used my tapestry needle to fray the yarn.  I repeated this 3 more times - for a total of 4 times on one side.  I then repeated the process on the opposite side of the face.

Fingers:
1.  With Orange yarn, I joined yarn on the arm end.  *Ch6.  Sl st into 2nd ch from hook and next 4 ch.  Sl st into the base stitch of the arm.  Sl st into the next st.* Rep from * to * until you have 4 fingers made.
2.  Repeat on opposite arm.

Feet:
I gave my Scarecrow 6 feet.  The feet are made the same way as the fingers were made.

Last, I added a decorative Pumpkin button to the hat.  And, that's it for this super simple and cute "Scarecrow Doll."

I hope you all will enjoy this little guy as much as I did in designing him.

Here’s a picture from fellow crocheter, Janis Saunders. She made her scarecrow into a wall/door hanging. Awesome job:

Happy Crocheting...
Legal:
--don't use/claim my design as your own
--don't use/claim my pics as your own
--okay to make and sale your finished work 
--don't share my pattern electronically or in print format (without prior consent) but provide a link to my blog

Tuesday, September 18, 2018

Hearts & Flowers Blanket

Here's a super cute, "Hearts & Flowers" Baby Blanket made using "I Love This Yarn" from Hobby Lobby.  I made this using the Herringbone Half Double Crochet stitches (one of my most favorites stitches to use - the texture is just simply gorgeous to me).

I made the blanket first, then added the border and last worked on the appliques to whipstitch attach...so you could simply make the blanket and the border and then add whatever you want to it or leave it plain.

Hearts & Flowers Blanket Pattern

Size:  Approximately 33" x 33"

Gauge:  12 stitches x 10 rows = 4"

Materials:
--6.0mm hook for the blanket
--5.0mm hook for the flowers, hearts and letters
--I Love This Yarn - (3) Pink; (1) White; (1) Peacock
--Tapestry needle for weaving

U.S. Stitch Abbreviations:
Ch:  chain
Sl st:  slip stitch
St:  stitch(es)
SC:  single crochet
HDC:  half double crochet
HHDC:  herringbone half double crochet
HHDC2tog:  herringbone half double crochet 2 stitches together (creates a decrease)
DC:  double crochet
TC:  triple crochet
BLO:  back loop only
Sk:  skip
Rep:  repeat
MR:  magic ring
FO:  fasten off

Special Stitch:
1.  HHDC (Herringbone Half Double Crochet):  yarn over and insert hook into stitch, yarn over and pull back through the stitch (3 loops on stitch); pull 1 loop on hook through; yarn over and pull remaining two loops on hook through.

Here’s my VIDEO TUTORIAL on how to do the HHDC Stitch....

Directions:
1.  Ch91.  HHDC in 2nd ch from hook and across.  Ch1 and turn.  (90)
2.  1 HHDC in each st across.  Ch1 and turn.  (90)
3-80.  Rep #2.  (90)

Border:
1.  With Pink yarn, 1 SC st evenly around, placing 3 SC st in each corner.  FO Pink yarn and join Turquoise.
2.  With Peacock yarn, *HHDC in st, Ch2, Sk2 st,* rep from * to * around, placing 3 HHDC st in each corner.  Sl st join to first st and Ch1.
3.  3 HHDC st in each Ch2 space around, placing 3 HHDC st in each corner.  Sl st join to first st and Ch1.
4.  1 HHDC st in each st around, placing 3 HHDC st in each corner.  Sl st join to first st.
5.  Ch5 and pull up loop and remove hook.  Join Pink yarn in next st with a sl st, Ch5 and remove hook.  Put hook back into the Peacock loop of Ch 5 and cross over the Pink Ch5 and sl st into the next st and Ch5.  Put hook into the Pink Ch5 loop and cross over the Peacock Ch5 and sl st into the next st and Ch5.  Rep this pattern around.  Sl st join and FO.  Weave ends.
(Note:  For Round 5, the hardest part is keeping your yarn from tangling but it is so worth doing; it makes such a pretty border...)

Flowers (make 4):
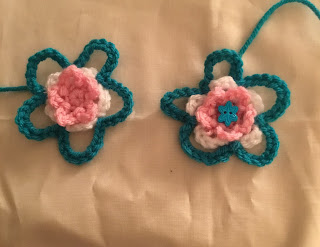
Tri-Color Flower Pattern
With or without a button in the center...
I'm going to attempt to give you the directions on how I made this flower.  It really is a simple design.
1.  With a 5.0mm hook and Pink yarn, I placed 5 SC into a MR.  Sl st join to first st.
2.  *Ch5 and sl st into next st,* rep around.  Sl st join and FO Pink yarn.  Leave a long enough Pink tail for attaching your flower to the blanket.  Join White yarn.
3.  *Ch5 and sl st into the BLO of the SC st made in Round1,* rep around.  Sl st join and FO White yarn.  Join Peacock yarn.
4.  *Ch10 and sl st into the BLO of the SC st made in Round1,* rep around.  Sl st join and FO.
5.  Weave ends. 

Heart:
1.  With Peacock yarn, Ch3, 1 HHDC in 2nd ch from hook and next ch.  Ch1 and turn.  (2)
2.  2 HHDC in first st, 1 HHDC in next st.  Ch1 and turn.  (3)
3.  2 HHDC in first st, 1 HHDC in next st and 2 HHDC in last st.  Ch1 and turn.  (5)

4.  You will continue to add an INCREASE st in the first st and the last st, with 1 HHDC in each st in-between until you reach and complete a row with 35 stitches.

5.  Now, you will complete an additional 9 rows of 35 stitches.

6.  HHDC2tog, 1 HHDC in next 31 st, HHDC2tog.  Ch1 and turn.  (33)
7.  1 HHDC in each st across.  Ch1 and turn.  (33)
8-9.  Rep #7.  (33)
10.  1 HHDC in 15 st across.  Ch1 and turn.  (15)
11.  HHDC2tog, 1 HHDC in next 11 st, HHDC2tog.  Ch1 and turn.  (13)
12.  1 HHDC in next 11 st.  HHDC2tog.  Ch1 and turn.  (12)
13.  1 HHDC in each st across. Ch1 and turn.  (12)
14.  HHDC2tog, 1 HHDC in next 8 st, HHDC2tog.  Ch1 and turn.  (10)
15.  1 HHDC in 8 st, HHDC2tog.  Ch1 and turn.  (9)
16.  HHDC2tog, 1 HHDC in next 5 st, HHDC2tog.  Ch1 and turn.  (7)
17.  HHDC2tog, 1 HHDC in next 3 st, HHDC2tog.  FO and weave ends.

Rep # 10-17 on opposite side to form 2nd hump of heart.

Border:
1.  SC in each st around.  Sl st join to first st.
2.  Ch3 and sl st into the first ch to form a Picot Stitch.  *Sl st into the next 3 st.  Ch3 and sl st into the first ch.* Rep around.  Sl st join and FO.  Leave a long tail for attaching the heart to the center of the blanket. 


Letters:
The letters are my own design.  There are a lot of great, FREE, patterns available online for the alphabet.  (I may eventually get my alphabet added to my blog).


I hope you all will enjoy this pattern.  Please share your work, if you decide to make yourself a Hearts & Flowers Blanket.  I'd love to see your work...

Happy Crocheting...
Legal:
--don't use/claim my design as your own
--don't use/claim my pics as your own
--okay to make and sale your finished work 
--don't share my pattern electronically or in print format (without prior consent) but provide a link to my blog

Thursday, September 6, 2018

My Little Pony - Twilight Costume

Okay, my granddaughter, Arielle, loves watching “My Little Pony” and Twilight is her favorite pony. So, I’ve started on a costume set for her.
The sizes I’m working on will comfortably fit 3T - 4T size; and depending on size of toddler could possibly fit a 2T and 5T.

To date, I have the Top and Skirt completed.  I still need to finish up making the tail on a belt, wings, a mask, and maybe wrist gloves.,.

Here’s a few pictures to share.  As soon as I get this ensemble completed, I will share the pattern with you all...

My Little Pony - Twilight Costume

I made braids to intertwine on the sides to remind you of a pony’s mane...
The cutie mark is on the top.  The sleeves are open, tied with yarn. 

I’m loving this pattern and I hope you all will too...AS soon as I’ve got it completed I will add details...


Happy Crocheting...
Legal:
--don't use/claim my design as your own
--don't use/claim my pics as your own
--okay to make and sale your finished work 
--don't share my pattern electronically or in print format (without prior consent) but provide a link to my blog