Friday, March 23, 2018

Easter Lamb Baby Blanket

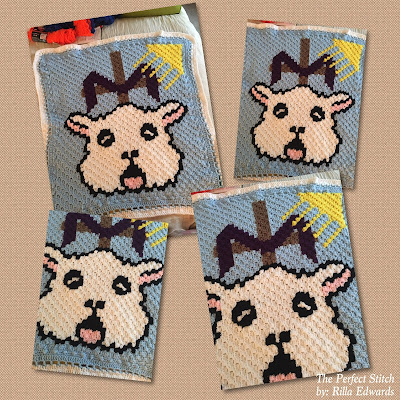
I woke up in the wee hours of this morning with this C2C graph design idea.  So, I opened up my Excel app and got this completed.  I'm so excited to make this graph into a blanket.  It is the true representation of what Easter means to me:  The Cross, The Lamb, The Son (sun)...

I'm going to go ahead and share my graph for those who may want to make this before Easter.  I will update this post as I progress/complete my blanket.

I plan to use a 6.0mm hook with the altered C2C method of crocheting -- Chain5, HDC stitches/Chain2.  I'm not sure yet if I will be using Red Heart Super Saver or I Love This Yarn.  I will have to go through my stash and make a choice by what I have on hand...

I hope you all will enjoy this one...

                                  Easter Lamb Baby Blanket 


Size:  Approximately 30" x 35”

Materials:
--6.0mm hook 
--#4 worsted weight yarn in Light Blue, White, Black, Pink, Brown and Yellow (I used Red Heart Super Saver yarn)
--tapestry needle for weaving

Stitch Abbreviations:
Ch:  chain
Sl st:  slip stitch
SC:  single crochet
HDC:  half double crochet 
FO:  fasten off 

Special Stitch:
1.  Popcorn Stitch (PS):  4 SC in same stitch, pull up loop, remove hook and place in first SC stitch (front to back), then join back in loop and pull through.

Directions:  
Blanket:
(The blanket is made using Corner-2-Corner - C2C - method)
1.  Use the C2C pixel graph below, starting in lower right corner.  I used Ch5 and HDC stitches, instead of Ch6 and DC stitches, to make the blanket.  

Border:  
1.  SC evenly around Blanket.  3 SC in each corner.  Sl st join to first st and Ch1.  
2.  For this round, I made Popcorn Stitches.   *PS in first st, 1 SC in the next 3 st.* repeat around.  3 SC in each corner.
3.  Repeat #1.  
4.  1 HDC st in each st around, placing 3 HDC st in each corner.  Sl St join and Ch1.  
5.  *1 HDC in first st, Ch2, Sk2,* Rep around, placing 3 HDC st in each corner.  Sl St join and FO.  Weave ends.  
6.  Join white yarn in any HDC st of previous round and Ch1.  HDC in first st, 2 HDC in ch2 space. Rep around, placing 3 HDC st in each corner.  Sl St join and Ch1.  
7.  1 HDC st in each st around.  3 HDC st in each corner.  Sl St join and FO.  Weave ends.  

Happy Crocheting...


Legal:
--don't use/claim my design as your own
--don't use/claim my pics as your own
--okay to make and sale your finished work
--don't share my pattern electronically or in print format (without prior consent) but provide a link to my blog

Thursday, March 22, 2018

Fluffy Slime Day...

Fluffy Slime Day

Today, is Fluffy Slime Day with my 4 grandchildren, Jacob, Arielle, Gabriel and Luke, and my youngest son, Cory.  This was so much fun to make, to roll and to just play with.  My 2 younger grandsons, Gabriel and Luke, howeever, ended up with more slime in their hair and on their clothes...lol.

Here's the LINK to the Bestideasforkids website with the directions and materials needed to do this super fun project with your kids/grand kids.


All in all, a fun, messy day with my grandchildren.  They are each super excited and eager to make more Slime - but, that's for another day...lol!!!


Monday, March 19, 2018

Simple Bunny Applique

Here's a quick and simple Bunny Applique -- add a pin to the back to wear on your shirt/jacket/scarf, attach to a baby bib, hat or outfit.  I'm sure there's lots of other ways to use this.

Minimal yarn, 2 eyes and only minutes to make...

Simple Bunny Applique 
Simple Bunny Applique Pattern

Size:  2" across

Materials:
--4.0mm hook
--#4 worsted weight yarn
--2 small safety eyes (or you could crochet your own) 
--pin to sew or glue to the back, if wearing as a broach
--tapestry needle for weaving

U.S. Stitch Abbreviations:
Ch:  chain
Sl st:  slip stitch
St:  stitch(es)
SC:  single crochet
HDC:  half double crochet
DC:  double crochet
Rep:  repeat
MR:  magic ring
FO:  fasten off

Directions:
1.  With yellow yarn, 6 SC into MR.  Sl st join to first st and Ch1.  (6)
2.  2 SC in each st around.  Sl st join to first st and Ch1.  (12)
3.  2 SC in first st, 1 SC in next st.  Rep around.  Sl st join to first st.  (18)
4.  *Ch7.  1 SC in 2nd ch from hook, 1 HDC in next ch, 1 DC in next 2 ch, 1 HDC in next ch and 1 SC in last ch.* (first ear made) Sl st into each of the next 3 st of Round 3.  Rep from * to * to make second ear.  FO and weave ends.

Attach safety eyes (or make your own eyes - follow same instructions for nose)

Nose:
1.  With pink yarn, Ch3.  Sl st into the first ch.  FO and leave a long enough tail for attaching.

Embroider mouth with pink yarn.

Simple, easy and cute!!!
Happy Crocheting...

Legal:
--don't use/claim my design as your own
--don't use/claim my pics as your own
--okay to make and sale your finished work
--don't share my pattern electronically or in print format (without prior consent) but provide a link to my blog

Simple Granny Square Baby Blanket with Hat & Diaper Cover...

I made this pink and gray Simple Granny Square Baby Blanket with a hat and diaper cover for a friend of mine whose third grandchild will be arriving soon.  She asked if I could make something in pink and gray.  I've been so busy with making character blankets, C2C blankets and Popcorn Stitch blankets that I actually had to pause a minute to think about the "Granny Square..." lol.

The pink is Red Heart Super Saver and the gray is "I Love This Yarn" from Hobby Lobby. I used what I had on hand here at the house.

I made the hat and diaper cover to fit Newborn - 6 months.  The blanket measures approximately 32" x 32".

Simple Granny Square Baby Blanket 
with Hat & Diaper Cover
Size:
Blanket:  approx 32" x 32"
Hat/Diaper Cover:  0-6 months
Gauge:  I did not gauge pattern

Materials:
--4.5 and 6.0mm hooks
--#4 worsted weight yarn in pink and gray
--1 button for diaper cover (1 1/4" - 1 1/2")
--tapestry needle for weaving

U.S. Stitch Abbreviations:
Ch:  chain
Sl st:  slip stitch
St:  stitch(es)
SC:  single crochet
HDC:  half double crochet
DC:  double crochet
Sk:  skip
Rep:  repeat
MR:  magic ring
FO:  fasten off

Directions:
 
Blanket:
If you are not familiar with the Granny Square Crochet, then there's a great tutorial on it HERE: How-to-Crochet-a-Granny-Square 

For my blanket, I made mine with:
  • 17 DC rounds in pink
  • 7 DC rounds in gray
If you want to make your blanket bigger, then simply continue making rounds.

For the Border:
1.  1 DC evenly in each stitch around.
2.  2 DC in first st, 1 DC in next st.  Repeat around.  Slip stitch join to the first stitch and fasten off.  Weave ends.

Hat:
1.  With a 4.5mm hook and pink yarn, 8 SC into MR.  (8)
2.  2 SC in each st around.  (16)
3.  2 SC in first st, 1 SC in next st.  Rep around.  (24)
4.  2 SC in first st, 1 SC in next 2 st.  Rep around.  (32) 
5.  2 SC in first st, 1 SC in next 3 st.  Rep around.  (40)
6.  2 SC in first st, 1 SC in next 4 st.  Rep around.  (48)
7.  2 SC in first st, 1 SC in next 5 st.  Rep around.  (56)
(If you need a bigger head circumference, then continue making additional increase rows)
8- 14.  1 SC in each st around.  (56)
15.  3 HDC in first st, skip 2 st.  Rep around.  2 HDC in last st.  
16.  1 SC in each st around. Fasten off pink yarn and switch to gray yarn for border.
17.  With gray yarn, 2 HDC in first st, 1 HDC in next st.  Rep around.
18.  2 HDC in first st, 1 HDC in next 2 st.  Rep around.  Sl st join to first st and FO.  Weave ends. 

Flowers (make 2 - 1 for hat and 1 for diaper cover): 
1.  I started with a magic ring and 10 SC.  Sl st join to first st and Ch1.
2.  In first st, add the following stitches:  *[1 SC, 1 HDC, 1 DC, 1 HDC, 1 SC], sl st into the next st,* repeat this around.  You will make 5 petals.  FO and leave tail for attaching.

Diaper Cover:
This pattern is not mine.   It is adjustable to fit 0 - 6 months.  HERE is the link to this simple, adjustable diaper cover.  I used gray yarn for the first 3 and last 5 rows and for the border.
Happy Crocheting...
Legal:
--don't use/claim my design as your own
--don't use/claim my pics as your own
--okay to make and sale your finished work
--don't share my pattern electronically or in print format (without prior consent) but provide a link to my blog

Sunday, March 18, 2018

Baby Chick Apron - Toddler-Sized...

Okay, how cute does my grandson, Gabriel, look wearing my newest design, "Baby Chick Apron" with "feet" pockets?  I wanted to design a cute, quick and easy pattern.  And, this truly fits the bill.

This is the perfect project to complete before Easter for your little one to wear while Easter Egg Hunting - no basket required.  Eggs can easily be collected and stored in the "feet" pockets.

The apron measures 18" long, 14" across at the widest and 9" across at the chest.  I used #4 worsted weight yarn and a 6.0mm hook.  I love using 1 hook size for an entire pattern.

Baby Chick Apron
Baby Chick Apron Pattern - Toddler-Sized!!!

Size:  Toddler; 18" long x 14" wide (lower portion) and 9" wide (upper portion)

Gauge:  6 HDC stitches x 5 rows = 2"

Materials:
--6.0mm hook
--#4 worsted weight yarn in yellow, orange and black
--tapestry needle for weaving

U.S. Stitch Abbreviations:
Ch:  chain
Sl st:  slip stitch
St:  stitch(es)
SC:  single crochet
HDC:  half double crochet
HDC2tog:  half double crochet 2 stitches together (creates a decrease)
DC:  double crochet
Rep:  repeat
MR:  magic ring
FO:  fasten off

Directions:
(The Apron is worked from the bottom up.)
1.  Ch35.  HDC in 2nd ch from hook and across.  Ch1 and turn.  (34)
2.  2 HDC in first st, 1 HDC in next 32 st, 2 HDC in last st.  Ch1 and turn.  (36)
3.  2 HDC in first st, 1 HDC in next 34 st, 2 HDC in last st.  Ch1 and turn.  (38)
4.  2 HDC in first st, 1 HDC in next 36 st, 2 HDC in last st.  Ch1 and turn.  (40)
5-16.  1 HDC in each st across.  Ch1 and turn.  (40)
17.  HDC2tog, 1 HDC in next 36 st, HDC2tog.  Ch1 and turn.  (38)
18.  HDC2tog, 1 HDC in next 34 st, HDC2tog.  Ch1 and turn.  (36)
19.  HDC2tog, 1 HDC in next 32 st, HDC2tog.  Ch1 and turn.  (34)
20.  HDC2tog, 1 HDC in next 30 st, HDC2tog.  Ch1 and turn.  (32)
21.  HDC2tog, 1 HDC in next 28 st, HDC2tog.  Ch1 and turn.  (30)
22.  HDC2tog, 1 HDC in next 26 st, HDC2tog.  Ch1 and turn.  (28)
23.  HDC2tog, 1 HDC in next 24 st, HDC2tog.  Ch1 and turn.  (26)
24.  HDC2tog, 1 HDC in next 22 st, HDC2tog.  Ch1 and turn.  (24)
25.  HDC2tog, 1 HDC in next 20 st, HDC2tog.  Ch1 and turn.  (22)
26.  HDC2tog, 1 HDC in next 18 st, HDC2tog.  Ch1 and turn.  (20)
27.  HDC2tog, 1 HDC in next 16 st, HDC2tog.  Ch1 and turn.  (18)
28.  2 HDC in first st, 1 HDC in next 16 st, 2 HDC in last st.  Ch1 and turn.  (20)
29.  2 HDC in first st, 1 HDC in next 18 st, 2 HDC in last st.  Ch1 and turn.  (22)
30.  2 HDC in first st, 1 HDC in next 20 st, 2 HDC in last st.  Ch1 and turn.  (24)
31-37.  I HDC in each st across.  Ch1 and turn.  (24)
38.  HDC2tog, 1 HDC in next 20 st, HDC2tog.  Ch1 and turn.  (22)
39.  HDC2tog, 1 HDC in next 18 st, HDC2tog.  Ch1 and turn.  (20)
40.  HDC2tog, 1 HDC in next 16 st, HDC2tog.  Ch1 and turn.  (18)
41.  HDC2tog, 1 HDC in next 14 st, HDC2tog.  Ch1 and turn.  (16)
42.  HDC2tog, 1 HDC in next 12 st, HDC2tog.  Ch1 and turn.  (14)
43.  1 HDC in each st across.  Ch1 and turn.  (14)
44.  1 SC in each st evenly around the apron, placing 3 SC st in each corner st.  Sl st join to first st, FO and weave ends.

Eyes (make 2):
1.  With black yarn, 8 HDC into MR.  Sl st join to first st and FO.  Leave a tail for attaching.

I placed my eyes at Rows 37-39, 5 stitches over from each end.


Beak:
1.  With orange yarn, Ch2.  1 HDC in 2nd ch from hook.  Ch1 and turn.  (1)
2.  2 HDC in stitch.  Ch1 and turn.  (2)
3.  2 HDC in first st.  1 HDC in next st.  Ch1 and turn.  (3)
4.  2 HDC in first st.  1 HDC in next st.  2 HDC in last st.  Ch1 and turn.  (5)
5.  1 SC in each st evenly around.  FO and leave a tail for attaching.

Place below, center of eyes.


Hair:
1.  I used the tapestry needle and yellow yarn.  I weaved yarn in center top stitch and tied in double knot.  Repeat a second time in the same st.
2.  I then repeated #1 in the stitch to the left of the center stitch and to the right of the center stitch.
3.  Use tapestry needle to fray yarn.


Pockets (make 2):
1.  With orange yarn, Ch5.  HDC in 2nd ch rom hook and across.  Ch1 and turn.  (4)
2.  2 HDC in first st, 1 HDC in the next 2 st and 2 HDC in the last st.  Ch1 and turn.  (6)
3.  2 HDC in first st, 1 HDC in the next 4 st and 2 HDC in the last st.  Ch1 and turn.  (8)
4.  2 HDC in first st, 1 HDC in the next 6 st and 2 HDC in the last st.  Ch1 and turn.  (10)
5-6.  1 HDC in each st across.  Ch1 and turn.  (10)
7.  2 HDC in first st, 1 HDC in the next 8 st and 2 HDC in the last st.  Ch1 and turn.  (12)
8.  2 HDC in first st, 1 HDC in the next 10 st and 2 HDC in the last st.  Ch1 and turn.  (14)
9-10.  1 HDC in each st across.  Ch1 and turn.  (14)
11.  2 HDC in first st, 1 HDC in the next 12 st and 2 HDC in the last st.  Ch1 and turn.  (16)
12-14.  1 HDC in each st across.  Ch1 and turn.  (16)
15.  1 DC in each of the first 4 st.  Sl st in each of the next 2 st.  1 DC in each of the next 4 st.  Sl st in each of the next 2 st.  1 DC in each of the last 4 st.  FO.  Leave a long tail for attaching.  (16)

Repeat for 2nd pocket.  Attach to Apron.  (See my pics to help with placement)

Neck Strap:
Note:  your child may not require 40 rows for the neck strap.  You may only need 30 Rows.  My grandson has a 20" head circumference; so you may want or need to adjust the number of rows for a smaller head.

1.  Leave a beginning tail for attaching.  Ch3.  HDC in 2nd ch from hook and next ch.  Ch1 and turn.  (2)
2-40.  HDC across.  Ch1 and turn.  At the end of Row 40, FO and leave a tail for attaching.  (2)

Attach each end of the strap to each end of the top of the apron.  Weave ends.  (See my pics)


Waist Straps:
1.  Join orange yarn at Row 26 with a Ch1.  HDC in same st.  1 HDC in end stitch of Row 25.  Ch1 and turn.  (2)
2-50.  HDC across.  Ch1 and turn.  At the end of Row 50, FO and weave ends.  (2)

Repeat on opposite side.

Happy Crocheting... 

Legal:
--don't use/claim my design as your own
--don't use/claim my pics as your own
--okay to make and sale your finished work
--don't share my pattern electronically or in print format (without prior consent) but provide a link to my blog

Saturday, March 17, 2018

Leprechaun Hat - Toddler

Happy St. Patrick's Day, everyone.  My grandson, Gabriel, asked me to make him a "Leprechaun Hat" so I whipped him up one this morning.  I'm finally on the road to recovery from my bout with the Flu.  But, I'm still physically drained and weak from having it.

This hat was simple to make.  It took me less than an hour to complete.  I used #4 worsted weight yarn and a 6.0mm hook.

Leprechaun Hat - Toddler
Size:  Toddler (18" - 20" head circumference)

Materials:
--6.0mm hook
--#4 worsted weight yarn in green, yellow and black
--tapestry needle for weaving

U.S. Stitch Abbreviations:
Ch:  chain
Sl st:  slip stitch
St:  stitch(es)
SC:  single crochet
DC:  double crochet
FLO:  front loops only
BLO:  back loops only
Rep:  repeat
MR:  magic ring
FO:  fasten off

Note:
  • Hat is worked in the round, so use a stitch marker to keep track of beginning/ending rounds.
  • I only made 1 round with black yarn, but I think it would've looked better with 2 rounds.  For the pattern, I indicated to complete 2 rounds in black yarn. 

Directions:
1.  10 DC into MR.
2.  2 DC each st around.
3.  2 DC first st, 1 DC next st.  Rep around.
4.  2 DC first st, 1 DC next 2 st.  Rep around.
5.  2 DC first st, 1 DC next 3 st.  Rep around.
6.  1 DC in BLO of each st around.
7-11.  1 DC in each st around.  At the end of Round 11, switch to black yarn.
12-13.  With black yarn, 1 DC in each st around.  At the end of Round 13, switch back to green yarn.
14.  With green yarn, 2 DC in FLO of first st, 1 DC in FLO of next st.  Rep around.
15.  2 DC in first st, 1 DC in next 2 st.  Rep around.
16.  1 SC in each st around.  FO.  Weave ends.

1.  With yellow yarn, Ch22.  FO and leave tail for attaching.  Place in a buckle (rectangular) shape over Rounds 12 and 13 and whipstitch into place.  Weave ends.

That's it.  Simple and easy.  Change up colors for different holidays/seasons.
Happy Crocheting...
Legal:
--don't use/claim my design as your own
--don't use/claim my pics as your own
--okay to make and sale your finished work
--don't share my pattern electronically or in print format (without prior consent) but provide a link to my blog

Wednesday, March 14, 2018

Flu is Paralyzing...

I was diagnosed with the Flu Tuesday morning.  And, I can honestly say it is paralyzing.  I'm miserable.  My body aches.  My head aches.  My throat is raw from so much dry coughing.  And, the chills - I'm so cold!!!  I've taken 4 baths in 24 hours just to ease the body/muscle pain.

I even I had my Flu shot in the Fall 2017 to help combat this evilness.  And, yet, I fail prey to it and all of its side effects.  I am literally bed-ridden with no desire or energy to do anything.

The Flu (and a Cold) seem to have to run its course.  There's no overnight, magical pill to make you all better.  So, as I lie in bed in misery, I can only pray that the Flu leaves my house and not dare to linger.

For, now, I hope each of you enjoy your hook and yarn and enjoy making pretty stuff...

Happy Crocheting!!!

Sunday, March 11, 2018

Baby Lamb

After church this morning, and hubby preaching on "The Cross," I decided to make this Baby Lamb for my upcoming niece's baby shower.  I think he turned out sooo SUPER cute.

This Baby Lamb makes the perfect Easter gift by itself or to include in an Easter basket.  I used Pipsqueak yarn for the body and hair portion.  Now, this yarn can be a little intimidating but it's also very forgiving if you miss a stitch and/or add a stitch.  So, don't be intimidated by it, but have fun with it...   

Baby Lamb

Baby Lamb Pattern

Size:  Approximately 8" tall

Materials:
--4.5mm hook
--#4 worsted weight yarn in gray and black (I used "I Love This Yarn" from Hobby Lobby
--Bernat's Pipsqueak Yarn in white
--polyfil
--2 animal eyes (optional: crochet eyes)
--tapestry needle for weaving

U.S.  Stitch Abbreviations:
Ch:  chain
Sl st:  slip stitch
St:  stitch(es)
SC:  single crochet
SC2tog:  Single Crochet 2 stitches together (creates decrease)
TC:  triple crochet
MR:  magic ring
FO:  fasten off

Directions:
  • This pattern is worked in the round, so use a stitch marker (I use a bobby pin...lol) to keep track of your beginning and ending rounds; move stitch marker up with the first stitch of each new round.

A.  Head/Body:
(made in one piece)
1.  With gray yarn, 6 SC into MR.   (6)
2.  2 SC in each st around.  (12)
3.  2 SC in first st, 1 SC in next st.  Rep around.  (18)
4.  2 SC in first st, 1 SC in next 2 st.  Rep around.  (24)
5.  2 SC in first st, 1 SC in next 3 st.  Rep around.  (30)
6-11.  1 SC in each st around.  (30)
12.  SC2tog, 1 SC in next 3 st.  Rep around.  (24)
13.  SC2tog, 1 SC in next 2 st.  Rep around.  (18)
14.  SC2tog, 1 SC in next st.  Rep around.  (12)
STOP:  
  • place eyes between Rounds 7 and 8 with 4 stitch gap between the eyes
  • stuff with polyfil
15.  SC2tog 6 times.  FO gray yarn.  Join Pipsqueak yarn.  (6)
16.  With Pipsqueak yarn, 2 SC in each st around.  (12)
17.  2 SC in first st, 1 SC in next st.  Rep around.  (18)
18.  2 SC in first st, 1 SC in next 2 st.  Rep around.  (24)
19-22.  1 SC in each st around.  (24)
23.  SC2tog, 1 SC in next 2 st.  Rep around.  (18)
24.  SC2tog, 1 SC in next st.  Rep around.  (12)
STOP:
  • stuff with polyfil
25.  SC2tog 6 times.  FO.  Leave tail to weave in and out of last round to close up opening.

B.  Arms (make 2):
1.  With black yarn, 6 SC into MR.  (6)
2.  2 SC in first st, 1 SC in next st.  Rep around.  FO black and join gray yarn.  (9)
3-8.  1 SC in each st around.  At the end of Round 8, FO and leave a tail for attaching.  Stuff with polyfil before attaching.  (9)

C.  Legs (make 2):
1.  With black yarn, 6 SC into MR.  (6)
2.  2 SC in each st around.  FO black and join gray yarn.  (12)
3.  With gray yarn, 1 SC in each st around.  (12)
4-6.  1 SC in each st around.  At the end of Round 6, FO and leave a tail for attaching.  Stuff with polyfil before attaching.  

D.  Ears (make 2):
1.  With gray yarn, 6 SC into MR.  (6)
2-6.  1 SC in each st around.  At the end of Round 6, FO and leave a tail for attaching.  Do NOT stuff.

E.  Hair:
1.  With Pipsqueak yarn,  6 SC into MR.  (6)
2.  2 SC in each st around.  (12)
3.  2 SC in first st, 1 SC in next st.  Rep around.  (18)
4.  *TC in first st, SC in next st, sl st into next st.*  Rep from * to * around.  Sl st join to first st and FO.  Leave tail for attaching to the top of the head, between the ears.

F.  Nose:
1.  With black yarn,  Ch5.  SC in 2nd ch from hook and into the next 2 ch.  3 SC in the last ch.  Rotate to work on opposite side of base ch.  SC in the next 2 ch.  2 SC in the last ch.  (10)
2.  1 SC in each st around.  FO and leave tail for attaching.  Stuff with a small amount of polyfil when attaching.  (10)

G.  Mouth:
1.  I used black to embroider mouth.

I hope you will enjoy making this really cute Baby Lamb.  It makes a great Easter basket item.  Please feel free to message and/or comment with any questions.

Happy Crocheting

Legal:
--don't use/claim my design as your own
--don't use/claim my pics as your own
--okay to make and sale your finished work
--don't share my pattern electronically or in print format (without prior consent) but provide a link to my blog

Saturday, March 10, 2018

Girlie Baby Bib

I whipped up this cute, "Girlie Baby Bib," this morning using Crafter's Secret Cotton yarn for my little niece, Kaeleigh. She is expected to arrive in a few short weeks.

Updated note: 
This is sized more for a newborn.  If you want to make this for an older baby, then go up on your hook size.

Girlie Baby Bib

Size:  Approximately 6 1/2" wide x 11" long (newborn)

Materials:
--5.0mm hook for bib
--3.5mm hook for border
--Crafter's Secret Cotton Yarn in Pinkalicious (for the bib portion) and Fuchsia (for the border)
--1 (1/2") button
--tapestry needle for weaving

U.S.  Stitch Abbreviations:
Ch:  chain
Sl st:  slip stitch
SC:  single crochet
SC2tog:  single crochet 2 stitches together (creates a decrease)
FO:  fasten off

Special Stitch (for border):
1.  Picot Stitch - Ch3 and then slip stitch into the first chain.

Directions:
1.  With 5.0mm hook and Pinkalicious yarn, Ch16.  SC in 2nd ch from hook and across.  Ch1 and turn.  (15)
2.  2 SC in first st, 1 SC in next 13 st, 2 SC in last st.  Ch1 and turn.  (17)
3.  2 SC in first st, 1 SC in next 15 st, 2 SC in last st.  Ch1 and turn.  (19)
4.   2 SC in first st, 1 SC in next 17 st, 2 SC in last st.  Ch1 and turn.  (21)
5-21.  1 SC in each st across.  Ch1 and turn.  (21)
22.  1 SC in the first 7 st.  Ch1 and turn.  (7)
23.  1 SC in each st across.  Ch1 and turn.  (7)
24.  SC2tog, 1 SC in next 3 st, SC2tog.  Ch1 and turn.  (5)
25-37.  1 SC in each st across.  Ch1 and turn.  (5)
Buttonhole:
38.  1 SC in first 2 st, Ch2, skip 1 st, 1 SC in each of the last 2 st.  Ch1 and turn.  (4 st and 2 Ch)
39.  1 SC in first 2 st, 1 SC in the Ch2 space and 1 SC in each of the last 2 st.  FO and weave ends.  (5)

Repeat #22-39 on the opposite side.  For 38-39, SC in each st across.

Attach button on opposite side of buttonhole.

Border:
1.  With Fuchsia yarn and 3.5mm hook, join yarn in the top left corner.  SC in each st around entire bib.  I placed 3 SC stitches in each corner.  Sl st join to first st. 
2.  *Ch3, sl st into the first ch.  Sl st into the next 3 st.*  Repeat from * to * around the outer portion of the bib.  Sl st join to first st and FO.  Weave ends.

This "Girlie Baby Bib" is super cute in Pinkalicious and Fuchsia.  I'm not sure if the above picture accurately depicts how pretty this actually is.  It's quick, easy and makes for a great gift.  I hope you all will enjoy making this project.

Happy Crocheting...

Legal:
--don't use/claim my design as your own
--don't use/claim my pics as your own
--okay to make and sale your finished work
--don't share my pattern electronically or in print format (without prior consent) but provide a link to my blog

Friday, March 9, 2018

Summer Top/Cover-Up

I was looking for some white cotton yarn in my craft room and came across this cute Summer Top/Cover-Up I made more than 1-2 years ago using Lily Sugar 'n Cream White Cotton Yarn.  I made this free-form, I think...lol.  But, I will look through my scribbled pattern notes to see if I, by chance, have it written.

If I do have the pattern written, I will share it for those who may want to make this...

It's made in a size large.  I used two (2) of the cylinder, cone-shaped yarns (retail $13.99 each at Hobby Lobby- I used the 40% off coupon and got each for $8.39; purchased separately to use 40% off coupon).  Each cylinder has 805 yards of yarn.  I did have a small amount of yarn leftover.

Large Summer Top/Cover-Up

Happy Crocheting...

Legal:
--don't use/claim my design as your own
--don't use/claim my pics as your own
--okay to make and sale your finished work
--don't share my pattern electronically or in print format (without prior consent) but provide a link to my blog

Thursday, March 8, 2018

St Paddy's Wreath....

I made my wreath cover in a spring color a few days ago, but tonight decided on making a St. Patrick's Day Wreath.  I love the way this turned out.  Simple and personifies Irish to me.

St. Patrick's Day/March Wreath
St. Patrick's Day/March Wreath Pattern

Size:  11 1/2" Wreath 

Materials:
--3.5mm & 5.0mm hook
--11.5" Styrofoam Wreath 
--#4 worsted weight yarn in light green for the wreath cover; small amount of dark green, black & yellow for the top hat; small amount of black & gold for the pot of gold;  small amount of white, red, orange, yellow, green, blue and purple for the clouds and rainbow
--small amount of polyfil for stuffing hat
--small piece of felt to glue to the hat bottom to keep polyfil inside hat
--crafters glue for attaching felt to hat bottom (or you could sew this on)
--tapestry needle for weaving

U.S. Stitch Abbreviations:
Ch:  chain
Sl st:  slip stitch 
St:  stitch(es) 
SC:  single crochet
HDC:  half double crochet
DC:  double crochet
FLO:  front loops only
BLO:  back loops only
Rep:  repeat
MR:  magic ring
FO:  fasten off 

Directions:

Wreath Cover:
1.  With 5.0mm hook and light green yarn (mine is Spring Green), ch21.  HDC in 2nd ch from hook and across.  Ch1 and turn.  (20)
2-56.  1 HDC in the BLO of each st across.  Ch1 and turn.  (20)

Note:  I wanted to create texture by working my stitches in the BLO but, you can work the stitches into both loops if you desire.  
Assembly: 
1.  Wrap the cover around the wreath while you whipstitching it together.  Work all the way around Athens close up the ends that meet.  Weave ends.  

Top Hat:
Options:  you can work in the round or slip stitch join and Ch1 at the end of each round -- your choice 
1.  With 5.0mm hook and dark green yarn, 8 HDC into MR.  (8)
2.  2 HDC in each st around.  (16)
3.  2 HDC in first st, 1 HDC in next st.  Rep around.  (24)
4.  2 HDC in first st, 1 HDC in next 2 st.  Rep around.  (32)
5.  1 HDC in the BLO of each st around.  (32)
6-9.  1 HDC in each st around.  (32)
10.  Working this round in the FLO, 2 HDC in the first st, 1 HDC in the next st.  Rep around.  (48). 
11.  In both loops, 2 HDC in the first st, 1 HDC in the next 2 st.  Rep around.  Sl st join and FO.  Leave a long tail to attach to top of wreath.  (64) 

Band:
Okay, the band could have actually been made by FO dark green yarn and joining black yarn at the end of Round 8.  However, I wasn't thinking when I was making this and so, my band is separate and then attached to the hat.  
1.  With 5.0mm hook and black yarn, ch46.  HDC in 2nd ch from hook and across.  FO and leave a long tail for attaching.  
Buckle:
2. With 5.0mm hook and yellow yarn, ch15.  Sl st in 2nd ch and across.  FO and leave tail for attaching.  

Assembly:
1.  I shaped buckle at the center of the band and attached in a rectangular shape.  
2.  I then wrapped band around base of hat and whipstitching it into place.  
3.  Now, atuff with a small amount of polyfil to help hat keep its shape.  Glue or sew a piece of felt across bottom to keep polyfil secure.   

Clouds (make 2):
1.  With 5.0mm hook and white yarn, ch9.  HDC in 2nd ch from hook and into the next 6 ch.  3 HDC in the last ch.  Rotate to work on base chain side.  1 HDC in each of the next 6 ch.  2 HDC in the last ch.  Sl st join to first st and Ch1.  (18)
2.  *5 HDC in first st, SC in the next 2 st.  5 DC in next st, SC in the next 2 st.* Rep from * to * around.  FO and leave tail for attachingto the rainbow ends.  

Rainbow:
To make the rainbow, you have to work the colors in reverse.
1.  With 5.0mm hook and purple yarn, ch33.  HDC in 2nd ch from hook and across.  FO Yarn.  (32)
2.  Join blue yarn to first st with a Ch1.  HDC in same st as Ch1 and across.  FO Yarn.  (32) 
3.  Rep #2 for green.
4.  Rep #2 for yellow.
5. Rep #2 for orange.
6.  Rep #2 for red.  

Assembly:
1.  Whipstitching attach clouds to each rainbow end.  


Pot of gold:  
Pot:
1.  With 5.0mm hook and black yarn, 6 HDC into MR.  Sl st join and Ch1.  (6)
2.  2 HDC in each st around.  Sl st join and Ch1.  (12) 
3.  2 HDC in first st, 1 HDC in next st.  Rep around.  Sl st join and Ch1.  (18)
4.  2 HDC in first st, 1 HDC in next 2 st.  Rep around.  Sl st join and Ch1.  (24)
5.  3 DC in the first st.  1 SC in each of the next 6 st.  3 DC in the next st.  FO and leave a long enough tail for attaching to Wreath.  

Gold Coins:
1.  With 3.5mm hook and Gold yarn, 6 SC into MR.  Sl st join to first st and FO.  Leave a tail for attaching.  (6) 

I made 9 coins and positioned them as follows:
     ðŸ”˜ 🔘
   ðŸ”˜ðŸ”˜ðŸ”˜
🔘🔘🔘🔘

1.  I whipstitched attached my coins together and then attached the bottom of the coins to the back side top of the pot.  
2.  See my pics for help with placement of pieces onto the wreath.

I hope you all will enjoy my Irish, March Wreath.... 

Happy Crocheting 

Legal:
--don't use/claim my design as your own
--don't use/claim my pics as your own
--okay to make and sale your finished work
--don't share my pattern electronically or in print format (without prior consent) but provide a link to my blog

Wednesday, March 7, 2018

Pinkalicious Washcloth/Dishcloth

I made this super cute, Pinkalicious Washcloth/Dishcloth using Crafter's Secret Cotton Yarn.  I used the colors Pink and Pinkalicious to make this 9 1/2" x 9 1/2" item for my bathroom.

Pinkalicious Washcloth/Dishcloth 


Pinkalicious Washcloth/Dishcloth Pattern

Size:  9 1/2" x 9 1/2"

Materials:
--5.0mm hook
--Crafter's Secret Cotton Yarn in Pink and Pinkalicious 
--tapestry needle for weaving ends

U.S. Stitch Abbreviations:
Ch:  chain
Sl st:  slip stitch
St:  stitch(es)
SC:  single crochet
HDC:  half double crochet
DC:  double crochet
Sk:  skip
Rep:  repeat
FO:  fasten off

Directions:

1.  With Pink Yarn, Ch33.  Place a SC, HDC & DC in 3rd ch from hook.  *Sk 2 ch.  SC, HDC & DC in next ch.* Rep from * to * across.  Place a SC st in the last ch.  Switch to Pinkalicious Yarn.  I did not cut the Pink Yarn.  I just left it on the end.  (I did not want a lot of ends to weave plus I knew I could conceal moving the yarn up with the border.)
2.  With Pinkalicious Yarn, SC in each st across.  Ch1 and turn.  
3.  Repeat #2.  Switch back to Pink Yarn and Ch1.
4.  With Pink Yarn, *SC, HDC & DC in first st.  Sk 2 st.* Rep from * to * across.  Place a SC in the last st.  Ch1 and turn.
5.  Rep #4.  

Repeat # 2 - 5, four (4) more times.
Then, repeat #2 - 3, one (1) more time.
And, for the last row, repeat #4.  FO and weave ends.

Border:
1.  With Pink Yarn, SC evenly around, placing 3 SC in each corner.  Sl st join to first st and FO.  Weave ends.
2.  Join Pinkalicious Yarn in any stitch and Ch1.  SC in same st as Ch1 and evenly around.  Sl st join to first st and Ch1.
3.  SC in each st around.  Sl st join to first st and FO.  Weave ends.  

A beautiful, texture is created and the colors I used made this a great project for Springtime...

Happy Crocheting...
Legal:
--don't use/claim my design as your own
--don't use/claim my pics as your own
--okay to make and sale your finished work
--don't share my pattern electronically or in print format (without prior consent) but provide a link to my blog