Sunday, April 30, 2017

Curtain Valence....

The last couple days has been busy here with commissioned crochet projects, the grand babies and church stuff.  One priority this week:  I have to get the goodie bags made up to take over to the cancer center to donate to patients undergoing chemo from our church...I've had the stuff in bags sitting near my bed for a few days now.

Have you ever felt so over-extended that you don't have enough time to do everything that needs to be done?  That's how I feel sometimes, but the hubby recently preached in one of his sermons about everyone having the same amount of time in a day and it's all about prioritizing and organizing.

I would appreciate some prayers....always welcomed, needed and appreciated!!!

Here's a look at a pair of curtain valences I just finished up for a lady in burgundy and hunter green.  I had to use my yardstick (as a curtain rod) since all the windows in my house have plantation shutters and I don't have curtains, except in my dining room and there's no way I'm tackling taking those down...lol!!!

I made these 49" long and 12" wide from the button tab to the bottom.

I used a 5.5mm hook and #4 worsted weight yarn:  the hunter green is Red Heart Super Saver and the burgundy is Hobby Lobby's, "I Love This Yarn."


I have the pattern written down on paper and may eventually edit this post to include it.  If you're interested in the pattern, please comment or shoot me an email.  

Happy Crocheting....

Wednesday, April 26, 2017

Messy Bun - Pig

I woke up way too early this morning.  Lol.  Still recovering from my slip and fall 2 days ago in the pouring rain.  I had parked the truck in the driveway and when I entered our garage it happened so quickly.  I slipped and landed flat on my tailbone -- and it hurt....I'm doing okay but it sure dampened my day since I was coming home from getting a massage to loosen up and rid myself of too many knots in my back.  So, I'm a day or so behind on several crochet projects I'm working on.

I did want to share this new Messy Bun Hat with you that I was commissioned to make.  This lady saw my Woodland Hats and asked if I could make one in a pig for her.  Of course, I can.  Isn't that the answer all crocheters seem to give!!!! Lol.

Free Pattern is below.  If you give it a go, please comment on here, send a pic or post on instagram, Ravelry or pinterest. (My username on all is:  rilla2u)  I would love to see your work!!!!

  
Messy Bun - Pig Pattern

Difficulty Level:  Easy

Size:  Teen - Adult

Materials:
--3.5, 4.5 and 5.5 hooks
--#4 worsted weight yarn in bright pink, light pink, black, white and yellow
--ponytail holder
--tapestry needle for weaving

Abbreviations:
MR:  magic ring
Ch:  chain
Sl st:  slip stitch
St:  stitch
SC:  single crochet
HDC:  half double crochet
DC:  double crochet
Dec:  decrease
FO:  fasten off

Directions: 
Hat:
1.  With larger hook and bright pink, join yarn to ponytail holder and Ch1.  Make 24 DC around the holder.  Sl st to first DC and Ch1.  (24)
2.  2 DC in each st around.  Sl st to first DC and Ch1.  (48)
3.  2 DC in first st, then 1 DC in the next 3 st.  Repeat around.  Sl st to first DC and Ch1.  (60)
4-10.  1 DC in each st around.  Sl st to first DC and Ch1.  On the last st of Round 10, FO bright pink yarn and switch to light pink yarn before completing the final stitch.  (60)
11-13.  In light pink yarn, 1 DC in each st around.  Sl st to first DC and Ch1.  (60)
14.  1 SC in each st around.  Sl st to first SC and FO.  Weave tail.  (60)

Eyes (make 2):
1. With smaller hook and black yarn, 6 HDC into MR.  Sl st to first HDC and FO, leaving a tail long enough for attaching to the hat.  
2.  Use a small amount of white yarn to embroider center of eyes.

Ears (make 2): 
1.  With 4.5mm hook and light pink, ch7.  SC in 2 ch from hook and across.  Ch1 and turn.  (6)
2-4.  1 SC in each st across.  Ch1 and turn.  (6)
5.  Dec, 1 SC in the next 2 st, dec last 2 st together.  Ch1 and turn.  (4)
6.  1 SC in each st across.  Ch1 and turn.  (4) 
7.  Dec first 2 st, dec last 2 st.  Ch1 and turn.  (2) 
8.  1 SC in each st across.  Ch1 and turn.  (2) 
9.  Dec 2 st together.  FO and weave ends.  
10.  Join bright pink in any st and Ch1.  SC all the way around the ear.  FO, leaving a tail long enough to attach to hat. 

Snout:
1.  With 4.5mm hook and light pink yarn, 6 HDC into MR. Sl st to join to first st and Ch1. (6)
2.  2 HDC in each st around.  Sl st to join to first st and Ch1.  (12)
3.  2 HDC in first st, 1 HDC in the next st.  Repeat around.  Sl st to join to first st and Ch1.  (18)
4.  2 HDC in first st, 1 HDC in the next 2 st. Repeat around.  Sl st to join to first st and FO, weaving tail.  (24)
5.  Join bright pink yarn,  Ch1.  Sc in same st as Ch1 and in each st around. FO.  Leave a tail long enough to attach to the hat.  (24)

Center Tip for Snout:
1.  With 4.5mm hook and light yarn, 6 SC into a MR.  Sl st to join last st to first st.  Pull to tighten and FO.  Leave a tail long enough to place at the center of the snout portion. 

Attach the center tip to the center part of the snout and weave ends.  Use black yarn and embroider on each side of the center portion of the snout.  (See pic for help)

Bow: 
1.  With 3.5 mm hook, and yellow yarn, ch15.  SC in 2 ch from hook and across.  Ch1 and turn.  (14)
2-6.  1 SC in each st across.  Ch1 and turn.  (14)
7.  SC all the way around the bow.  FO and weave ends.
8.  Join yarn at center of bow and wrap 10-12 times around.  Tie into a tight knot to secure and then weave to attach bow to the hat.

Legal:
--don't use my pics
--don't copy and claim my pattern as your own, but provide a link to my blog
--freely make and sale your finished work
--link back to my blog


Happy Crocheting & May God Bless You... 

Saturday, April 22, 2017

Caribbean Summer Top...

I found this gorgeous cotton yarn at Hobby Lobby the other day and just knew I had to make something summery with it.  The brand is Crafter's Secret and was on sale...yay for me!!!  $1.87 per skein.  So, this cute top was very economically friendly.  It comes in 120 yards per skein.  I used Caribbean and Dark Teal.

Caribbean Summer Top

Size:  Women's Large
Difficulty Level:  Easy

Materials:
--5.0mm hook
--Crafter's Secret 100% cotton yarn (4 skeins Caribbean -- I didn't use all of the 4th skein; 1 skein Dark Teal)
--(5) 1/2 buttons in coordinating color
--tapestry needle for weaving

Abbreviations:
Ch: chain
Sl st: slip stitch
St: stitch
Sc: single crochet
HDC: half double crochet
Sk st: skip stitch
FO: fasten off

Note:  My chest measurement (around my breasts) is 42".  If you are bigger breasted, then you would want to adjust the hook size up a size.

Directions:
1.  With Caribbean yarn, ch120.  Into the 2nd ch from the hook, Sc and HDC, then sk st.  *Sc and HDC in next st, sk st.* Repeat across until the last st.  Only Sc in last st.  Ch1 and turn.  (119 total stitches)
--I wrapped the first row around my back/breasts to check sizing; the ends were approximately 2" short of touching which was fine since I was adding bands on each end in secondary color for the buttons and buttonholes--
2-30.  Repeat row 1.  At the end of Row 30, FO Caribbean yarn.  (119)
Button Bands:
Left side (this is the band I attached the buttons on):
1.  Join Dark Teal yarn in the corner and Ch1.  You will be working on the short ends.  1 Sc st evenly down the side.  There's 30 rows; so you should have 30 stitches.  Ch1 and turn.  (30)
2-6.  1 sc in each st across.  Ch1 and turn.  At the end of Row 6, FO and weave ends.  (30)

Right side (this is the band with the buttonholes):
1.  Join Dark Teal yarn in the corner on the opposite short end and Ch1.  1 Sc st evenly down the side.    You should have 30 sc stitches.  Ch1 and turn.  (30)
2-3.  1 sc in each st across.  Ch1 and turn.  (30)
4.  1 sc in the first 2 st, skip 2, ch2, *1 sc in next 4 st, skip 2, ch2,* repeat from * to * across.  1 sc in each of the last 2 stitches.  (You will have made 5 buttonholes) 
5.  1 sc in each st across with 2 sc into the buttonholes made.  Ch1 and turn.  (30)
6.  1 sc in each st across.  FO.  Weave ends.  

Important Step
Attach Buttons:  
At this point, attach buttons to the left side.  Make sure button placement aligns with the buttonholes. Once buttons are attached, button up each one.  We will now be working in the round....

1.  With Dark Teal yarn, join into any st of Row 30.  I joined mine in the first st of Row 30 (after the button band).  You will work 1 sc into each st around.  When you come to the first button band, make sure it is aligned on top of the second button band and continue to work your sc stitches (on button band, you are working thru both layers...).  Sl st to first st to join and Ch1. 
2-4.  1 sc in each st around.  Sl st to first st to join and Ch1.  
5.  This is an increase round.  2 Sc in first st, 1 Sc in the next 10 st.  Repeat around.  1 sc in any remaining stitches.
Stitch markers for straps 

Mesh Rounds:
1.  Ch1 and sc in same st.  *Ch5, skip 3, sc in next st,* repeat this pattern around.  Sl st to first sc st and Ch1.  
2-5.  Repeat pattern around:  Sc in same st as Ch1, then *Ch5, skip 3, sc in next st,* repeat this pattern around.  Sl st to first sc st and Ch1.  


Straps (make 2):
1.  With Dark Teal, I joined yarn on Row 1, 5 cluster stitches (Sc/HDC) over from each side of the button band, excluding the button band stitches (so count over 5 cluster stitches that was done in the Caribbean  yarn).  Work 5 sc stitches between cluster 5 and cluster 7 stitches.  Ch1 and turn.  (5)
2-55.  1 sc in each st across.  Ch1 and turn.  (5)

To attach Row 55 to the backside, I made sure my top was evenly aligned and then I sc the last row of the strap onto the backside.  If you don't want to sc the strap to the backside, then you can FO, leaving a long tail to whipstitch to the top row on the backside.  

Repeat for second strap.  

That's it!!!  If any part is confusing, please drop me an email or comment and I will try to help you and better explain any part of the pattern.


Happy Crocheting!!!

Legal:
--do not claim pattern as your own
--do not use my pics
--do not post my pattern or pics to any social media sites, but reference back to my blog
--you may make and sale your finished work


Wednesday, April 19, 2017

Messy Bun/Ponytail - Arctic Hats!!!

Well, good evening all!!!  I decided to make a 2nd set of the Messy Bun/Ponytail Hats.  This set is done in Arctic Animals - Polar Bear, Penguin and the Arctic (White) Fox!!!  I think they turned out pretty good and offering the pattern below for FREE.  I think I may do one or two more sets -- I was thinking of a Safari set and Insect/Bug set...but who knows, I go where the hook leads me...

Enjoy the free pattern and be sure to post your pics if you decide to make one.  I'd really love to see what you do with the pattern.


 Arctic Hats -Messy Bun/Ponytail Pattern

Size:  Teen-Adult
For Pre-teen:  use a smaller hook size to make the hat
Difficulty Level:  Easy 
Gauge:  4 rows of 6 DC per row = 2" x 2"

Materials:
--4.5mm and 5.5mm hooks
--#4 Worsted Weight yarn in White, Peacock, Bright Yellow, Black and Blue
--small amount of Red Heart Buttercup for the trim (if you don't have this; then you can just use the white yarn)
--1 small black button
--small amount of polyfil for Polar Bear nose
--ponytail holder
--tapestry needle for weaving

Abbreviations:
Ch:  chain
Sl st:  slip stitch
MR:  magic ring
SC:  single crochet
ESC:  extended single crochet
HDC:  half double crochet
DC:  double crochet
TC:  triple crochet 
TC2tog:  triple crochet 2 stitches together
FPDC:  front post double crochet
BPDC:  back post double crochet
Dec:  decrease
FO:  fasten off

Arctic (White) Fox:

Directions:
1.  With white yarn and 5.5mm hook, sl st to join yarn, ch1 to ponytail holder.  24 DC around ponytail holder.  Sl st to join to first st and ch1.  (if you don't have a ponytail holder, ch 30; sl st to first ch to form a ring and work the 24 DC into the ring).  (24)
2.  2 DC in each st around.  Sl st to join and ch1.  (48)
3.  2 DC in first st, 1 DC in next 3 st.  Repeat around.  Sl st to join and ch1.  (60)
4-13.  1 DC in each st around.  Sl st to join and ch1.  FO and weave ends.  (60)
14.  With buttercup yarn, join in any stitch and work SC in each st around.  Sl st to join.  FO.  Weave ends.

Ears (make 2):
1.  With 4.5mm hook and white yarn, ch2. 1 SC in 2nd ch from hook.  Ch1 and turn.  (1)
2.  2 SC in st.  Ch1 and turn.  (2)
3.  2 SC in first st, 1 SC in next st.  Ch1 and turn.  (3)
4.  2 SC in first st, 1 SC in next st and 2 SC in last st.  Ch1 and turn.  (5)
5.  1 SC in each st across.  Ch1 and turn.  (5)
6.  2 SC in first st, 1 SC in next 3 st, 2 SC in last st.  Ch1 and turn.  (7)
7-8.  1 SC in each st across.  Ch1 and turn.  FO and weave ends.  (7)
9.  Join buttercup yarn into any st and ch1.  SC in same st and evenly around the ear.  FO, leaving a long enough tail to attach to hat.

Nose:
1.  With 4.5mm hook and white yarn, Ch11.  SC in 2nd ch from hook and across.  Ch1 and turn.  (10)
2.  1 SC in each st across.  Ch1 and turn.  (10)
3.  Dec first 2 st together, 1 SC in each of the next 6 st, dec last 2 st together.  Ch1 and turn.  (8)
4.  1 SC in each st across.  Ch1 and turn.  (8)
5.  Dec first 2 st together, 1 SC in each of the next 4 st, dec last 2 st together.  Ch1 and turn.  (6)
6.  1 SC in each st across.  Ch1 and turn.  (6)
7.  Dec first 2 st together, 1 SC in each of the next 2 st, dec last 2 st together.  Ch1 and turn.  (4)
8.  1 SC in each st across.  Ch1 and turn.  (4)
9.  Dec first 2 st together, dec last 2 st together.  Ch1 and turn.  (2)
10.  1 SC in each st across.  FO, leaving a long enough tail to attach to hat.  (2)

Eyes (make 2):
1.  With 4.5mm hook and black yarn, 6 HDC into MR.  Sl st to join and FO, leaving a long enough tail to attach to hat.  Embroidered a small piece of blue yarn in center of eye.

Assembly (see pics for help):
Ears:  I attached them on each side between rows 2-4.
Nose:  I placed the long end on row 9, with the smaller end flush with row 14 of the hat; I attached a black button on top of the nose on rounds 9 and 10.
Eyes:  I placed the eyes on each side of the nose at rows 11-12.
                                                 
   
Polar Bear:
Directions:
1.  With white yarn and 5.5mm hook, sl st to join yarn, ch1 to ponytail holder.  24 DC around ponytail holder.  Sl st to join to first st and ch1.  (if you don't have a ponytail holder, ch 30; sl st to first ch to form a ring and work the 24 DC into the ring).  (24)
2.  2 DC in each st around.  Sl st to join and ch1.  (48)
3.  2 DC in first st, 1 DC in next 3 st.  Repeat around.  Sl st to join and ch1.  (60)
4-10.  1 DC in each st around.  Sl st to join and ch1.  FO and weave ends.  (60)
11-13.  Join peacock yarn at any st and ch3 (this counts as the first FPDC); BPDC around the next post st.  Alternate between FPDC then BPDC.  Repeat this around.  (60)

Note:  if you are not comfortable with doing post stitches, you can just do DC stitches on rows 11-13.  If you would like to learn how to do post stitches, then here's a link that has a great tutorial on post stitches:

14.  1 SC in each st around.  Sl st to join.  FO.  Weave ends. (60)

Ears (make 2):
1.  With 5.5 hook and Peacock yarn, 6 HDC into MR.  Sl st to join.  Ch1.  (6)
2.  2 HDC in each st around.  Sl st to join.  Ch1.  (12)
3.  2 HDC in first st, 1 HDC in next st.  Repeat around.  Before completing last st, FO Peacock and join White yarn.  Sl st to join.  Ch1.  (18)
4.  With white yarn, 1 ESC in each st around.  Sl st to join and FO.  Leave a long enough tail to attach to hat.  

Nose:
1.  With 4.5 hook and White yarn, 6 HDC into MR.  Sl st to join and ch1.  (6)
2.  2 HDC in each st around.  Sl st to join.  Ch1.  (12)
3.  2 HDC in first st, 1 HDC in next 3 st.  Repeat around.  Sl st to join.  FO.  Leave a long enough tail to attach to hat.  (15)

Black Spot:
1.  With 4.5 hook and Black yarn, ch6.  TC in the 4th ch from the hook.  TC in the next 2 ch.  FO.  Leave a long enough tail to attach to the top of the nose.

Eyes (make 2):
1.  With 4.5 hook and Black yarn, 6 HDC into MR.  Sl st to join and FO.  Leave a long enough tail to attach to hat.

Assembly (see pics for help):
Ears:  I attached them on each side between rows 2-4.
Nose:  I first attached the black spot to the nose.  I then placed the nose at rows 5-8 at the center of the hat.  Before you finish attaching, add a small amount of polyfil.  Use black yarn, to embroider mouth (see pic).
Eyes:  I placed the eyes at rows 3-4.
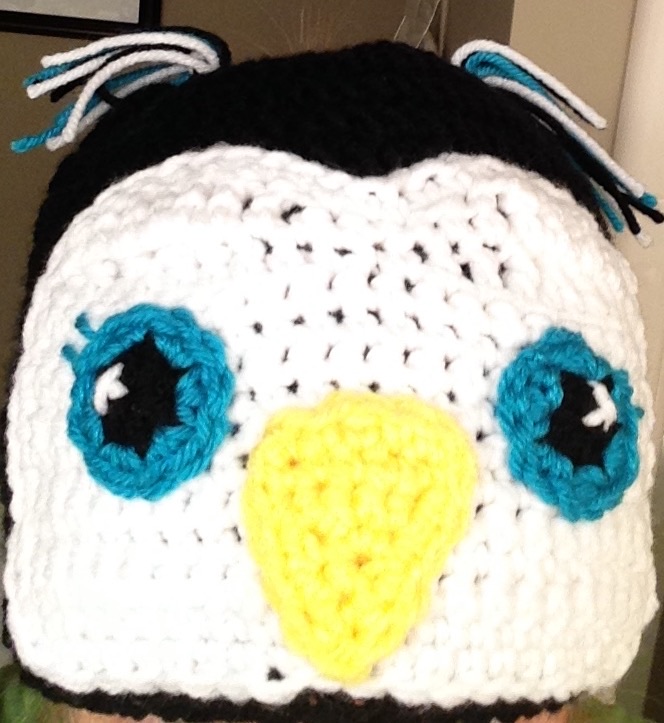
Penguin:
The Penguin Hat, itself, is made exactly the same as the Arctic Fox Hat.  The only difference is in the yarn I used.  I used Black yarn. 

See Fox pattern for detailed directions in making the hat.
1-14:  with Black yarn

Face:
1.  With 5.5 hook and White yarn, ch22.  SC in 2nd ch from hook and across.  Ch1 and turn.  (21)
2-10.  1 SC in each st across.  Ch1 and turn.  (21)
11.  Complete the following st pattern across:  SC, HDC, DC, TC, TC2tog, TC, DC, HDC, SC, Sl St, SC, HDC, DC, TC, TC2tog, TC, DC, HDC, SC.  Ch1 and turn.  (19)
12.  Repeat row 11, but into the TC2tog you will put 2 TC stitches.  This will bring your stitch count back to 21.  Ch1 and turn.  (21)
13.  SC around perimeter of face.  FO and leave a long enough tail to attach to hat.

Nose:
1.  With Bright Yellow yarn and 4.5mm hook, Ch2.  SC in 2nd ch from hook.  Ch1 and turn.  (1)
2.  2 SC in st.  Ch1 and turn.  (2)
3.  2 SC in first st, 1 SC in next st.  Ch1 and turn.  (3)
4.  2 SC in first st, 1 SC in next st and 2 SC in last st.  Ch1 and turn.  (5) 
5.  1 SC in each st across.  Ch1.  (5)
6.  1 SC evenly around the nose.  FO, leaving a long enough tail to attach to hat.

Eyes (make 2):
1.  With Black yarn and 4.5mm hook, 6 HDC into MR.  FO Black yarn and join Peacock yarn.  Sl st to join and ch1.  (6)
2.  In Peacock yarn, 2 SC in each st around.  FO, leaving a long enough tail to attach to hat.  (12)
3.  Embroider white yarn to the black portion of the eye and Peacock to the outside corner of the eye.  (see pic)

Tassel Ears (make 2):
I used Peacock, White and Black.  I cut (2) 6" long strips of each color.  I weaved each set of strips into the sides at Round 2 and tied into a double knot.  (see pic)

Assembly:
I attached the eyes and the nose to the face before attaching the face to the center of the hat.
(see pic)

On 2 of the hats, I used a ponytail holder and on the third one, I made a ch 30 and sl st into first ch to form ring.  All 3 hats fit the same.

Be sure to check out my post on the Messy Bun/Ponytail - Woodland Animals Hats for the Fox, Wolf and Owl!!!  Here's the link for ya:


If you have any questions or problems with the pattern, please feel free to comment or email me and I will help you as much as I can.  

Legal:
--don't use my pics 
--don't claim pics or pattern as your own
--do not share/post my pattern anywhere, but link back to my blog 

Special Request:  Please share and Re-pin my pins with your friends!!!  Follow me on social media:  my blog; Ravelry, Instagram and Pinterest (rilla2u); Facebook:  /rillaedwards; Crocheting & Crafting

Happy Crocheting.... 


Tuesday, April 18, 2017

Boobies for Breast Cancer....

I had the privilege to crochet a set of boobs for a childhood friend of mine who had been diagnosed with breast cancer, underwent a double mastectomy and chemotherapy.  For me, I found it to be an honor to, in some small way, contribute something as she travels this scary journey that so many women face today.
                                          Size "D" Boobs


To find out more information about crocheting or knitting boobs, specific type of yarn to use, the FREE pattern, and where you can donate these, please check out the following LINK:

Saturday, April 15, 2017

Messy Bun/Ponytail Woodland Hats....

With spring in full force here in North Carolina, I've been seeing a lot of animals outside and I got to thinking, I really like wearing the Messy Bun hats -- so, why not, make this type of hat in animals...lol.  So, here's my "Woodland Hats" - fox, wolf and an owl....

Woodland Hats -- Messy Bun/Ponytail


Woodland Hats -Messy Bun/Ponytail Pattern

Size:  Teen-Adult
For Pre-teen:  use a smaller hook size to make the hat
Difficulty Level:  Easy 
Gauge:  4 rows of 6 DC per row = 2" x 2"

Fox:
Materials:
--4.5mm and 5.5mm hooks
--#4 Worsted Weight yarn in a burnt orange-type color (I used Desert Glaze from Hobby Lobby, "I Love This Yarn"); less than 1 skein
--small amount of white and black #4 yarn
--1 small button
--ponytail holder

Abbreviations:
Ch:  chain
Sl st:  slip stitch
MR:  magic ring
SC:  single crochet
HDC:  half double crochet
DC:  double crochet
Dec:  decrease
FO:  fasten off

Directions:
1.  With Desert Glaze yarn and 5.5mm hook, sl st to join yarn, ch1 to ponytail holder.  24 DC around ponytail holder.  Sl st to join to first st and ch1.  (if you don't have a ponytail holder, ch 30; sl st to first ch to form a ring and work the 24 DC into the ring).  (24)
2.  2 DC in each st around.  Sl st to join and ch1.  (48)
3.  2 DC in first st, 1 DC in next 3 st.  Repeat around.  Sl st to join and ch1.  (60)
4-10.  1 DC in each st around.  Before completing last st of round 10, switch to white yarn.  Sl st to join and ch1.  (60)
11-13.  With white yarn, 1 DC in each st around.  Sl st to join and ch1.  (60)
14.  SC in each st around.  Sl st to join.  FO.  Weave ends.

Ears (make 2):
1.  With 4.5mm hook and black yarn, ch2. 1 SC in 2nd ch from hook.  Ch1 and turn.  (1)
2.  2 SC in st.  Ch1 and turn.  (2)
3.  2 SC in first st, 1 SC in next st.  Switch to Desert Glaze yarn before completing last st.  Ch1 and turn.  (3)
4.  With Desert Glaze yarn, 2 SC in first st, 1 SC in next st and 2 SC in last st.  Ch1 and turn.  (5)
5.  1 SC in each st across.  Ch1 and turn.  (5)
6.  2 SC in first st, 1 SC in next 3 st, 2 SC in last st.  Ch1 and turn.  (7)
7-8.  1 SC in each st across.  Ch1 and turn.  FO and weave ends.  (7)
9.  Join white yarn into any st and ch1.  SC in same st and evenly around the ear.  FO, leaving a long enough tail to attach to hat.

Nose:
1.  With 4.5mm hook and Desert Glaze yarn, Ch11.  SC in 2nd ch from hook and across.  Ch1 and turn.  (10)
2.  1 SC in each st across.  Ch1 and turn.  (10)
3.  Dec first 2 st together, 1 SC in each of the next 6 st, dec last 2 st together.  Ch1 and turn.  (8)
4.  1 SC in each st across.  Ch1 and turn.  (8)
5.  Dec first 2 st together, 1 SC in each of the next 4 st, dec last 2 st together.  Ch1 and turn.  (6)
6.  1 SC in each st across.  Ch1 and turn.  (6)
7.  Dec first 2 st together, 1 SC in each of the next 2 st, dec last 2 st together.  Ch1 and turn.  (4)
8.  1 SC in each st across.  Ch1 and turn.  (4)
9.  Dec first 2 st together, dec last 2 st together.  Ch1 and turn.  (2)
10.  1 SC in each st across.  FO, leaving a long enough tail to attach to hat.  (2)

Eyes (make 2):
1.  With 4.5mm hook and black yarn, 6 HDC into MR.  Sl st to join and FO, leaving a long enough tail to attach to hat.  Embroidered a small piece of white yarn in center of eye.

Assembly (see pics for help):
Ears:  I attached them on each side between rows 2-4.
Nose:  I placed the long end on row 9, with the smaller end flush with row 14 of the hat; I attached a black button on top of the nose on rounds 9 and 10.
Eyes:  I placed the eyes on each side of the nose at rows 11-12.

Wolf:
The Wolf Hat is made exactly the same as the Fox Hat -- only difference is the yarn color; colors used were light grey, white and black.  (see pics if you need help)

Owl:
The Owl Hat, itself, is made exactly the same as the Fox Hat.  The only difference is in the yarn I used.  I used "I Love This Yarn" from Hobby Lobby in Brown Tweed as main color; light beige in contrast color; and a small amount of bright yellow, peacock, white and black.

See Fox pattern for detailed directions in making the hat.
1-10:  with Brown Tweed
 11-14:  with Light Beige

Nose:
1.  With Bright Yellow yarn and 5.5mm hook, Ch2.  SC in 2nd ch from hook.  Ch1 and turn.  (1)
2.  2 SC in st.  Ch1 and turn.  (2)
3.  2 SC in first st, 1 SC in next st.  Ch1 and turn.  (3)
4.  2 SC in first st, 1 SC in next st and 2 SC in last st.  Ch1 and turn.  (5) 
5.  1 SC in each st across.  Ch1.
6.  1 SC evenly around the nose.  FO, leaving a long enough tail to attach to hat.

Eyes (make 2):
1.  With black yarn and 4.5mm hook, 6 HDC into MR.  FO black yarn and join white yarn.  Sl st to join and ch1.  (6)
2.  In white yarn, 2 HDC in each st around.  FO white yarn and join peacock (turquoise) yarn.  Sl st to join and ch1.  (12)
3.  In peacock yarn, 2 HDC in first st, 1 HDC in next st.  Repeat around.  Sl st to join and ch1.  (18)
4.  1 SC in each st around.  FO peacock yarn and join light beige yarn.  Sl st to join and ch1.  (18)
5.  In light beige yarn, 2 SC in first st, 1 SC in next 2 st.  Repeat around.  Sl st to join and ch1.  (24)
6.  1 SC in each st around.  FO, leaving a long enough tail to attach to hat.  (24)

Tassel Ears (make 2):
I used peacock, white and light beige.  I cut (2) 6" long strips of each color.  I weaved each set of strips into the sides at Round 2 and tied into a double knot.  (see pic)

Assembly:
I centered the eyes and placed the nose underneath the center of the eyes.  (see pic)

And, that's it!!!!  3 hats made from 1 pattern.  Plus, so many more hats that can be made using the same pattern.  On 2 of the hats, I used a ponytail holder and on the third one, I made a ch 30 and sl st into first ch to form ring.  All 3 hats fit the same.

Happy Crocheting...

Be sure to check out my Messy Bun Hats - Arctic Animals.  Here's the link to it: https://rilla2u.blogspot.com/2017/04/messy-bunponytail-arctic-hats.html

And, my Messy Bun Hats - Farm Animals here:
https://rilla2u.blogspot.com/2017/05/messy-bun-hats-farm-animals.html

Legal:
--don't use my pics 
--don't claim pics or pattern as your own
--do not share/post my pattern anywhere, but link back to my blog 

Special Request:  Please share and Re-pin my pins with your friends!!!  Follow me on social media:  my blog; Ravelry, Instagram and Pinterest (rilla2u); Facebook:  /rillaedwards; Crocheting & Crafting

Happy Crocheting.... 


Friday, April 14, 2017

Harlequin Slipper Loafers -- Large....

I decided to make me a new pair of slippers with a yarn that's 70% wool and 30% acrylic.  The yarn reminds me so much of a vintage style.  So, of course, I added vintage buttons to the top of each one to add to the look.

My feet are just a little big...lol!!!!  Okay, so I'm fibbing a little.  I have big feet.  I wear 10's and 11's, depending on the brand and style of shoe I'm wanting.  I'm 5'9" so I guess a small foot would look funny on me.  I have a 6'7" hubby, 6'6" son and 6'5" son.  My grandchildren are tall.  So, we are a family of tall folks with big feet and big hands which is normal to us...lol!!!!

I kept the pattern pretty simple and straightforward.

"Harlequin Slipper Loafers"

Difficulty level:  Easy

Size:  Women's 9-10 (and by adding a couple extra rows for the soles, then a size 11, as well)

Materials:
-4.5mm hook
-1 and a half skeins of Yarn Bee Melody Bulky in Harlequin (129 yds/skein)
-tapestry needle for weaving
-2 decorative buttons

Abbreviations:
Ch: chain
MR: magic ring
Sc: single crochet
HDC:  half double crochet
HHDC: Herringbone half double crochet
Sl st: slip stitch
Dec: decrease
RS: right side
FO: fasten off

Special Stitch:  HHDC - this is not a complicated stitch; yarn over, insert hook into ch or st; yarn over and draw thru the ch or st AND the first loop on the hook; yarn over, draw thru remaining loops on hook.  (Note:  the slippers can be made using HDC stitch in place of HHDC st....)

Directions:
1.  8 HHDC into MR.  Sl st to join and Ch1.  (8)
2.  2 HHDC in each st around.  Sl st to join and Ch1.  (16)
3.  2 HHDC in first st, 1 HHDC in next.  Repeat around.  Sl st to join and Ch1.  (24)
4.  2 HHDC in first st, 1 HHDC in next 2 st.  Repeat around.  Sl st to join and Ch1.  (32)
5.  1 HHDC in each st around.  Sl st to join and Ch1.  (32)
6-10.  Repeat #5.  (32)
11.  1 HHDC in the first 20 st.  Ch1 and turn.  Leave the remaining 12 st unworked.  (20)
12-24.  Repeat #11.  (20)
25.  Make a dec with the first 2 st, then 1 HHDC into the next 16 st, and dec with the last 2 st.  (18)
26.  Fold the RS together of Row 25.  This will give you 9 st on each side to sl st together.  (9 sl st)
27.  Now, you will want to place a stitch marker, into st 1 and 12 that was left unworked in round 11.
28.  Now, you will be working on the sides.  Join yarn in the first st on the side that's near the top of the shoe.  Ch1.  Sc in same st and evenly around.  Ch1, turn and make a second round of Sc around the sides of the shoe.  FO.  Weave ends.
29.  (Now, you will be working across the top into the 12 st from round 11 that was left unworked.  Join yarn into first st and Ch1.)   1 HDC into same st as Ch1, ch3, skip 3 st, 1 HDC into next st, ch3, skip 3 st, 1 HDC in next st, ch3, skip 2 st and 1 HDC in the last st.  Ch1 and turn.
30-31.  Repeat #29.
32.  This row is a little tricky.  It's to be done like the Butterfly Stitch.  *Step 1.  HDC in first st and then make a Ch1.  Step 2.  Yarn over hook, now insert hook into the second chains of Row 31, 30 and 29.  Step 3.  Yarn over hook draw through loops on the hook and Ch1.*  Repeat these steps across.
33.  Sl st to the first st on the side and sl st around.  Make sure to sl st the last side st to the first top st.


Optional:  
1.  Sew decorative button on top of each slipper
2.  Spray bottom of each slipper with a non-slip spray


Legal:
--freely use pattern to make and sale your finished work
--don't claim pattern as your own but credit design to me
--don't use my pics as yours
--don't copy and post my pattern to any social media outlets, but extend me the kind courtesy of sharing a link back to my blog (Rilla2u.blospot.com)

Special Request:  I would greatly appreciate if you would re-pin my pins.  

Happy Crocheting....


Thursday, April 13, 2017

The Lamb - Crochet Pillow....

With Good Friday only a couple days away, I wanted to design a lamb to represent the ultimate Lamb who willingly gave His life at Calvary's Cross so that I could choose to accept Him and make Heaven my home one day.

So, here is a pic of my "Lamb Pillow."  I made it with bulky yarn.  It is super, super soft.   I think he's cute, but, of course, I'm a little partial.

I scribbled a few notes while I worked on this so I may or may not type up the pattern for it...

Lamb Pillow

Happy Easter!!!!
and as always,
Happy Crocheting...

Wednesday, April 12, 2017

Minion Hoodie Blanket for Toddler - 5 Year Old...

April 12, 2017:
Well, Gabriel was surely the most excited child (or person) to receive a crocheted gift.  The shear joy and thrills in his voice has made my day.  He just couldn't contain himself.  Check out my pics....FREE pattern below.


Minion Blanket

This crochet project was completed using Red Heart Supersaver yarn.  It worked up fairly quickly and my grandson loves it.  The size can easily be adjusted by making the blanket bigger or smaller - just adjust starting chain number.  This blanket measures 38" wide and 42" long (from top of hood to bottom).  

Size:  Toddler - 5-year-old

Materials: 
-6mm hook
-4mm hook (to make the black buttons on the straps)
-2 skeins of Red Heart in Bright Yellow (it did not take all of 2nd skein)
-2 skeins of Blue (it did not take all of the 2nd skein)
-small amount of black, gray, brown and white
-1 button (optional) to fasten like a cape

Abbreviations:
Ch: chain
Sl st:  slip stitch
St: stitch
DC: double crochet
HDC: half double crochet 
SC: single crochet
Sk st: skip stitch
MR: magic ring

Special Stitch:  V-Stitch - DC, Ch1, DC in same space

Gauge:  3 rows of 2 cluster sets of V-Stitches per row will equal 2" x 2"

Directions:
1.  Starting with blue yarn and larger hook, ch 90.  HDC in 2nd ch from hook and across.  Ch1 and turn.  (89)
2.  DC in 1st st, *sk st, V-stitch* repeat across.  In last st, DC.  Ch1 and turn.  (2 DC & 43 sets of V-st)
3.  DC in the first st.  Sk the next st (which is the first DC of the previous row's V-stitch). Make a V-stitch in the Ch1 space.  Continue to make V-stitches in the Ch1 spaces across.  DC in the last st.  Ch1 and turn.  (2 DC; 43 sets of V-st).  
4-29.  Repeat # 3.   

In the following rows, you will be switching between yellow and blue yarn.  I did not want to carry over on my yarn, so I made up 2 balls of yellow yarn.  

30-41.  Starting with yellow yarn, DC in the first st, then you will complete 14 sets of V-stitches. Before completing the last st, switch to blue yarn.  Complete 15 sets of V-stitches.  Before completing the last st, switch to yellow yarn.  Complete 14 sets of V-stitches and then DC in the last st.  (2 DC & 43 sets of V-st)
42-53.  In yellow yarn, repeat #2.  

Bib Straps (make 2):
1.  With blue yarn, ch4.  Sc in 2nd ch from hook and across.  Ch1 and turn.  (3)
2-23.  Sc in each st across.  Ch1 and turn.  (3) 

Button for Bibs (make 2):
1.  With 4mm hook and black yarn make a MR and Ch1. 5 HDC into MR.  Sl st to first st to join and FO.  Leave a tail long enough for attaching button.  

Pocket:
1.  With blue yarn, ch19.  Sc in 2nd ch from hook and across.  Ch1 and turn.  (18)
2-16.  Sc in each st across.  Ch1 and turn.  Leave a tail long enough to attach.  (18)

With black yarn, I embroidered stitches around the perimeter of the pocket before attaching it to the center of the bib overalls.  (See pic) 

Important Note:  So, this made the bib overalls on the backside of the blanket if my grandson chooses to wear it as a cape.  The next part in brackets [] is completely optional.  [To remedy this, I decided to make a second set of the bib/pocket and straps to place where the sides join when fashioning a cape.  (See pics for help on where to place the second set).  The straps/buttons were made the same way as above.  

1.  For the bib portion, I ch 16.  DC into 2nd ch from hook, *sk st, V-st* across.  Ch1 and turn.  (1DC & 7 sets of V-st)
2-11.  Make the V-st into the previous row V-st and 1 DC into the previous row's DC.  (1DC & 7 sets of V-st)

(Make 2) 
1.  For the pocket portion, I ch10. Sc into 2nd ch and across.  Ch1 and turn.  (9)
2-16.  1Sc in each st across.  Using black yarn, only embroider 3 sides with stitches.  This way when you line up the sides of the blanket, it will resemble one pocket.  (See below pic)]

Optional:  attach button at top of side to use as cape.

That completes the blanket portion....

Hoodie:
For the hood portion, I decided I didn't want to make a rectangle and sew the last row together.  To me, that just didn't give the Minion head shape.  So, I did this hood a little different than my "animal series" blankets I recently made.  I crocheted the hood portion as you would if you were going to make a scoodie (scarf/hood) or the sole of a shoe.  This hood was completely experimental on my part.  If you are making this for a small child you may start with a smaller number of chains or if you are making for an older kid, then you would start with a larger number of chains and follow the same premise below of the increase stitches starting in the last chain and just marking them off and increasing them in each round.  

-------------------------------------------------------------------------
Updated 9/9/2017:
For purposes of picture tutorial, I used orange yarn to make this again, and to, better explain how I made the hoodie and how I attached it to the blanket.

1.  With yarn, I started with a ch31.  HDC into 2nd ch from hook and across until the last chain.  Into the last ch, I added 8 HDC.  Place a stitch marker into the first and the last st of the 8 HDC you just completed (beginning and ending stitches of increase rounds).  Now, rotate and work on the opposite side of the base chain.  HDC in each st.  Sl st to first st and ch1.  (Note:  1 end will have increase stitches; the other end will not; sorta like making the soles of a shoe)

Stitch Markers placed for where the increases will take place:

Round 1 Completed (66 stitches):
2. 1 HDC  in each st across, until you reach the stitch marker.  2 HDC into the next stitch that has the stitch marker (move it to the 1st HDC just made) and 2 HDC into each of the next 7 stitches (move stitch marker to last HDC just made).  1 HDC in remaining st.  Sl st to first st and ch1.

Round 2 Completed (74 stitches):
3.  1 HDC in each st across, until you reach the stitch marker.  *2 HDC into the next stitch (move marker into the first HDC just made), 1 HDC into next st,* repeat 7 more times (move stitch marker into last HDC just made).  1 HDC in remaining st.  Sl st to first st and ch1.

Round 3 Completed (82 stitches):
 4.  1 HDC in each st across, until you reach the stitch marker.  *2 HDC into the next stitch (move marker into the first HDC just made, 1 HDC into next 2 st,* repeat 7 more times (move stitch marker into last HDC just made).  1 HDC in remaining st.  Sl st to first st and ch1.

Round 4 Completed (90 stitches):
5.  1 HDC in each st across, until you reach the stitch marker.  *2 HDC into the next stitch (move marker into the first HDC just made), 1 HDC into next 3 st,* repeat 7 more times (move stitch marker into last HDC just made).  1 HDC in remaining st.  Sl st to first st and ch1. 

Round 5 Completed (98 stitches):
 NOTE:  At this point, you will need to determine if you have made enough increase stitches for the hood.  I just placed the hood on my grandson's head.  

6-10.  1 HDC st in each st around.  Sl st join to first st and Ch1.  (98)

Round 10 Completed:

11.  1 HDC st in each st around.  Sl st to join to first st.  Do not Ch1.  Turn. Flatten the non-increase end (this will be the bottom of the hood) and place a stitch marker on the left and right sides.  (98)

NOTE:  the increase end is going to be the hood;  from stitch marker to stitch marker is going up the right side, across the increase section and down the left side.  It is NOT going across the bottom (see below pic) 

Stitch Marker placement on left and right sides:
 12-19.  Now, for the remaining Rounds you will work HDC st from stitch marker to stitch marker.  After you work a HDC st into the stitch marker, move stitch marker up into the new stitch.  

20-21.  For these 2 rounds, you will make a FPDC and then BPDC.  Repeat from stitch marker to stitch marker.  Ch1 and turn.  

I think post stitches are just pretty and really added an extra touch to the outline of the hood.  Here's a link where you can find a great tutorial on post stitches:

Now, your hoodie is complete and ready to attach to the center top of your blanket.  

For my purposes of a picture tutorial, I only completed 14 rounds as you will see in the next pics.  But, once all of your rounds are completed then you are ready to attach the hoodie to the blanket.  
 

 As you can see in the pics, I attached the hoodie to the inside of the blanket and whipstitched across and around the lower hoodie portion.  Please NOTE:  there's probably a better way of achieving the hoodie to look like this, but this was an experimental way of doing this that I tried. 

Once I completed the hood, I then added the facial features and the hair before attaching the hood to the blanket portion, but this can be done after you have attached the hoodie to the blanket.
---------------------------------------------------------------------

Hair:
1.  I just weaved black yarn in and out at the top and tied in a double knot.

Eyes (make 2):
1.  With black yarn, 6 HDC into MR. Sl st to join.  Ch1.  Fasten off black yarn.
2.  Join brown yarn, 2 HDC into each st around.  Sl st to join.  Ch1.  Fasten off brown yarn.
3.  Join white yarn, 1 HDC into each st around.  Sl st to join.  Ch1.  Fasten off white yarn.
4.  Join gray yarn, 2 HDC into each st around.  Sl st to join.  Ch1.  Fasten off, leaving a long tail for attaching.

I embroidered a piece of white yarn from the center of the MR into one HDC of the first round.

Black Band:
For this part, I'm sorry but I didn't write down how many chains I made.  But, I made enough chain stitches to comfortably fit around the middle section of the hood.  Once I was satisfied that I had enough chains, I then HDC into the 2nd chain from the hood and across.  Fasten off and left a long tail for attaching the band.  

Mouth:
With black yarn, ch15.  SC into 2nd ch from hook and across.  Fasten off, leaving a long enough tail to attach.

Assembly of Hood to Blanket:
I centered the hood at the top of the blanket.  I then whipstitched the hood to the blanket portion.  

There's probably a lot of easier and different ways of achieving this style-type of blanket but this is what I did to make one for my grandson.  I'm posting the pattern FREE.  If there's any part that I wasn't too clear on or is confusing, please drop me a comment or an email and I will try to better clarify for you.

Legal:
--don't claim pattern as your own
--don't use my pics
--you may make, sell or give away any of your finished products
--please link to my blog as opposed to posting my pattern


---------------------------------------------------
My grandson, Gabriel, who's getting ready to turn 21 months old in a few days, loves the Minions.  He wants to watch it every single day...lol.  When he walks into my sunroom and says, Bob, I know that he’s asking to watch Minions.  Bob is the name of one of the Minions.  So, I figured I needed to make my little sweetie a Minion blanket for him to snuggle with when he's watching TV and/or napping...