Tuesday, July 31, 2018

Seaspray Unicorn Pillow

I made this Seaspray Unicorn Pillow more than a month ago and just love the colors. I initially made it for my granddaughter but have found myself sleeping on it every night. The yarn is so soft and comfortable to snuggle up with.

You can leave the pillow plain or Jazz it up a little like I did into a Unicorn with a horn, ears, eyes, nose and curlicues. I made this pillow in one piece and then whipsitched together. It is 16” x 16”.

I made this pillow using the "Tulip Stitch."  I separated my rows of Tulip Stitches by making 5 rows of HDC stitches.  If you do a search on Pinterest, you will find many charts/diagrams of the Tulip Stitch.  

Seaspray Unicorn Pillow
 
Happy Crocheting...

Legal:
--don't use/claim my design as your own
--don't use/claim my pics as your own
--okay to make and sale your finished work 
--don't share my pattern electronically or in print format (without prior consent) but provide a link to my blog

Monday, July 30, 2018

Forestry C2C Blanket

Yarn Bee's Sugarwheel in "Gelato's My Motto" is absolutely gorgeous.  The subtle changes in greens and cream -- simply beautiful.  

I decided to make a C2C (Corner-2-Corner) Blanket with it.  And, then add a border.  This blanket measures approximately 50" x 50".  With all the shades of green in this yarn, I decided to aptly name this project, "Forestry C2C Blanket."

Forestry C2C Blanket
Size:  Approximately 50" x 50"

Materials:
--6.0mm hook
--(6) Yarn Bee's Sugarwheel in "Gelato's My Motto"
--tapestry needle for weaving

U.S. Stitch Abbreviations:
Ch:  chain
Sl st:  slip stitch
St:  stitch(es)
SC:  single crochet
HDC:  half double crochet
DC:  double crochet

Rep:  repeat
Sk:  skip
FO:  fasten off

Special Stitch:
1.  C2C (Corner-2-Corner) - I used HDC stitches with Ch5 (instead of DC stitches and Ch6).  

Directions:
Knowledge of C2C is needed to make this blanket.  There are a lot of great video tutorials on Youtube to teach you how to do C2C.

1.  I used 2 Sugarwheels (355 yds/roll) to make my increase rows with HDC stitches and Ch5.
2.  I then used 2 Sugarwheels to make my decrease rows.

Here is a few pictures of the C2C portion completed:  
 
Border:
For the border, I used 2 Rolls of Sugarwheel. 

1.  I joined my yarn in one of the corner stitches with a sl st, Ch1.  3 HDC in the corner st and then 1 HDC evenly in each st around.  3 HDC st in each corner around.  Sl st join to first st and Ch1. 
2-4.  1 HDC in each st around, 3 HDC st in each corner.  Sl st join to first st and Ch1.  At the end of Round 4, sl st join to first st.  Do not Ch1.
5.  Ch5 (counts as DC and Ch2), *DC in next st, Ch 2, Sk 2 st,*  Rep from * to * around.  Into each corner, place 3 DC st.  Sl st join to first st and Ch1.
6.  SC in first st, 2 DC into the previous row's Ch2 space.  Continue to rep this until you get to the corner.  Now, once you complete the stitch pattern before the corner, (SC in first st, 2 DC into the previous row's Ch2 space) you should have 1 st remaining before the previous row’s 3 DC in the corner - sk this st).  Ch1, sk 1st corner st, then place 3 DC into the corner middle st, then Ch1 and sk 3rd corner st and first st after corner.  This way you can continue with your pattern around.  (Rep this for each corner).  This worked out perfectly for my blanket.  However, if you somehow have an additional stitch, then add an extra chain before and after each corner (and Sk the before and after additional st) .  Sl st join to first st.
7.  Ch3 (counts as first DC), *1 SC into next 2 st, DC in next st.*  Rep this pattern around.  For the corner area, complete same as #6, except you will use 3 SC st in the corners.  Sl st join to first st.
8.  Ch1.  SC in same st as Ch1.  *1 DC into next 2 st, SC in next st.*  Rep this pattern around.  For the corner area, complete as #6. 
9.  Rep #7.
10.  Rep #8.
11.  Rep #7.
12.  Rep #8.

Essentially, what you are doing is placing a SC st into the previous row's DC st and DC st into the previous row's SC st.  

Now, this will make your blanket approximately 50" x 50".  I went to Hobby Lobby today and bought 2 more Sugarwheels to continue with my border rounds to increase the size of my blanket.  

I hope my pattern makes sense.  If you have any questions, please feel free to comment, email/message me and I would be glad to help you.  
 
  Happy Crocheting...

Legal:
--don't use/claim my design as your own
--don't use/claim my pics as your own
--okay to make and sale your finished work 
--don't share my pattern electronically or in print format (without prior consent) but provide a link to my blog

Tuesday, July 24, 2018

Crochet Groot...

I made this cute little fella for a young lady who is a HUGE Groot fan.  She has very serious medical problems that impairs her quality of life and keeps her wheelchair-bound.

I wanted to make this for her.  I searched Pinterest and found a few I liked but was unsettled how I wanted to make him.
Groot
Size: approximately 8-9" tall

Materials:
--5.0mm hook
--#4 worsted weight yarn (light tan/brown and green) -- the coloring on my pics is a little off from editing
--black embroidery thread for mouth
--2 black eyes
--polyfil
--stitch marker
--1 Chenille stem
--tapestry needle for weaving

U.S. Stitch Abbreviations:
Ch:  chain
Sl st:  slip stitch
St:  stitch(es)
SC:  single crochet
Rep:  repeat
MR:  magic ring
FO:  fasten off

Special Note:
I worked this pattern in the round.  Use your stitch marker to keep track of the beginning and ending stitches.  Move stitch marker up as you start each new round.

Directions:
Head:
For the most part, I followed the blog of Twinkie Chan for the head portion with a few slight changes.    Here is the LINK to her blog.  Note:  I did not make stems for the top of the head but I did make and attach 3 leaves.

After that, her Baby Groot was made like a tree.  I wanted mine to have a body and legs.  On my first attempt, I went up in increase stitches to 24 - but, I thought 24 stitches was too big.  I then settled on stopping at 18 stitches.

Body/Legs:
1.  For the body, I started with 6 SC st in a magic ring.  Pull tail to tighten.  (6)
2.  2 SC in each st around.  (12)
3.  2 SC in first st, 1 SC in next st.  Rep around.  (18)
4-10.  1 SC in each st around.  (18)
Stuff body with polyfil.
First Leg:
11.  1 SC in the first 9 st.  Sl st join to first st.  (9)
12-17.  1 SC in each st around.  At the end of Round 17, FO and weave ends.
Second Leg:
Rep 11-17 for the second leg.
Stuff legs with polyfil.

Bottom of Leg (make 2):
1.  6 SC st in a magic ring.  (6)
2.  2 SC in first st.  1SC in next st.  Rep around.  Sl st join to first st and FO.  Leave a long enough tail to attach to the bottom of each leg.

Arms (make 2):
1.  6 SC into magic ring.
2-10.  1 SC in each st around.  At end of Round 10, FO and leave a tail for attaching to body.
(I placed a Chenille stem - approx length of arm - inside to make movable.)

Hand (make 2):
1.  For the hand, I chained 2, slip stitched in first.  I rep this until I had 5 "fingers" made and then attached to bottom of arm.
2.  Rep again for second hand.

Leaves:
1.  I just made picot stitches (chain 3, slip stitch in first chain and fasten off) and attached throughout.  I attached a leaf to each arm, each leg and on the body and head.

I saw several pictures that used a long chain of stitches (well, that's what it looked like to me) so I made one and attached from under the arm, around the body and around one leg.  I then made a second chain of stitches long enough to wrap around the second leg.  I did not count how many chains for each.

Attach the body parts and that's it.


Happy Crocheting...


Saturday, July 21, 2018

True Blue Beach Cover-Up

Here's a Beach and/or Pool Cover-Up (dress) that's easy to make and really pretty.  I don't think the pictures accurately reflect how pretty the varying shades of blue really are.  This is a "One Size Fits Most" garment piece.

I used 2 skeins of Red Heart Super Saver yarn to make this - (1) Ombré yarn in True Blue and a 1/3 skein in Light Blue.  The reason for the Light Blue - I only bought 1 skein of Ombre yarn initially because I fell in love with the color but wasn't sure what I was going to make with it.  Well, as luck would have it, when I returned to the store to purchase another skein, alas, they were out of it.  And, in my eagerness to complete my project, I decided on the Light Blue skein since it compliments the Ombre yarn perfectly.

I used an  8mm hook and crocheted this very loose.  If you tend to make tight stitches, then you may want to use a 9mm or 10mm hook.

So, I hope you will like and enjoy the simplicity of this pattern.

Special Note:  I do not like modeling/exposing myself in pictures but I had no model available to wear this garment for me.  I'm currently a size large, so, as you can see in the pictures it will fit a medium-sized or small-sized person a little looser. 

True Blue Beach Cover-Up 
Size:  One size fits most; it measures approximately 24" in length from the center of the V-neck to the hemline

Materials:
--8.0mm hook
--1 skein of RHSS Ombre yarn in True Blue
--1 skein of RHSS yarn in Light Blue
--tapestry needle for weaving 

U.S. Stitch Abbreviations:
Ch:  chain
Sl st:  slip stitch
St:  stitch(es)
SC:  single crochet
HDC:  half double crochet
BPDC:  back post double crochet
FPDC:  front post double crochet
Sk:  skip
Rep:  repeat
FO:  fasten off

Directions:
The top portion is made by making 2 rectangles then joining together, leaving a neck opening, and then working the skirt portion in the round.  I used post stitches in the last 3 rows of the skirt's hem; however, if you are not comfortable with post stitches, you can substitute with double crochet stitches. 

Top Portion:
(make 2)
1.  Ch101.  HDC in 2nd ch from hook and across.  Ch1 and turn.  (100)
-- or you can FHDC 100 --
2.  HDC in first st.  *Ch1, sk next st, HDC in next st.*  Rep from * to * across.  HDC in last st.  Ch1 and turn.  (100)
3-20.  Rep #2.  At the end of Row 20, FO.  Leave a long tail.

Rep and make a 2nd rectangular piece. 

Now, you are ready to join the 2 pieces together, leaving an opening in the center for the neck.  Whipstitch or slip stitch the ends (lengthwise) together, leaving the 30 center stitches unworked.  See below pic for help.
 Now, you are ready to whipstitch or slip stitch each side together.  I left 8" at the top on each side unworked for the arms.  
Skirt Portion:
1.  Join yarn with sl st and Ch1 in any corner stitch on the bottom.  SC in same st and in each st evenly around.  Sl st join to first st and Ch1.  You should have 80 stitches since each rectangle was made in 20 rows.  (80)
2-5.  1 SC in each st around.  Sl st join to first st and Ch1.  (80)
6.  2SC in first st, 1 SC in next st.  Rep around.  Sl st join to first st and Ch1.  (100)
7.  1 HDC in each st around.  Sl st join to first st and Ch1.  (100)
8-22.  1 HDC in each st around.  Sl st join to first st and Ch1.  (100)
Special Note:  I was able to complete up to Round 15 using the Ombre yarn
23.  1 BPDC in each post st around (OR, 1 DC in each st around).  Sl st join to first st and Ch1.  (100)
24.  1 FPDC in each post st around (OR, 1 DC in each st around).  Sl st join to first st and Ch1.  (100)
25.  1 BPDC in each post st around (OR, 1 DC in each st around).  Sl st join to first st and FO.  Weave ends.

Arms:
1.  Join yarn with sl st and Ch1 in any corner stitch.  SC in same st and evenly around.  Sl st join to first st and FO.  Weave ends.
2.  Rep #1 on second arm opening.

And, that's it for this simple and pretty, "True Blue Beach Cover-Up..."  I'd love to hear your thoughts and/or opinions on this.  If you make one, please share your pictures!!!!

  Happy Crocheting...

Legal:
--don't use/claim my design as your own
--don't use/claim my pics as your own
--okay to make and sale your finished work 
--don't share my pattern electronically or in print format (without prior consent) but provide a link to my blog


Monday, July 16, 2018

WV Baby Blanket

I was asked by my hubby's coworker to make a baby blanket for a WV fan.  Of course, I said yes.  I grew up in WV.  I've lived in NC for the past 24 years but I still call WV home.  So, this was exciting for me...

While John and I were at the beach last week, I started on this project.  I had received a 7.0mm hook for Christmas and decided to use it for my hook size.  Of course, you can easily change up the hook size to what you have readily available.  My son ordered the 7.0mm size on Amazon.  I hadn't seen this size in my local craft stores.

I hope crocheters who are also WV residents (former or current) and/or fans will enjoy this blanket.  I used HDC, DC and post stitches for this project.

The blanket measures approximately 30" x 38".

WV Baby Blanket

Size: 30" x 38"

Materials:
--7.0mm hook (or whatever size hook you have available; just note that different hook size will yield a different blanket size) 
--RHSS Yarn - 2 skeins Soft Navy and 1 skein of Gold
--tapestry needle for weaving

U.S. Stitch Abbreviations:
Ch:  chain
Sl st:  slip stitch
St:  stitch(es)
HDC:  half double crochet
FPHDC: front post half double crochet
BPHDC:  back post half double crochet
FO:  fasten off

Directions:  
1.  Ch81.  HDC in 2nd ch from hook and across.  Ch1 and turn.  (80)
2-5.  1 HDC in each st across.  Ch1 and turn.  (80)
6.  1 HDC in each st across.  FO and weave ends.  (80) 
7.  Join Gold yarn in first st and Ch1.  HDC in same st and across.  Ch1 and turn.  (80)
8.  1 HDC in each st across.  FO and weave ends.  (80) 
9.  Join Soft Navy yarn in first st and Ch1.  HDC in same st and across.  Ch1 and turn.  (80)
10-44.  1 HDC in each st across.  Ch1 and turn.  (80)
45.  1 HDC in each st across.  FO and weave ends.  (80)
46.  Join Gold yarn in first st and Ch1.  HDC in same st and across.  Ch1 and turn.  (80)
47.  1 HDC in each st across.  FO and weave ends.  (80) 
48.  Join Soft Navy yarn in first st and Ch1.  HDC in same st and across.  Ch1 and turn.  (80)
49-52.  1 HDC in each st across.  Ch1 and turn.  (80)
53.  1 HDC in each st across.  FO and weave ends. (80)

Border:
54.  Join Gold yarn in first st and Ch1.  HDC in same st and around, placing 3 HDC st in each corner. Sl st join to first st and Ch1.  
55-56.  1 HDC in each st around.  Sl st join to first st and Ch1.  At the end of Round 56, FO and weave ends.
57.  Join Soft Navy yarn in first st and Ch1.  HDC in same st and around.  Sl st join to first st and Ch1.  
58-59.  For the last 2 rounds, I alternated between FPHDC and BPHDC st and placing 3 HDC st in each corner.  However, if you're not familiar/comfortable with making post stitches, then you can simply complete the last 2 rounds with HDC stitches.  Once you complete the 2 rounds, FO and weave ends.  

If you want to make this blanket bigger, then simply increase your starting chain with your desired length and/or make more rows before you start working on the border.  

For the letters, here's the link:

See my pics, for help with how I positioned my letters before I whipstitched them to the center of the blanket.  
Happy Crocheting...

Legal:
--don't use/claim my design as your own
--don't use/claim my pics as your own
--okay to make and sale your finished work 
--don't share my pattern electronically or in print format (without prior consent) but provide a link to my blog

Reversible Hat

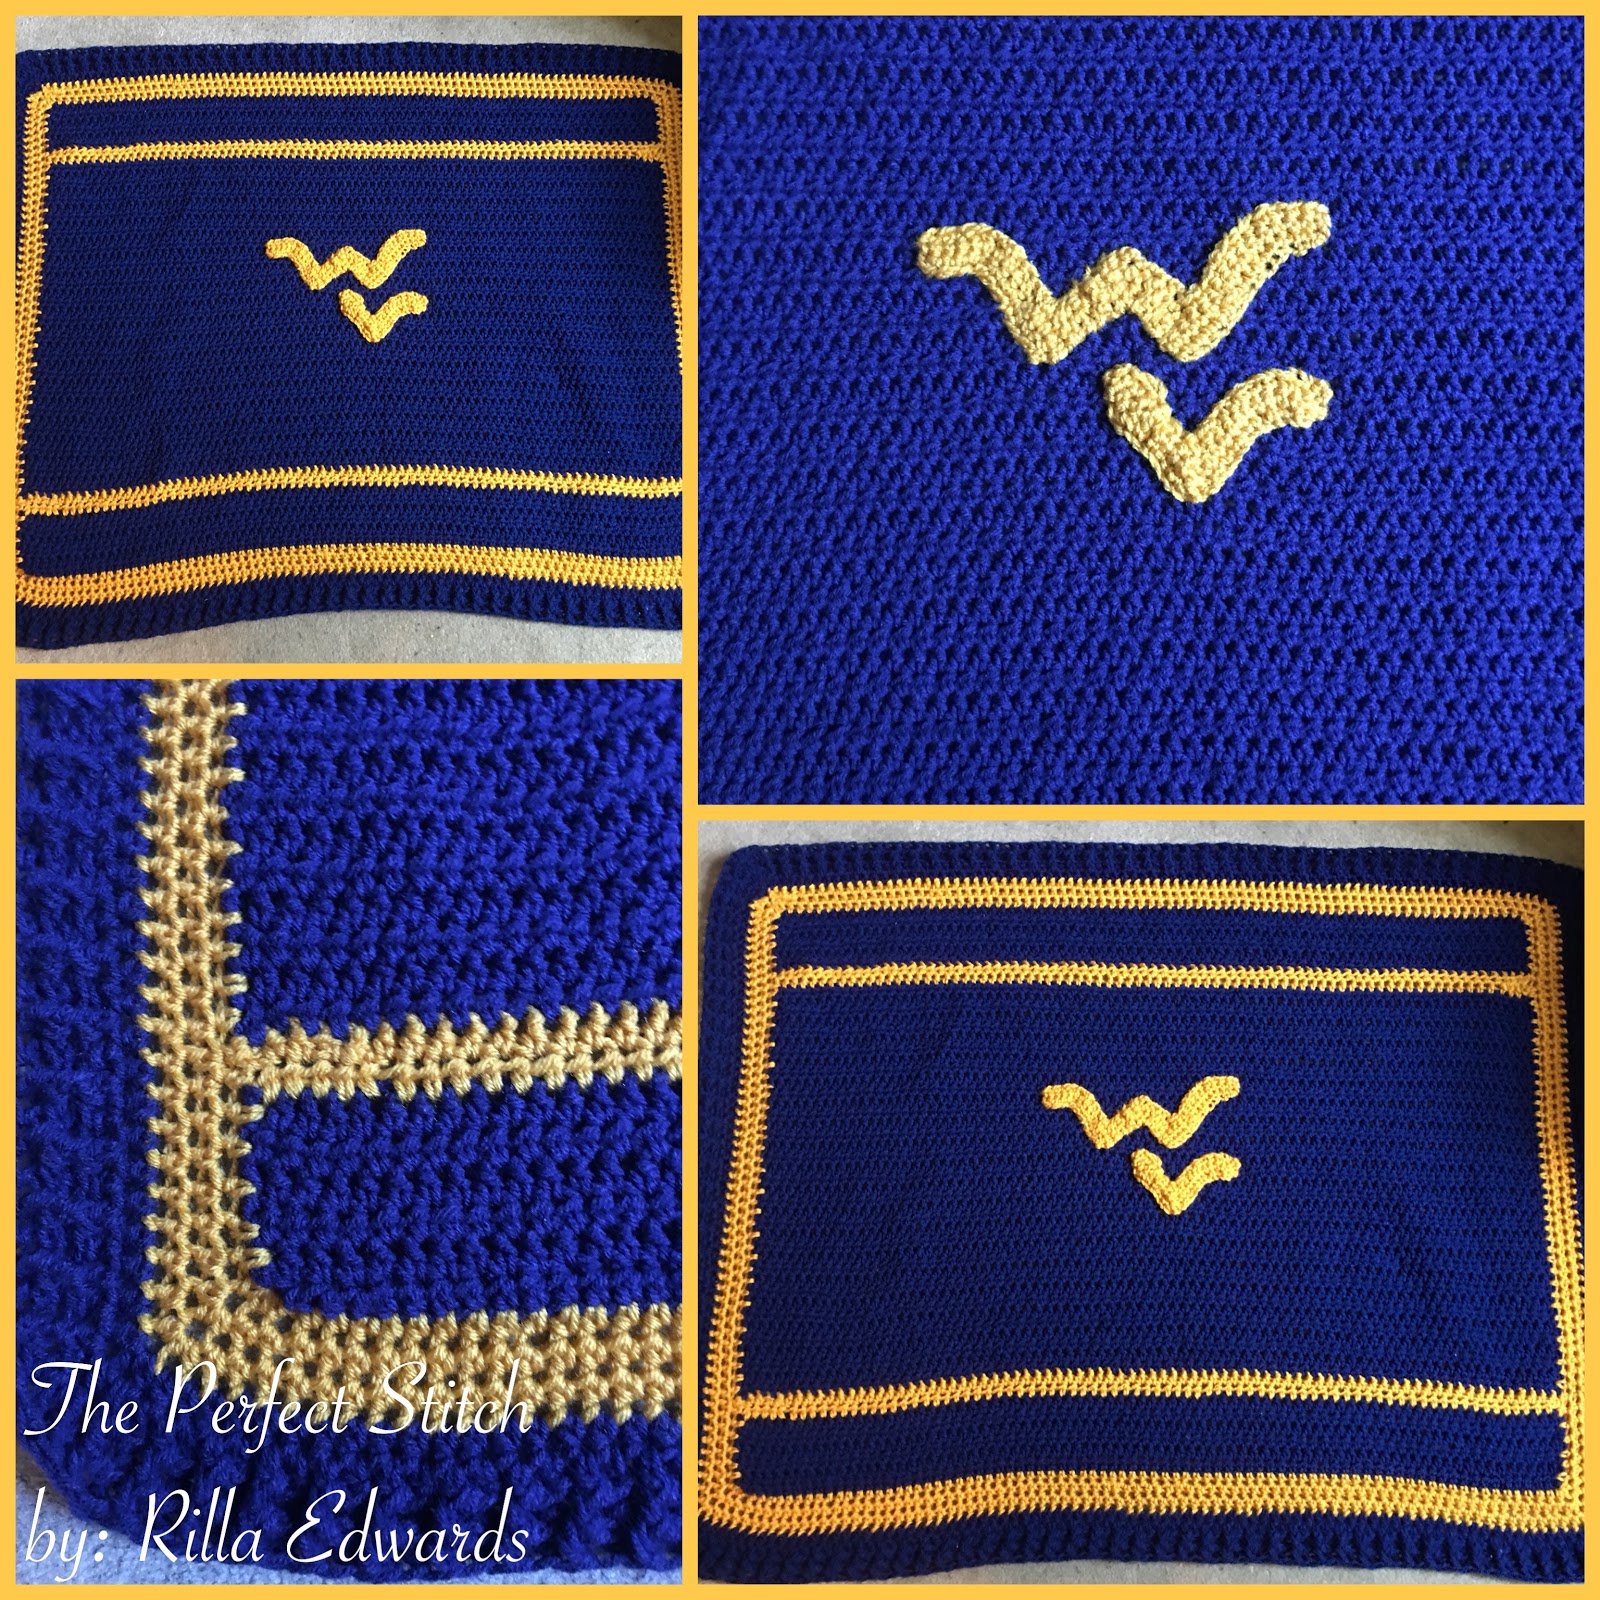
I love versatility, especially with craft projects.  I'm making a hat and diaper cover set to match the WV Baby Blanket I just completed.  So, I decided to make the hat reversible with pompoms on each side.  It's made completely in one piece - so not much weaving at all.

Quick, easy, functional and sure to keep a baby's head toasty warm come this fall and winter.

I used a 5.0mm hook and RHSS yarn in Soft Navy and Gold to complete.  It's double the warmth for certain.

What do you all think?

Reversible Hat
Size:  
Pattern below is for 1-3 year olds (18" head circumference)

Alternate sizes:
1.  To make a Newborn size (14" head circumference), stop increase rounds at 40 stitches, then complete 5-6 repeat rounds before switching yarn color and repeating pattern in reverse.
2.  To make for a 3 month - 6 month (15 1/2" head circumference), stop increase rounds at 48 stitches, then complete 6-7 repeat rounds before switching yarn color and repeating pattern in reverse.
3.  To make for 3 - 5 year olds (19" - 20" head circumference), stop increase rounds at 64 stitches, then complete 8-9 repeat rounds before switching yarn color and repeating pattern in reverse.
4.  To make additional sizes, just make fewer or more increase rounds to get the head circumference you need.

How to determine the number of stitches needed for your head size:
1.  Use a tape measure, and measure around your head in inches to get your size;
2.  Divide that number by 3.14.  The number you get will determine how many inches wide your circle needs to be before you stop increasing the number of stitches in each round.   If you do not have a tape measure readily available, you can go to Pinterest and do a head circumference chart search.  This will bring up charts/tables that will give you the approximate age, head circumference size and length you need to make your hat.

Materials:
--5.0mm hook
--RHSS yarn in Soft Navy and Gold (or your colors of choice)
--tapestry needle for weaving

U.S. Stitch Abbreviations:
Ch:  chain
Sl st:  slip stitch
St:  stitch(es)
HDC:  half double crochet
HDC2tog:  half double crochet 2 stitches together (creates a decrease)
MR:  magic ring
Rep:  repeat
FO:  fasten off

Special Stitch:
1.  HDC2tog:  yarn over, insert hook into next stitch, yarn over and come back through the stitch, yarn over and insert hook into the next stitch, yarn over and come back through the stitch, yarn over and pull all 5 loops on the hook through; you have created a decrease stitch.

Special Note:
1.  This Reversible Hat is ALL made in one piece.
2.  This hat can be worked in the round (if so, then use a stitch marker to keep track of starting/ending stitch) or you can slip stitch join and chain 1.

Directions:
1.  With Soft Navy yarn, 8 HDC into MR.  Pull tail to tighten.  Sl st join to first st and Ch1.  (8)
2.  2 HDC in each st around.  Sl st join to first st and Ch1.  (16)
3.  2 HDC in first st, 1 HDC in next st.  Rep around.  Sl st join to first st and Ch1.  (24)
4.  2 HDC in first st, 1 HDC in next 2 st.  Rep around.  Sl st join to first st and Ch1.  (32)
5.  2 HDC in first st, 1 HDC in next 3 st.  Rep around.  Sl st join to first st and Ch1.  (40)
6.  2 HDC in first st, 1 HDC in next 4 st.  Rep around.  Sl st join to first st and Ch1.  (48)
7.  2 HDC in first st, 1 HDC in next 5 st.  Rep around.  Sl st join to first st and Ch1.  (56)
8-14.  1 HDC in each st around.  Sl st join to first st and Ch1.  At the end of Round 14, FO and weave ends.  (56)
15.  Join Gold yarn in any stitch with a sl st and Ch1.  HDC in same st and in every stitch around.  Sl st join to first st and Ch1.  (56)
16-22.  1 HDC in each st around.  Sl st join to first st and Ch1.  (56)
23.  HDC2tog, 1 HDC in next 5 st.  Rep around.  Sl st join to first st and Ch1.  (48)
24.  HDC2tog, 1 HDC in next 4 st.  Rep around.  Sl st join to first st and Ch1.  (40)
25.  HDC2tog, 1 HDC in next 3 st.  Rep around.  Sl st join to first st and Ch1.  (32)
26.  HDC2tog, 1 HDC in next 2 st.  Rep around.  Sl st join to first st and Ch1.  (24)
27.  HDC2tog, 1 HDC in next st.  Rep around.  Sl st join to first st and Ch1.  (16)
28.  HDC2tog.  Rep around.  Sl st join to first st and FO.  Leave a long tail to weave in and out of the last row to close the hole.  (8)
Pompoms:
1.  I held Navy and Gold strands together and wrapped 30 times around 3 fingers.  Cut and tied in the center.  Then trimmed ends and rubbed together with the palms of my hands to shape.
 
To wear:
1.  Push one color inside the other color and your hat is ready to wear - with DOUBLE the WARMTH.
2.  Turn inside out, to wear the contrasting color. 
Happy Crocheting...
Legal:
--don't use/claim my design as your own
--don't use/claim my pics as your own
--okay to make and sale your finished work
--don't share my pattern electronically or in print format (without prior consent) but provide a link to my blog

Sugarplum Baby Blanket

I'm in love with the Sugarplum Stripe, Periwinkle and White Yarn I used for this baby blanket.  The color combination is so, so pretty and, well, just girly.

I used a 6.0mm hook and "I Love This Yarn" from Hobby Lobby to complete this project.  The yarn is a #4 worsted weight yarn.  

This blanket was designed using single crochet and half double crochet crossed over stitches.  

The completed blanket measures approximately 36" x 32".  And, I'm sure this blanket is going to keep a little baby girl super warm come this fall...

Sugarplum Baby Blanket 
Size:  Approx. 36" x 32"

Materials:
--6.0mm hook
--#4 worsted weight yarn - I used Hobby Lobby's, I Love This Yarn, in Sugarplum Stripe, Periwinkle and White (2 skeins of Sugarplum and 1 each of Periwinkle and White)
--tapestry needle for weaving

U.S. Stitch Abbreviations:
Ch:  chain
Sl st:  slip stitch
St:  stitch(es)
SC:  single crochet
HDC:  half double crochet
Rep:  repeat
FO:  fasten off

Directions:
For this blanket, I started out working rows with the Sugarplum Stripe.  When I switched to Periwinkle, I started working around all four sides, placing 3 stitches in each corner.  

Special Stitch:  
1.  HDC Crossover - Skip stitch, HDC in next st.  Then, go back to the skipped stitch and place an HDC stitch.  

1.  With Sugarplum Stripe, Ch 49.   HDC in 2nd ch from hook.  Then, skip the next ch.  HDC in the following ch.  Continue to skip the next ch, place the HDC stitch in following ch, then go back to the skipped ch and place the HDC stitch.  Rep across.  HDC in last st.  Ch1 and turn.  (48)
2-26.  HDC in first st.  *Sk next st, HDC in following st.  Then, HDC in skipped st.* Rep from * to * across.  HDC in last st.  Ch1 and turn.  At the end of Row 26, FO and weave ends.  (48)
27.  Join Periwinkle yarn in any stitch with a sl st and ch1.  SC in same st.  SC in each st evenly around all 4 sides, placing 3 SC st in each corner.  Sl st join to first st and Ch1.
28-32.  SC in each st around, placing 3 SC st in each corner.  Sl st join to first st and Ch1. At the end of Round 32, FO and weave ends.
33.  Join White yarn in any stitch with a sl st and ch1.  HDC in first st.  Now, you will work HDC Crossover around all 4 sides, placing 3 HDC stitches in each corner.  Sl st join to first st and Ch1.
34-36.  Rep # 33.  At the end of Round 36, FO and weave ends.
37.  Join Sugarplum Stripe in any stitch with a sl st and Ch1.  SC in same st.  SC in each st evenly around all 4 sides, placing 3 SC st in each corner.  Sl st join to first st and Ch1.
38-41.  Rep #37.  At the end of Round 41, FO and weave ends.
42.  Join Periwinkle yarn in any stitch with a sl st and Ch1.  HDC in first st.  Now, you will work HDC Crossover around all 4 sides, placing 3 HDC stitches in each corner.  Sl st join to first st and Ch1.
43-47.  Rep #42.  At the end of Round 47, FO and weave ends.
48.  Join White yarn in any stitch with a sl st and ch1.  SC in same st.  SC in each st evenly around all 4 sides, placing 3 SC st in each corner.  Sl st join to first st and Ch1.
49-54.  Rep #48.  At the end of Round 48, FO and weave ends.
55.  Join Sugarplum Stripe yarn in any stitch with a sl st and Ch1.  HDC in first st.  Now, you will work HDC Crossover around all 4 sides, placing 3 HDC stitches in each corner.  Sl st join to first st and Ch1.
56-57.  Rep #55.  At the end of Round 57, FO and weave ends.

And, that's it for this super soft and "girly" baby blanket...

Happy Crocheting...
Legal:
--don't use/claim my design as your own
--don't use/claim my pics as your own
--okay to make and sale your finished work 
--don't share my pattern electronically or in print format (without prior consent) but provide a link to my blog


Wednesday, July 11, 2018

"Wild Like The Wind" Throw Blanket

A few weeks ago, I bought this yarn, Wild Flower Winds, at Hobby Lobby on clearance sale for a $1.24 per skein (regular $3.99 per skein). Each skein has 252 yards.  I loved the color combo and decided to make a throw blanket.  I used 5 skeins.

This was a fun and easy pattern design, even for a beginner.  The finished blanket measures approximately 38" x 50".  You may use a different #4 worsted weight yarn brand, just note that the size may vary some.

"Wild Like The Wind" Throw Blanket
Size:  approximately 38" x 50"

Materials:
--6.0 mm hook
--(5) skeins of Wild Flower Winds Yarn (#4 worsted weight yarn); 252 yds/skein
--tapestry needle for weaving

U.S. Stitch Abbreviations:
Ch:  chain
Sl st:  slip stitch
St:  stitch
SC:  single crochet
HDC:  half double crochet
Sk:  skip
Rep:  repeat
FO:  fasten off

Directions:
1.  FHDC 150.  Or, Ch151.  HDC in 2nd ch and across.  Ch1 and turn.  (150)
2.  HDC across.  Ch1 and turn.  (150)
3-7. Rep #2.
8.  HDC in first st.  *Ch2, Sk 2.  HDC in next st.*  Rep across.  Ch1 and turn.
9.  HDC in first st.  *2 HDC in Ch2 space.  HDC next st.* Rep across.  Ch1 and turn.
10-78.  Rep #8 and #9.
79-85.  Rep #2.
86-88.  SC evenly around blanket.  FO and weave ends.                            
Happy Crocheting...

Legal:
--don't use/claim my design as your own
--don't use/claim my pics as your own
--okay to make and sale your finished work 
--don't share my pattern electronically or in print format (without prior consent) but provide a link to my blog