Wednesday, February 28, 2018

Luck of the Irish Soap Saver...

My Luck of the Irish Soap Saver works up really quick.  I was inspired to make this when I realized we had no whole bars of soap but multiple small pieces at different stages.  So, I needed something made to utilize the small pieces, as well as something to accommodate a whole bar.  And, with March upon the horizon, I decided to make it Irish-themed...

I used a 4.5mm hook and "I Love This Cotton" Yarn from Hobby Lobby.

This makes a super cute gift for hubby or to include in a gift basket to a friend....

Luck of the Irish Soap Saver
Luck of the Irish Soap Saver Pattern

Size: approximately 4" x 3"

Gauge:  I did not gauge pattern.

Materials:
--4.5mm hook
--Cotton Yarn in green and white
--stitch marker 
--tapestry needle for weaving 

U.S. Stitch Abbreviations:
Ch:  chain
Sl st:  slip stitch 
St:  stitch(es)
SC:  single crochet 
HDC:  half double crochet 
DC:  double crochet 
Sk:  skip
Rep:  repeat
FO:  fasten off
MR:  magic ring 

Directions: 
1.  With green yarn, Ch15.  SC in 2nd ch from hook (place stitch marker in first St and move upward at the start of each new round) and into next 12 ch.  3 SC st in the last st.  Rotate and work on the opposite side of the base ch.  SC in each of the next 12 ch.  2 SC in the last ch.  Sl st join to first st and Ch1.  (30).
2.  SC in the first 14 st.  3 SC in the last st.  Rotate.  SC in the next 14 st.  2 SC in the last st.  Sl st join to first st and Ch1.  (33)
3-4.  1 SC in each st around.  Sl st join to first st and Ch1.  (33)
5.  *SC, HDC & DC all in the first st.  Sk 2 st.*. Rep around from * to *.  Sl st join to first St and Ch1.  (33)
6-15.  Rep #5.
16.  1 SC in each st around.  Sl st join to first st and Ch1.  (33)
17-18.  Rep #16.
19.  *5 SC in first st, sk next 2 st, Sl st in next st, sk next 2 st.*  rep around with 5 SC in the 31st st, sk the next st and place 3 SC in the last st.  Sl st join to first st and FO.  Weave ends.

Drawstring:
1.  With white yarn, Ch80.  FO and leave a tail for weaving.

Assembly:
1.  With tapestry needle weave the Drawstring in and out of Round 15.  Double knot ends and trim.

Shamrock Appliqués (make 2):
1.  With green yarn, make a MR.  *Ch3,  DC, HDC, DC and Ch3.  Sl st into MR.* rep 2 more times.  Pull tail to tighten center.
Stem:
2.  Ch6.  SC in 2nd ch from hook and next 4 ch.  Sl st to center of Shamrock and FO.  Leave a tail for attaching.

And, that's it for this simple, cute, and efficient project.  Hope you guys will enjoy making this.... 

Happy Crocheting....

Legal:
--don't use/claim my design as your own
--don't use/claim my pics as your own
--okay to make and sale your finished work
--don't share my pattern electronically or in print format (without prior consent) but provide a link to my blog

Saturday, February 24, 2018

Carry Along Barn and Farm Animals...

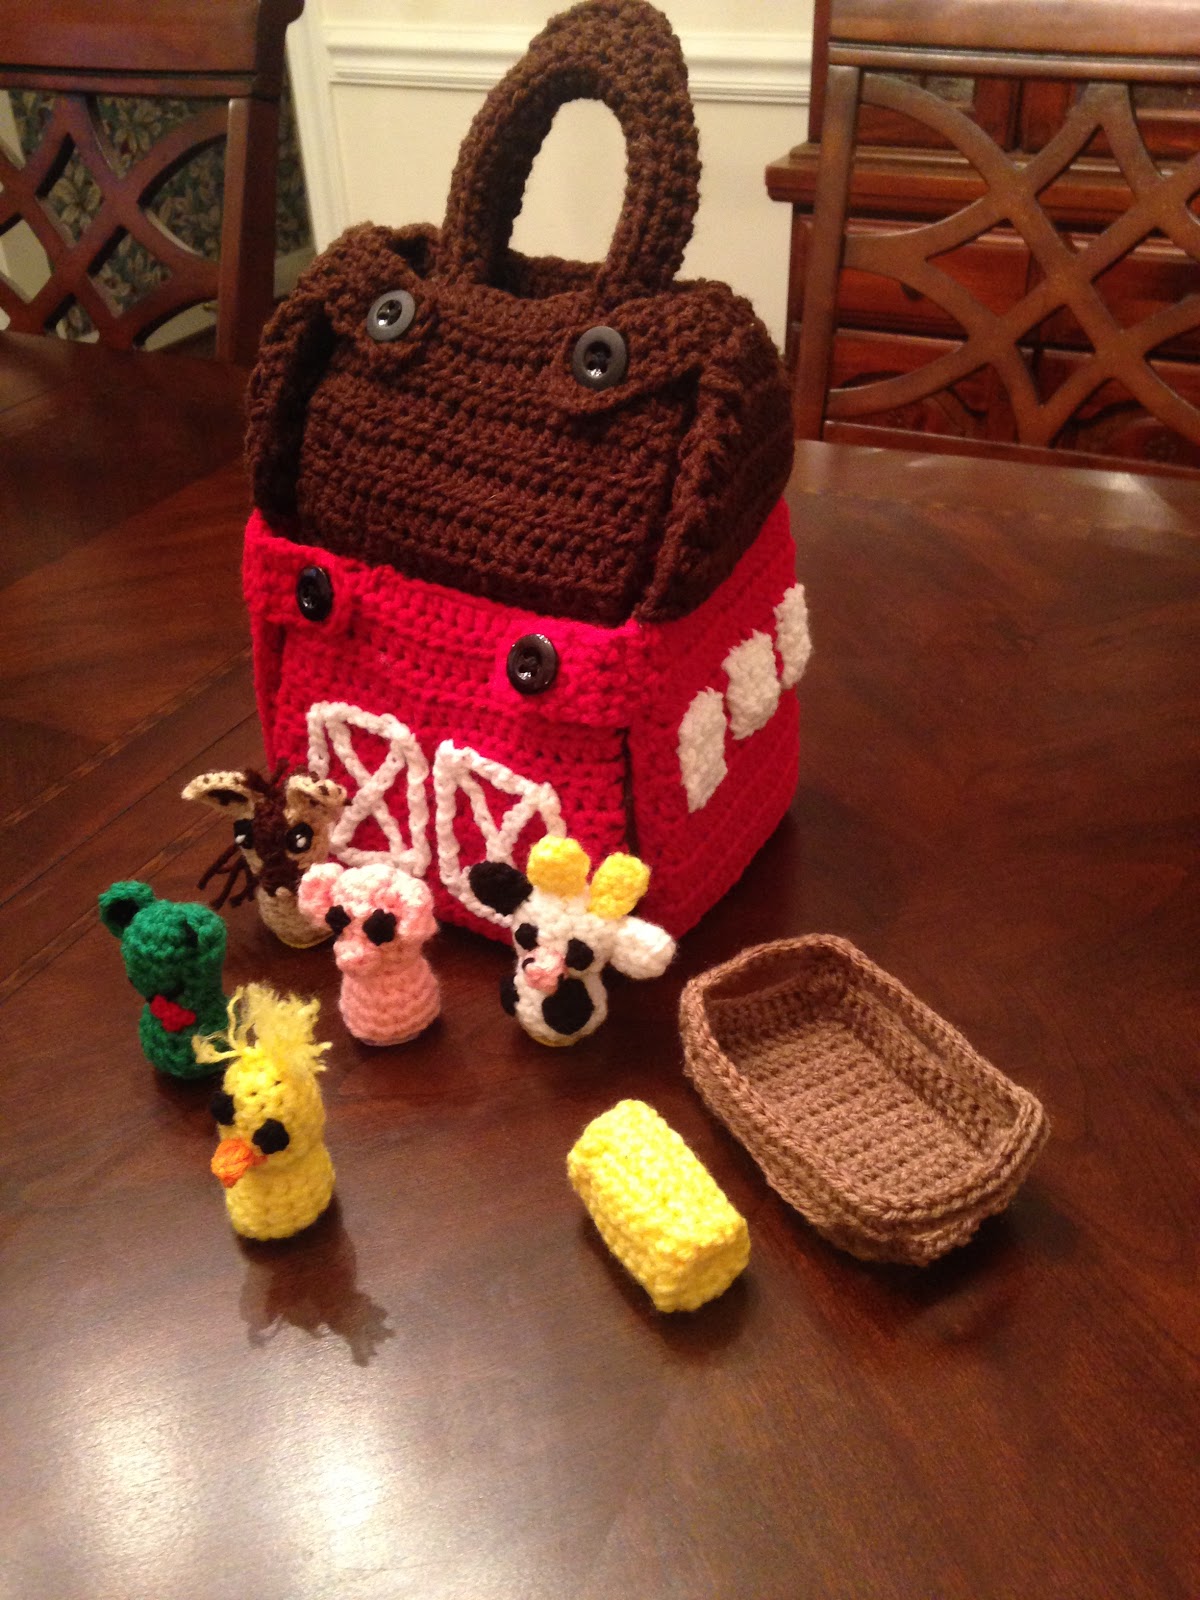
The past few days I've been working on my "Carry Along Barn."  I'm using Red Heart Super Saver yarn.  The Barn stands approximately 10" tall, not including handles, and 8" wide.  Each Farm Animal stands approximately 3" tall. 

Today, I'm working on the inside if the barn and will then hopefully move toward making the animals to complete this...

This is a LARGE pattern.  I have created an AD-FREE, PDF VERSION and listed it in my Etsy Shop.  You can purchase it by clicking on this LINK>>>

Carry Along Barn


Carry Along Barn and Farm Animals Pattern

Size:
Barn:  Approximately 10" tall (not including handles) and 8" wide
Animals:  Approximately 3" tall

Gauge:  
I did not gauge this project

Materials:
--5.0mm hook for the barn, windows, door and the gate
--3.5mm hook for the animals, water, hay and horse corral
--3.0mm hook for a few of the animal features
--4.5mm hook will also be used for horse corral
--#4 worsted weight yarn - I used Red Heart Super Saver Yarn:
     Cherry Red, White and Coffee Cafe for the barn
     Cafe Latte for the horse corral 
     Yellow and White for the gate
     Yellow for the bale of hay
     Blue for the water
     Green, Red, Black, Yellow, Orange, White, Pink, Beige and Coffee Cafe for the animals  
--Polyfil for the animals and the hay bale
--(4) 3/4" black buttons
--3 sheets of 8x10 plastic canvas 
--small amount of felt for the bottom of each animal
--craft glue for attaching felt (or you could sew the felt to the animal bottom)
--tapestry needle for weaving

U.S. Stitch Abbreviations:
Ch:  chain
Sl st:  slip stitch
St:  stitch(es)
SC:  single crochet
SC2tog:  single crochet 2 stitches together (creates a decrease)
HDC:  half double crochet
HDC2tog:  half double crochet 2 stitches together (creates a decrease) 
HDC3tog:  half double crochet 3 stitches together (creates a decrease) 
DC:  double crochet
MR:  magic ring
BLO:  back loops only 
FLO:  front loops only
Rep:  repeat
Sk:  skip
FO:  fasten off

Directions:
The Barn is made in 9 pieces x 2 (which equals 18) plus the 2 handles.  Each piece is made 2 times and whipstitched together with a piece of plastic canvas between it.  Here's a breakdown of the pieces that will need to make, using a 5.0mm hook:
--2 center (Cherry Red)
--2 front (1 Cherry Red and 1 Coffee Cafe)
--2 back (Cherry Red)
--4 sides (Cherry Red)
--4 roof (Coffee Cafe)
--4 side peaks (Coffee Cafe)
 
Center, Front and Back (5 Cherry Red and 1 Coffee Cafe):
1.  Ch22.  HDC in 2nd ch from hook and across.  Ch1 and turn.  (21)
2-15.  1 HDC in each st across.  Ch1 and turn.  At the end of Row 15, FO and leave a long tail for attaching.  (21)

Sides (4 Cherry Red):
1.  Ch20.  HDC in 2nd ch from hook and across.  Ch1 and turn.  (19)
2-15.  1 HDC in each st across.  Ch1 and turn.  At the end of Row 15, FO and leave a long tail for attaching.  (19)

Roof (4 Coffe Cafe):
1.  Ch22.  HDC in 2nd ch from hook and across.  Ch1 and turn.  (21)
2-10.  1 HDC in each st across.  Ch1 and turn.  At the end of Row 10, FO and leave a long tail for attaching.  (21)

Side Peaks (4 Coffee Cafe):
1.  Ch20.  HDC in 2nd ch from hook and across.  Ch1 and turn.  (19)
2.  1 HDC in each st across.  Ch1 and turn.  (19)
3.  HDC2tog, 1 HDC in next 15 st, HDC2tog.  Ch1 and turn.  (17)
4.  HDC2tog, 1 HDC in next 13 st, HDC2tog.  Ch1 and turn.  (15)
5.  HDC2tog, 1 HDC in next 11 st, HDC2tog.  Ch1 and turn.  (13)
6.  HDC2tog, 1 HDC in next 9 st, HDC2tog.  Ch1 and turn.  (11)
7.  HDC2tog, 1 HDC in next 7 st, HDC2tog.  Ch1 and turn.  (9)
8.  HDC2tog, 1 HDC in next 5 st, HDC2tog.  Ch1 and turn.  (7)
9.  HDC2tog, 1 HDC in next 3 st, HDC2tog.  Ch1 and turn.  (5)
10.  HDC2tog, 1 HDC in next st, HDC2tog.  Ch1 and turn.  (3)
11.  HDC3tog.  FO and leave a long tail for attaching.  (1)

Handles (2 Coffee Cafe):
 1.  Ch25.  HDC in 2nd ch from hook and across.  Ch1 and turn.  (24)
2-4.  1 HDC in each st across.  Ch1 and turn.  At the end of Row 4, FO and leave a long enough tail for folding in half and whipstitching together.  

Button Tabs (2 Cherry Red and 2 Coffee Cafe):
 1.  Ch5.  SC in 2nd ch from hook and across.  Ch1 and turn.  (4)
2-4.  1 SC in each st across.  Ch1 and turn.  (4)
5.  1 SC in first st.  Ch2, sk 2, and 1 SC in the last st.  Ch1 and turn.  (2 SC and 2 Ch)
6.  1 SC in first st, 2 SC in the Ch2 space and 1 SC in last st.  FO and leave a long enough tail for attaching to the barn.  (4)

 Barn Assembly:
 Side-view pic of the completed sections:

1.  First you will whipstitch your individual sections together, placing plastic canvas between it.  I trimmed the plastic canvas approx 1-2" smaller than the sections.
2.  Then, you will begin to whipstitch the sections together.  Please see above picture for layout/positioning of the sections.  I whipstitched the roof to the back, the back to the center, the center to the front (with the Coffee Cafe on top - to be on the inside of the barn), and the front to the roof.  I then attached each peak to each side.  I then attached each side to the center side.  I then attached the back to the sides on each side.  
3.  Next, you will add the button tabs.  I added the brown tabs to the top side of each peak.  I added the red tabs on each side of the side section.  The buttons are then added.  Place buttons on the outside of the barn (2 on the roof  and 2 on the front).  See below pic for help on where to place the button tabs and buttons...
4.  Last, place each handle on the roof top, centered.  See pic for help on where to place.  

Barn doors and windows (appliques):
Left Side (1 window and 1 door):
Door:
1.  With 5.0mm hook and white yarn, Ch8.  SC in 2nd ch from hook and across.  Ch1 and turn.  (7)
2-10.  1 SC in each st across.  Ch1 and turn.  (7)
11.  SC2tog, 1 SC in next 3 st, SC2tog.  FO and leave a long tail for attaching.  (5) 

Doorknob:  
1.  With 5.0mm hook and Coffee Cafe, Ch3.  Sl st in 1st ch and FO.  Leave tail for attaching to door.
2.  See above picture on where to place the knob to the door.  

Window:
1.  With 5.0mm hook and white yarn, Ch5.  SC in 2nd ch from hook and across.  Ch1 and turn.  (4)
2-5.  1 SC in each st across.  Ch1 and turn.  At the end of Round 5, FO and leave a tail for attaching.  (4)

Front (make 2 Cross Doors):
 1.  Ch40.  FO and leave a long tail for attaching.
2.   Shape and whipstitch into a rectangle shape.

X's (make 4):
1.  Ch10.  FO and leave a long tail for attaching.
2.  Position corner-to corner in each rectangle and whipstitch, forming an X. 

Right Side (3 windows):
1.  With 5.0mm hook and white yarn, Ch5.  SC in 2nd ch from hook and across.  Ch1 and turn.  (4)
2-5.  1 SC in each st across.  Ch1 and turn.  At the end of Round 5, FO and leave a tail for attaching.  (4)

Barn Animals:
Each animal is made from the same basic pattern and then the individual features were added.  I wanted my animals to be hand-sized and safe (no button eyes) for Toddlers. 

Basic Animal Pattern:
1.  With 3.5mm hook, 6 SC into MR.  Sl st join and Ch1.  (6)
2.  2 SC in each st around.  Sl st join and Ch1.  (12)
3-5.  1 SC in each st around.  Sl st join and Ch1.  (12)
6.  SC2tog 6 times.  Sl st join and Ch1.  (6)
7.  1 SC in each st around.  Sl st join and Ch1.  (6)
8.  2 SC in each st around.  Sl st join and Ch1.  (12)
9-11.  1 SC in each st around.  Sl st join and Ch1.  At the end of Round 11, FO and leave a tail.  Stuff with polyfil.  Cut a piece of felt to either glue or sew to the bottom.  (I used a Dr. Pepper bottle cap as a guide for my felt pieces) 

A.  Pig:
Ears (make 2):
1.  With 3.5mm hook and pink yarn, 3 SC into MR.  Sl st join and Ch1.  (3)
2-3.  1 SC in each st around.  Sl st join and Ch1.  At the end of Round 3, FO and leave a tail for attaching.  (3) 

Snout:
1.  With 3.5mm hook and pink yarn, 3 SC into MR.  Sl st join and Ch1.  (3)
2.  1 SC in each st around.  Sl st join and FO.  Leave tail for attaching.  (3)

Eyes (make 2):
1.  With 3.5mm hook and black yarn, Ch3.  Sl st into 1st ch and FO.  Leave tail for attaching.

Assembly:
1.  Attach ears on each side.  I also attached the bottom of the ear to the side.
2.  Attach eyes.
3.  Attach snout below, center of eyes.

B.  Chick:
Eyes (make 2):
1.  With 3.5mm hook and black yarn, Ch3.  Sl st into 1st ch and FO.  Leave tail for attaching.

Beak:
1.  With 3.5mm hook and orange yarn, 2 SC into MR.  Sl st join and FO.  Leave tail for attaching.

Hair:
1.  With yellow yarn, use tapestry needle to weave strands of yarn at the center top and tie into a double knot.  I then used the tapestry needle to fray the yarn strands.  My strands are approximately an inch to an inch and half long.

Assembly:
1.  Attach eyes.
2.  Attach beak below, center of eyes.
3.  Attach hair.

C.  Cow:
Eyes (make 2):
1.  With 3.5mm hook and black yarn, Ch3.  Sl st into 1st ch and FO.  Leave tail for attaching.

Ears (1 black and 1 white):
1.  With 3.5mm hook, 6 SC into MR.  Sl st join and Ch1.  (6)
2-3.  1 SC in each st around.  Sl st join and Ch1.  At the end of Round 3, FO.  Leave a long enough tail for attaching.  (6)

Nose:
1.  With 3.5mm hook, 3 SC into MR.  Sl st join and Ch1.  (3)
2.  1 SC in each st around.  Sl st join and FO.  Leave a tail for attaching.  
3.  With black yarn, embroider nostrils.  

Horns (make 2):
1.  With 3.0mm hook and yellow yarn, 3 SC into MR.  Sl st join and Ch1.  (6)
2-4.  1 SC in each st around.  Sl st join and Ch1.  At the end of Round 4, FO.  Leave a tail for attaching.  

Spots (1 small and 1 large):
Large:
1.  With 3.5mm hook and black yarn, 6 SC into MR.  Sl st join and FO.  Leave tail for attaching.
Small:
1.  With 3.5mm hook and black yarn, 3 SC into MR.  Sl st join and FO.  Leave tail for attaching.

Assembly:
1.  Attach ears to each side.
2.  Attach horns at the top.
3.  Attach eyes.
4.  Embroider nostrils to nose and then attach nose below, center of eyes.
5.  Attach spots on the bottom portion.

D.  Horse:
Ears (make 2):
1.  With 3.0mm hook and Coffee Cafe, Ch3.  SC in 2nd ch from hook and next ch.  Ch1 and turn.  (2)
2.  1 SC in each st.  Ch1 and turn.  (2)
3.  2 SC in first st, 1 SC in next st.  FO Coffee Cafe and join beige yarn.  Ch1 and turn.  (3)
4.  1 SC in each st evenly around.  FO and leave a tail for attaching.

Nose Stripe:
1.  With 3.0mm hook and Coffee Cafe, Ch5.  SC in 2nd ch from hook and across.  FO.  Leave tail for attaching.

Nose/Mouth:
1.  With 3.0mm hook and Coffee Cafe, 6 SC into MR.  Sl st join and FO.  Leave tail for attaching.
2.  Use beige yarn to embroider nostrils; use black yarn to embroider mouth.

Eyes:
1.  With 3.5mm hook and black yarn, Ch3.  Sl st into 1st ch and FO.  Leave tail for attaching.
2.  With white yarn, embroider eye center.   

Assembly:
1.  Attach ears to each side at the top.
2.  Embroider eye center to eye and attach eyes.
3.  Attach nose stripe between the ears and down between the eyes.
4.  Attach nose/mouth, just below the nose stripe.
5.  Add hair with Coffee Cafe to the top and one side.  Use tapestry needle and tie each strand into a double knot.  I made the top of the hair between the ears about 1/2" long and the hair on the side about 1 1/2" - 2" long. 

E.  Frog:
 Mouth:
1.  With black yarn, embroider mouth.

Tongue:
1.  With 3.5mm hook and Cherry Red yarn, Ch3.  SC in 2nd ch from hook and next ch.  FO and leave a tail for attaching.

Eyes (make 2):
Outer  Section:
1.  With 3.5mm hook and green yarn, 6 SC into MR.  Pull to tighten tail, but do not join.  Ch1 and turn.  (6)
2.  1 SC in each st across.  FO and leave tail for attaching.  (6)

Inner Section:
1.  With 3.5mm hook and black yarn, Ch3.  Sl st into 1st ch and FO.  Leave tail for attaching.

Assembly:
1.  Embroider mouth and attach tongue.
2.  Attach inner eye section to outer eye section and place on each side at the top.  

Gate (make 2):
Note:  I left my gate to be free standing.  However, you can attach one end to the side of the barn if you so desired.  

1.  With 5.0mm hook, Ch22.  HDC in 2nd ch from hook and across.  Ch1 and turn.  (21)
2-6.  1 HDC in each st across.  Ch1 and turn.  At the end of Row 6, FO and leave a tail for attaching.  

Border:
1.  With 5.0mm hook and white yarn, Ch65.  FO and leave a long tail for attaching.

Border X's (make 2):
1.  With 5.0mm hook and white yarn, Ch22.  FO and leave a long tail for attaching.

Assembly:
1.  Make 2 sections.  Cut/trim a piece of plastic canvas to place between the 2 sections.  Whipstitch together.
2.  Attach the border around the gate.
3.  Attach to make the X's.

Bale of Hay:
1.  With 3.5mm hook and yellow yarn, Ch9.  SC in 2nd ch from hook and across. Ch1 and turn.  (8)
2-4.  1 SC in each st across.  Ch1 and turn.  (8)
5.  1 SC in BLO of each st across.  Ch1 and turn.  (8)
6-8.  1 SC in each st across.  Ch1 and turn.  (8)
9.  1 SC in BLO of each st across.  Ch1 and turn.  (8)
10-12.  1 SC in each st across.  Ch1 and turn.  (8)
13.  1 SC in BLO of each st across.  Ch1 and turn.  (8) 
14-16.  1 SC in each st across.  Ch1 and turn.  At the end of Row 16, FO and leave a tail.  (8)
17.  Attach Row 1 to Row 16.  
Sides (make 2):
1.  Ch5.  SC in 2nd ch from hook and across.  
2-4.  1 SC in each st across.  Ch1 and turn.  At the end of Row 4, FO and leave tail for attaching.  

Assembly:
1.  Stuff with polyfil.
2.  Attach sides to each end. 

Water Pond:
1.  With 3.5mm hook and blue yarn, 6 SC into MR.  Sl st join and Ch1.  (6)
2.  2 SC in each st around.  Sl st join and Ch1.  (12)
3.  2 SC in first st, 1 SC in next st.  Rep around.  Sl st join and Ch1.  (18)
4.  2 SC in first st, 1 SC in next 2 st.  Rep around.  Sl st join and FO.  Leave tail for attaching.  (24)  
5.  I attached my water pond to the inside front piece.  Weave ends.

Horse Corral:
1.  With 3.5mm hook and beige yarn, Ch10.  SC in 2nd ch from hook and across.  Ch1 and turn.  (9)
2-15.  1 SC in each st across.  Ch1 and turn.  At the end of Round 15, switch to a 4.5mm hook.
16.  1 SC evenly in each st around.  
17.  1 SC in FLO around.
18.  1 SC in each st around.  Ch1 and turn.  
19.  On this round, you will sl st in each st around, placing 3 DC st in each corner.  Sl st join to first st.  Sl st to the 2nd DC st that was made.
20.  Stop and count how many stitches you made between 2nd DC st in corner to the next 2nd DC st corner.
21.  Whatever your stitch count is, then make that number of chains and then sl st into the next 2nd DC corner.  Repeat steps 20 and 21 until you make all 4 sides.  Sl st join and Ch1.
22.  SC evenly around and FO.  Weave ends.  

And, that's it for the "Carry Along Barn and Farm Animals..."  I hope you all will enjoy this pattern.  I'd love to see your pictures if you decide to make this.

And, here's a couple pictures of Gabriel with the horse and the barn...
Happy Crocheting...

Legal:
--don't use/claim my design as your own
--don't use/claim my pics as your own
--okay to make and sale your finished work
--don't share my pattern electronically or in print format (without prior consent) but provide a link to my blog

Saturday, February 17, 2018

Farm Animal Puppets...

For the past few days, I've been working on a new Puppet collection - Farm Animals.  The collection will include:  a Cow, Horse, Pig, Chick and a Frog.  I may add more later on.

My Woodland Puppets were well received at Stanford Children's Hospital by a fellow crocheter who used my pattern so I thought it was time to design more Puppets.

I plan to donate this Farm Collection to my church to use in storytime and puppet shows with the younger children.

Here’s the Link to my Etsy Shop if you’re looking for great gift ideas:

For an AD-FREE, PDF VERSION, you can purchase it in my Etsy Shop!!!  Here is the LINK:

Farm Animal Hand Puppets


Farm Animal Hand Puppets Pattern
Size:  Each puppet measures approximately 9" tall

Gauge:  I did not gauge this pattern

Materials:
--4.5mm hook
--#4 worsted weight yarn in white, black, yellow, orange, red, pink, green, brown, tan/light brown
--small amount of polyfil (for cow, horse and pig's nose)
--tapestry needle for weaving 

Stitch Abbreviations:
Ch:  chain
St:  stitch(es)
Sl st:  slip stitch
Sk:  skip
SC:  single crochet
SC2tog:  single crochet 2 stitches together (creates a decrease)
SC3tog:  single crochet 3 stitches together (creates a decrease) 
HDC:  half double crochet
Rep:  repeat
MR:  magic ring
FO:  fasten off

Directions:

Before assembling your puppets, be sure to read through the directions.  The facial features are added before the front and back pieces are joined together.  The ears, horns, hair are added after the front and back pieces are joined together...

Basic Puppet Pattern - make 2 pieces (front & back)
1.  Ch21.  SC in 2nd ch from hook and across.  Ch1 and turn.  (20)
2-10.  1 SC in each st across.  Ch1 and turn.  (20)
11.  2 SC in first st, 1 SC in next 18 st and 2 SC in the last st.  Ch1 and turn.  (22)
12.  1 SC in each st across.  Ch1 and turn.  (22)
13.  2 SC in first st, 1 SC in next 20 st and 2 SC in the last st.  Ch1 and turn.  (24)
14.  1 SC in each st across.  Ch1 and turn.  (24)
15.  2 SC in first st, 1 SC in next 22 st and 2 SC in the last st.  Ch1 and turn.  (26)
16.  1 SC in each st across.  Ch1 and turn.  (26)
17.  2 SC in first st, 1 SC in next 24 st and 2 SC in the last st.  Ch1 and turn.  (28)
18.  1 SC in each st across.  Ch1 and turn.  (28)
19.  2 SC in first st, 1 SC in next 26 st and 2 SC in the last st.  Ch1 and turn.  (30)
20.  1 SC in each st across.  FO and weave ends.  (30)
21.  Sk the first 6 st.  Join yarn in next st and Ch1.  1 SC in same st as Ch1 and into the next 17 st.     Ch1 and turn.  (18)
22-27.  1 SC in each st across.  Ch1 and turn.  (18)
28.  SC2tog, 1 SC in next 14 st, SC2tog.  Ch1 and turn.  (16)
29.  1 SC in each st across.  Ch1 and turn.  (16)
30.  SC2tog, 1 SC in next 12 st, SC2tog.  Ch1 and turn.  (14)
31.  1 SC in each st across.  Ch1 and turn.  (14)
32.  SC2tog, 1 SC in next 10 st, SC2tog.  Ch1 and turn.  (12)
33.  1 SC in each st across.  Ch1 and turn.  (12)
34.  SC2tog, 1 SC in next 8 st, SC2tog.  Ch1 and turn.  (10)
35.  1 SC in each st across.  Ch1 and turn.  (10)
36.  SC2tog, 1 SC in next 6 st, SC2tog.  Ch1 and turn.  (8)
37.  1 SC in each st across.  FO and leave a long tail for attaching front and back together.  (8)

-- Do not join the front and back pieces together yet -- 

Assembly Directions:
1.  First, you will want to make and add your facial features to the front side of one piece.  
2.  Next, you will place the right sides together and whipstitch up the side, across the top and down the other side together.   
3.  Then, you will turn right sides out and attach the ears, horns and/or hair (and eyes for the frog).

A.  Cow:
Eyes (make 2):
1.  With black yarn, 6 SC into MR.  Sl st join to first st and FO.  Leave tail for attaching.  (6)

Horns (make 2):
1.  With yellow yarn, 6 SC into MR.  Sl st join to first st and Ch1.  (6)
2-4.  1 SC in each st around.  Sl st join to first st and Ch1.  At the end of Round 4, FO and leave a long enough tail for attaching.  (6)

Nose:
1.  With pink yarn, 6 SC into MR.  Sl st join to first st and Ch1.  (6)
2.  2 SC in each st around.  Sl st join to first st and Ch1.  (12)
3.  1 SC in each st around.  Sl st join and FO.  Leave a long enough tail for attaching.  
4.  Use black yarn and embroider nostrils (see pic for help)

Ears (make 2):
(I made 1 black and 1 white) 
1.  6 SC into MR.  Sl st join to first st and Ch1.  (6)
2.  2 SC in each st around.  Sl st join to first st and Ch1.  (12)
3-4.  1 SC in each st around.  Sl st join to first st and Ch1.  At the end of Round 4, FO and leave a long enough tail for attaching.

Spots:
Small (2):
1.  With black yarn, 6 SC into MR.  Sl st join to first st and Ch1.  (6)
2.  2 SC in first st, 1 SC in next st.  Rep around.  Sl st join and FO.  Leave a long enough tail for attaching.  (9)

Large (1):
1.  With black yarn, 6 SC into MR.  Sl st join to first st and Ch1.  (6)
2.  2 SC in each st around.  Sl st join and FO.  Leave a long enough tail for attaching.  (12)

Assembly:
1.  Attach eyes.  
2.  Attach nose.  Before closing up, add a small amount of polyfil.
3.  Attach spots.
4.  Attach front and back sides together.  See above for further explanation on how to do this.
5.  Attach horns at the top.
6.  Attach ears on each side.  

B.  Chick:
 Eyes (make 2):
1.  With black yarn, 6 SC into MR.  Sl st join to first st and FO.  Leave tail for attaching.  (6)

Beak:
1.  With orange yarn, 6 SC into MR.  Sl st join to first st and Ch1.  (6)
2.  2 SC in first st, 1 SC in each of the next 5 st.  Sl st join to first st and Ch1.  (7)
3.  2 SC in first st, 1 SC in each of the next 6 st.  Sl st join to first st and Ch1.  (8)
4.  2 SC in first st, 1 SC in each of the next 7 st.  Sl st join to first st and Ch1.  (9)
5.  2 SC in first st, 1 SC in each of the next 8 st.  Sl st join to first st and FO.  Leave a long enough tail for attaching.  (10) 

Hair:
(attach hair strands after the front/back are whipstitched together)
1.  Weave strands of yarn at the top and tie each strand into a double knot.  Use your tapestry needle to fray the strands.

Assembly:
1.  Attach eyes.
2.  Attach beak.
3.  Attach front and back sides together.  See above for further explanation on how to do this.
4.  Attach hair.   

C.  Pig:
 Eyes (make 2):
1.  With black yarn, 6 SC into MR.  Sl st join to first st and FO.  Leave tail for attaching.  (6)

Snout:
1.  6 SC into MR.  Sl st join to first st and Ch1.  (6)
2.  2 SC in each st around.  Sl st join to first st and Ch1.  (12)
3.  1 SC in each st around.  Sl st join to first st and FO.  Leave a long enough tail for attaching.  (12)

Ears (make 2):
1.  6 SC into MR.  Sl st join to first st and Ch1.  (6)
2.  1 SC in each st around.  Sl st join to first st and Ch1.  (6)
3-4.  Rep #2.  (6)
5.  SC2tog, SC next st.  Rep around.  Sl st join to first st and Ch1.  (4)
6.  1 SC in each st around.  Sl st join to first st and FO.  Leave a long enough tail for attaching.  (4)

Mouth:
1.  With black yarn, embroider.  (see pic) 

Assembly:
1.  Attach eyes.
2.  Attach snout.  Before closing up, add a small amount of polyfil.
3.  Embroider mouth.
4.  Attach front and back sides together.  See above for further explanation on how to do this.
5.  Attach ears to each side.

D.  Frog:
Inner Eyes (make 2): 
1.  With black yarn, 6 SC into MR.  Sl st join to first st and FO.  Leave tail for attaching.  (6)

Outer Eyes (make 2):
1.  With green yarn, 6 SC into MR.  Pull to tighten but do not join together.  Ch1 and turn.  (6)
2.  2 SC in first st, 1 SC in next 4 st, 2 SC in last st.  Ch1 and turn.  (8)
3.  2 SC in first st, 1 SC in next 6 st, 2 SC in last st.  Ch1 and turn.  (10)
4-5.  1 SC in each st across.  Ch1 and turn.  At the end of Round 5, FO.  Leave a long enough tail for attaching.  

Attach Inner Eye to the center of the Outer eye.  

Tongue:
1.  With red yarn, Ch6.  SC in 2nd ch from hook and across.  FO and leave a long enough tail for attaching.  (5)

Stomach:
1.  With yellow yarn, 6 SC into MR.  Pull to tighten but do not join together.  Ch1 and turn.  (6)
2.  2 SC in each st across.  Ch1 and turn.  (12)
3.  2 SC in each st across.  Ch1 and turn.  (24)
4.  2 SC in first st, 1 SC in next st.  Rep across.  Ch1 and turn.  (36)
5.  1 SC in each st across and then continue to evenly work 1 SC across the bottom.  Sl st join to first st and FO.  Leave a long enough tail for attaching.  

Mouth:
1.  With black yarn, embroider.

Assembly:
1.   Attach mouth and tongue.
2.  Attach stomach.  It's a good idea to pin this to hold in place while attaching.
3.  Attach front and back sides together.  See above for further explanation on how to do this.
4.  Attach eyes to each side at the top.   

E.  Horse:
Eyes (make 2):
1.  With black yarn, 6 SC into MR.  Sl st join to first st and FO.  Leave tail for attaching.  Embroider eye center with white yarn.  (6)

Ears (make 2):
1.  With light tan/beige yarn, Ch5.  SC in 2nd ch from hook and across.  Ch1 and turn.  (4)
2.  1 SC in each st across.  Ch1 and turn.  (4)
3.  SC2tog, 1 SC in next 2 st.  Ch1 and turn.  (3)
4.  1 SC in each st across.  Ch1 and turn.  (3)
5.  SC3tog.  Ch1 and turn.  (1)
6.  1 SC in st.  FO and join dark brown yarn.  Ch1 and turn.  (1)
7.  1 SC in each st around ear.  FO and leave a long enough tail for attaching. 

Nose Stripe:
1.  With light tan/beige yarn, Ch11.  HDC in the 2nd ch from the hook and next 4 ch.  SC in each of the last 5 ch.  FO and leave a long enough tail for attaching. 

Mouth:
1.  With light tan/beige yarn, Ch4.  SC in 2nd ch from hook and into the next ch.  3 SC in the last ch.  Rotate.  SC in next ch.  2 SC in the last ch.  Sl st join to first st and Ch1.  (8)
2.  SC in the first 3 st, 3 SC in the next st, SC in the next 3 st and 2 SC in the last st.  Sl st join to first st and Ch1.  (11)
3.  SC in the first 4 st, 3 SC in the next st, SC in the next 5 st and 2 SC in the last st.  Sl st join to first st and FO.  Leave a long enough tail for attaching.  (14)
4.  With dark brown, embroider nostrils.
5.  With black yarn, embroider mouth.

Hair:
(attach hair strands after the front/back are whipstitched together)
1.  Weave strands of yarn at the top (between the ears) and tie each strand into a double knot.  
2.  Weave strands of yarn on one side (between the ear and thumb portion) and tie each strand into a double knot.  (see pic)

Assembly:
1.  Attach eyes.
2.  Attach nose stripe (with the HDC end on top) between the eyes, vertically.  (see pic)
3.  Attach mouth.
4.  Attach front and back sides together.  See above for further explanation on how to do this.
5.  Attach ears to each side. 
6.  Attach hair to top and then one side.

And, that's it for my Collection of Farm Animals Hand Puppets.  I'd love to see a picture of your finished work or your feedback/comments on what you think of this pattern.  

I hope you will enjoy making each of these Hand Puppets!!!


Happy Crocheting...

Legal:

--don't use/claim my design as your own

--don't use/claim my pics as your own

--okay to make and sale your finished work

--don't share my pattern electronically or in print format (without prior consent) but provide a link to my blog