Showing posts with label Ornament. Show all posts

Wednesday, March 31, 2021

Cross Ornament Free Pattern

 Cross Ornament Free Pattern 

It’s Easter week, and for me, as a Christian, this is everything. “The Cross” represents everything.  I wanted a quick and easy project to signify and represent this week — “Cross Ornaments.”

I created an Ad-Free, PDF pattern for you all.  I hope you enjoy this pattern and take the time to meditate on what the cross represents.  Click on the below link for the free pattern: 

Cross Ornament Pattern

And, for those of you who may be more of a visual learner, here is the LINK to my YouTube Video...

From my home to yours Happy Easter to you and yours!!!

Rilla

Happy Crocheting...

Legal:
--don't use/claim my design as your own
--don't use/claim my pics as your own
--okay to make and sale your finished work
--don't share my pattern electronically or in print format (without prior consent) but provide a link to my blog

Social Media:
If you are on the following sites, let's connect and hook up...
  • Pinterest:  Rilla2u
  • Twitter:  Rilla2u
  • Facebook:  /rilla.edwards 
  • Instagram:  Rilla2u 

Sunday, February 7, 2021

Face Mask Ornament

 Face Mask Ornament


Face Mask Ornament Pattern

The Face Mask Ornaments were made for Jacob and Arielle to include with their yearly ornaments I either make or buy them.  With the pandemic, going to school, having to wear masks everywhere we go, I thought this was a fitting ornament for each of them to represent 2020.  

Fun and easy pattern.  The embroidery portion is optional.  I did it freehand.  I'm not great at doing embroidery but I try...

Enjoy this freebie...

Face Mask Ornament Free Pattern:

Materials:

--#4 worsted weight yarn

--2.5 mm hook

--black embroidery thread (optional)

--needle for weaving ends & embroidery


U.S. Stitch Abbreviations:

Ch:  chain

St:  stitch

Sl st:  slip stitch

SC:  single crochet

BLO:  back loops only

FO:  fasten off


Directions:

1.  Ch 10.  Sl st in 2nd Ch from hook and next Ch.  SC in the next 5 Ch.  Sl st in last 2 Ch. across.  Turn.  (9)

2-6.  Working in BLO.  Sl st in first 2 st.  SC in next 5 st.  Sl st in last 2 st.  At the end of Row 6, SC in the first 4 st, Sl st in the next st.  Ch 12.  Sl st back into the same st (this makes the loop for hanging).  SC in the remaining 4 st.  Ch12.  Sl st to the bottom last st to create the first loop.  SC across the bottom.  Ch12.  Sl st to the top first st to create the second loop.  FO and weave ends.  

The applique portion is optional.  I used black embroidery thread and embroidered '20 to the corner of each Face Mask Ornament to denote the year...

And be sure to check out my Super-cute, Toilet Paper Roll Ornament.  Here is the LINK to the free pattern....

Happy Crocheting...

Legal:
--don't use/claim my design as your own
--don't use/claim my pics as your own
--okay to make and sale your finished work
--don't share my pattern electronically or in print format (without prior consent) but provide a link to my blog

Social Media:
If you are on the following sites, let's connect and hook up...
  • Instagram:  Rilla2u
  • Pinterest:  Rilla2u
  • Twitter:  Rilla2u
  • Facebook:  /rilla.edwards

Toilet Paper Roll Ornament

Toilet Paper Roll Ornament

I had a lot of fun making these cuties for my two grandsons, Gabriel and Luke!!!! I like to make or purchase an ornament each year for my grandchildren that sums up the year for them.  And, I think, the toilet paper roll fits each of them perfectly.  They each are 5; started Kindergarten (home-schooled) and learned to go to the potty on their own.  Using and minimizing toilet paper...lol!!!  

Toilet Paper Roll Ornament Pattern

Materials:

--#4 worsted weight yarn (Mainstays Yarn from Walmart in white)

--2.5mm hook

--Polyfil

--small black eyes

--black embroidery thread

--needle


U.S. Stitch Abbreviations:

Ch:  chain

St:  stitch

Sl st:  slip stitch

SC:  single crochet

FO:  fasten off

MR:  magic ring.  

BLO:  back loops only


Directions:

Toilet Paper Roll:

I started with a Magic Ring.  Use a stitch marker to keep up with the first stitch and move up each round accordingly.  You will not be joining stitches and chain 1 at the end of each round. 

1.  6 SC st

2.  12 SC st

3.  18 SC st

4.  24 SC st

5-8.  24 SC st

9.  18 SC st

Add eyes.  Add mouth.  Stuff with Polyfil.  (see my pic for placement)

10.  12 SC st

11.  6 SC st

12.  Ch 24.  Sl st directly across from the beginning chain.  FO and weave ends to make sure the top is closed.  


Toilet Paper Sheet:

1.  Ch 7.  SC in 2nd chain and across.  (6) 

2-6.  Working in the BLO, SC in each st.  At the end of each row, Ch1 and turn.  At the end of Row 6, FO and leave a tail long enough to attach the sheet to the roll.  (see my pic for placement)


Applique (optional):

1.  I used black embroidery thread and embroidered '20.  I did this freehand.   


Simple and cute...


Here's the Face Mask Ornament Link!!!! 

Happy Crocheting... 

Legal:
--don't use/claim my design as your own
--don't use/claim my pics as your own
--okay to make and sale your finished work
--don't share my pattern electronically or in print format (without prior consent) but provide a link to my blog

Social Media:
If you are on the following sites, let's connect and hook up...
  • Instagram:  Rilla2u
  • Pinterest:  Rilla2u
  • Twitter:  Rilla2u
  • Facebook:  /rilla.edwards


Tuesday, February 2, 2021

Hanging Hearts


Hanging Hearts

I made these super quick, like 3 minutes tops for each one, and easy hearts to hang on my artificial tree in my sunroom.  I love seasonal decorating and these hearts take literally no time at all to make!!!  

Size: 
I made these in 3 sizes:  1 1/2”, 1 3/4” and 2.”
Materials:
--4.0 mm, 5.0mm & 6.0mm hooks
--#4 worsted weight yarn in pink, red & white; I used RHSS yarn
--tapestry needle for weaving

U.S. Stitch Abbreviations:
Ch:  chain
St:  stitch(es)
Sl st:  slip stitch
TC:  triple crochet 
DC:  double crochet
Rep:  repeat
FO:  fasten off
MR:  magic ring

Directions:

1.  Leave an approximate 3-4” tail. Make a MR.  Ch4 (this counts as your first TC). 
2.  Into MR:  2TC, 3DC, Ch1, TC, Ch1, 3DC, 3TC.
3.  Pull tail to begin to close up center. Add a sl st to MR before pulling tail taunt to close up center ring.
4.  FO leaving a 3-4” tail. Double knot tie the beginning and ending tails so that the center stays closed. 
5.  Last, double knot the tail ends together for hanging.  
   Happy Crocheting...

Legal:
--don't use/claim my design as your own
--don't use/claim my pics as your own
--okay to make and sale your finished work
--don't share my pattern electronically or in print format (without prior consent) but provide a link to my blog

Social Media:
If you are on the following sites, let's connect and hook up...
  • Instagram:  Rilla2u
  • Pinterest:  Rilla2u
  • Twitter:  Rilla2u
  • Facebook:  /rilla.edwards 

Saturday, April 4, 2020

Fuzzy Mini-Puppy

Sometimes just playing around with yarn brings about the cutest little projects!!!  My “Fuzzy Mini-Pup” is literally so simple to make.  Simple stitches.  Quick to complete.  Scrap yarn, stuffing and a hook.  I used a set of eyes and nose, but if unavailable, you can simply make crocheted ones.  And, of course, have a handy hairbrush on hand.

Fuzzy Mini-Pup


And, here I added a hanger...

Happy Crocheting...
Legal:
--don't use/claim my design as your own
--don't use/claim my pics as your own
--okay to make and sale your finished work
--don't share my pattern electronically or in print format (without prior consent) but provide a link to my blog

Social Media:
If you are on the following sites, let's connect and hook up...
  • Instagram:  Rilla2u
  • Pinterest:  Rilla2u
  • Twitter:  Rilla2u
  • Facebook:  /rilla.edwards


Thursday, September 6, 2018

Hanging Happy Ghost Ornament

My "Hanging Happy Ghost Ornament" can be used to hang or attach to a wreath.  He could also easily find himself sitting on a shelf, table or anywhere else in your home...OR, attach him to a gift!!!

He’s super cute and so easy to make...

Hanging Happy Ghost
Size:  Approximately 6” tall from top of hat to bottom

Materials:
—5.0mm hook
—#4 worsted weight yarn in white, black and orange
—small amount of polyfil (or your stuffing of choice)
—2 black eyes (buttons or you could make crocheted eyes)
—tapestry needle for weaving 

U.S. Stitch Abbreviations:
Ch:  chain
St:  stitch(es)
Sl St:  slip stitch
SC:  single crochet
SC2tog:  single crochet 2 stitches together (creates a decrease)
HDC:  half double crochet 
FLO:  front loops only
BLO:  back loops only
Rep:  repeat
MR:  magic ring
FO:  fasten off

Special Note:  If you work this in the round, then use a stitch marker to keep track of the beginning and ending stitch of each row.  If you are going to slip stitch join to the first stitch, then chain 1.

Directions:
Ghost:
1.  With white yarn, 6 SC into MR.  Pull tail to tighten.  (6)
2.  2 SC into each st around.  (12)
3.  2 SC in the first st, 1 SC in the next st.  Rep around.  (18)
4.  2 SC in the first st, 1 SC in the next 2 st.  Rep around.  (24)
5.  2 SC in the first st, 1 SC in the next 3 st.  Rep around.  (30)
6.  2 SC in the first st, 1 SC in the next 4 st.  Rep around.  (36)
7-11.  1 SC in each st around.  (36)
12.  SC2tog, 1 SC in the next 4 st.  Rep around.  (30)
13.  SC2tog, 1 SC in the next 3 st.  Rep around.  (24)
14.  SC2tog, 1 SC in the next 2 st.  Rep around.  (18)
15.  SC2tog, 1 SC in the next st.  Rep around.  (12)
16.  1 SC in each st around.  (12)
17.  2 SC in the first st, 1 SC in the next st.  Rep around.  (18)
18.  2 SC in the first st, 1 SC in the next st.  Rep around.  (24)
19.  2 SC in the first st, 1 SC in the next 11 st.  2 SC in next st, 1 SC in each of the remaining st.  (26)
20.  2 SC in the first st, 1 SC in the next 12 st.  2 SC in next st, 1 SC in each of the remaining st.  (28)
21.  1 SC in each st around.  (28)
22.  1 SC in each st around.  FO and weave ends.  

Facial Features:
1.  Attach eyes at Rounds 11/12, 4 stitches in-between.  
2.  I used black yarn to embroider mouth.

Stuff with polyfil.  

Bottom:
I did not close up the bottom since I'm going to use mine as a hanging ornament.  However, if you fear your polyfil will come out, then simply use your white yarn:
1.  6 SC into MR.  (6)
2.  2 SC in each st around.  (12)
3.  2 SC in first st, 1 SC in next st.  Rep around.  (18)
4.  2 SC in first st, 1 SC in next 2 st.  Rep around.  Sl st join to first st and FO.  Leave a long tail to whipstitch to the bottom of your ghost.  

Hat:
1.  With Orange yarn, 6 SC into MR.  Sl st join to first st and Ch1.  (6)
2.  2 SC in each st around.  Sl st join and Ch1.  (12)
3.  2 SC in first st, 1 SC in next st.  Rep around.  Sl st join and Ch1.  (18)
4.  2 SC in first st, 1 SC in next st.  Rep around.  Sl st join and Ch1.  (24)
5.  Working in BLO, 1 SC in each st around.  Join black yarn and Ch1.  (I did not trim off the Orange yarn, I just left it hanging and joined my black yarn -- I did not want a lot of ends to weave.)  (24)
6.  With Black yarn, 1 SC in each st around.  Sl st join and Ch1.  (24)
7.  1 SC in each st around.  Sl st join and pick up the Orange yarn again and drop the Black yarn.  (24)
8.  With Orange yarn, 1 SC in each st around.  Sl st join and pick up the Black yarn again and drop the Orange yarn.  (24)
9-10.  With Black yarn, 1 SC in each st around.  Sl st join.  At the end of Round 10, pick up the Orange yarn and drop the Black yarn.  (24)
11.  With Orange yarn, 1 SC in each st around.  Sl st join and FO Orange yarn.  Weave ends.  (24)
12.  With Black yarn, working in FLO, 2 SC in the first st, 1 SC in the next st.  Rep around.  (36)
13.  1 HDC in each st around.  FO and leave a tail for attaching the hat to your ghost.

Hanger:
1.  With Orange yarn, Ch20.  Sl st to first ch and FO.  Attach to center, top of hat.  

I hope you all will enjoy my "Hanging Happy Ghost!!!!"  

 Happy Crocheting...

Legal:
--don't use/claim my design as your own
--don't use/claim my pics as your own
--okay to make and sale your finished work 
--don't share my pattern electronically or in print format (without prior consent) but provide a link to my blog

Thursday, April 19, 2018

Unicorn Softie...

I designed this Unicorn Softie many months ago and my granddaughter immediately loved and scooped it up to take home.  This cutie is made from my basic Softie pattern and then the features added....

Unicorn Softie
Happy Crocheting...

Legal:
--don't use/claim my design as your own
--don't use/claim my pics as your own
--okay to make and sale your finished work
--don't share my pattern electronically or in print format (without prior consent) but provide a link to my blog

Friday, December 15, 2017

Cookie Monster Ornament

One of my Christmas traditions is to either make or buy my hubby, sons, daughters-in-law and grandchildren a Christmas ornament for my tree that sums up the year for them.  I then store my grandchildren's ornaments in their own special box to one day give to them as they start their own family and traditions.

Well, around 1:00 am this morning, I decided to make my grandson, Luke, his Christmas ornament for my tree this year.  He loves Sesame Street, especially Cookie Monster.  I can hear him saying, "Cookie..."

So, I made him a 5" tall Cookie Monster to commemorate this year.

Cookie Monster Ornament 

I used #4 worsted weight yarn in blue, white and black.  I made the head and body in one piece and then attached the arms and feet.  It was a fairly quick project, requiring little yarn and polyfil.  

Happy Crocheting...


Thursday, November 16, 2017

Gingerbread Man & Woman Softie - Ornament

And, here's my Mr. & Mrs. Gingerbread Softies?  Use as an ornament on a Christmas tree or wreath, as a toy for small hands, or hang anywhere in your house, on a bag or a keychain.  Endless possibilities.

Gingerbread Man & Woman Softies

Gingerbread Man & Woman Pattern

Difficulty Level:  Easy

Size:  
Gingerbread Man:  3" x 5"
Gingerbread Woman:  3" x 3"

Materials:
--4.0mm hook
--small amount of #4 worsted weight yarn in warm brown, red, white and black
--4 small safety eyes (I purchased a 264-pc set of eyes in varying sizes, 6mm-12mm, from Amazon for 9.99.  Check out this great deal by clicking HERE...)
--1 small white Pompom (optional)
--keyring(s) (optional)
--very small amount of polyfil
--tapestry needle for weaving 

Stitch Abbreviations:
Ch:  chain
Sl st:  slip stitch
St: stitch(es)
SC:  single crochet
SC2tog:  single crochet 2 stitches together
Rep:  repeat 
MR:  magic ring
FO:  fasten off

Directions:
The man and woman are each made the same way.  
1.  With warm brown yarn, 6 SC into MR.  Sl st to join and ch1.  (6)
2.  2 SC in each st around.  Sl st to join and ch1.  (12)
3.  2 SC in first st, 1 SC in next st.  Rep around.  Sl st to join and ch1.  (18)
4.  2 SC in first st, 1 SC in next 2 st.  Rep around.  Sl st to join and ch1.  (24)
5-8.  1 SC in each st around.  Sl st to join and ch1.  (24)
9.  SC2tog, 1 SC in next 2 st.  Rep around.  Sl st to join and ch1.  (18)
10.  SC2tog, 1 SC in next st.  Rep around.  Sl st to join and ch1.  (12)
11.  SC2tog.  Rep 5 more times.  Sl st to join and FO.  Leave a long enough tail for closing the opening.  (6)

Add a very small amount of polyfil into the opening before closing it up.  Do not overstuff to make puffy.  With stuffing, mine is approximately a 1/2" in width.  I didn't want mine to be round but more flat for the versatility of being able to use this Softie in multiple ways.

Gingerbread Man: 
Hat:
1.  Leave a long tail at the start for attaching hat to head.  With white yarn and 3.0mm hook, Ch25.  Sl st to first ch to form a ring.  1 SC st in each ch around.  FO white yarn and join red yarn.  Sl st join and Ch1.  (25)
2.  With red yarn, 1 SC in each st around.  Sl st join and Ch1.  (25)
3.  1 SC in each st around.  Sl st join and Ch1.  (25)
4.  SC2tog, 1 SC in next 3 st.  Rep around.  Sl st join and Ch1.  (20)
5.  SC2tog.  Rep 9 more times.  Sl st join and Ch1.  (10)
6-9.  Decrease by 1 st in each row.  1 SC in each st around.  Sl st join and Ch1.  (9, 8, 7, 6)
10.  1 SC in each st around.  Sl st join and FO.  Weave ends.  (6)

I attached a small white Pompom to the tip of the hat.  You can make a Pompom.  

Attach hat to head using the tail from the white yarn.  

Use black yarn to embroider mouth.  

I used craft glue to attach my eyes.  If you are making this for a child, then you may want to use the safety closures or make crocheted eyes.  

Bow tie:
1.  With red yarn and 3.0mm hook, Ch6.  SC in 2nd ch from hook and across.  Ch1 and turn.  (5)
2-3.  1 SC in each st across.  Ch1 and turn.  At the end of Row 3, FO and leave a long tail.  (5)
4.  With tapestry needle, weave tail over 2 st to the center.  Wrap the tail several times around the center to form bow tie. Then attach to center bottom of Softie.  

Hanger: 
1.  Join yarn to top, back of the hat.  Ch12.  Sl st join to hat and FO.  Weave ends.  

Gingerbread Woman:
Bow:
1.  Make the hair bow the same way as the bow tie.  
2.  With white yarn and 3.0mm hook, Ch3 and sl st to first ch.  FO and leave a tail to attach to center of hairbow.  

Wavy Line:
1.  With white yarn and 2.0mm hook, Ch16.  FO and leave a long tail for attaching across the top.  

Cheeks (make 2):
1.  With red yarn and 3.0mm hook, Ch3 and sl st to first ch.  FO and leave a long enough tail to attach each cheek to the corners of the mouth.  

Use black yarn to embroider mouth.  

I used craft glue to attach my eyes.  If you are making this for a child, then you may want to use the safety closures or make crocheted eyes. 

Assembly:
1.  Attach wavy line first.  
2.  Then attach the hairbow.  
3.  And, last attach the cheeks.  

Hanger: 
1.  Join yarn to top, back of the Softie.  Ch12.  Sl st join to the back and FO.  Weave ends.  


And, here they are with their friend - Mr. Elf!!!

Happy Crocheting 


Legal:
--don't claim my pattern/design as your own
--don't use my pics as your own
--don't share my pattern/design electronically or in print format but provide a link to my blog
--okay to make and sale your finished work

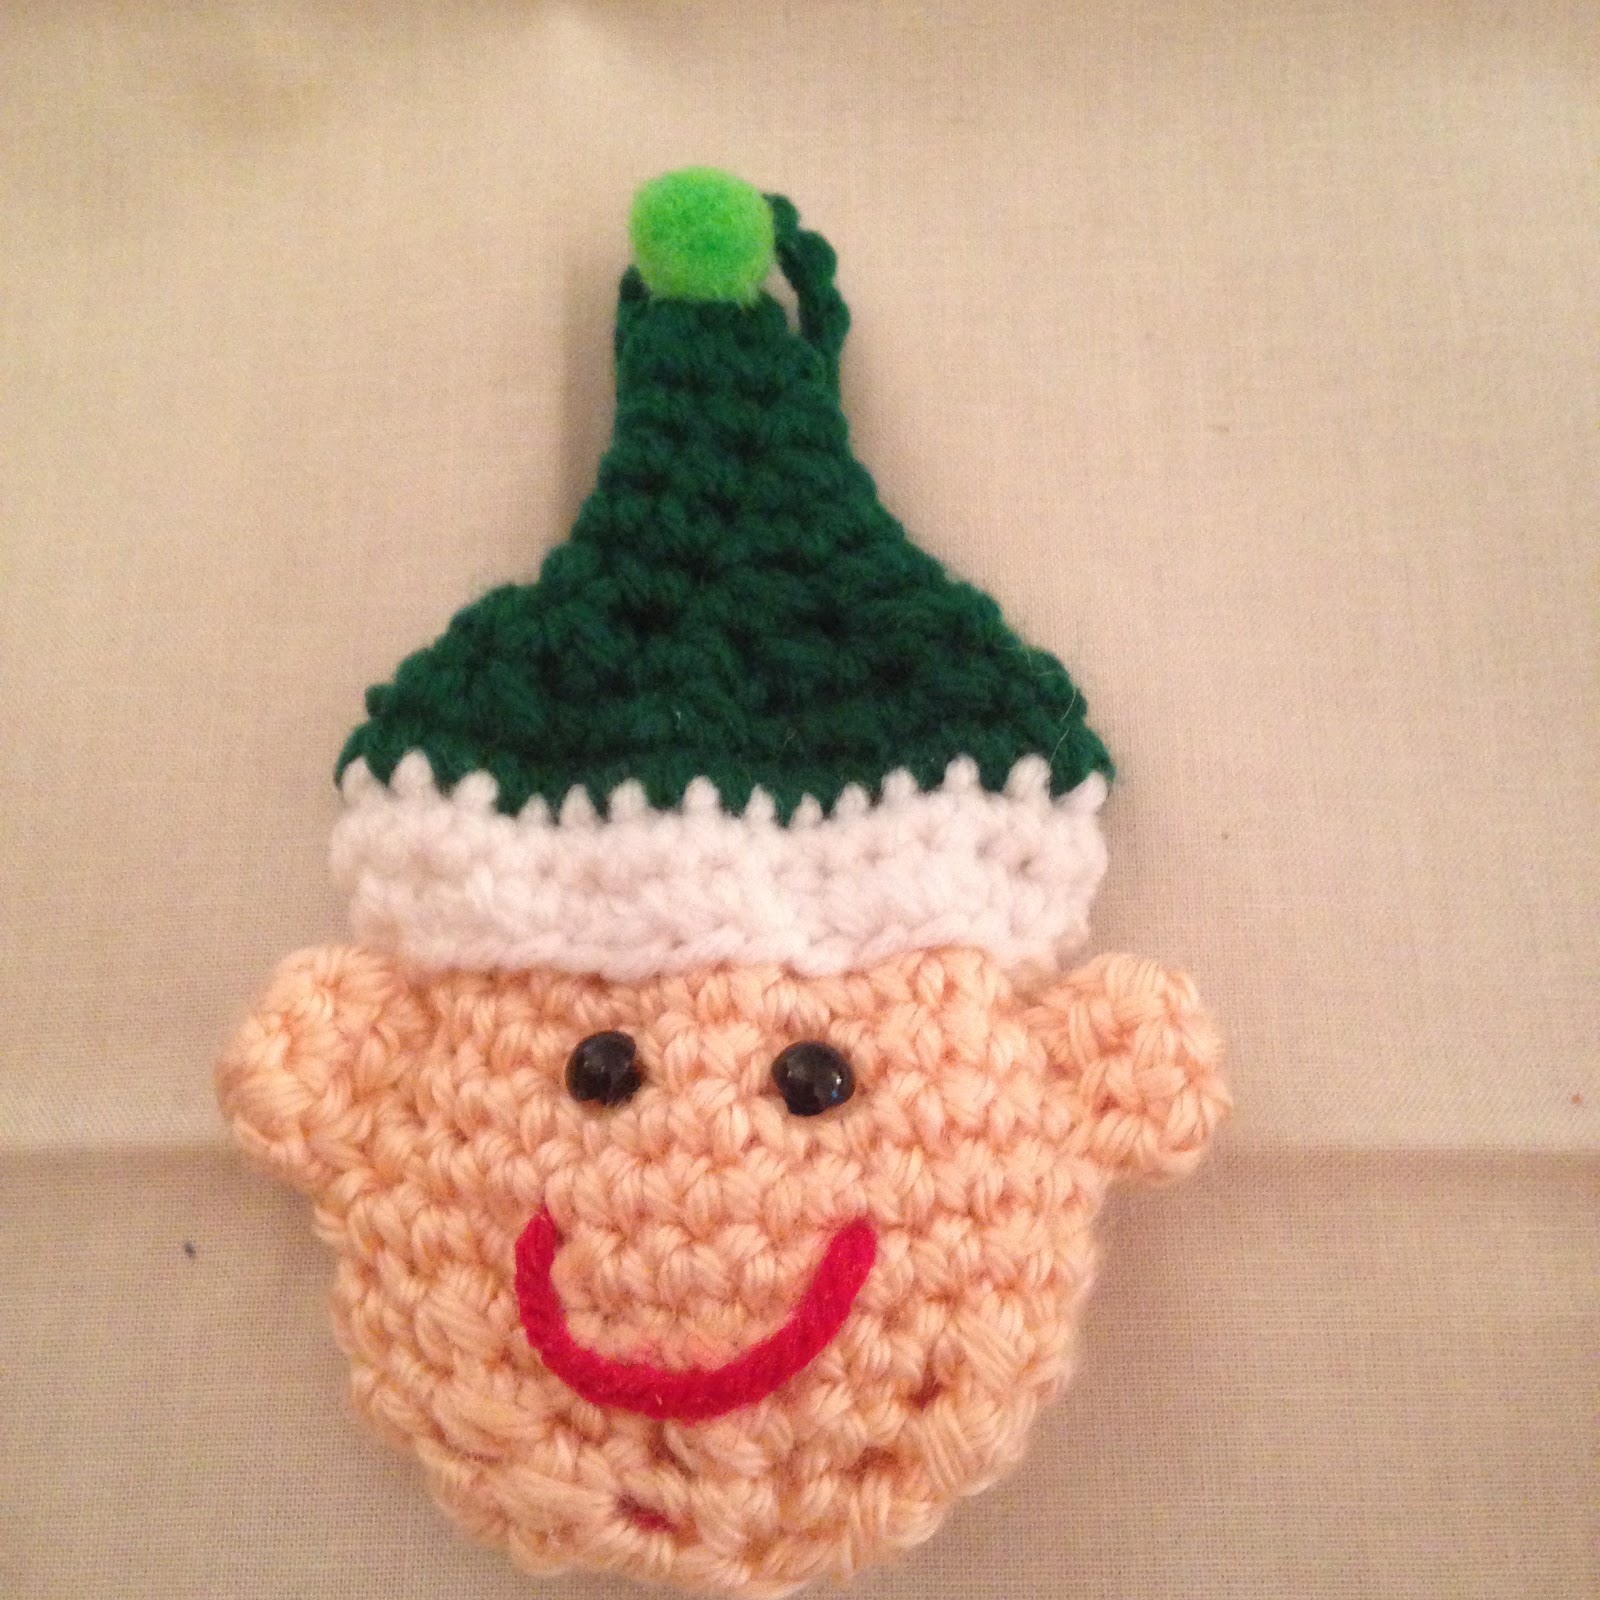
Elf Softie - Ornament

How cute is this Elf Softie?  Use as an ornament on a Christmas tree or wreath, as a toy for small hands, or hang anywhere in your house, on a bag or a keychain.  Endless possibilities.

Elf Softie
Difficulty Level:  Easy

Size:  Approximately 3" x 5"

Materials:
--4.0mm hook
--small amount of #4 worsted weight yarn in peach, green, white and red
--2 small safety eyes (I purchased on Amazon; link is below)
--1 small green Pompom (optional)
--keyring (optional)
--very small amount of polyfil
--tapestry needle for weaving 

Stitch Abbreviations:
Ch:  chain
Sl st:  slip stitch
St: stitch(es)
SC:  single crochet
SC2tog:  single crochet 2 stitches together
Rep:  repeat 
MR:  magic ring
FO:  fasten off

Directions:
1.  With peach yarn, 6 SC into MR.  Sl st to join and ch1.  (6)
2.  2 SC in each st around.  Sl st to join and ch1.  (12)
3.  2 SC in first st, 1 SC in next st.  Rep around.  Sl st to join and ch1.  (18)
4.  2 SC in first st, 1 SC in next 2 st.  Rep around.  Sl st to join and ch1.  (24)
5-8.  1 SC in each st around.  Sl st to join and ch1.  (24)
9.  SC2tog, 1 SC in next 2 st.  Rep around.  Sl st to join and ch1.  (18)
10.  SC2tog, 1 SC in next st.  Rep around.  Sl st to join and ch1.  (12)
11.  SC2tog.  Rep 5 more times.  Sl st to join and FO.  Leave a long enough tail for closing the opening.  (6)

Add a very small amount of polyfil into the opening before closing it up.  Do not overstuff to make puffy.  With stuffing, mine is approximately a 1/2" in width.  I didn't want mine to be round but more flat for the versatility of being able to use this Softie in multiple ways.

For the eyes:
I used 2 small safety eyes.  

I purchased a 264-pc set with Case for 9.99 from Amazon.  Here's the LINK to the listing if you're interested.  

I used Red Yarn to embroider mouth.

Ears (make 2):
1.  With peach yarn and 3.0mm hook, 6 SC into MR.  (6)
2.  1 SC in each st around.  Sl st join to first st and FO.  Leave a long enough tail for attaching ear to each side. 

Hat:
1.  Leave a long tail at the start for attaching hat to head.  With white yarn and 3.0mm hook, Ch25.  Sl st to first ch to form a ring.  1 SC st in each ch around.  Sl st join and Ch1.  (25)
2.  1 SC in each st around.  FO white yarn and join green yarn.  Sl st join and Ch1.  (25)
3.  With green yarn, 1 SC in each st around.  Sl st join and Ch1.  (25)
4.  SC2tog, 1 SC in next 3 st.  Rep around.  Sl st join and Ch1.  (20)
5.  SC2tog.  Rep 9 more times.  Sl st join and Ch1.  (10)
6-9.  Decrease by 1 st in each row.  1 SC in each st around.  Sl st join and Ch1.  (9, 8, 7, 6)
10.  1 SC in each st around.  Sl st join and FO.  Weave ends.  (6)

I attached a small green Pompom to the tip of the hat.  You can make a Pompom.  

Attach hat to head using the tail from the white yarn.  

Hanger.:
1.  Join yarn to top, back of the hat.  Ch12.  Sl st join to hat and FO.  Weave ends.  


And, here he is with his friends -- Mr. & Mrs. Gingerbread!!!

Happy Crocheting 


Legal:
--don't claim my pattern/design as your own
--don't use my pics as your own
--don't share my pattern/design electronically or in print format but provide a link to my blog
--okay to make and sale your finished work