Saturday, December 31, 2016

Football Messy Bun/Ponytail Hat -- FREE pattern....

Friday, January 6, 2017
UPDATE: FREE pattern posted below

My newest crochet project I worked on today: Football Messy Bun/Ponytail Hat -- child/teen & adult size...

I used "I Love This Yarn" from Hobby Lobby in "coffee" and "white". For child/teen size I used a 5mm hook and a 5.5 mm hook for the adult size...I will post the free pattern when I get a chance


UPDATE -- PATTERN
Friday, January 6, 2017:   

ADULT-SIZED:

Materials:
--5.5mm hook
--#4 worsted weight yarn; I used "I Love This Yarn" in coffee and white
--tapestry needle

Abbreviations:
Sc= single crochet
Dc= double crochet
Sl st= slip stitch
Ch= chain
Sk- skip
St= stitch

Directions:
Start with coffee yarn
1. Chain 24. Slip stitch to first chain to join, forming a ring.
2. Work 30 single crochet into the ring. Sl st to first stitch to join. Chain 1. (30)
3. Sc, Dc in first st, sk next st, *sc, Dc in next st, sk next st...* repeat around. Ch 1. (30)
4. Sc, Dc in first st; Sc, Dc in next st; sk third st; *sc, Dc next st; sc, Dc next st; sk st; sc, Dc next st, sk st...* repeat around. Ch 1. (36)
5. Sc, Dc in each sc of previous rounds the previous round Dc stitches. Sl st to first st. Ch 1. (36)
6. *Sc, Dc in first st; sc, Dc in next st; sk st; sc, Dc next st; sk st; sc, Dc next st; sc, Dc next st; sk st; sc, Dc next st; sk st; sc, Dc next st; sc, Dc next st...* repeat these pattern 2 more times around. Sl st to first st. Ch 1. (48)
7-9. Sc, Dc into each sc of previous round. Sl st to join and ch 1. At end of round 9, join white yarn on last st.
10. With white yarn, sc, Dc in each sc of previous round. Re-join coffee on last st. Sl st to join. Ch 1. (48)
11-18. With coffee, sc, Dc in each sc of previous round. At the end of round 18, join white yarn. Sl st to join. Ch 1. (48)
19.  With white yarn, sc, Dc in each sc of previous round.  Re-join coffee.  Sl st to join.  Ch 1.  (48)
20.  With coffee, sc, Dc in each sc of previous round. Sl st to join. Ch 1. (48)
21. In this row, you will not be skipping any stitches. *2sc in the first st, 1 sc in the next...* repeat around. (72)
22. 1 sc around. (72). Fasten off. Weave ends.

Using white yarn and my pic as a guide, embroider the football lace in the front.
Optional: add a bow of your choice

For child-sized, I used a 5mm hook and same pattern above...


Wednesday, December 28, 2016

Crochet Neckwarmer & Earwarmer/Headband with Coordinating Bag...

I crocheted this Neckwarmer, Earwarmer/Headband & coordinating bag using the Herringbone Half Double Crochet Stitch.  I love the colors and the texture of this set.

Tuesday, December 27, 2016

Crochet Ponytail/Messy Bun Hat - Bobble Stitch -- Free Pattern...


This super cute ponytail hat was crocheted using the Bobble Stitch.  It will fit a child to a small head adult (18" - 21" circumference).

Materials:
-- #4 Worsted Weight yarn (I used "I Love This Wool" in Navajo)
-- 5.5 mm hook
-- tapestry needle for weaving

Abbreviations:
Sc - single crochet
Dc- double crochet
Cl St - cluster stitch (or Bobble stitch - partially complete 5 DC all in the same stitch)
Ch - chain
FPDC - front post double crochet
BPDC - back post double crochet
Sl st - slip stitch
Rep - repeat

There's a great tutorial on the Bobble Stitch at:  lookatwhatimade.net
There's a great tutorial on FPDC & BPDC at:  newstitchaday.com

Instructions:
1.  Ch 20.  Join with a sl st to the first ch.  Ch 1.
2.  22 DC into the ring.  Join with a sl st to first DC.  Ch 1.  (22)
3.  *Cl st, ch 1, skip next st...* rep around.  Join to first DC.  (11 cl st)
4.  Sl st over to work in ch.  Ch 1.  Rep row 3.
5.  Sl st over to work in ch.  Ch 1.  Complete *1 cl st, ch 1 in first ch; 1 cl st, ch 1, 1 cl st in next ch...* rep around and join to first st.  (16 cl st)
6.  Repeat row 5.  (24 cl st)
7.  Sl st over to work in ch.  1 cl st in each previous cl st.  (24 cl st)
8. - 9.  Rep Row 7.  (24 cl st)
10.  Ch 1.  Sc in same stitch as ch 1.  *2 sc in next st; 1 sc in next...* rep around.  Ch 1.  (72 sc)
11. - 16.  Sc around.  Ch 1.   (72 sc)
17.  Dc in each st around.  (72 Dc)
18.  Ch 2 (counts as the first FPDC), then *BPDC, then FPDC around...* (36 FPDC & 36 BPDC)
19.  Rep Row 18.
20.  Fasten off and weave ends.  

Monday, December 26, 2016

Crochet Boba Fett, Elsa, Elmo & a Cat Christmas Ornament...free pattern


I either make or buy ornaments each year for my tree that sums up the year for each of my grand babies. After Christmas, they each have their own special box that their individual ornaments go in to keep them safely stored away. And, one day, when they have their own homes/family, they will have a box of ornaments from their Mamaw....

Ornaments I made for my grand babies this year...
Elsa for Arielle -- she loves Frozen and really enjoyed herself when we watched Disney on Ice...
Cat for Gabriel -- he calls every animal cat...lol
Elmo for Luke -- he loves, loves Sesame Street
Boba Fett for Jacob -- he is such a big fan of Star Wars


Materials:
-- 1.4" styrofoam ball (or you can use poly-fil)
-- #4 worsted weight yarn
-- 4.0 mm & 3mm hooks
-- tapestry needle

General Instructions:
1.  Magic ring with 8 single crochet stitches; work in the round.  (8)
2.  2 single crochet stitches into each stitch around.  (16)
3. - 7. 16 single crochet stitches around.  Insert the styrofoam ball before decrease row.  
8.  Decrease 8 times around.  (8)
9.  Chain 16 and sl st to make a loop.  Leave a tail long enough to weave the top closed.  

For Elsa, I started with a turquoise color, then changed yarn color to light peach at end of Row 5, then to ivory at the end of Row 7.  I used black yarn to embroider the eyes and pink for the lips.  I cut 6 strips of ivory yarn, approximately 7" long.  I used my hook to attach each strip to the top side which made 12 strips.  I made 3 sections of 4 strips each and braided the hair then used the tapestry needle to attach the hair to the side, coming around the front.  You could make the strips an inch or two longer if you prefer.  

For Boba Fett, I followed the general instructions.  I then used black yarn with the 3mm hook, and chained 7.  I single crocheted in 2nd chain from hook and across (6).  Then, chain 5.  Single crochet in 2nd chain and 3 remaining chains; slip stitch to the last single crochet stitch of base row.  Last, chain 5 and single crochet in 2nd chain and across; slip stitch again to the last single crochet stitch of base row.  This will make the shape of a "T".  Fasten off.  Join red yarn and single crochet around.  Leave a long enough tail to attach.  Weave ends.  For the antenna, I used gray yarn.  I chained 6.  Single crochet in the 2nd chain from hook and across.  Turn.  Chain 1 and complete 1 half double crochet in the first stitch.  Fasten off.  Leave a tail to attach to the side.  

For the cat, I followed the general instructions.  Then, I made the ears.  Chain 2 and make 2 single crochet stitches into the 2nd chain from the hook.  Chain 1 and turn.  2 single crochet in the first stitch and 1 single crochet in the next stitch.  Fasten off.  Leave a tail long enough to attach.  Repeat for second ear.  I used black yarn to embroider the eyes, nose and mouth.  

For Elmo, I followed the general instructions.  Then, I made the eyes with white yarn. I made a magic ring of 4 single crochet.  Tighten the yarn but don't join.  Complete 1 single crochet round.  Fasten off.  Leave a tail for attaching.  I then used black yarn to make a chain 3.  Single crochet in 2nd chain and remaining chain.  Leave a tail and attach to center of white yarn.  Repeat process and attach eyes beside each other, with no gap.  I used orange yarn and made a magic ring of 4 single crochet.  Slip stitch to first stitch and fasten off leaving a tail to attach.  

And that's it!!!

Questions?  Just comment or email me.  

Copyright -- make, give or sale whatever you make...just credit me as the designer and link back to my blog.  I would love to see your pics if you make one or all of these.  This pattern is easily adaptable to making so many ornaments.  

Happy Crocheting…


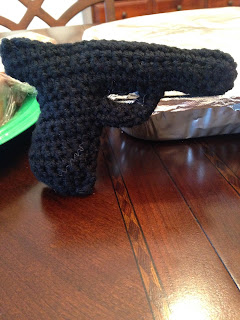
Crochet Handgun/Pistol -- Free Pattern

My oldest grandson, Jacob, has been asking me for months to crochet him a pistol/handgun.  He likes pretending he's a cop.  So, this morning, I finally sit down and worked up a basic pattern.  I will post the free pattern on my blog for anyone who is interested in making one.


Crochet Handgun/Pistol:

Materials:
--#4 worsted weight yarn in black (or color of choice)
--4mm hook
--poly-fil
--tapestry needle

Abbreviations:
Ch = chain
Sc = single crochet
Sl st = slip stitch
HDC = Half Double crochet (yarn over and insert hook into ch or st, yarn over, pull through ch or st; yarn over and pull through all 3 loops on hook)
Sk = skip
St = stitch
Inc = increase
Dec = decrease
Ext sc = extended single crochet (insert hook into ch or st, yarn over, pull thru ch or st, yarn over and pull through 1 loop on the hook, yarn over and pull through both loops on the hook)

Instructions:
(Make 2)
1.  Ch 6.  Sc in 2nd ch from hook and across.  (5)
2.  Ch 1.  Sc across. (5)
3.  Ch 3.  Sc in 2nd ch and across.  (7)
4.  Ch 1.  Sc across (7)
5.  Ch 1.  Sc across until last st.  Inc sc in last st.  (8)
6.  Ch 1.  Sc across.  (8)
7.  Dec sc, sc in the next 5 st and inc sc in last st.  (8)
8.  Ch 1.  Sc across.  (8)
9.  Dec sc, sc in the next 5 st and inc sc in last st.  (8)
10.  Ch 7.  Sc in 2nd ch from hook and across.  (14)
11.  Dec sc, sc in next 7 st, sl st in next 2 st, ext sc in next st, sl st in next 2 st.  Turn.  (13)
12.  Ch 2.  Sc in 2nd ch from hook, sc in next st, ch 4, ext sc in 2nd ch from hook, ch 1, sk 2 ch and 3 st, sc in next 7 st, dec sc the last 2 st together.  (11 stitches plus 2 chains = 13)
13.  Sc inc, sc in next 12 st.  (14)
14.  Ch 9.  Sc in 2nd ch from hook and remaining 7 ch.  Sc in each st across.  (22)
15.  Ch 4.  Sc in 2nd ch from hook and remaining 2 ch.  Inc sc in first st.  Sc across.  SC dec last 2 st.  (25)
16.  Ch 1.  Dec sc.  Sc across.  (24)
17.  Ch 1.  Sc in first st, HDC in next 2 st, sc in next 11 st, sl st in next 7 st, sc in next st and dec sc last 2 st together.  (23)

Fasten off.  Leave a long tail for sewing.

Assembly:
Using a tapestry needle, join the 2 pieces together.  Stuff with poly-fil as you go.

If you have any questions, please comment or email me.

Copyright:
This is my original design.  Make, give or sale any completed items.  I just ask that you give me credit as the designer.  Please do not copy my pattern but link back to my blog.  Thanks so much.


Monday, December 19, 2016

Crochet Christmas Women's Slippers...9.5" size

Women slippers to keep your feet toasty warm during the cold winter months...

1.  I used Bernat Christmas yarn and a 4 mm hook.
2.  The slippers were worked from the toe, going toward the back.  Start with a magic ring and 12 double crochet.
3.  You will keep working in the round, add increase rounds where needed.  I just kept trying them on.


Happy Crocheting...

Monday, December 12, 2016

Santa Cozy

Santa Cozy


I made this super cute cozy this evening for my bathroom Christmas decor...perfect for a hair straightener to sit inside.

Crochet Santa Cozy for mason jar (quart size; wide-mouth) free pattern.

Materials
--5.5 mm hook
--#4 worsted weight yarn (I used yarn from Hobby Lobby in red, white, taupe, black & toasted almond)
--Tapestry needle

Note:
--I used the Herringbone Half Double Crochet stitch (HHDC) but you can easily use Half Double Crochet (HDC), if you prefer.

--Cluster Stitch (cl st):  yarn over (yo), insert hook into next st, yo, draw up loop.  Repeat 3 times.  YO and draw through all 7 loops on hook.

Instructions:
With red yarn:
1.  Start with a magic ring and work 10 HHDC into the ring.  Join with a slip stitch and chain 1.  (10)
2.  2 HHDC in each stitch around.  Join with a slip stitch and chain 1.  (20)
3.  2 HHDC in first stitch, 1 HHDC into next stitch.  Repeat around.  Join with a slip stitch and chain 1.  (30)
4.  2 HHDC in first stitch, 1 HHDC into next 2 stitches.  Repeat around.  Join with a slip stitch and chain 1.  (40)
5.  1 HHDC into each stitch around.  Join with a slip stitch and chain 1.  (40)
6.  In Back Loops Only (BLO), 1 HHDC in each stitch around.  Join with a slip stitch and chain 1.  (40)
7. - 8.  In both loops, 1 HHDC in each stitch around.  Join with a slip stitch and chain 1.  (40)
(In the last stitch of row 8, join white yarn)
9. - 10.   In white yarn, 1 HHDC in each stitch around.  Join with a slip stitch and chain 1. (40)
(In the last stitch of row 10, join light taupe yarn)
11. - 15.  In light taupe yarn, 1 HHDC in each stitch around.  Join with a slip stitch and chain 1.  (40)
(In the last stitch of row 15, join white yarn)
16.  In white yarn, single crochet (sc) around.  Join with a slip stitch and chain 1.  (40)
17.  Sc into first stitch, cluster stitch into the next stitch.  Repeat around.  In the last stitch, join red yarn.    Join with a slip stitch and chain 1.
18.  With red yarn, 1 HHDC in each stitch around.  Join with a slip stitch and chain 1.  (40)
19.  HHDC2tog, 1 HHDC into the next 2 stitches.  Repeat around.  This is a decrease Row.  (30)
20.  Fasten off.  Weave ends.

Mustache (make 2)
With white yarn, chain 9.  *Sc into 2nd ch from hook, 2sc in the next ch.* repeat across.  (12)
Fasten off.  Keep tail long enough to attach.

Nose
With toasted almond yarn, add 6 single crochet stitches into a magic ring.  Slip stitch join to first stitch.  Chain 1.  Sc2tog three times.  Slip stitch to first stitch.  Fasten Off.

Eyes (make 2)
With black yarn, start with a Magic ring and add 6 single crochet stitches.  Join to first stitch and fasten off.  Leave a tail long enough to attach.

Assembly
Look at my pics to see where I placed the eyes, nose and mustache.

Hope y'all enjoy this pattern.  And, as always, please don't copy/claim my pattern as your own.  Please reference my blog.  Thank you...

Sunday, December 11, 2016

Christmas Blanket - pixel graph - C2C

I crocheted this Christmas Blanket - pixel graph - C2C method - for a special lady.  I did not design the graphs for this one.  The graphs are free on Pinterest.

I did do a chain 3, sl st, alternating between red and white for the border to give it a candy cane effect.  It took me twice as long to finish the border but was well worth it.

The pixel graphs are not my designs for this blanket, but by several designers that I found on Pinterest.


Saturday, December 10, 2016

Lucy van Pelt Costume/Dress...

"Lucy van Pelt" Costume-- Charlie Brown


Difficulty Level:  Easy

Size:  this costume was made to fit a slim teenager/young adult 

Materials:
--2 T-shirts (same color) from Hobby Lobby); 1 small and 1 XL
--4 buttons
--matching thread
--sewing machine

Directions:
Cutting:  
Small T-shirt
1.  I measured from bottom up of the small T-shirt approximately 4-5" and lightly marked it.  
2.  I just held the shirt firmly down with one hand while I cut across the mark to shorten the shirt.  Set aside.

XL T-shirt
1.  I laid the T-shirt flat on my table.  
2.  I then cut across from underarm to underarm.  Do not discard the top portion. You will use it later on.  

Assemble Dress
1.  Turn the XL T-shirt wrong side out.
2.  Make sure the bottom portion of the small T-shirt is aligned with the top portion of the XL T-shirt.  
3.  With your sewing machine, and like-colored thread you will hem the waistline and add a few pleats.  

For the arms:
1.  I removed the arm sections from the small T-shirt and used the XL T-shirt arms.  This made the arms puffy.  
2.  I made a band (about an inch wide) and hemmed to each arm end.  

For the ruffled neckline:
1.  I used part of the upper T-shirt of the XL that was leftover.  I cut a long strip that was about 1 and 1/2 times the length of the neck.  I made sure the width was wide enough so I could fold it in half.
2.  I then positioned it on one side of the neck, adjusted my numbers on my machine to create a ruffle.  It was actually quite easy to do.  I did an internet search with my sewing machine brand and what I needed to adjust it to to make ruffles.  

Buttons:
1.  Last I attached 4 buttons in the center, under the ruffles.  

And, that's it.  It was fairly quick to make and made a super cute costume for a Christmas play....

If you have any questions, please feel free to comment and I will answer the best I can.  

Happy Sewing....

Crochet Bunny Hat...toddler size


A cute bunny hat for a 2 year old little girl to match her favorite bunny stuffed animal....

I used #4 worsted weight yarn. 5.5 mm hook.

Special Stitch:  I completed this hat using the herringbone Half Double crochet stitch (HHDC)...

I started with a magic ring and 10 HHDC.  Each round I increased until I had the circumference I needed.  I then completed rounds with 1 HHDC stitch into each stitch around until the length I needed was achieved. 


Happy Crocheting….


Saturday, December 3, 2016

Crochet Sesame Street Tote Bag...Elmo & Cookie Monster...free C2C graphs

--6mm hook
--#4 worsted weight yarn
--tapestry needle for weaving

Crochet Sesame Street Tote Bag --  Elmo & Cookie Monster.  I worked this up for my grandson, Luke Samson to use to tote his toys to and from his house.  The pixel graphs are below.  After I completed each graph, I held together green and yellow yarn and single crocheted around each 25X25 graph.

I used green and yellow together to make the base.  I made a chain of 48 and then single crocheted across.  Ch 1, and continued to single crochet across until my desired width was achieved.

I then whipstitched each graph to a side of the base.  On the end of the base, I single crocheted across (my width was 4 so I had 4 single crochets), ch 1, until the side was the length of the front and back.  I then whipstitched the side to the front/back and repeated on the other side.

And, last, I used green yarn to make the handles (I ran out of yellow).  Ch 5, then make 4 single crochet across.  Ch 1 and continue to single crochet across until desired length is achieved.  Make a second handle.  Then attach handles to the top by whipstitching.  See pics on where to place handles.

I know this isn't the normal way to make a Tote Bag.  I was just trying something different and ended up liking the end result.  If the instructions are too confusing, please comment or email me and I will try to better explain it.


And, here's the bottom I worked up to make the tote....


Thursday, December 1, 2016

Snowman Wreaths...

Two Christmas wreaths I finished up this evening....a cute snowman wreath with ornaments and painted letters and a snowman mesh wreath with a crocheted top hat...aren't these just too cute...


Sesame Street Ornaments...

I finished these little crochet Sesame Street ornaments in Cookie Monster, Elmo, Oscar and Big Bird for my grandson, Luke Samson, who turned 1 yesterday....