Dollar Tree DIY:
Pumpkin Topiary
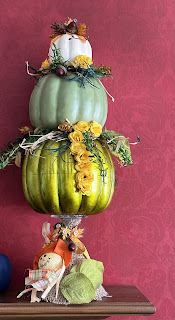
Here’s my newest Dollar Tree project using their pumpkins. I absolutely love how this topiary turned out.
I used straw, greenery and florals I had leftover from other projects. The scarecrow came as a set of 2 with a wood stick. I just snipped the stick off and hot glued it the base.
To make:
1. I removed the stems from #2 and #3 pumpkins. I hot glued them at the center. I removed #1 stem, made the hole a little bigger and inserted #2 stem in its place with hot glue. Then hot glued #1 to the center of #2.
2. Normally, you would hot glue the bottom of #3 pumpkin to a candlestick. However, when I sent my hubby to the Dollar Tree to get me a candlestick, he came back with a margarita glass. So, to improvise, I wrapped it in burlap with hot glue and then attached the topiary to the bottom of the glass.
3. To set out with decorating, I basically used items from previous projects that I had purchased from Dollar Tree and just started hot gluing it. This part is more of a free-spirited adventure for me. I just used what I had and made it work. I had bits and pieces of stuff, so I made sure to make it uniform throughout. If it was attached on the top pumpkin, then I made sure to counter with it on the bottom pumpkin - to give it a uniform look. I didn’t have enough leftover floral to wrap around all the pumpkins so I deciding to attach what I had in a cascading effect.
So, sometimes, you have to get creative when working with minimal supplies but that’s okay. It just takes a little maneuvering and balancing what you have to create a beautiful, subtle effect.
Happy Crafting…
Legal:
- Instagram: Rilla2u
- Pinterest: Rilla2u
- Twitter: Rilla2u
- Facebook: /rilla.edwards
- Etsy: rilla2u
- TikTok: rillae2u
- YouTube: Rilla2u
- Shopify: Rilla2u


No comments:
Post a Comment