

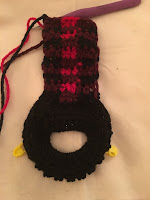
In plaid-mode at the moment, I decided to make a “Buffalo Plaid Ponytail Ear Warmer/Headband.” Cute for my head, secures my ponytail and will definitely keep my ears toasty warm. Plus, the plaid-look is so stylish and fashionable- I see it everywhere.
I hope you all will enjoy making this as much as I did in designing it. I'd love to see your finished projects and share your pictures.

I hope you all will enjoy making this as much as I did in designing it. I'd love to see your finished projects and share your pictures.
HERE is the LINK... to my Etsy Shop if you would like to purchase the PDF, Ad-Free Version of my Buffalo Plaid Ponytail Ear Warmer/Headband Pattern...
Buffalo Plaid Ponytail Ear Warmer/Headband Pattern

Size: This will fit the average Teen - Adult. It measures 4" wide. To make smaller, adjust the number of rows you complete. A good rule of thumb, is to test length as you go to make sure you get the right fit for your head.
Gauge: 8 HDC st x 5 rows = 2"
Materials:
--5.0mm hook
--ponytail holder
--stitch markers
--RHSS yarn in red, black and claret (or any brand of #4 worsted weight yarn) - it takes a total of 100-130 yards
--small amount of #5 bulky yarn in white (I used Yarn Bee's Fleece Lite in Quartz) for the trim
--tapestry needle for weaving ends
U.S. Stitch Abbreviations:
Ch: chain
Sl st: slip stitch
St: stitch(es)
SC: single crochet
HDC: half double crochet
Rep: repeat
Sk: skip
FO: fasten off
Special Note:
This is a variation to my Basic Ponytail Ear Warmer/Headband pattern. If you are not familiar with it, you can check out the pattern HERE... From there, you can also find the link to my video tutorial on Youtube.
Plaid Stitch:
1. First row you will work HDC st with black and claret.
2. Second row you will with HDC st with claret and red.
3. You will be carrying over your yarn so just keep the color not in use to the back as you carry it over and then just pick up when you are ready to use it.
Plaid Stitch:
1. First row you will work HDC st with black and claret.
2. Second row you will with HDC st with claret and red.
3. You will be carrying over your yarn so just keep the color not in use to the back as you carry it over and then just pick up when you are ready to use it.
Directions:
1. Sl st join black yarn to the ponytail holder and Ch1. Make 24 SC around holder. (If you don't have a ponytail holder, you can Ch20, sl st join to first ch to form a ring and then make 24 SC st). Sl st join to first st and Ch1. (24)
2. 1 HDC in each st around. Sl st join to first st and Ch1. (24)
3. Rep #2. Sl st join to first st and stop for a moment.
 Stitch Marker Placement:
You will place a stitch marker at the following stitches: #1, #9, #13 and #21. You are going to be working between st markers #1 and #9 to make the band. Once you make the numbered rows, you will join the last row at and between stitch markers #13 and #21.

Now, you are ready to continue crocheting. From here forward, you will be working between stitch #1 and #9.
4. With black yarn, Ch2 (this counts as the first HDC st). Make 2 more HDC st in the next 2 st. Before completing the 2nd HDC st, you will want to switch to claret yarn and complete the stitch. HDC in the next 3 st with the claret yarn. Before completing the 3rd st, you will want to switch back to the black yarn to complete the 3rd st. HDC in the next 3 st with black yarn.
5. With claret yarn, Ch2 (this counts as the first HDC st). Make 2 more HDC in the next 2 st. Before completing the 2nd HDC st, you will want to switch to red yarn and complete the stitch. HDC in the next 3 st with red yarn. Before completing the 3rd st, you will want to switch back to the claret yarn to complete the 3rd st. HDC in the next 3 st with claret yarn.
6-45. You will continue repeating steps #4 and #5 until you have completed 45 rows (or the number of rows you need to fit your head)
 46. Now, you are ready to sl st join Row 45 to the stitches between stitch markers #13 and #21 of Round 3. FO all yarn and weave ends.
47. Join claret in the side stitch of Row 4 and Ch1. Evenly SC from Row 4 to Row 45. FO and weave ends.
48. Rep #47 on opposite side.
49. With your bulky yarn, join in any stitch and Ch1. HDC in same st and around. Sl st join to first st and FO. Weave ends.
50. Rep #49 on opposite side.


And, that completes your Buffalo Plaid Ponytail Ear Warmer/Headband. I'm very pleased with the outcome of this project and hope you all will enjoy making this stylish and warm Ear Warmer for yourselves or to gift to others.
Please feel free to PIN and SHARE this pattern to your PINTEREST boards!!!! I would love to hear your feedback and see your pictures...


1. Sl st join black yarn to the ponytail holder and Ch1. Make 24 SC around holder. (If you don't have a ponytail holder, you can Ch20, sl st join to first ch to form a ring and then make 24 SC st). Sl st join to first st and Ch1. (24)
2. 1 HDC in each st around. Sl st join to first st and Ch1. (24)
3. Rep #2. Sl st join to first st and stop for a moment.

You will place a stitch marker at the following stitches: #1, #9, #13 and #21. You are going to be working between st markers #1 and #9 to make the band. Once you make the numbered rows, you will join the last row at and between stitch markers #13 and #21.

Now, you are ready to continue crocheting. From here forward, you will be working between stitch #1 and #9.
4. With black yarn, Ch2 (this counts as the first HDC st). Make 2 more HDC st in the next 2 st. Before completing the 2nd HDC st, you will want to switch to claret yarn and complete the stitch. HDC in the next 3 st with the claret yarn. Before completing the 3rd st, you will want to switch back to the black yarn to complete the 3rd st. HDC in the next 3 st with black yarn.
5. With claret yarn, Ch2 (this counts as the first HDC st). Make 2 more HDC in the next 2 st. Before completing the 2nd HDC st, you will want to switch to red yarn and complete the stitch. HDC in the next 3 st with red yarn. Before completing the 3rd st, you will want to switch back to the claret yarn to complete the 3rd st. HDC in the next 3 st with claret yarn.
6-45. You will continue repeating steps #4 and #5 until you have completed 45 rows (or the number of rows you need to fit your head)

47. Join claret in the side stitch of Row 4 and Ch1. Evenly SC from Row 4 to Row 45. FO and weave ends.
48. Rep #47 on opposite side.
49. With your bulky yarn, join in any stitch and Ch1. HDC in same st and around. Sl st join to first st and FO. Weave ends.
50. Rep #49 on opposite side.


And, that completes your Buffalo Plaid Ponytail Ear Warmer/Headband. I'm very pleased with the outcome of this project and hope you all will enjoy making this stylish and warm Ear Warmer for yourselves or to gift to others.
Please feel free to PIN and SHARE this pattern to your PINTEREST boards!!!! I would love to hear your feedback and see your pictures...


Happy Crocheting...
Legal:
--don't use/claim my design as your own
--don't use/claim my pics as your own
--okay to make and sale your finished work
--don't share my pattern electronically or in print format (without prior consent) but provide a link to my blog
Social Media:
If you are on the following sites, let's connect and hook up...
- Instagram: Rilla2u
- Pinterest: Rilla2u
- Twitter: Rilla2u
- Facebook: /rilla.edwards
No comments:
Post a Comment