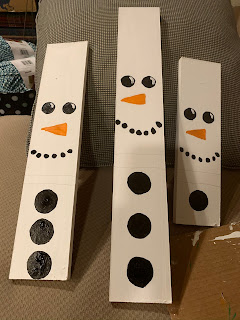
Rustic Snowman Trio
Hi, y’all. So, I found a couple of 1” x 4” boards lying around in my garage and thought they would be perfect for a Christmas craft project. I had hubby cut them for me into 3 size lengths:
— 20”
—16”
—12”
First, I spray-painted a base coat of white paint on the top and around the sides of each board. I did this outside. Allow to dry completely.
The remainder of the project was completed inside the house. I used “Apple Barrel” paint in:
—Snow White
—Black
—Orange
You can find this paint in the craft department at your local store. I purchased mine at Wal-Mart.
1. I applied a coat of Snow White paint to each board and allowed it to dry completely.
2. I then used a pencil to freestyle draw on the eyes, nose, mouth and buttons.
3. I used black paint to fill in the eyes, mouth and buttons. I used orange to fill in the nose. I used white to add insides to the eyes. For the eyebrows, I used a black paint marker. However, you can use your black paint to create this. My hand isn’t steady enough.
Allow paint to dry completely....
For the hat and scarf, I found a plaid mini-tree skirt at the Dollar General store for $1.00.
1. I cut 3 triangle-shaped pieces.
2. With right sides facing each other hot glue the ends together. Turn right side out. Hot glue to the top of your snowman. Repeat for the remaining two.
3. For the pom, I used white yarn and wrapped around my three fingers 20-30 times, tied in the center and trimmed ends. I then hot glued to the top of the hat. If you don’t have yarn, you can simply purchase a bag of poms at the Dollar Tree for $1.00 and hot glue to the end.
4. For the scarf, I trimmed 5 blocks of the mini-tree skirt fabric and hot glued it to the board just above the top button. I then took another piece of fabric, tied a center knot and glued to the center to complete the “scarf.”
Alternatives:
—use fuzzy socks for the hats
—make a crochet or knitted hat and scarf
—use black buttons for the eyes, mouth and belly
—trim a larger piece of fabric and wrap around each board and secure with a knot for the scarf
The possibilities are endless. Get creative and just have FUN!!!
And that’s it!!! I think these turned out so SUPER cute.
I hope you all enjoy this project as much as I do. If you try it, please be sure to tag me in your posts #rilla2u @rilla2u. I’d love to see what you create.....
Happy Crafting...


No comments:
Post a Comment