Halloween C2C Blanket
Difficulty Level: Intermediate
Size: Approximately 60" x 65"
Materials:
--6mm hook
--#4 worsted weight yarn in colors of my graphs or your own personal choice; I did not keep track of yardage for this project; I used whatever scrap colors I already had; if I were to guess an approximate yardage 800-1100 (I used a lot of different colors from scrap)
--tapestry needle for weaving
Gauge: not too important
U.S. Stitch Abbreviations:
Ch: chain
Sl st: slip stitch
St: stitch(es)
SC: single crochet
HDC: half double crochet
FO: fasten off
Note: I made each block using C2C method of chain 5 with HDC stitches. For a bigger blanket, you can chain 6 with DC stitches. You will start each graph in the lower right corner and work your rows vertically, increasing on each end until you complete the halfway mark, then you will start decreasing on each end.
Note: I made each block using C2C method of chain 5 with HDC stitches. For a bigger blanket, you can chain 6 with DC stitches. You will start each graph in the lower right corner and work your rows vertically, increasing on each end until you complete the halfway mark, then you will start decreasing on each end.
Directions:
Pixel Graphs:
A. Pumpkin
(Orange, Green, Yellow, Brown and Black Yarn)
B. Frankenstein
(White, Green-light and dark, Black, Gray and Blue Yarns)
C. Candy Corn
(Black, White, Orange and Yellow Yarn)
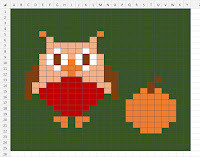
D. Owl with Pumpkin
(Green, Orange, Brown, Yellow, White, shade of Red Yarn)
E. Maple Leaf
(Yellow, Orange, Brown and shade of Red Yarn)
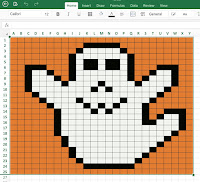
F. Ghost
(Orange, White and Black Yarn)
G. Fall
(Black, Red, Blue, Yellow, Purple, Brown and Green Yarn)
H. Witch
(Yellow, Black, Pale Yellow, Black, Green and Purple Yarn)
I. And, here's an extra block for ya:
(Black, Purple, Orange and Green Yarn)
J. Black Cat
(Orange, Black and Yellow Yarn)
The Black Cat Graph is not mine. But, here's the link for it:
Blanket Portion:
1. Each Block is made using the C2C method (Corner-2-Corner) with Ch5 and HDC Stitches. If you want to make your blanket bigger, then you can do Ch6 and Double Crochet (DC) Stitches. There are some great tutorials on the internet for C2C, if you don't have a working knowledge of it.
2. After completing each Block, I added 3 rows of SC stitches in the background color around the perimeter, with 3 SC stitches in each corner. Now, again, if so desired, you could use HDC stitches (if using the Ch5 and HDC method) or DC stitches (if using the Ch6 and DC method) around the perimeter to make each block (therefore, your blanket) bigger.
3. Next, I added 3 rows of SC stitches in Black around the perimeter of each Block, with 3 SC stitches in each corner. Again, if you are going to use HDC stitches in step #2 for your perimeter, then use HDC stitches in this step as well. If you are going to use DC stitches in steps #1 and #2, then use DC stitches in this step as well.
4. Once I had each Block completed, I then laid them out (see above pic) how I wanted them. I then used my tapestry needle and black yarn and whipstitched the blocks together.
Border:
1-2. Once the Blocks were joined, I completed 2 rounds of SC stitches around the blanket, with 3 SC stitches in each corner with black yarn
3. With green yarn, 1 round of SC stitches with 3 SC stitches in each corner.
4-6. For the next 3 rounds, I used Cranberry yarn and granny stripes to complete with (granny stripe, ch2, granny stripe) in each corner.
For Granny Stripe: *3 HDC stitches into same stitch, ch3, skip 3,* repeat around
7-8. The next 2 rows, I completed with yellow yarn and SC stitches, with 3 SC stitches in each corner.
9. For my final round, I used Pumpkin yarn and SC stitches with 3 SC stitches in each corner. FO and weave ends.
Happy Crocheting...
Legal:
--don't claim my pattern/design as your own
--don't use my pics as your own
--don't share my pattern electronically or in print format but provide a link to my blog


Do you have written instructions for the Halloween blanket? I am not familiar with pixel graphs.
ReplyDeleteI’m sorry I don’t. But, you can work each square from right to left by starting with a chain. My squares are 25x25. So, you could start with 26 chains and work 1 HDC in each stitch across OR start with 51 chains and work HDC in each ch across. This would be like 2 stitches per little block. Or any variation like that. I hope this is helpful to you.
DeleteThank You ❤❤❤
ReplyDelete