Saturday, October 31, 2020

Rosy Cheeks Cardigan & Hat

 Rosy Cheeks Cardigan & Hat

Materials:

-5mm hook

-(2) skeins #4 worsted weight yarn; I used I Love This Yarn in “Rosy Cheeks”

-Needle for weaving

-6 buttons

Directions:

For the cardigan, I used the “Baby Bear Crochet Hoodie” pattern from Yarnspirations.com.  I tweaked the pattern to make mine a 15-month old pattern  Here is the link for the pattern:  

RedHeartBabyBearCrochetHoodie

For the hat, I used a combination of DC stitches (for the increase rounds) and then HDC stitches in groups of 3 (3-4 rounds) and 1 HDC crossover stitch round.  My final round was SC stitches  

Happy Crocheting...


Thursday, October 22, 2020

Pumpkin Spice Painting

Fall literally screams pumpkins, pumpkin spice, pumpkin pie — everything PUMPKIN to me!!!

I have been busy this fall time with home schooling Jacob, Gabriel and Luke; working on new crochet projects; learning to paint on different mediums and crafting with glass, wood, chipboard, Styrofoam and so on....

Here is my completed “Pumpkin Spice” Canvas Painting. I’m by no means a professional but I’m thrilled with this finished piece of artwork. 

Happy Crafting...


Saturday, October 17, 2020

Faith Wall Hanging

 I absolutely LOVE how this project turned out!!!  It’s simple, cheap and beautiful. 

So, here’s what I did to turn something cheap into something chic for my fireplace in the den:  

Materials: 

(From Dollar Tree)

—silver tray

—modpodge 

—sponge brush 

—faith word

—black and white paint

(From Hobby Lobby)

—1 sheet of black/white plaid scrapbook paper 

—1 roll of 3/4” red/black ribbon 

My items from Hobby Lobby were purchased when each department was on sale at 40% off.

(Items I already had)

—jute twine

—scissors 

—hot glue gun

—old cloth/rag

Directions:

1.  First, I used my sponge brush and painted the front and back of the silver tray. I only applied one coat. I wanted a streaked, aged look. 

2.  Second, I painted “faith” word black. Let dry completely. I then used an old cloth and dipped it in white paint and then rubbed the white onto each letter to give it a faded look. (Look at pics to see the difference it made) 


3.  Third, I cut my plaid scrapbook paper to fit on top of the tray. For this, I turned the tray upside down and laid the paper (plaid side down) on top. I used a pencil to draw an outline of the center of the tray. 

4.  Next, evenly brush modpodge on the tray. Carefully, lie the paper down and gently brush your hand across to get any air bubbles out. Let dry and then modpodge the top. Dry completely.

5.  I used hot glue to attach the ribbon around the outline of the paper. 

6.  I hot glued “faith” to the center. 

7.  I made a loop with the jute twine and then hot glued to center back. 

And, that’s it!!!!

Happy Crafting...

Tuesday, October 6, 2020

Rustic Snowman Trio

 Rustic Snowman Trio

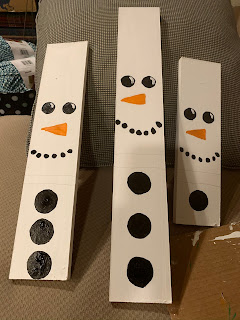
Hi, y’all.  So, I found a couple of 1” x 4” boards lying around in my garage and thought they would be perfect for a Christmas craft project. I had hubby cut them for me into 3 size lengths: 

— 20” 

—16” 

—12” 

First, I spray-painted a base coat of white paint on the top and around the sides of each board.  I did this outside.  Allow to dry completely.  

The remainder of the project was completed inside the house.  I used “Apple Barrel” paint in: 

—Snow White 

—Black

—Orange 

You can find this paint in the craft department at your local store.  I purchased mine at Wal-Mart.  

1.  I applied a coat of Snow White paint to each board and allowed it to dry completely.  

2.  I then used a pencil to freestyle draw on the eyes, nose, mouth and buttons.  

3.  I used black paint to fill in the eyes, mouth and buttons.  I used orange to fill in the nose.  I used white to add insides to the eyes.  For the eyebrows, I used a black paint marker.  However, you can use your black paint to create this.  My hand isn’t steady enough.  

Allow paint to dry completely....

For the hat and scarf, I found a plaid mini-tree skirt at the Dollar General store for $1.00. 

1.  I cut 3 triangle-shaped pieces.  

2.  With right sides facing each other hot glue the ends together. Turn right side out.  Hot glue to the top of your snowman.  Repeat for the remaining two.

3.  For the pom, I used white yarn and wrapped around my three fingers 20-30 times, tied in the center and trimmed ends. I then hot glued to the top of the hat.  If you don’t have yarn, you can simply purchase a bag of poms at the Dollar Tree for $1.00 and hot glue to the end.  

4.  For the scarf, I trimmed 5 blocks of the mini-tree skirt fabric and hot glued it to the board just above the top button.  I then took another piece of fabric, tied a center knot and glued to the center to complete the “scarf.”

Alternatives:

—use fuzzy socks for the hats 

—make a crochet or knitted hat and scarf

—use black buttons for the eyes, mouth and belly

—trim a larger piece of fabric and wrap around each board and secure with a knot for the scarf 

The possibilities are endless.  Get creative and just have FUN!!!

And that’s it!!!  I think these turned out so SUPER cute. 

I hope you all enjoy this project as much as I do.  If you try it, please be sure to tag me in your posts #rilla2u @rilla2u.  I’d love to see what you create.....


Happy Crafting...

Sunday, October 4, 2020

Fall Pumpkin Topiary

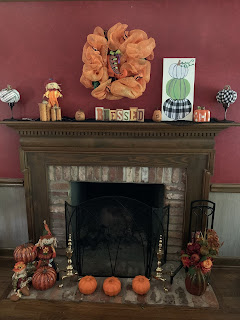
 I just love everything about fall — the weather, the smell, the colors...just everything!!!  With the help of my grand kids, I got my living room fireplace decorated. 

I hung up a mesh wreath that I had made a few years ago. To the mantel, I added plaid pumpkins on each end and fall decor items I’ve had for years. 

To finish off, my mantel, I added my “Pumpkin Topiary” canvas painting. It took me 3-4 hours to complete, including drying time and touch-ups.

I’m very pleased with the overall look...


Happy Crafting...