Sunday, March 12, 2017

Polar Bear Blanket...FREE PATTERN

Well, I'm thankful to be on the mend and was able to complete "My Polar Bear" Blanket this afternoon.

On this animal blanket, I added a few options:  a removable neck clasp; a footed cozy and, of course, a little hat for the polar bear...


*******************************************************************************


My Polar Bear Blanket/Pillow
Designer:  Rilla Edwards
Contact Info:
email:  rilla2u@gmail.com
Instagram:  rilla2u
Pinterest:  rilla2u
Facebook Page:  Crocheting & Crafting
Twitter:  rilla2u

Skill Level:  Beginner - Intermediate
Finished Size:  Approx. 34"x58" (with foot cozy) or 34"x73" (without foot cozy)
Materials:
--4 skeins of Bernat Blanket Yarn (220 yds/skein) in white
--1 skein of Bernat Blanket Yarn (220 yds) in black
--1 skein of Bernat Blanket Yarn (76 yds/skein) in baby teal (I only used about 1/2 skein)
--2-3 yds of Bernant Blanket Yarn for contrast color and pompom on hat (I used red)
--8.0mm hook
--10.0mm hook
--tapstry needle for weaving
--small amount of polyfil (for muzzle)
--2 white and 1 black buttons (1" size) - optional
Abbreviations:
Ch:  chain
Sl st:  slip stich - insert hook into next stitch, yarn over, pull through stitch and loop on the hook
St:  stitch
HDC:  half double crochet - yarn over and insert hook into next stitch, yarn over, draw up loop, yarn over and pull all 3 loops through hook
Sc:  single crochet - insert hook into next stitch, yarn over, draw up loop, yarn over and pull 2 loops through hook
Dc:  double crochet - yarn over, insert hook into next stitch, yarn over, draw up a loop, yarn over and pull 2 loops through the hook, yarn over and pull remaining 2 loops on hook through
FPDC & BPDC:  www.newstitchaday has a great tutorial if you are not familiar with post stitches
Sk:  skip
FO:  fasten off
MR:  magic ring
HDC2tog:  decrease a stitch by yarn over, insert hook into next stitch, yarn over, draw up loop, yarn over and insert hook into the next stitch, yarn over, draw up loop, yarn over and pull all 5 loops through hook
SC2tog:  decrease a stitch by inserting hook into next stitch, yarn over, draw up loop, insert hook into the next stitch, yarn over, draw up loop, yarn over and pull all 3 loops through hook
Directions:
Body of the Blanket:
1.  With white yarn and 8 mm hook, ch 109.  HDC into 2nd ch from hook and across.  Ch1.  Turn.  (108).  OR, you can complete 108 FHDC.  Either way is fine.
2-45.  1 HDC in each st across.  Ch1.  Turn.  (108)  Do not fasten off.  At the end of Row 45, Ch1.  At this point, turn your blanket.  You will now be working across the short end (side) of the blanket.
--at this point your blanket will measure approx. 28" wide by 54 1/2" long--
(if you want your blanket to be wider, then continue to add additional rows; note, we will be adding 5 additional rows in black to each side later on to make this 34" in width)

Hoodie Portion:
1.  Working on the side, 1 HDC in each st across.  Ch1.  Turn.  (45)
2.  1 HDC in each st across.  Ch1.  Turn.  (45)
3.  HDC2tog, 1HDC in the next 41 st, HDC2tog.  Ch1.  Turn.  (43)
4.  1 HDC in each st across.  Ch 1.  Turn.  (43)
5-20.  Repeat #4.  Do not fasten off.
--you may want your hood smaller or bigger than this; if so, decrease or increase the number of rows--
Hoodie Border:
21.  At the end of Row 20, switch to your 10mm hook and Ch1.  DC in each st across.  Ch2.  Turn.  (43)
22.  The Ch 2 counts as the first FPDC st, into the next post stitch, complete BPDC, then FPDC into the next post...repeat across.  Ch 1.  Turn. 
23.  Sk 1st stitch, sl st into the 2nd stitch and then SC across remaining stitches until 2 st remain.  Sk the 2nd to the last st and sl st into the last st.  FO. 
--Fold and join the last row of the hoodie together with right sides facing and whipstitch together to form the hoodie shape.--
Second Part of Body of the Blanket:
With a 10mm hook and black yarn, join yarn with a sl st into the first st of Row 45, (and working horizontally again with the long side), you will complete 5 Rows of HDC stitches.  FO.  Now, turn and work on the opposite side (your initial base row).  Join black yarn with a sl st in the first st of the base row and complete 5 Rows of HDC stitches.  Do not fasten off yet. 
Once you have the 5 rows of black completed on each side, you will then turn and work across the bottom of your blanket.  Ch1 and work 1 HDC in each st across.  Ch 1.  Turn.  Complete a second row of HDC st.  FO. 
Optional:
1.  Fold bottom of your blanket up 15" (more or less depending on who you are making this for) and whip stitch around the black portion to make a foot cozy
2.  Clasp for neck strap:  with white yarn and 8 mm hook, ch 4.  SC in 2nd ch from hook and remaining ch.  Ch 1.  Turn.  (3)
Complete 9 additional rows of 3sc per row.  FO.  Weave ends.  Attach white buttons to each end.  This will make the clasp removable.  My clasp is attached in the first and last st of the hoodie portion.
3.  Add a black button to Row 5 on one of the sides that was completed in black yarn. 
The neck strap and black button, in my opinion, makes the polar bear look a little classy...this is purely optional.  Also, it makes the blanket usable as a cape-like blanket for my grandson...lol.
Facial Features:
Ears (make 2):
1.  With 8 mm hook and white yarn, 8 HDC into MR.  Sl st to join.  Ch 1.  (8)
2.  2 HDC in each st around.  Sl st to join.  Ch 1.  (16)
3.  2 HDC in first st, 1 HDC in next st.  Repeat around.  Sl st to join.  Ch 1.  (24)
4-5. 1HDC in each st across.  Sl st to join.  Ch 1.  (24)
6.  HDC2tog, 1 HDC in next st.  Repeat around.  Sl st to join.  FO.  Leave a long tail for attaching to head.  (16)
Muzzle:
1.  With 8 mm hook and white yarn, 8 HDC into MR.  Sl st to join.  Ch 1.  (8)
2.  2HDC in each st around.  Sl st to join.  Ch 1.  (16)
3-4.  1 HDC in each st around.  Sl st to join.  Ch 1.  At the end of row 4, sl st to join and FO.  Leave a long tail for attaching.  (16)
Nose:
1  With 8mm hook and black yarn, Ch4.  SC in 2nd ch from hook and remaining 2 ch.  Ch 1.  Turn.  (3)
2.  SC2tog, SC in next st.  Ch 1.  Turn.  (2)
3.  SC2tog.  Ch 1.  Turn.  (1)
4.  Sl st around the nose.  FO.  Leave a long tail for attaching.
See pic for nose placement and embroidery details...
Eyes (make 2):
1.  With 8mm hook and black yarn, 6 HDC into MR.  Sl st to join.  Ch1.  (6)
2.  2 HDC in each st around.  Sl st to join.  FO.  Leave a long tail for attaching.  (12)
Hat:
1.  With baby teal yarn and 8mm hook, 6SC into MR.  Sl st to join.  Ch 1.  (6)
2.  2SC in each st around.  Sl st to join.  Ch 1.  (12)
3.  2SC in first st, 1SC in next.  Repeat around.  Sl st to join.  Ch 1.  (18)
4.  2SC in first st, 1SC in next 2 st.  Repeat around.  Sl st to join.  Ch 1.  (24)
5.  2SC in first st, 1SC in next 3 st.  Repeat around.  Sl st to join.  Ch 1.  (30)
6-9.  1 SC in each st around.  Sl st to join.  Ch 1.  At the end of Row 9, before completing the last st, switch to a contrast color (I used red).  (30)
10.  In contrast color, 1 SC in each st around.  Sl st to join.  Leave a long tail for attaching.
Pompom:
I wrapped contrast color around 3 of my fingers 25 times.  I left a long tail to to knot in the middle and for attaching to the hat.  I then cut the loops and trimmed it up. 
 Assembly of Face:
I attached the nose and embroidered the mouth to the muzzle before attaching it to the hood.  Before I finished attaching the muzzle to the head, I stuffed it with Polyfil.  See pics for eyes, ears and hat placement.
To use as a pillow:
First, I folded the blanket from bottom up about halfway, then I folded inward each side (like a paper airplane) to mirror the hoodie portion and then nestle it under the hoodie.  
 Legal:
--please do not claim pattern as your own
--please do not use my pics on any social media sites
--please do not post and/or share this pattern on social media sites
--please reference to my blog as designer of pattern
 Happy Crocheting!!!!


Friday, March 10, 2017

Crochet Bunny Treat Bags/Sacks...

I whipped up these Easter Bunny Treat Bags/Sacks this evening. It doesn't take long to make.  A great bag to add treats for children and adults,

Crochet Bunny Treat Bags/Sacks...

Materials:
--3mm hook (turquoise bunny)
--5mm hook (white bunny)
--4mm hook (yellow bunny)
--Worsted weight yarn (I used "I Love This Yarn" from Hobby Lobby); uses less than a 1/3 of a skein
--tapestry needle for weaving

Abbreviations:
Ch - chain
Sc - single crochet
HDC- half double crochet
Dec - decrease
St - stitch(es)
Sc3tog - single crochet 3 stitches together

Directions:
(Make 2)
Body
1.  In main color, ch 22.  Into 2nd ch from hook, *SC and HDC in same ch, skip a ch...* repeat across. In last stitch, though, 1 SC stitch only.  Ch 1.  Turn. (21)
2.  *SC and HDC in first st, then skip a stitch...* repeat across. In last stitch, though, 1 SC stitch only.  Ch 1.  Turn. (21)
3-14.  Repeat #2.  

First ear
15.  1 SC in the first five stitches.  Ch 1.  Turn.  
16-26.  Repeat #15.
27.  Sc dec first two stitches, 1 sc in the next stitch and sc dec in the last two stitches.  Ch 1. Turn. (3)
28-30.  Sc in each st across.  Ch 1.  Turn. (3)
31.  Sc3together.  Fasten off.  Leave a long tail for attaching to the second one.  

Repeat 15-31 on opposite side for the second ear.

Before joining the two pieces together, you will want to go ahead and either embroider, glue or crochet facial features to the right side of only one of your two pieces made.  Once this is complete, align the two pieces together and whipstitch.  Leave the opening between the ears unstitched.  

Drawstring:
1.  Ch 85. Fasten off.  Weave the drawstring in and out.  I weaved mine in and out of Row 13.  

White bunny:  5mm hook
Turquoise bunny:  3mm hook
Yellow bunny:  4mm hook 


Simple and cute to make...

Legal:
--use pattern to make, sale or give away your finished product(s)
--don't use my pics
--don't claim pattern as your own
--link back to my blog

Happy Crocheting!!!


Irish Caddy

Irish Caddy


I don't know if any of you are like me but I'm constantly saving containers with the intent to re-purpose it into something else. Well, I'm continually saving the containers and have come to realize I'm doing very little on the re-purpose side. Lol...

So, while I'm still lying in bed trying to free myself of this virus mess and watching one of my fav shows on Netflix, Merlin, I was inspired to transform one of the tall cake frosting containers into a "Hook Caddy...". The container is the perfect height so it doesn't require anything to help support the hooks. Although, I did add some cute red rose fabric to the inside...

I did not write a row by row pattern for this but here's the jest of what I did to bring a wee bit o' Irish for a few of my hooks to call home.

Materials:

--4.5 mm hook
--#4 worsted weight yarn in green and just a tad in white
--fabric to line inside is optional
--tapestry needle for weaving
--large (tall) frosting container

Directions:
(Cover, Cozy, Irish Hat...so many names to choose from...lol)
I chained 29, HDC in 2nd ch and across. I worked in rows and created a rectangle shape that fit comfortably around the container. I then fastened off, whipstitched the short ends together and weaved ends.

Now, I joined yarn in any stitch and worked in the round. Slip stitch to join to first stitch and chain 1 at end of each round.

Steps:
1.  I completed a round of HDC in back loops only.
2.  Then 3 rounds of HDC in both loops.
3.  I then worked in front loops only row: 1 HDC in the first stitch, 2 HDC in the next stitch. Repeat around.
4.  Then in both loops, 2 HDC in first stitch, 1 HDC in the next 2 stitches, repeat around.
5.  Last round - 1 single crochet in each HDC stitch around. Join and fasten off.

Shamrock:
I used white yarn to make my shamrock. I used a simple free pattern and then attached to the cover.  Here's the link:

To make the lining, I simply placed the container lid on wrong side of fabric and used my pen to make circle.  Cut.  Then I wrapped fabric around the container added about 1/2" to 3/4" more to it for seam allowance and cut it.  I didn't take the time to properly measure or even cut perfectly straight.  I just eyeballed it. With right sides together, I sewed the shorts ends together, then on the bottom portion, I sewed the piece of circular fabric.  On the top, I folded down about 1/4" to 1/2" and sewed to give a straight edge.  I added some craft glue straight on the wrong side of the fabric, and placed it inside the container to dry.  


Add your hooks.  Simple, recycling/re-purposing, and great seasonal decor item....


Happy Crocheting!!!

Thursday, March 9, 2017

Crochet Cami "Sunrise"...

Well, I'm still trying to overcome this sore throat, coughing and overall sickness.  Doc started me on new meds yesterday so I'm praying this will clear this mess up and get it out of my house.

So, I've had to put aside completing "My Polar Bear" Blanket for a few days since it requires more energy and thought to finalize the pattern.  But, I've managed to work on a few smaller projects/ideas that I had jotted down.  And, here is one of them for ya -- Cami "Sunrise"

I've had this gorgeous Red Heart Boutique Unforgettable yarn in Sunrise for probably the last year to year and half waiting for the right inspiration to use it on.

Who doesn't need an undergarment for the top that may be getting a little snug or is cut too low and too revealing?  Well, this is the perfect essential wardrobe item to have -- add a little color and a splash of crochet, especially with warmer weather on its way.

This project works up fairly quickly, doesn't require much yarn and is easy for any crocheter to complete.

Cami "Sunrise"

Skill Level:  Easy

Gauge:  Not too important

Size:  One size for most

Materials:
--4.5 mm hook
--Red Heart Boutique Unforgettable Yarn in Sunrise (approximately 60 yards)
--Tapestry needle for weaving
--(2) 1/2" buttons

Abbreviations:
Ch -- chain
Sc -- single crochet
Dc -- double crochet
St -- stitch

Directions:
1.  Ch 25.  Sc in 2nd ch from hook and across.  Ch 1.  Turn.  (24 sc)
2-16.  Sc in each st across.  Ch 1.  Turn.  (24 sc)
17.  Dc in each st across.  Ch 1.  Turn.  (24 dc)
18.  2sc in first st, 1 sc in the next 22 st and 2 sc in the last st.  Ch 1.  Turn.  (26 sc)
19.  Dc in each st across.  Ch 1.  Turn.  (26 dc)
20.  2sc in the first st, 1 sc in the next 24 st and 2sc in the last st.  Ch 1.  Turn.  (28 sc)
21.  Dc in each st across.  Ch 1.  Turn.  (28 dc)
22.  2sc in the first st, 1 sc in the next 26 st and 2sc in the last st.  Ch 1.  Turn.  (30 sc)
23.  Dc in each st across.  Ch 1.  Turn.  (30 dc)
24.  Sc in each st across.  Ch 1.  Turn.  (30 sc)
25.  Dc in each st across.  Ch 1.  Turn.  (30 dc)
26.  Sc in each st across.  Ch 1.  Turn.  (30 sc)
27.  Dc in each st across.  Ch 1.  Turn.  (30 dc)
28.  Sc in each st across.  Ch 1.  Turn.  (30 sc)
29.  Dc in each st across.  Ch 1.  Turn.  (30 dc)
30.  Sc around the entire garment.  Sl st in the first st to join.  Do not fasten off. 

Straps:
1.  Ch 16.  Sc in the 2nd ch and across.  Sl st to the last st that was made above and fasten off.  Weave ends.  Make a second strap on the opposite side.

Buttons:
1.  Sew the buttons to the end of the straps.

And, that's it.  Simple & stylish!!!  I would love to see your pics if you decide to make this.  


Legal:
--it’s okay to use for your own personal use to make, sale or give away your finished product(s); just credit me as the designer
--please don't use my pics as your own
--don't claim my pattern as your own
--please don’t share my pattern but provide a link to my blog

Happy Crocheting!!!
 

Friday, March 3, 2017

WIP Break to Make Something Else...lol

Well, I had to take a break from my WIP:


and make Miss Arielle this cute unicorn headband.  This isn't my pattern. I just had to make a few adjustments to fit Arielle.

Also including pics of Jacob donning "My Lion Blanket" and prowling thru the upstairs.  Lol


Looking forward, though, to the weekend and what inspiration lies ahead.

Happy Crocheting.

Thursday, March 2, 2017

Crochet Newborn Pants and Hat, Little Slugger


Little Slugger Pants and Hat

"Little Slugger" pants and hat I whipped up this morning for a 5-6 lb newborn...isn't it just way too cute?

Materials:
--5mm hook
--#4 worsted weight yarn in red, white & blue (I used "I Love This Yarn" from Hobby Lobby)
--2 decorative baseball buttons
--tapestry needle for weaving

Abbreviations:
MR:  magic ring
Sl st:  slip stitch
Ch:  chain
Dc:  double crochet
Sc:  single crochet
HDC:  half double crochet
FHDC:  foundation half double crochet
FPHDC:  front post half double crochet
BPHDC:  back post half double crochet
FO:  fasten off

Hat:
1.  With white yarn, 12 Dc into a MR.  Sl st to first st to join.  Ch 1.  (12)
2.  2 Dc into each st around.  Sl st to first st to join.  Ch 1.  (24)
3.  2 Dc into first st, 1 Dc in the next.  Repeat around.  Sl st to first st to join.  Ch 1.  (36)
4.  2 Dc into first st, 1 Dc into the next 8 st.  Repeat around.  Sl st to first st to join.  Ch 1.  (40)
5.  1 Dc into each st around.  Sl st to first st to join.  Ch 1.  (40)
6-9.  Repeat #5.  On the last st of round 9, switch to red yarn before completing the st.  Sl st to first st
to join.  Ch 1.  (40)
10.  In red yarn, 1 Dc in each st around.  On the last st, switch to blue yarn before completing the st.  Sl st to first st to join.  Ch 1.  (40).
11.  In blue yarn, 1 Sc in each st around.  Sl st to first st to join.  FO. Weave ends.  (40)

Optional:  attach decorative baseball button to hat


Pants:
1.  With blue yarn, 40 FHDC.  Keeping yarn from twisting, sl st to join to first st, making a ring.  Ch 1.  (40)
--or, you can ch 41, HDC in 2nd st and across then Sl st to form a ring--
2-3.  FPHDC around the first post st, then BPHDC around the next post.  Repeat around.  Before completing the last st of round 3, switch to red yarn.  Sl st to join.  Ch 1.  (20 FPHDC & 20 BPHDC)
4.  With red yarn, 1 Sc in each st around.  Before completing the last st, switch to white yarn.  Sl st to join.  Ch 1.  (40)
5-16.  With white yarn, 1 Sc in each st around.  Sl st to join.  Ch 1.  (40)

First leg:
17.  1 Sc in the first 20 st, skip over the remaining 20 st and join with a sl st to the first st.  Ch 1.  (20)
18.  2 Sc in the first st, 1 sc in the next 9 st, 2 Sc in the next st, 1 Sc in the remaining 9 st.  Sl st to join.  Ch 1.  (22)
19-30.  1 Sc in each st around.  On the last st of round 30, switch to red yarn before completing st.  Sl st to join.  Ch 1.  (22)
31.  With red yarn, 1 Sc in each st around.  Before completing the last st, switch to blue yarn.  Sl st to
join.  Ch 1.  (22)
32-33.  With blue yarn, FPHDC around the first post st, then BPHDC around the next post.  Repeat around.  Sl st to join.  Ch 1.  At the end of Round 33, sl st to join and FO.  Weave ends.  (11 FPHDC & 11 BPHDC)

Second leg:
17.  With white yarn, join at the crotch in one of the 20 st that was skipped over.  Ch 1.  Sc in same st as ch 1 and remaining 19 st.  Sl st to join.  Ch 1.  There will be a small opening between the 2 legs.  Don't worry about this, you can weave together with white yarn when finished.  (20)
18.  2 Sc in the first st, 1 sc in the next 9 st, 2 Sc in the next st, 1 Sc in the remaining 9 st.  Sl st to join.  Ch 1.  (22)
19-30.  1 Sc in each st around.  On the last st of round 30, switch to red yarn before completing st.  Sl st to join.  Ch 1.  (22)
31.  With red yarn, 1 Sc in each st around.  Before completing the last st, switch to blue yarn.  Sl st to join.  Ch 1.  (22)
32-33.  With blue yarn, FPHDC around the first post st, then BPHDC around the next post.  Repeat around.  Sl st to join.  Ch 1.  At the end of Round 33, sl st to join and FO.  Weave ends.  (11 FPHDC & 11 BPHDC)

With tapestry needle and white yarn, whipstitch the small opening in the crotch area

Optional:  attach decorative baseball button at the center of the pants between rounds 3 and 4.


**March 11, 2017**
Update:

To make the pants for a newborn, size 6-8 lbs:

Adjust  hook size to a 5.5 mm hook and beginning at Row 5 of pattern above, make HDC stitches instead of SC stitches, and subsequently alternating rows with one row HDC then next row SC thru Row 30. Complete rows 31-33 as above.  The pants will measure approximately 6 1/2" wide by 11" long.... 


Hope you enjoy making this!!!

Happy Crocheting...

Legal:
--don't claim pattern as your own
--don't use my pics
--credit me as designer of pattern by linking to my blog
--freely make, sale and/or give away your finished product

Wednesday, March 1, 2017

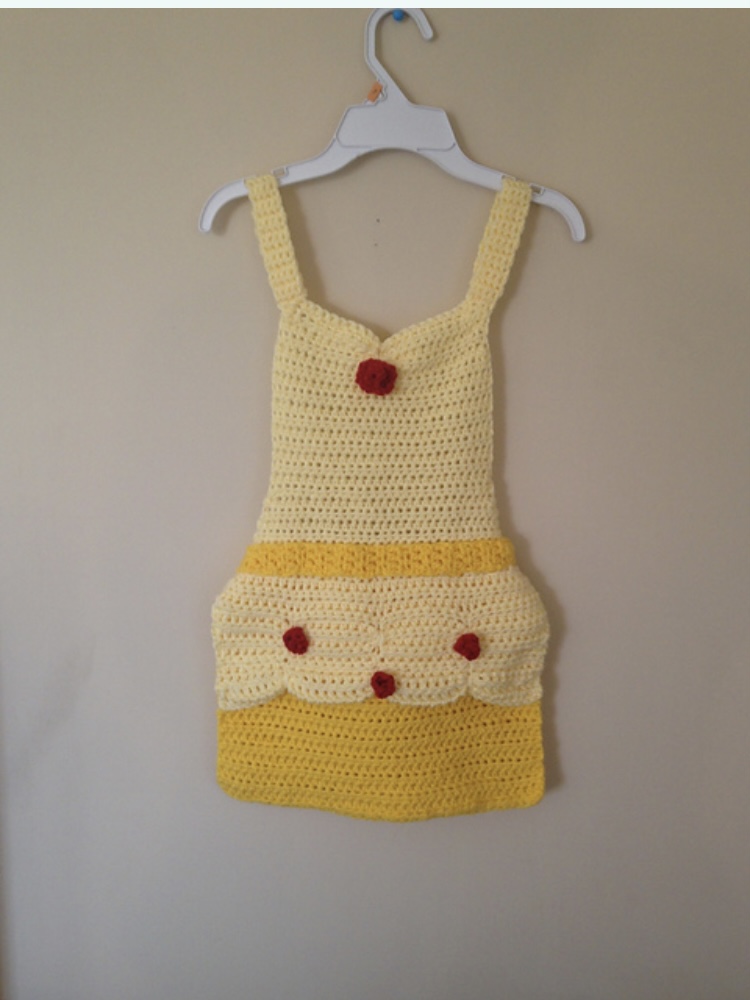
Beauty and the Beast Aprons - Belle & Prince Adam...

Beauty and the Beast Aprons - 
Belle & Prince Adam...

The aprons for each of these turned out so super cute. I have listed this as one combined pattern in my Etsy shop.

Each of these patterns took a lot of time to work on to create the design. I hope you all will love this as much as I do.  

Here's the link if you're interested:

--  Belle's Apron is sized 2T-5 and can easily be adjusted for a smaller or bigger size. 


--  Prince Adam, the Beast, is sized 4-8 year olds.  This apron, too, can easily be adjusted. 

Aren't these so cute?  I absolutely love each of them. 

 Happy Crocheting...

Legal:
--don't use/claim my design as your own
--don't use/claim my pics as your own
--okay to make and sale your finished work
--don't share my pattern electronically or in print format (without prior consent) but provide a link to my blog

Social Media:
If you are on the following sites, let's connect and hook up...
  • Instagram:  Rilla2u
  • Pinterest:  Rilla2u
  • Twitter:  Rilla2u
  • Facebook:  /rilla.edwards 
  • Etsy:  rilla2u 
  • TikTok:  rillae2u