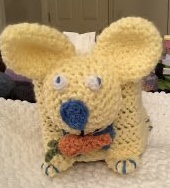
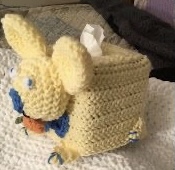
This was fun and quick to make...
Easter Bunny Tissue Box Cover
Materials:
--5mm hook
--4mm hook (for eyes, nose and carrot)
--#4 worsted weight yarn; I used I Love This Yarn (yellow, blue, green, white and orange)
--tapestry needle for weaving
--tissue box (size approx. 4.5" x 5")
--small amount of polyfil
Abbreviations:
Ch: chain
Sl st: slip stitch
HHDC: Herringbone Half Double Crochet
MR: magic ring
SC: single crochet
Dec: decrease
Special Stitch: HHDC - yarn over, insert hook into next stitch, yarn over, draw through stitch and first loop on the hook, yarn over and draw through remaining two loops on hook
Directions:
Sides (made in 1 piece)
1. With yellow yarn, ch 56. HHDC into the 2nd st from the hook and across. Ch1. Turn. (55)
2. 1 HHDC in each st across. Ch1. Turn. (55)
3-13. Repeat #2. Fasten off. Leave a long tail to attach the rectangle piece around the sides of the tissue box. (55)
Top
1. Ch15. HHDC into the 2nd st from the hook and across. Ch1. Turn. (14)
2-5. 1 HHDC in each st across. Ch1. Turn. (14)
6. 1 HHDC into the first 4 stitches, Ch6, skip 6, 1 HHDC into each of the last 4 stitches. Ch1. Turn. (14)
7. 1 HHDC in first 4 stitches, 6 HHDC into the Ch6 and 1 HHDC into each of the last 4 stitches. Ch1. Turn. (14)
8-12. 1 HHDC in each st across. Ch1. Turn. At the end of Row 12, leave a long tail for attaching the top to the sides. (14)
Bunny
Ears (make 2):
1. 6 HHDC into MR. Sl st to join to first st. Ch1. (6)
2. 2 HHDC into each st around. Sl st to join. Ch1. (12)
3. 2 HHDC into first st, 1 HHDC into the next st. Repeat around. Sl st to join. Ch1. (18)
4-6. 1 HHDC in each st around. Sl st to join. Ch1. (18)
7. HHDC2tog, 1 HHDC into next st. Repeat around. Sl st to join. Ch1. (12)
8. 1 HHDC into each st around. Sl st to join. Fasten off. Leave a long enough tail to attach to the bunny's head. (12)
Face:
1. 6 HHDC into MR. Sl st to join to first st. Ch1. (6)
2. 2 HHDC into each st around. Sl st to join. Ch1. (12)
3. 2 HHDC into first st, 1 HHDC into the next st. Repeat around. Sl st to join. Ch1. (18)
4. 2 HHDC into first st, 1 HHDC into the next 2 st. Repeat around. Sl st to join. Ch1. (24)
5. 2 HHDC into the first st, 1 HHDC into the next 3 st. Repeat around. Sl st to join. Ch1. (30)
6-7. 1 HHDC in each st around. Sl st to join. Ch1. (30)
8. HHDC2tog, 1 HHDC into the next 3 st. Repeat around. Sl st to join. Ch 1. (24)
9. HHDC2tog, 1 HHDC into the next 2 st. Repeat around. Sl st to join. Ch1. (18)
10. HHDC2tog. Repeat 8 more times. Sl st to join. Fasten off. Leave a long tail for weaving the last row to close after stuffing with polyfil and for attaching to the side of the tissue box. (9)
Eyes:
1. With 4mm hook and white yarn, 6 SC into MR. Sl st to join. Fasten off. I used tapestry needle to thread through blue yarn for eye color. (See pic)
Nose:
1. With 4mm hook and blue yarn, Ch2. Sc in 2nd Ch from hook. Ch1. Turn. (1)
2. 2 SC into st. Ch1. Turn. (2)
3. 2 SC into first st. 1 SC in next next. Ch1. Turn. (3)
4. SC around the perimeter. Fasten off. Leave a tail for attaching to face.
Feet (make 4):
1. With 5mm hook and yellow yarn, 3 HHDC into MR. Sl st to join. Ch1. (3)
2. 2 HHDC into each st around. Sl st to join. Ch1. (6)
3. 2 HHDC into first st, 1 HHDC into next st. Repeat around. Sl st to join. Ch1. (9)
4. 1 HHDC into each st around. Sl st to join. Fasten off. Leave a long tail for attaching 2 feet at the front of the box and the other 2 will go on each side positioned at the back side. I weaved blue yarn in and out at the tips of the feet to make it look like toes.
Carrot:
1. With 4mm hook and orange yarn, Ch2. SC into 2nd Ch from hook. Ch1. Turn. (1)
2. 2 SC into st. Ch1. Turn. (2)
3. 2 SC into first st, 1 SC into the next st. Ch1. Turn. (3)
4. 2 SC into first st, 1 SC into next st and 2SC in the last st. Ch1. Turn. (5)
5. 2 SC into first st, 1 SC into the next 3 st and 2 SC in the last st. Ch1. Turn. (7)
6. 2 SC into first st, 1 SC into the next 5 st and 2 SC in the last st. Ch1. Turn. (9)
7. 2 SC into the first st, 1 SC into the next 7 st and 2 SC into the last st. Fasten off. Leave a long tail for weaving and attaching. (11)
To form the carrot shape, I rolled the worked piece like a tortilla and then whipstitched it together. It did not require any stuffing.
Carrot top:
1. With 4mm hook and green yarn, Ch4. SC in 2nd Ch from hook and Ch4, sl st into 2nd Ch from hook and remaining 2 Ch; SC into the next base Ch and then Ch4, *sl st into the 2nd Ch from hook and remaining 2 Ch;* SC into the last base Ch and then Ch4, and repeat from * to *. Fasten off and weave ends.
Bowtie:
1. With 5mm hook and blue yarn make a MR. I worked 10 triple crochet stitches into the MR. Fasten off leaving a tail long enough to whip around the center to form the bowtie shape and to attach to the tissue box.
Tail:
I wrapped blue yarn around 3 of my fingers around 30 times. I left a long tail to tie a knot in the center and then trimmed the ends and ruffled to make the pompom.
Assembly:
See pics for how and where I placed my parts. For the mouth, I just embroidered it. I attached the carrot at the mouth.
Overall, this was fairly simply to make. I chose to make mine a yellow bunny but feel free to use whatever colors you want. If you are not comfortable with the HHDC stitch, then you can simply replace it with the HDC stitch.
Legal:
--feel free to use my pattern to make and sale your finished product(s)
--don't use my pics
--don't claim pattern as your own
--please link to my blog
If you use my pattern, please share your pics to either my blog, on Ravelry (rilla2u) or hashtag (#rilla2u) on Instagram. Please Pin this to your board on Pinterest. Thanks so much and blessings to you.
Happy Crocheting!!!


No comments:
Post a Comment