

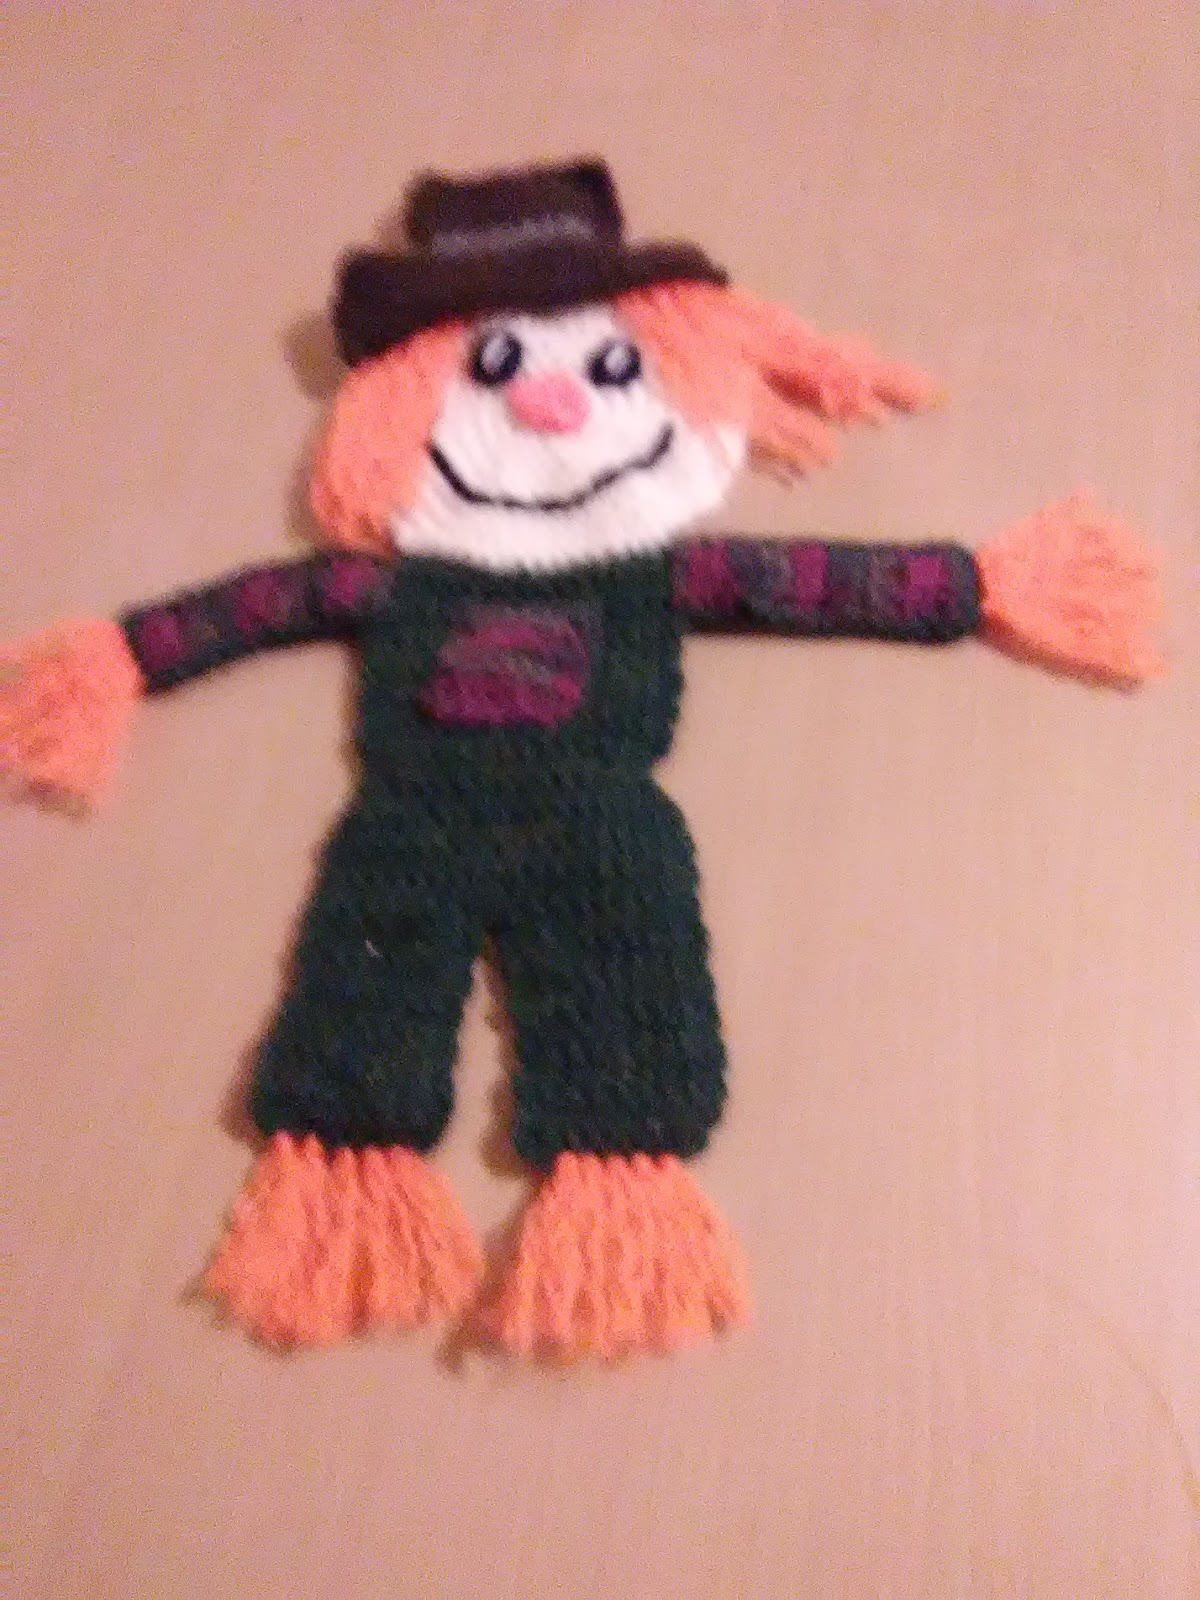
With Fall season here, I wanted to make a Scarecrow. I've been days throwing ideas back and forth in my head until, finally, I settled on making a "Scarecrow Doll." He measures approximately 19" long. He's super cute and sure to please my grandchildren to hug up with when they take their afternoon naps.
I used "I Love This Yarn" from Hobby Lobby, polyfil to stuff, 1 button to accent the hat and a 4.5mm hook. I started on him yesterday evening and finished him up earlier today. So, this is a pretty quick and simple pattern. You can use any #4 worsted weight stash yarn you have on hand. It doesn't use a lot of any one color.


Size: approximately 19" long
Materials:
--4.5mm hook
--#4 worsted weight yarn (Terra Cotta, Orange, Black, White, Medium Blue, Green/Gold, Taupe/Tan and a pale/light yellow skin color) -- not a lot of each color; the most used was the body/leg portion - approx. 110 - 150 yds and the face - 80 - 11 yds
--1 decorative button (on hat)
--tapestry needle for weaving
U.S. Stitch Abbreviations:
Ch: chain
Sl st: slip stitch
St: stitch(es)
SC: single crochet
SC2tog: single crochet 2 stitches together (creates a decrease)
BLO: back loops only
Rep: repeat
MR: magic ring
FO: fasten off
Directions:
Head (make 2):
(Note: I used a pale yellow color. Any skin color yarn will work just fine. I worked the head portion in the round; so use a stitch marker to keep track of beginning/ending stitch)
1. 8 SC to MR. (8)
2. 2 SC in each st around. (16)
3. 2 SC in first st, 1 SC in next st. Rep around. (24)
4. 2 SC in first st, 1 SC in next 2 st. Rep around. (32)
5. 2 SC in first st, 1 SC in next 3 st. Rep around. (40)
6. 2 SC in first st, 1 SC in next 4 st. Rep around. (48)
7. 2 SC in first st, 1 SC in next 5 st. Rep around. (56)
8. 2 SC in first st, 1 SC in next 6 st. Rep around. (64)
9. 2 SC in first st, 1 SC in next 7 st. Rep around. Join to first st with a sl st and FO. Weave ends. (72)
Hat (make 2):
1. With Terra Cotta yarn, Ch21. SC in 2nd ch from hook and across. Ch1 and turn. (20)
2. SC across. Ch1 and turn. (20)
3-5. Rep #2. At the end of Row 5, FO and weave ends.
6. With Taupe/Tan yarn, join in the 5th st (Sk 4 st) with a sl st and ch1. SC in same st and into the next 11 st. Ch1 and turn. (12)
7. SC across. FO and weave ends. (12)
8. Re-join Terra Cotta yarn. SC across. Ch1 and turn. (12)
9-15. SC across. Ch1 and turn. At the end of Row 15, FO and weave ends.
 Body (make 2):
1. Join Medium Blue yarn into any stitch with a sl st into the BLO of Round 9 of the Head. Into the BLO, SC in same and into the back loops of the next 15 st. Ch1 and turn.
2. SC across. Ch1 and turn. (16)
3-13. Rep # 2. (16)
14. SC2tog, 1 SC in the next 12 st, SC2tog. Ch1 and turn. (14)
15. SC2tog, 1 SC in the next 10 st, SC2tog. Ch1 and turn. (12)
16. 2 SC in the first st, 1 SC in the next 10 st, 2 SC in the last st. Ch1 and turn. (14)
17. 2 SC in the first st, 1 SC in the next 12 st, 2 SC in the last st. Ch1 and turn. (16)
18. 2 SC in the first st, 1 SC in the next 14 st, 2 SC in the last st. Ch1 and turn. (18)
19. SC across. Ch1 and turn. (18)
20-24. Rep #19.
First Leg:
25. SC in the first 7 st, 2 SC in the next st. Ch1 and turn. (9)
26. SC across. Ch1 and turn. (9)
27. SC across. Ch1 and turn. (9)
28. SC2tog, 1 SC in the next 7 st. Ch1 and turn. (8)
29. SC across. Ch1 and turn. (8)
30-36. Rep #29. At the end of Row 36, FO and weave ends. (8)
Second Leg:
Join yarn at the other end of Row 24 and Rep steps #25 - 36 for the second leg.
 Now, center hat at the top and whipstitch to attach. I placed Row 1 of Hat to Round 7 of Head, with 2 stitches on each end of the hat hanging over.
By now, you should have 2 completed/attached Hat to Head to Body pieces (Front section and Back section)
Arms:
1. Join Green/Gold (or your color of choice) to the first side stitch of the body with a sl st and ch1. SC in same st. SC in the next 3 st. Ch1 and turn. (4)
2. SC across. Ch1 and turn. (4)
3-16. Rep #2. At the end of Row 16, FO and weave ends.
Repeat on the opposite side of Body. And, then repeat again on the second Body piece.

Now, that the arms are attached, you will be adding the facial features to only one of the Head sections.
Eyes:
1. With Black yarn, 6 SC into MR. Sl st join to first st and FO. Leave a tail for attaching. (6)
2. I used White yarn to embroider a pupil.
3. Attach eyes at Rounds 4-5 of the Head.
Nose:
1. With Orange yarn, Ch4. SC in 2nd ch from hook and across. Ch1 and turn. (3)
2. SC2tog, SC in next st. Ch1 and turn. (2)
3. SC2tog. FO and leave a tail for attaching.
4. Attach nose to center of Head at Round 1.
Mouth:
For the mouth, I used Black yarn and embroidered a smile, then continued to make the mouth to look like stitches.
Patch:
1. With Green/Gold yarn, Ch7. SC in 2nd ch from hook and across. Ch1 and turn. (6)
2. SC across. Ch1 and turn. (6)
3-6. Rep #2. (6)
7. SC evenly around. FO and leave a tail for attaching to center front of Body.
 Now, you are ready to attach the Front and Back sections together. With the Front section facing me, I joined Terra Cotta yarn on the right side, bottom of hat with a sl st and Ch1. SC in same. I then SC joined my 2 sections together, changing colors, where needed, to match up with each area. As you join the 2 pieces together, add your polyfil (or your stuffing of choice). For the arms, I had to stuff small amounts at a time to get it in.
Finally, you are ready to attach hair, fingers and toes.
Hair:
For the hair, I joined yarn and tied into a double knot. I then used my tapestry needle to fray the yarn. I repeated this 3 more times - for a total of 4 times on one side. I then repeated the process on the opposite side of the face.
Fingers:
1. With Orange yarn, I joined yarn on the arm end. *Ch6. Sl st into 2nd ch from hook and next 4 ch. Sl st into the base stitch of the arm. Sl st into the next st.* Rep from * to * until you have 4 fingers made.
2. Repeat on opposite arm.
Feet:
I gave my Scarecrow 6 feet. The feet are made the same way as the fingers were made.
Last, I added a decorative Pumpkin button to the hat. And, that's it for this super simple and cute "Scarecrow Doll."
I hope you all will enjoy this little guy as much as I did in designing him.

Here’s a picture from fellow crocheter, Janis Saunders. She made her scarecrow into a wall/door hanging. Awesome job:

I used "I Love This Yarn" from Hobby Lobby, polyfil to stuff, 1 button to accent the hat and a 4.5mm hook. I started on him yesterday evening and finished him up earlier today. So, this is a pretty quick and simple pattern. You can use any #4 worsted weight stash yarn you have on hand. It doesn't use a lot of any one color.
Scarecrow Doll


Size: approximately 19" long
Materials:
--4.5mm hook
--#4 worsted weight yarn (Terra Cotta, Orange, Black, White, Medium Blue, Green/Gold, Taupe/Tan and a pale/light yellow skin color) -- not a lot of each color; the most used was the body/leg portion - approx. 110 - 150 yds and the face - 80 - 11 yds
--1 decorative button (on hat)
--tapestry needle for weaving
U.S. Stitch Abbreviations:
Ch: chain
Sl st: slip stitch
St: stitch(es)
SC: single crochet
SC2tog: single crochet 2 stitches together (creates a decrease)
BLO: back loops only
Rep: repeat
MR: magic ring
FO: fasten off
Directions:
Head (make 2):
(Note: I used a pale yellow color. Any skin color yarn will work just fine. I worked the head portion in the round; so use a stitch marker to keep track of beginning/ending stitch)
1. 8 SC to MR. (8)
2. 2 SC in each st around. (16)
3. 2 SC in first st, 1 SC in next st. Rep around. (24)
4. 2 SC in first st, 1 SC in next 2 st. Rep around. (32)
5. 2 SC in first st, 1 SC in next 3 st. Rep around. (40)
6. 2 SC in first st, 1 SC in next 4 st. Rep around. (48)
7. 2 SC in first st, 1 SC in next 5 st. Rep around. (56)
8. 2 SC in first st, 1 SC in next 6 st. Rep around. (64)
9. 2 SC in first st, 1 SC in next 7 st. Rep around. Join to first st with a sl st and FO. Weave ends. (72)
Hat (make 2):
1. With Terra Cotta yarn, Ch21. SC in 2nd ch from hook and across. Ch1 and turn. (20)
2. SC across. Ch1 and turn. (20)
3-5. Rep #2. At the end of Row 5, FO and weave ends.
6. With Taupe/Tan yarn, join in the 5th st (Sk 4 st) with a sl st and ch1. SC in same st and into the next 11 st. Ch1 and turn. (12)
7. SC across. FO and weave ends. (12)
8. Re-join Terra Cotta yarn. SC across. Ch1 and turn. (12)
9-15. SC across. Ch1 and turn. At the end of Row 15, FO and weave ends.

1. Join Medium Blue yarn into any stitch with a sl st into the BLO of Round 9 of the Head. Into the BLO, SC in same and into the back loops of the next 15 st. Ch1 and turn.
2. SC across. Ch1 and turn. (16)
3-13. Rep # 2. (16)
14. SC2tog, 1 SC in the next 12 st, SC2tog. Ch1 and turn. (14)
15. SC2tog, 1 SC in the next 10 st, SC2tog. Ch1 and turn. (12)
16. 2 SC in the first st, 1 SC in the next 10 st, 2 SC in the last st. Ch1 and turn. (14)
17. 2 SC in the first st, 1 SC in the next 12 st, 2 SC in the last st. Ch1 and turn. (16)
18. 2 SC in the first st, 1 SC in the next 14 st, 2 SC in the last st. Ch1 and turn. (18)
19. SC across. Ch1 and turn. (18)
20-24. Rep #19.
First Leg:
25. SC in the first 7 st, 2 SC in the next st. Ch1 and turn. (9)
26. SC across. Ch1 and turn. (9)
27. SC across. Ch1 and turn. (9)
28. SC2tog, 1 SC in the next 7 st. Ch1 and turn. (8)
29. SC across. Ch1 and turn. (8)
30-36. Rep #29. At the end of Row 36, FO and weave ends. (8)
Second Leg:
Join yarn at the other end of Row 24 and Rep steps #25 - 36 for the second leg.

By now, you should have 2 completed/attached Hat to Head to Body pieces (Front section and Back section)
Arms:
1. Join Green/Gold (or your color of choice) to the first side stitch of the body with a sl st and ch1. SC in same st. SC in the next 3 st. Ch1 and turn. (4)
2. SC across. Ch1 and turn. (4)
3-16. Rep #2. At the end of Row 16, FO and weave ends.
Repeat on the opposite side of Body. And, then repeat again on the second Body piece.

Eyes:
1. With Black yarn, 6 SC into MR. Sl st join to first st and FO. Leave a tail for attaching. (6)
2. I used White yarn to embroider a pupil.
3. Attach eyes at Rounds 4-5 of the Head.
Nose:
1. With Orange yarn, Ch4. SC in 2nd ch from hook and across. Ch1 and turn. (3)
2. SC2tog, SC in next st. Ch1 and turn. (2)
3. SC2tog. FO and leave a tail for attaching.
4. Attach nose to center of Head at Round 1.
Mouth:
For the mouth, I used Black yarn and embroidered a smile, then continued to make the mouth to look like stitches.
Patch:
1. With Green/Gold yarn, Ch7. SC in 2nd ch from hook and across. Ch1 and turn. (6)
2. SC across. Ch1 and turn. (6)
3-6. Rep #2. (6)
7. SC evenly around. FO and leave a tail for attaching to center front of Body.

Finally, you are ready to attach hair, fingers and toes.
Hair:
For the hair, I joined yarn and tied into a double knot. I then used my tapestry needle to fray the yarn. I repeated this 3 more times - for a total of 4 times on one side. I then repeated the process on the opposite side of the face.
Fingers:
1. With Orange yarn, I joined yarn on the arm end. *Ch6. Sl st into 2nd ch from hook and next 4 ch. Sl st into the base stitch of the arm. Sl st into the next st.* Rep from * to * until you have 4 fingers made.
2. Repeat on opposite arm.
Feet:
I gave my Scarecrow 6 feet. The feet are made the same way as the fingers were made.
Last, I added a decorative Pumpkin button to the hat. And, that's it for this super simple and cute "Scarecrow Doll."
I hope you all will enjoy this little guy as much as I did in designing him.

Here’s a picture from fellow crocheter, Janis Saunders. She made her scarecrow into a wall/door hanging. Awesome job:
Happy Crocheting...
Legal:
--don't use/claim my design as your own
--don't use/claim my pics as your own
--okay to make and sale your finished work
--don't share my pattern electronically or in print format (without prior consent) but provide a link to my blog
Do you have a girl pattern ? My friend says he needs a wife.
ReplyDeleteNot yet, but I was thinking the same thing just the other day. I have an idea for one. As soon as I can make her and type up the pattern, I will share.
DeleteI made the Scarecrow. I don't know how to send a pic on here please tell me how I can send it to you. I didn't stuff because I just moved and can't find my fiberfill. I left him flat. I'm going to hang him on the door. Thank you
DeleteOh, that’s a great idea, too, to hang him up. Send pic to my email and I will add it. Rilla2u@gmail.com
Delete