Tuesday, October 23, 2018

Snowman Popcorn Tin Cover

I've had this popcorn contain/tin sitting in my bedroom since last Christmas waiting for inspiration to strike on how to re-purpose this into something cute and usable.  Well, this morning, I ran out of a yarn color for my C2C Snowman Blanket and I decided it was time to do something with this empty container.  So, I settled on a cover - a Snowman, of course...lol.

Snowmen are just adorable, whether you're making a blanket, pillow, cozies, hot pads, softies, amigurumi, etc. -- they, simply, look good, in any fashion and form, in my opinion.

And, now, here is a perfect and easy pattern to whip up for the Popcorn Container that is already on display at most stores.  I'm usually gifted one every year from someone.  Well, if you are one to gift the Popcorn Container - now, you can include a little bit of crochet with it to jazz it up, plus no worries on wrapping a cylinder-shaped item.  Or, if you have several of these empty - you could make the Snowman Cover and fill with your own array of goodies...

I used Bernat Blanket yarn in colors I already had on hand.  So, please feel free to make and share pictures of your finished project in your colors of choice. 

I hope you all will enjoy this fun project.
Snowman Popcorn Tin Cover Pattern
Size:  Approximately 13" tall from top of hat to bottom

Gauge:  6 HDC stitches x 6 Rounds = 4"

Materials:
--10.0mm hook
--(1) skein each of Bernat Blanket Yarn in Vintage White, Purple Plum, Black and Pumpkin Spice (the pattern uses very little Pumpkin Spice and Purple Plum)
--Popcorn Tin Container (18.5 oz container)
--Small amount of Polyfil (for stuffing the hat)
--7" diameter of felt or fabric (for the hat)
--Tapestry needle for weaving

U.S. Stitch Abbreviations:
Ch:  chain
Sl st:  slip stitch
St:  stitch(es)
SC:  single crochet
HDC:  half double crochet
FLO:  front loops only
BLO:  back loops only
Rep:  repeat
MR:  magic ring
FO:  fasten off
Directions:
Snowman Cover:
1.  With Vintage White, 8 HDC into MR.  Sl st join to first st and Ch1.  (8)
2.  2 HDC into each st around.  Sl st join to first st and Ch1.  (16)
3.  2 HDC into the first st, 1 HDC into the next st.  Rep around.  Sl st join to first st and Ch1.  (24)
4.  2 HDC into the first st, 1 HDC into the next 2 st.  Rep around.  Sl st join to first st and Ch1.  (32)
5.  2 HDC into the first st, 1 HDC into the next 3 st.  Rep around.  Sl st join to first st and Ch1.  (40)
6.  2 HDC into the first st, 1 HDC into the next 4 st.  Rep around.  Sl st join to first st and Ch1.  (48)
7.  Working in the BLO, 1 HDC in each st around.  Sl st join to first st and Ch1.  (48)
8-10.  1 HDC in each st around.  Sl st join to first st and Ch1.  At the end of Round 10, FO Vintage White.  Join Purple Plum and Ch1.  (48)
11-12.  With Purple Plum, 1 HDC in each st around.  Sl st join to first st and Ch1.  At the end of Round 12, FO Purple Plum.  Re-join Vintage White and Ch1.  (48)

13-17.  1 HDC in each st around.  Sl st join to first st and Ch1.  At the end of Round 17, FO and weave ends.  (48)
 

Eyes (make 2):
1.  With Black yarn, 6 SC into MR.  Sl st join to first st and FO.  Leave a long tail for attaching.  (6)

Nose:
1.  With Pumpkin Spice yarn, Ch2.  1 SC in 2nd ch from hook.  Ch1 and turn.  (1)
2.  2 SC in st.  Ch1 and turn.  (2)
3.  2 SC in first st, 1 SC in next st.  FO and leave a long enough tail for attaching.  (3)

Belly Button (1):
1.  With Black yarn, 6 SC into MR.  Sl st join to first st and FO.  Leave a long enough tail for attaching.  (6)

See my pictures for help with Eyes, Nose and Belly button placement.  Eyes at Rounds 15-17, with 5 stitch space between the eyes.  The Nose is at Rounds 13-14.  The Belly Button is at Rounds 8-9. 

Scarf End:
1.  With Purple Plum, Ch19.  1 SC in 2nd ch from hook and across.  FO and weave ends.  (18)
2.  I weaved strands of yarn on each end to make fringe.  I made 5 fringe for each end.
3.  I folded in half at the center and whipstitch attached to the left side of my Snowman Cover at Rounds 11-12.
 
Top Hat:
1.  With Black yarn, 10 HDC st into MR.  Sl st join to first st and Ch1.  (10)
2.  2 HDC in each st around.  Sl st join to first st and Ch1.  (20)
3.  2 HDC in first st, 1 HDC in next st.  Rep around.  Sl st join to first st and Ch1.  (30)
4.  Work this round in the BLO.  1 HDC in each st around.  Sl st join to first st and Ch1.  (30) 
5-9.  1 HDC in each st around.  Sl st join to first st and Ch1.  (30) 
10.  Work this round in the FLO.  2 HDC in first st, 1 HDC in next st.  Rep around.  Sl st join to first st and Ch1.  (45) 
11.  2 HDC in first st, 1 HDC in next 2 st.  Rep around.  Sl st join to first st and Ch1.  (60) 
12.  2 HDC in first st, 1 HDC in next 3 st.  Rep around.  Sl st join to first st and FO.  Weave ends. (75) 
13.  I stuffed the center portion of the hat with Polyfil so it would stand tall and firm.  
14.  Now, you will need a piece of felt or fabric or make a crochet ring.  Whatever medium you decide to use, you will need to cut it circular - approx. 7" diameter.  You will then need to either glue or sew it to the inside of your hat - this is to keep the Polyfil secure.  
15.  I haven't secured my hat to the Tin lid yet.  I'm not sure if I want to glue it to the lid or if I want to add Velcro dots to the center.  Or, you could opt to leave it freestanding.  

Now, you could add a little more detail to the hat if you so desired - flowers, holly, a little bird.  I'd 
love to see what you all do with this pattern.  So, please share your pictures.  If you're on Instagram, then please HASHTAG to #rilla2u

  
********** 
I received this gorgeous picture of the Snowman Popcorn Tin Cover from Debbie Semones Bowman in Maryland.  I absolutely love her Snowman...
Debbie stated, “Snowman I made following your pattern....Love how it turned out!”
**********
Happy Crocheting...

Legal:
--don't use/claim my design as your own
--don't use/claim my pics as your own
--okay to make and sale your finished work
--don't share my pattern electronically or in print format (without prior consent) but provide a link to my blog

Social Media:
If you are on the following sites, let's connect and hook up...
  • Instagram:  Rilla2u
  • Pinterest:  Rilla2u
  • Twitter:  Rilla2u
  • Facebook:  /rilla.edwards

Sunday, October 21, 2018

Pompom Christmas Tree

I was at Hobby Lobby last week, and just oohed and aahed over all of the gorgeous Christmas decorations they have on display.

I decided to buy a Styrofoam Cone - 3.8" x 8.8" size.  It was $3.99 and 40% off.  I decided to put a skein of RHSS yarn - in Mistletoe - to good use by making poms for my tree.  Now, of course, you can use a pompom maker, which will highly likely make your poms much prettier than mine.  But, for me, I just wrapped the yarn around 3 of my fingers 40 times, double tied in a knot at its center and trimmed the ends.

This is going to be a great addition to my Christmas Town collection... 

Pompom Christmas Tree 


Size:  Styrofoam Cone is 8.8" tall; with the star it's approximately 12" tall.

Gauge:  Not applicable

Materials:
--Styrofoam Cone
--RHSS yarn in Mistletoe and Yellow
--4.0mm hook (for making the star)
--Craft glue and pins
--tapestry needle for weaving ends of the star

U.S. Stitch Abbreviations:
Ch:  chain
Sl st:  slip stitch
St:  stitch(es)
SC:  single crochet
HDC:  half double crochet
DC:  double crochet
TC:  triple crochet
MR:  magic ring
FO:  fasten off
Rep:  repeat
Sk:  skip

Directions:

Pompoms:
1.  Use a pom maker or make them as I stated above by wrapping around 3 of your fingers 40 times.  
2.  I made 20+ poms.  I honestly did not count mine.  I just made and added them to my cone as I went along.  

Assembly:
1.  I used craft glue to attach the poms to the cone.  I then used stick pins to secure them until the glue set up.  
Star (make 2):
1.  With Yellow yarn and 4.0mm hook, 6 SC st into a MR.  Sl st join to the first st and ch 1.  (6)
2.  2 SC st in each st around.  Join and ch 1.  (12)
3.  2  SC st in the first st, 1 SC st in the next st.  Rep this pattern around.  Join.  (15)
4.  *Ch 5.  SC in the 2nd ch from hook, HDC in the next ch, DC in the next ch and TC in the last ch.  Sk 2 st of Round 3 and sl st into the next st.* Rep from * to * around.  You will have 5 star points made.

Assembly:
1.  Make 2 stars and whipstitch together.  Before closing up, I added a small ball of the yellow yarn to the center.  Of course, you can use polyfil, but I just decided on using the yellow yarn since it was handy.  
And, that's it for this super cute and quick project for Christmas decor.  I'm working on a plaid Christmas tree skirt for it.  This makes a great centerpiece for your table or basically anywhere in your house.  

I hope you all will enjoy this.  Share your pictures.  I'd love to see your creations.
Happy Crocheting...
Legal:
--don't use/claim my design as your own
--don't use/claim my pics as your own
--okay to make and sale your finished work
--don't share my pattern electronically or in print format (without prior consent) but provide a link to my blog

Christmas Cheer Cuddlers - Turkey

With all the Fall decorations, I've been working on that's been more geared toward Halloween, I decided to make a "Turkey Pal."  He makes a great little snuggle buddy, cuddler, toy or throw pillow/shelf sitter.  He measures approximately 10" tall from the top of his head to the bottom.

The Turkey Cuddler is made Rag Doll style so it's not overly stuffed with Polyfil.  It's more flat style.  

Christmas Cheer Cuddlers - Turkey Pattern

Size:  approximately 10" tall

Gauge:  Not important for this project

Materials:
--4.0mm & 5.0mm hooks
--#4 worsted weight yarn (I used Lion Brand yarn in Chocolate to make the turkey itself; I then used a variety of #4 worsted weight yarn colors I had on hand to make the remaining features)
--2 black safety eyes (optional); you could opt to make crocheted eyes
--Polyfil
--tapestry needle for weaving

U.S. Stitch Abbreviations:
Ch:  chain
Sl st:  slip stitch
St:  stitch(es)
SC:  single crochet
SC2tog:  single crochet 2 stitches together
SC3tog:  single crochet 3 stitches together
DC:  double crochet
Sk:  skip
Rep:  repeat
MR:  magic ring
FO:  fasten off

Directions:
Head/Body Panel (make 2):
1.  With Chocolate yarn and 5.0mm hook, Ch15.  SC in 2nd ch from hook and across.  Ch1 and turn.  (14)
2.  1 SC in each st across.  Ch1 and turn.  (14)
3.  2 SC in first st, 1 SC in next 12 st, 2 SC in last st.  Ch1 and turn.  (16)
4.  2 SC in first st, 1 SC in next 14 st, 2 SC in last st.  Ch1 and turn.  (18)
5.  2 SC in first st, 1 SC in next 16 st, 2 SC in last st.  Ch1 and turn.  (20)
6-20.  1 SC in each st across.  Ch1 and turn.  (20)
21.  SC2tog, 1 SC in next 16 st, SC2tog.  Ch1 and turn.  (18)
22.  SC2tog, 1 SC in next 14 st, SC2tog.  Ch1 and turn.  (16)
23.  SC2tog, 1 SC in next 12 st, SC2tog.  Ch1 and turn.  (14)
24.  SC2tog, 1 SC in next 10 st, SC2tog.  Ch1 and turn.  (12)
25.  1 SC in each st across.  Ch1 and turn.  (12)
26.  2 SC in first st, 1 SC in next 10 st, 2 SC in last st.  Ch1 and turn.  (14)
27.  2 SC in first st, 1 SC in next 12 st, 2 SC in last st.  Ch1 and turn.  (16)
28-35.  1 SC in each st across.  Ch1 and turn.  (16)
36.  SC2tog, 1 SC in next 12 st, SC2tog.  Ch1 and turn.  (14)
37.  SC2tog, 1 SC in next 10 st, SC2tog.  Ch1 and turn.  (12)
38.  SC2tog, 1 SC in next 8 st, SC2tog.  Ch1 and turn.  (10)
39.  1 SC in each st across.  FO and weave ends.  (10)

Beak:
1.  With Orange yarn and 4.0mm hook, Ch6.  SC in 2nd ch from hook and across.  Ch1 and turn.  (5)
2.  1 SC in each st across.  Ch1 and turn.  (5)
3.  SC2tog, 1 SC in next st, SC2tog.  Ch1 and turn.  (3)
4.  SC3tog.  Ch1 and turn.  (1)
5.  SC in each st around.  FO and leave a long enough tail for attaching.

Wattle:
1.  With Red yarn and 4.0mm hook, Ch7.  Sl st in 2nd ch from hook.  DC into each of the next 3 ch.  HDC into next ch.  Sl st into the last ch.  FO and leave a long enough tail for attaching.  (6)

Feet (make 2):
1.  With Orange yarn and 4.0mm hook, Ch3.  SC in 2nd ch from hook and next ch.  Ch1 and turn.  (2)
2.  2 SC in first st, 1 SC in next st.  Ch1 and turn.  (3)
3-5.  1 SC in each st across.  Ch1 and turn.  (3)
6.  2 SC in first st, 1 SC in next st, 2 SC in last st.  Ch1 and turn.  (5)
7.  1 SC in each st across.  Ch1 and turn.  (5)
8.  2 SC in first st, 1 SC in next 3 st, 2 SC in last st.  Turn.  (7)
9.  Ch3 (counts as DC), 2 DC in first st.  Sl st into each of the next 2 st.  3 DC into next st.  Sl st into each of the next 2 st.  3 DC in the last st.  FO and leave and long enough tail for attaching.

Bowtie:
1.  With Turquoise yarn and 5.0mm hook, make a MR and Ch3.  3 DC into MR.  Sl st into MR.  Ch3.  3 DC into MR.  Sl st into MR.  Pull tail to tighten and wrap around the center several times.  FO and leave a long enough tail for attaching.

Feathers (make 6):
For my feathers, I used light purple, red, green, yellow, pink and turquoise colors of yarn.
1.  6 SC into MR.  Sl st join to first st and Ch1.  (6)
2-8.  1 SC in each st around.  Sl st join to first st and Ch1.  At the end of Round 8, FO and leave a long enough tail for attaching.  (6)

Wings (make 2):
1.  With Chocolate yarn and 5.0mm hook, 6 SC into MR.  Sl st join to first st and Ch1.  (6)
2.  2 SC in first st, 1 SC in next st.  Rep around.  Sl st join to first st and Ch1.  (9)
3-7.  1 SC in each st around.  Sl st join to first st and Ch1.  At the end of Round 7, FO and leave a long enough tail for attaching.  (9)

Assembly:
1.   You will use one panel to attach the eyes (at Round 34-35), with 6 stitches between them; the beak, wattle, bowtie and feet.  (see my pics to help you with placement.
2.  I whipstitched my 2 panels together, and pinned/worked the wings and feathers between the 2 panels.  Now, you can use the single crochet stitch, if you want, to join the 2.  Before you finish up joining the 2 panels, you will want to stuff with polyfil.  Remember, don't overly stuff, since this is made in the Rag Doll style.
Backside View

How cute is my Turkey Pal?  I think he's adorable and looks so cute beside my Scarecrow.  I'd love to see pictures of your finished projects.  PIN now and make later if you're pressed for time...
Happy Crocheting...

Legal:
--don't use/claim my design as your own
--don't use/claim my pics as your own
--okay to make and sale your finished work
--don't share my pattern electronically or in print format (without prior consent) but provide a link to my blog


Saturday, October 20, 2018

Fox Apron

I'm in love with foxes - OR, it could simply just be the yarn colors that I'm fascinated with.  Either way, I know I do a lot of FOX projects, but, I'm okay with that...lol.

My newest FOX project is this super cute, Fox Apron - use in the kitchen, play dress up or wear as a costume.  However or wherever/whenever you choose to wear this, you are sure to look sly and foxy...

If you would like the PDF, Ad-Free version of this pattern, it is listed in my ETSY Shop for $1.99.  Any support is greatly appreciated.  Here is the LINK to my Etsy Shop...

Fox Apron Pattern
Size:  26" long

Gauge:  6 HDC stitches x 5 rows = 2"

Materials:
—6.5mm hook
—3.0mm hook (for inner ear portion)
—(1) skein each of "I Love This Yarn" (Hobby Lobby) in Terra Cotta, Black and White
—tapestry needle for weaving

U.S. Stitch Abbreviations:
Ch:  chain
Sl st:  slip stitch
St:  stitch(es)
SC:  single crochet
SC2tog:  single crochet 2 stitches together
SC3tog:  single crochet 3 stitches together
HDC:  half double crochet
BLO:  back loops only
FLO:  front loops only
Rep:  repeat
Sk:  skip
FO:  fasten off

Directions:
The apron is worked from the top, down.
1.  With Terra Cotta, Ch 26.  HDC in 2nd ch from hook and across OR 25FHDC.  Ch1 and turn.  (25)
2-4.  1 HDC in each st across.  Ch1 and turn.  (25)
5.  2 HDC in first st, 1 HDC in next 23 st, 2 HDC in last st.  Ch1 and turn.  (27)
6.  2 HDC in first st, 1 HDC in next 25 st, 2 HDC in last st.  Ch1 and turn.  (29)
7.  2 HDC in first st, 1 HDC in next 27 st, 2 HDC in last st.  Ch1 and turn.  (31)
8-12.  1 HDC in each st across.  Ch1 and turn.  (31)
13.  2 HDC in first st, 1 HDC in next 29 st, 2 HDC in last st.  Ch1 and turn.  (33)
14.   2 HDC in first st, 1 HDC in next 31 st, 2 HDC in last st.  Ch1 and turn.  (35)
15.   2 HDC in first st, 1 HDC in next 33 st, 2 HDC in last st.  Ch1 and turn.  (37)
16.   2 HDC in first st, 1 HDC in next 35 st, 2 HDC in last st.  Ch1 and turn.  (39)
17.   2 HDC in first st, 1 HDC in next 37 st, 2 HDC in last st.  Ch1 and turn.  (41)
18.   2 HDC in first st, 1 HDC in next 39 st, 2 HDC in last st.  Ch1 and turn.  (43)
19.   2 HDC in first st, 1 HDC in next 41 st, 2 HDC in last st.  FO and weave ends.  (45)
20.  Join White yarn and Ch1.  1 HDC in each st across.  Ch1 and turn.  (45)
21-27.  1 HDC in each st across.  At the end of Row 27, FO White yarn and weave ends.  Join black yarn.  (45)
28.  With Black yarn, 1 HDC in each st across.  Ch1 and turn.  (45)
29-34.  1 HDC in each st across.  Ch1 and turn.  At the end of Row 34, FO Black yarn and weave ends.  Join Terra Cotta yarn.  (45)
35.  With Terra Cotta yarn, 1 HDC in each st across.  Ch1 and turn.  (45)
36-47.  1 HDC in each st across.  Ch1 and turn.  At the end of Row 47, FO Terra Cotta yarn and weave ends.  (45)

— SPECIAL NOTE:  if you want your apron to be longer than 26”, then continue with additional rows using the Terra Cotta yarn — before moving on with Row 48...

48.  Work this Row in BLO.  With Black yarn and BLO, 1 HDC in each st across.  Ch1 and turn.  (45)
49-62.  1 HDC in each st across.  Ch1 and turn.  At the end of Row 62, FO and weave ends.  (45)

63.  With Terra Cotta yarn, go back and join in the FLO only of Row 48.  1 SC in each st across.  Ch1 and turn.  (45)
64.  *1 SC in the first st, Sk next st, 5 HDC in the next st, Sk next st.* Rep from * to * across.  Ch1 and turn.
65-70.  Rep #64 across.  At the end of Row 70, FO and weave ends.

Top Border and Neck Strap:
1.  Join Terra Cotta in the first st of Row 1 with a sl st and Ch1.  HDC in same st and into the next 9 st.  Sl st into the next 5 st.  HDC in each of the last 10 st.  Ch1 and turn.  (20 HDC and 5 sl st)
2-3.  Rep #1.
Neck Strap:
4.   HDC in the first 3 st.  Ch1 and turn.
5-35.  Rep #4.  At the end of Row 34, FO and leave a tail to attach to opposite side to make your neck strap.  Prior to joining, make sure the number of rows is enough to comfortably fit around your neck.


Eyes (make 2):
1.  With Black yarn, 6 HDC into MR.  Sl st join to first st and FO.  Leave tail for attaching.  (6)

Nose:
1.  With Black yarn, 6 HDC into MR.  Sl st join to first st and Ch1.  (6)
2.  2 HDC in first st, 1 HDC in next st.  Rep across.  Sl st join to first st.  FO and leave a tail for attaching.  (9)

Outer Ears (make 2):
1.  With Terra Cotta, Ch6.  SC in 2nd ch from hook and across.  Ch1 and turn.  (5)
2.  SC across.  Ch1 and turn.  (5)
3.  SC2tog, 1 SC in next st, SC2tog.  Ch1 and turn.  (3)
4.  SC across.  Ch1 and turn.  (3)
5.  SC3tog.  Ch1 and turn.  (1)
6.  1 SC.  FO and weave ends.  (1)
7.  Join black yarn in any stitch with sl st and ch1.  SC around ear.  Sl st join to first st and FO.  Leave a tail for attaching.

Inner Ear (make 2):
1.  With White yarn and 3.0mm hook, Ch4.  SC in 2nd ch from hook and across.  Ch1 and turn.  (3)
2.  SC across.  Ch1 and turn.  (3)
3.  SC3tog.  FO and leave tail to attach to Outer Ear.  (1)

 
Waist Straps (make one on each side):
1.  Join Black yarn at the end of Row 28 with a sl st and Ch1.  HDC in same st.  HDC in the next 6 end stitches.
2-35.  1 HDC in each st across.  Ch1 and turn.  At the end of Row 35, FO and weave ends. 

Repeat on opposite side.  For the straps, make sure the straps are long enough to secure into a bow around the waist.  You may need to add or reduce the number of rows you need.
Assembly:
1.  Attach Inner Ear to Outer Ear's center.  Then attach each ear to the front of the neck straps on each side.
2.  Attach nose in the center at Rows 18-20.
3.  Attach eyes at Rows 14-15 (see my pics for help with placement).
Hope ya'll will enjoy this Fox Apron as much as I enjoyed designing it!!!


Happy Crocheting...
Legal:
--don't use/claim my design as your own
--don't use/claim my pics as your own
--okay to make and sale your finished work
--don't share my pattern electronically or in print format (without prior consent) but provide a link to my blog


Wednesday, October 17, 2018

Basketball in a Hoop Costume

Basketball has always been my favorite sport. I love it as a fan and a participator. Hubby and I love watching college basketball, especially the UK Wildcats and WV Mountaineers.

My grandson had dismantled (aka tore up...lol) one of those stick up basketball hoops for inside use. I think it may have come from the Dollar Tree or Dollar General Store ($1-$2).  The hoop frame measures approximately 9 1/2" in diameter.  Instead of tossing in the trash, I decided to re-purpose it by making it into a usable costume idea for toddlers and making it functional again as a basketball hoop.


"Basketball in a Hoop" Toddler Costume

Size:  The hoop's diameter is approximately 9 1/2" and will fit most toddlers as a costume

Gauge:  Is not important

Materials:
For the Hat and Hoop Costume:
--6.0mm hook
--#4 worsted weight yarn in white, orange and brown (I used ILTY and Crafter's Secret)
--(1) plastic hoop
--tapestry needle for weaving

For the Basketball:
--4.5mm hook
--#4 worsted weight yarn in orange and brown
--(2) small eyes (optional); you could make crocheted eyes
--Polyfil
--tapestry needle for weaving

U.S. Stitch Abbreviations:
Ch:  chain
Sl st:  slip stitch
St:  stitch(es)
SC:  single crochet
HDC:  half double crochet
SC2tog:  single crochet 2 stitches together (creates a decrease)
Rep:  repeat
Sk:  skip
MR:  magic ring
FO:  fasten off

Directions:
Hat:
  • There are 2 ways you can work this hat - 1.) in the round; if so, use a stitch marker to keep track of the beginning and ending stitch and move the stitch marker up as you start each new round; or 2.) slip stitch join to the first stitch and chain 1.
  • To altar the overall size of your hat, you will need to know the diameter.  To find this, you will first use a tape measure around a child, teen or adult's head.  Now, divide this number by 3.14.  This will give you the diameter of your circle you will need to achieve before you stop with increase rounds and start working repeat rounds. 

1.  With 6.0mm hook and orange yarn, 10 HDC into MR.  (10)
Increase Rounds:
2.  2 HDC in each st around.  (20)
3.  2 HDC in first st, 1 HDC in next st.  Rep around.  (30)
4.  2 HDC in first st, 1 HDC in next 2 st.  Rep around.  (40)
5.  2 HDC in first st, 1 HDC in next 3 st.  Rep around.  (50)
6.  2 HDC in first st, 1 HDC in next 4 st.  Rep around.  (60)
Repeat Rounds:
7-16.  1 HDC in each st around.  At the end of Round 16, FO orange yarn and weave ends.  (60)
17.  With brown yarn, sl st join into any st of Round 16 and Ch1.  SC in same st and each st around.  Sl st join and FO.  Weave ends.  (60)

Stripes (make 3):
1.  Leave a starting tail.  With 6.0mm hook and brown yarn, Ch50.  FO and leave a long tail for attaching to the hat.

Assembly:
1.  See pics for help with placement of stripes:  1 is middle center and the 2 remaining stripes are placed to the left and to the right of the center stripe.  I placed each of mine 5 stitches over on each side from the center with each touching Round 6.

Hoop:

1.  With a 6.0mm hook, plastic hoop and white yarn, you will want to join yarn around hoop and work 56 SC stitches.  I put 3 SC stitches at the beginning, and then 10 SC between each of the notches on the hoop and then 3 SC at the end.  Sl st join to first st and Ch1.  (56)
2.   SC in first st.  Ch9, Sk 3 st.  SC in next st.  Rep around.  Sl st join to first st and Ch1.  (14 SC and 14 Ch9)
3-9.  Rep #2.
10.  Same as #2, except you will Ch7 (not Ch9).
11-12.  Rep #10.  At the end of Round 12, FO and weave ends.

Hoop Straps (make 2):
1.  With 6.0mm hook and white yarn, I chained 75.  FO and left a tail to attach to the side of the hoop.
Attach the second strap to the opposite side of the hoop.  Make sure to really secure the straps.  
2.  The straps can either be left visible and tied in a bow around the neck or you can weave under the shirt and then tie in a bow around the heck.  
  

Basketball:
Follow same principle as hat for working in the round; see above note:

1.  With 4.5mm hook and orange yarn, 6 SC into MR.  (6)
2.  2 SC in each st around.  (12)
3.  2 SC in first st, 1 SC in next st.  Rep around.  (18)
4.  2 SC in first st, 1 SC in next 2 st.  Rep around.  (24)
5.  2 SC in first st, 1 SC in next 3 st.  Rep around.  (30)
6-10.  1 SC in each st around.  (30)
11.  SC2tog, 1 SC in next 3 st.  Rep around.  (24)
12.  SC2tog, 1 SC in next 2 st.  Rep around.  (18)
13.  SC2tog, 1 SC in next st.  Rep around.  (12)

If using safety eyes, add them now at Round 10, with 3 stitch spaces between them.  Stuff with polyfil.

14.  SC2tog.  Rep around.  FO and leave a tail for closing up last 6 stitches.  (6)

Assembly:
1.  Using the tail, weave yarn in and out of the last 6 stitches and pull to close up opening.
2.  I used brown yarn and added a smile 3 rows down from the eyes.
3.  For the stripes, I used my tapestry needle and brown yarn and just embroidered around the center of the ball for the center stripe and then worked a circular stripe for each side 4 stitches over from the center on each side.

Frayed Hair:
1.  I used the tapestry needle to weave and knot yarn at the top of the ball.
2.  I then used the needle to fray the yarn.
3.  I made 5 for the top of my ball.

This is a super cute, quick and simple project to make.  The hat and hoop can be worn as a costume for Halloween (or dress-up) with the ball to carry as an accessory.  AND, then, afterwards, can be used to play ball indoors during the coming winter months...

Inexpensive costume with a little versatility...I hope ya'll will enjoy this.


 Happy Crocheting...


Legal:
--don't use/claim my design as your own
--don't use/claim my pics as your own
--okay to make and sale your finished work
--don't share my pattern electronically or in print format (without prior consent) but provide a link to my blog


Sunday, October 14, 2018

Snowman C2C Blanket

I have been working on this project for the past couple of weeks for one of my winter projects.  I wanted a Snowman with a Redbird.  When I was a young girl, I vividly remember painting the Plaster of Paris Cardinals/Redbirds during this time of the year in elementary school — and I loved taking my time and making mine as pretty as I could to gift to my mom.

And, of course, I grew up in the mountains of West Virginia - so I absolutely LOVE snow and wintertime.  Sadly, however, in North Carolina, I don’t get to enjoy the heavy snowfall as I did during my childhood unless I travel back home.


Snowman C2C Blanket 
Size:  Approximately 36" x 36"

Materials:
--6.0mm hook
--1 skein each of #4 worsted weight yarn in light blue, red, white and black; and a very small amount of orange and yellow
--tapestry needle for weaving ends

U.S. Stitch Abbreviations:
Ch:  chain
Sl st:  slip stitch
St:  stitch(es)
SC:  single crochet
HDC:  half double crochet
Sk:  skip
Rep:  repeat
FO:  fasten off

Special Note:
This blanket can be made several ways, using different stitch techniques.  
1.  C2C with HDC and Ch5 stitches;
2.  C2C with DC and Ch6 stitches;
3.  SC stitches working right to left of the graph.

Directions:
I worked my C2C blanket using Ch5 and HDC stitches.  If desired, you can use Ch6 and DC stitches.  If you use DC stitches, please note you may require an extra skein of yarn in light blue and white.

I had so many ongoing projects during the fall that I opted to leave the "Let It" (top border) and "Snow" bottom border off of mine and just completed a few rounds of stitches for my border.

For the C2C version, you will start in the lower right hand corner and work the increase rows diagonally.  Once you complete the center diagonal row, you will then start your decrease rows. 

Below is a picture halfway through this project when I started the decrease rows.
I loved the cardinal on this graph.  I think it looks so pretty.

Border:
Once you complete the graph, you will then either complete the top and bottom graph borders, make your own border or use the border rounds I made.

1.  For the first round of the border, with light blue yarn, you will complete a round of SC st, placing 3 SC st in each corner.  Sl st join to the first st and Ch1.  Here is a picture of the first round of the border completed.
2.  For this round, you will place 1 HDC st in each st around, placing 3 HDC st in each corner.  Sl st join to the first st and Ch1.
3-4.  Rep #2.  At the end of Round 4, FO light blue yarn and weave ends.
5.  Join white yarn in and st and Ch1.  For this round, I made a *blanket st, Ch1, Sk1, SC next st, Ch1, Sk1* rep around, placing 2 HDC, Ch1, 2 HDC in each corner.  (if you have to manipulate a stitch here and there to make this work, then that's okay).  Sl st join to first st and Ch1.
6.  For this round, you will place HDC st into the previous round's st and Ch.  2 HDC, Ch1, 2HDC in each corner.  Sl st join to first st and Ch1.
7-9.  Rep #6
10.  For the final round, *SC in first st, Sk2 st, 5 HDC in next st, Sk2 st,* rep around.  Place 2 HDC, Ch1, 2HDC in each corner.  Sl st join to first st and FO.  Weave ends.

And, here is a picture of the finished border.


C2C Snowman Graph

Top Border:

Bottom Border:


I hope you will enjoy this cute Snowman and Redbird/Cardinal C2C Blanket pattern.  Please comment and/or email me with any questions.
 
Happy Crocheting...
Legal:
--don't use/claim my design as your own
--don't use/claim my pics as your own
--okay to make and sale your finished work 
--don't share my pattern electronically or in print format (without prior consent) but provide a link to my blog

Saturday, October 13, 2018

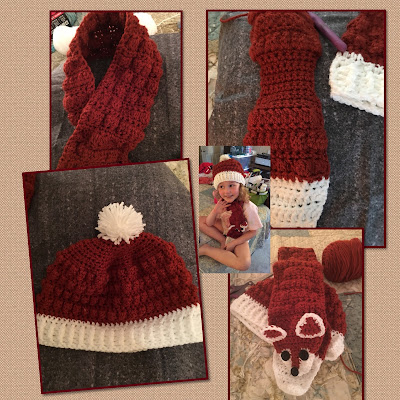
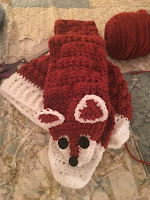
Fox Hat and Scarf Set...

I know I’ve said this so many times in the past - and it still remains the same - there’s just something about foxes that just fascinates me.  I love the majestic creature from its look to its colors and everything in-between.

This project was easy to complete and the perfect colors for the fall season.  I used “I Love This Yarn” from Hobby Lobby in Terra Cotta and White.

I hope you all will enjoy this project as much as I enjoyed designing it.

Fox Hat and Scarf Pattern
Size:
Hat:  19” - 21” Head Circumference
Scarf: 39” in length x 4” wide

Materials:
—5.0mm hook
—(1) skein each of “I Love This Yarn” in Terra Cotta and White (or any #4 worsted weight yarn in your colors of choice); just note different yarn brand can cause slight variation in overall size
—(2) 3/4” black buttons for eyes
—(1) 1/2” black button for the nose
—(1) 1/2” black button for the back side of the scarf for securing the tail end (optional)
—stitch marker
—tapestry needle for weaving

U.S. Stitch Abbreviations:
Ch:  chain
Sl St:  slip stitch
St:  stitch(es)
SC:  single crochet
HDC:  half double crochet
DC:  double crochet
FPDC:  front post double crochet
BPDC:  back post double crochet
SC2tog:  single crochet 2 stitches together (creates a decrease)
Rep:  repeat
Sk:  skip
FO:  fasten off

Special Stitch:
1.  Cluster Stitch:  yarn over and insert hook into stitch; yarn over and come back thru the stitch; yarn over and pull thru 2 loops on stitch; yarn over and insert hook into same stitch; yarn over and pull back thru stitch; yarn over and pull thru 2 loops on stitch; yarn over and insert hook into same stitch; yarn over and pull back thru stitch; yarn over and pull thru 2 loops on hook; yarn over and pull thru remaining 4 loops on hook.

Directions:
The hat is worked in the round, unless otherwise stated; so use your stitch marker to keep track of the first and last stitch of each round.  If desired, you can slip stitch join to first stitch and chain 1.

Hat:
Cluster Side
Reverse Side

1.  With Terra Cotta yarn, 10 HDC in MR.  Pull to tighten center.  (10)
2.  2 HDC in each st around.  (20)
3.  2 HDC in first st, 1 HDC in next st.  Rep around.  (30)
4.  2 HDC in first st, 1 HDC in next 2 st.  Rep around.  (40)
5.  2 HDC in first st, 1 HDC in next 3 st.  Rep around.  (50)
6.  2 HDC in first st, 1 HDC in next 4 st.  Rep around.  (60)
7.  2 HDC in first st, 1 HDC in next 5 st.  Rep around.  (70)
8.  Cluster stitch in first st, SC in next st.  Rep around.  (70)
9-10.  SC in each st around.  (70)
11.  Rep #8.  (70)
12-13.  SC in each st around.  (70)
14.  Rep #8.  (70)
15-16.  SC in each st around.  (70)
17.  Rep #8.  (70)
18-19.  SC in each st around.  (70)
20.  SC in each st around.  Sl st join to first st and FO Terra Cotta yarn.  Weave ends.  Join White yarn in any st with a sl st and Ch1.  (70)
21.  SC in each st around.  Sl st join to first st.  (70)
22.  Ch3 (counts as first DC).  DC in each st around.  Sl st join and Ch1.  (70)
23.  Work a FPDC around the first DC post st of the previous round, BPDC around the next DC post st of the previous round.  Rep around.  Sl st join to first st and Ch1.  (70)
24-25.  Rep #23.  (70)
26.  Loosely sl st in each st around.  Sl st join to first st and FO.  Weave ends.

Pompom:
I used the White yarn and wrapped around 4 of my fingers approximately 50 times.  I then tied a double-knot in the center and trimmed the ends.  Shape pompom and attach to top of hat.

You can wear the hat on either side.  One side the cluster stitches puff out; on the inside the stitches do not puff out.  The hat looks great both ways.  If so desired, make a 2nd pompom to attach to the opposite side so you will have a pom on both sides.
 Either side of the hat can be worn and both sides look great to me!!!

Scarf:
 
1.  With White yarn, Ch3.  HDC in 2nd ch from hook and next ch.  Ch1 and turn.  (2)
2.  2 HDC in first st, 1 HDC in next st.  Ch1 and turn.  (3)
3.  2 HDC in first st, 1 HDC in next st, 2 HDC in last st.  Ch1 and turn.  (5)
4.  1 HDC in each st across.  Ch1 and turn.  (5)
5.  2 HDC in first st, 1 HDC in next 3 st, 2 HDC in last st.  Ch1 and turn.  (7)
6.  1 HDC in each st across.  Ch1 and turn.  (7).
7.  2 HDC in first st, 1 HDC in next 5 st, 2 HDC in last st.  Ch1 and turn.  (9)
8.  1 HDC in each st across.  Ch1 and turn.  (9)
9.  2 HDC in first st, 1 HDC in next 7 st, 2 HDC in last st.  Ch1 and turn.  (11)
10.  1 HDC in each st across.  Ch1 and turn.  (11)
11.  1 HDC in each st across.  FO White yarn and join Terra Cotta yarn.  Ch1 and turn.  (11)
12.  1 HDC in each st across.  Ch1 and turn.  (11)
13.  Cluster st in first st, SC in next st.  Rep across, ending with a cluster st in the last st.  Ch1 and turn.  (11)
14-15.  SC in each st across.  Ch1 and turn.  (11)
16.  Rep #13.  (11)
17-18.  SC in each st across.  Ch1 and turn.  (11)
19.  Rep #13.  (11)
20-21.  SC in each st across.  Ch1 and turn.  (11)
22.  SC2tog, 1 SC in next 7 st, SC2tog.  Ch1 and turn.  (9)
23-30.  SC in each st across.  Ch1 and turn.  (9)
31.  2 SC in first st, 1 SC in next 7 st, 2 SC in last st.  Ch1 and turn.  (11)
32.  Rep #13.  (11)
33-34.  SC in each st across.  Ch1 and turn.  (11)
35.  Rep #13.  (11)
36-37.  SC in each st across.  Ch1 and turn.  (11)
38.  Rep #13.  (11)
39-40.  SC in each st across.  Ch1 and turn.  (11)
41.  Rep #13.  (11)
42-43.  SC in each st across.  Ch1 and turn.  (11)
44.  Rep #13.  (11)
45-46.  SC in each st across.  Ch1 and turn.  (11)
47.  Rep #13.  (11)
48-49.  SC in each st across.  Ch1 and turn.  (11)
50.  Rep #13.  (11)
51-52.  SC in each st across.  Ch1 and turn.  (11)
53.  Rep #13.  (11)
54-55.  SC in each st across.  Ch1 and turn.  (11)
56.  Rep #13.  (11)
57-58.  SC in each st across.  Ch1 and turn.  (11)
59.  Rep #13.  (11)
60-61.  SC in each st across.  Ch1 and turn.  (11)
62.  Rep #13.  (11)
63-64.  SC in each st across.  Ch1 and turn.  (11)
65.  Rep #13.  (11)
66-67.  SC in each st across.  Ch1 and turn.  (11)
68.  Rep #13.  (11)
69-70.  SC in each st across.  Ch1 and turn.  (11)
71.  Rep #13.  (11)
72-73.  SC in each st across.  Ch1 and turn.  (11)
74.  Rep #13.  (11)
75-76.  SC in each st across.  Ch1 and turn.  (11)
77.  Rep #13.  (11)
78-79.  SC in each st across.  Ch1 and turn.  (11)
80.  Rep #13.  (11)
81-82.  SC in each st across.  Ch1 and turn.  (11)
83.  Rep #13.  (11)
84-85.  SC in each st across.  Ch1 and turn.  (11)
86.  Rep #13.  (11)
87-88.  SC in each st across.  Ch1 and turn.  (11)
89.  Rep #13.  (11)
90-91.  SC in each st across.  Ch1 and turn.  (11)
92.  Rep #13.  (11)
93-94.  SC in each st across.  Ch1 and turn.  (11)
95.  Rep #13.  (11)
96-97.  SC in each st across.  Ch1 and turn.  (11)
98.  Rep #13.  (11)
99-100.  SC in each st across.  Ch1 and turn.  (11)

Here's a pic of the "tail" end of the scarf:  
Forming the Face:
101-103.  SC in each st across.  At the end of Row 103, join White yarn and Ch1.  Do not FO Terra Cotta yarn, but you will want to carry over the yarn to use to form the nose stripe.  (11)
104.   With White yarn, SC2tog, 1 SC in next 2 st.  Before completing the last st, switch to Terra Cotta yarn, SC in next 3 st.  Before completing the last st, switch back to White yarn, SC in next 2 st and then SC2tog.  Ch1 and turn.  (9)
105.  SC in each st across - 3 SC in White, 3 SC in Terra Cotta and 3 SC in White.  Ch1 and turn.  (9)
106.  In White, SC2tog, SC in next st.  3 SC in Terra Cotta.  In White, SC in next st, SCtog.  Ch1 and turn.  (7)
107.  SC in each st across - 2 SC in White, 3 SC in Terra Cotta and 2 SC in White.  Ch1 and turn.  (7)
108.  In White, SC2tog, 3 SC in Terra Cotta. In White, SC2tog.  Ch1 and turn.  (5)
109.  SC in each st across - 1 SC in White, 3 SC in Terra Cotta and 1 SC in White.  Ch1 and turn.  (5)
110.  In White, 1 SC.  With Terra Cotta, SC3tog.  In White, 1 SC.  Ch1 and turn.  (3)
111.  With White yarn, SC3tog.  FO and weave ends.  (1)
112.  Join Terra Cotta with sl st and Ch1 in any st.  SC in each st around scarf.  Sl st join to first st and FO.  Weave ends.

NOTE:  if you want your scarf longer than 49", then complete more repeat rows of 13-15 before you start forming the face!!!

Ears:
1.  With Terra Cotta, Ch6.  SC in 2nd ch from hook and across.  Ch1 and turn.  (5)
2.  SC across.  Ch1 and turn.  (5)
3.  SC2tog, SC in next 2 st, SC2tog.  Ch1 and turn.  (3)
4.  SC3tog.  FO Terra Cotta yarn and join White yarn.  Ch1.  (1)
5.  White White yarn, SC in each st around.  Sl st join to first st and FO.  Leave a tail for attaching each ear to your scarf.  I attached my ears at Row 102.  (see pics)

Attach buttons for the eyes and nose.  (see pics)

Loop:

1.  Ch9.  SC in 2nd ch from hook and across.  Ch1 and turn.  (8)
2-4.  SC in each st across.  At the end of Row 4, FO and leave a tail for attaching.

Attach the Loop to the back side of your scarf at Row #92.

Optional:
Prior to attaching my Loop to Row 92, I added a 1" black button in the center of the Loop.  This way, I can either slip the "Tail End" of my scarf into the Loop OR I can use the button and button it up through one of the cluster stitches.

Here's my granddaughter, Miss Arielle, donning the "Fox Hat and Scarf" set:


And, here is a SNEAK PEEK at two projects I'm currently working on:
Noah's Ark Quiet Book:

"Let It Snow" C-2-C Blanket:
Happy Crocheting...
Legal:
--don't use/claim my design as your own
--don't use/claim my pics as your own
--okay to make and sale your finished work
--don't share my pattern electronically or in print format (without prior consent) but provide a link to my blog