

Okay, I must admit, I love designing projects of FOXES - and have made quite a few designs with the beautiful fox in mind. There’s just something about this animal that fascinates me.
My latest project is the “Fox Pillow.” I had seen a picture of a fabric-made dog and cat pillow — and decided I wanted to make a crochet version, well, my own version of an animal pillow.
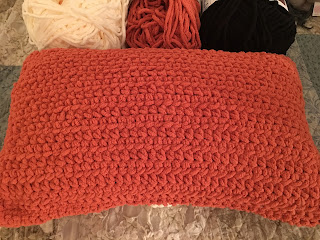
I used Bernat Blanket yarn in Pumpkin Spice, Vintage White and Black.
This pattern is very easy to make. With color adjustments, you can make any animal you want. Kids are sure to love it. Once my grandsons spotted this Fox Pillow, they were each claiming it as their own.
I hope you all will enjoy this pattern. I would love to see pictures of your finished projects and what animal(s) you decide to make from my pattern.
Gauge: 4 HDC stitches x 3 rows = 2”
Materials:
—8.0mm hook
—1 Skein each of Bernat Blanket Yarn in Pumpkin Spice, Vintage White and Black (you can buy a small skein of the Black and White - it does not require much; for the Pumpkin Spice I had a 220 yd skein)
—(1) 12” x 22” Pillow
—Small amount of polyfil for the Fox face
—(1) 1” button
—tapestry needle for weaving
U.S. Stitch Abbreviations:
Ch: chain
Sl St: slip stitch
St: stitch(es)
SC: single crochet
SC2tog: single crochet 2 stitches together (creates a decrease)
HDC: half double crochet
Rep: repeat
MR: magic ring
FO: fasten off
Directions:
The Pillow Cover section is made in 2 pieces - 1 will be solid Pumpkin Spice; the other will use Pumpkin Spice and a small amount of Vintage White to make the tummy.
 Pillow Top:
1. With Pumpkin Spice, Ch41. HDC in 2nd ch from hook and across. Ch1 and turn. (40)
2. HDC across. Ch1 and turn. (40)
3-20. Rep #2.
21. SC in each stitch all the way around, placing 2 SC st in each corner. FO. Weave ends.
Pillow Bottom:
I found it easier to work with both ends of the skein of Pumpkin Spice while working with the Vintage White (one end for each side while I was making the tummy) as opposed to one strand and carrying over the Pumpkin Spice - it was showing through the Vintage White. But, feel free to carry over your yarn, if that’s your preference.
1. With Pumpkin Spice, Ch41. HDC in 2nd ch from hook and across. Ch1 and turn. (40)
2. HDC across. Ch1 and turn. (40)
3-5. Rep #2.
6. With Pumpkin Spice, HDC in 19 st. Before completing the 19th st, switch to Vintage White. HDC in next 2 st. Before completing the 2nd st, join Pumpkin Spice. HDC in each of the remaining 19 st. Ch1 and turn. (40)
7. Rep #6.
8. With Pumpkin Spice, HDC in 18 st. Before completing the 18th st, switch to Vintage White. HDC in next 4 st. Before completing the 4th st, switch to Pumpkin Spice. HDC in each of the remaining 18 st. Ch1 and turn. (40)
9-10. Rep #8.
11. With Pumpkin Spice, HDC in 17 st. Before completing the 17th st, switch to Vintage White. HDC in next 6 st. Before completing the 6th st, switch to Pumpkin Spice. HDC in each of the remaining 17 st. Ch1 and turn. (40)
12-13. Rep #11.
14. With Pumpkin Spice, HDC in 16 st. Before completing the 16th st, switch to Vintage White. HDC in next 8 st. Before completing the 8th st, switch to Pumpkin Spice. HDC in each of the remaining 16 st. Ch1 and turn. (40)
15-16. Rep #14.
17. With Pumpkin Spice, HDC in 15 st. Before completing the 15th st, switch to Vintage White. HDC in next 10 st. Before completing the 10th st, switch to Pumpkin Spice. HDC in each of the remaining 15 st. Ch1 and turn. (40)
18-20. Rep #17.
21. With the Pumpkin Spice, SC in each st all the way around, placing 2 SC st in each corner. FO and weave ends.
To join the 2 pieces together, you will want to place right sides together. Now, join and secure a long piece of Pumpkin Spice in the lower right corner. Using your tapestry needle, you will want to whipstitch the 2 pieces together, across the 40 stitches, up the 20 rows and across the 40 stitches. You will leave the one short end open for pillow insertion (in place of a pillow, you can opt to use polyfil; just make sure you don’t over-stuff, making it difficult to bend/close your pillow to stand)


Legal:
My latest project is the “Fox Pillow.” I had seen a picture of a fabric-made dog and cat pillow — and decided I wanted to make a crochet version, well, my own version of an animal pillow.
I used Bernat Blanket yarn in Pumpkin Spice, Vintage White and Black.
This pattern is very easy to make. With color adjustments, you can make any animal you want. Kids are sure to love it. Once my grandsons spotted this Fox Pillow, they were each claiming it as their own.
I hope you all will enjoy this pattern. I would love to see pictures of your finished projects and what animal(s) you decide to make from my pattern.
Fox Pillow Pattern

Size: 12” x 22”
Gauge: 4 HDC stitches x 3 rows = 2”
Materials:
—8.0mm hook
—1 Skein each of Bernat Blanket Yarn in Pumpkin Spice, Vintage White and Black (you can buy a small skein of the Black and White - it does not require much; for the Pumpkin Spice I had a 220 yd skein)
—(1) 12” x 22” Pillow
—Small amount of polyfil for the Fox face
—(1) 1” button
—tapestry needle for weaving
U.S. Stitch Abbreviations:
Ch: chain
Sl St: slip stitch
St: stitch(es)
SC: single crochet
SC2tog: single crochet 2 stitches together (creates a decrease)
HDC: half double crochet
Rep: repeat
MR: magic ring
FO: fasten off
Directions:
The Pillow Cover section is made in 2 pieces - 1 will be solid Pumpkin Spice; the other will use Pumpkin Spice and a small amount of Vintage White to make the tummy.

1. With Pumpkin Spice, Ch41. HDC in 2nd ch from hook and across. Ch1 and turn. (40)
2. HDC across. Ch1 and turn. (40)
3-20. Rep #2.
21. SC in each stitch all the way around, placing 2 SC st in each corner. FO. Weave ends.
Pillow Bottom:
I found it easier to work with both ends of the skein of Pumpkin Spice while working with the Vintage White (one end for each side while I was making the tummy) as opposed to one strand and carrying over the Pumpkin Spice - it was showing through the Vintage White. But, feel free to carry over your yarn, if that’s your preference.
1. With Pumpkin Spice, Ch41. HDC in 2nd ch from hook and across. Ch1 and turn. (40)
2. HDC across. Ch1 and turn. (40)
3-5. Rep #2.
6. With Pumpkin Spice, HDC in 19 st. Before completing the 19th st, switch to Vintage White. HDC in next 2 st. Before completing the 2nd st, join Pumpkin Spice. HDC in each of the remaining 19 st. Ch1 and turn. (40)
7. Rep #6.
8. With Pumpkin Spice, HDC in 18 st. Before completing the 18th st, switch to Vintage White. HDC in next 4 st. Before completing the 4th st, switch to Pumpkin Spice. HDC in each of the remaining 18 st. Ch1 and turn. (40)
9-10. Rep #8.
11. With Pumpkin Spice, HDC in 17 st. Before completing the 17th st, switch to Vintage White. HDC in next 6 st. Before completing the 6th st, switch to Pumpkin Spice. HDC in each of the remaining 17 st. Ch1 and turn. (40)
12-13. Rep #11.
14. With Pumpkin Spice, HDC in 16 st. Before completing the 16th st, switch to Vintage White. HDC in next 8 st. Before completing the 8th st, switch to Pumpkin Spice. HDC in each of the remaining 16 st. Ch1 and turn. (40)
15-16. Rep #14.
17. With Pumpkin Spice, HDC in 15 st. Before completing the 15th st, switch to Vintage White. HDC in next 10 st. Before completing the 10th st, switch to Pumpkin Spice. HDC in each of the remaining 15 st. Ch1 and turn. (40)
18-20. Rep #17.
21. With the Pumpkin Spice, SC in each st all the way around, placing 2 SC st in each corner. FO and weave ends.
To join the 2 pieces together, you will want to place right sides together. Now, join and secure a long piece of Pumpkin Spice in the lower right corner. Using your tapestry needle, you will want to whipstitch the 2 pieces together, across the 40 stitches, up the 20 rows and across the 40 stitches. You will leave the one short end open for pillow insertion (in place of a pillow, you can opt to use polyfil; just make sure you don’t over-stuff, making it difficult to bend/close your pillow to stand)
Top of Pillow

Bottom of Pillow

Fox Head/Face:
1. With Pumpkin Spice, 6 SC into MR. Sl St join to first st and Ch1. (6)
2. 2 SC in each st around. Sl St join and Ch1. (12)
3. 2 SC in first st, 1 SC in next st. Rep around. Sl St join and Ch1. (18)
4. 2 SC in first st, 1 SC in next 2 st. Rep around. Sl St join and Ch1. (24)
5. 2 SC in first st, 1 SC in next 3 st. Rep around. Sl St join and Ch1. (30)
6. 2 SC in first st, 1 SC in next 4 st. Rep around. Sl St join and Ch1. (36)
7-9. 1 SC in each st around. Sl St join and Ch1. (36)
At the end of Round 9, Do NOT Ch1. FO yarn. Join Vintage White and Ch1.
10. With Vintage White, 1 SC in each st around. Sl St join and Ch1. (36)
11. Rep #10.
12. SC2tog, 1 SC in next 4 st. Rep around. Sl St join and Ch1. (30)
13. SC2tog, 1 SC in next 3 st. Rep around. Sl St join and Ch1. (24)
14. SC2tog, 1 SC in next 2 st. Rep around. Sl St join and Ch1. (18)
15. SC2tog, 1 SC in next st. Rep around. Sl St join and Ch1. (12)
Lightly stuff. I did not want a round (ball-like) head. I wanted more of a stacked pancake head (if that makes sense...).
16. SC2tog. Rep 5 more times. Sl St join. FO and leave a long tail for attaching to pillow. (6)
I made all of my facial features since this is a pillow and can be played with.
Nose Stripe:
1. With Pumpkin Spice, Ch2. 1 SC in 2nd ch from hook. Ch1 and turn. (1)
2. 2 SC. Ch1 and turn. (2)
3. 2SC in first st, 1 SC in next st. Ch1 and turn. (3)
4. 2 SC in first st, 1 SC in next st, 2 SC in last st. Ch1 and turn. (5)
5. 1 SC in each st across. Ch1 and turn. (5)
6. 2 SC in first st, 1 SC in next 3 st, 2 SC in last st. Ch1 and turn. (7)
7. 1 SC in each st across. FO and leave a long enough tailto attach. (7)
Nose Tip:
1. With Black yarn, 3 SC into MR. Sl St join to first st and FO. Leave tail to attach to Rows 1-2 of Nose Stripe. (3)
Eyes (make 2):
1. With Black yarn, 6 SC into MR. Sl St join to first st and FO. Leave tail for attaching.
2. With Vintage White, embroider a pupil.
Ears (make 2):
1. With Black yarn, 6 SC into MR. Sl St join to first st and Ch1. (6).
2. 1 SC in each st around. Sl St join and FO. Weave ends. (6).
3. Join Pumpkin Spice in any st and Ch1. 2 SC in first st, 1 SC in next st. Rep around. Sl St join and Ch1. (9)
4. 2 SC in first st, 1 SC in next 2 st. Rep around. Sl St join and Ch1. (12)
5. 1 SC in each st around. Sl St join and FO. Leave a long enough tail for attaching. (12)
Strap/Loop:
1. With Pumpkin Spice, Ch6. Sl St to first Ch and FO. Leave a long enough tail for attaching.
Pompom Tail:
I held all 3 of my color strands together. I wrapped all 3 around 4 of my fingers 15 times. I then tied a double knot in the center, leaving a long end to attach. Use scissors to trim ends.
Assembly:
1. Attach Nose Tip to Stripe.
2. Attach Nose to Center of face at Rounds 10-15.
2. Attach Eyes on each side of the Nose.
3. Attach Ears. I placed mine on each side at Rounds 2-6.
4. Insert pillow form into your whipstitched piece. Now, to close up, I chose to whipstitch mine. But, you could add a zipper or buttons to close up.
5. After you close up, attach the Strap/Loop on this end at the center.
6. On the opposite short end (left side), at the center, attach your button. Make sure to secure your button very tight.
7. Attach Pompom to center back of the top of the long vertical side.
8. Now, attach face, center bottom of the long vertical side, centered with the tummy portion of the bottom.
And, that’s it — project complete....


Happy Crocheting...
Legal:
--don't use/claim my design as your own
--don't use/claim my pics as your own
--okay to make and sale your finished work
--don't share my pattern electronically or in print format (without prior consent) but provide a link to my blog
--don't share my pattern electronically or in print format (without prior consent) but provide a link to my blog
No comments:
Post a Comment