Saturday, August 26, 2017

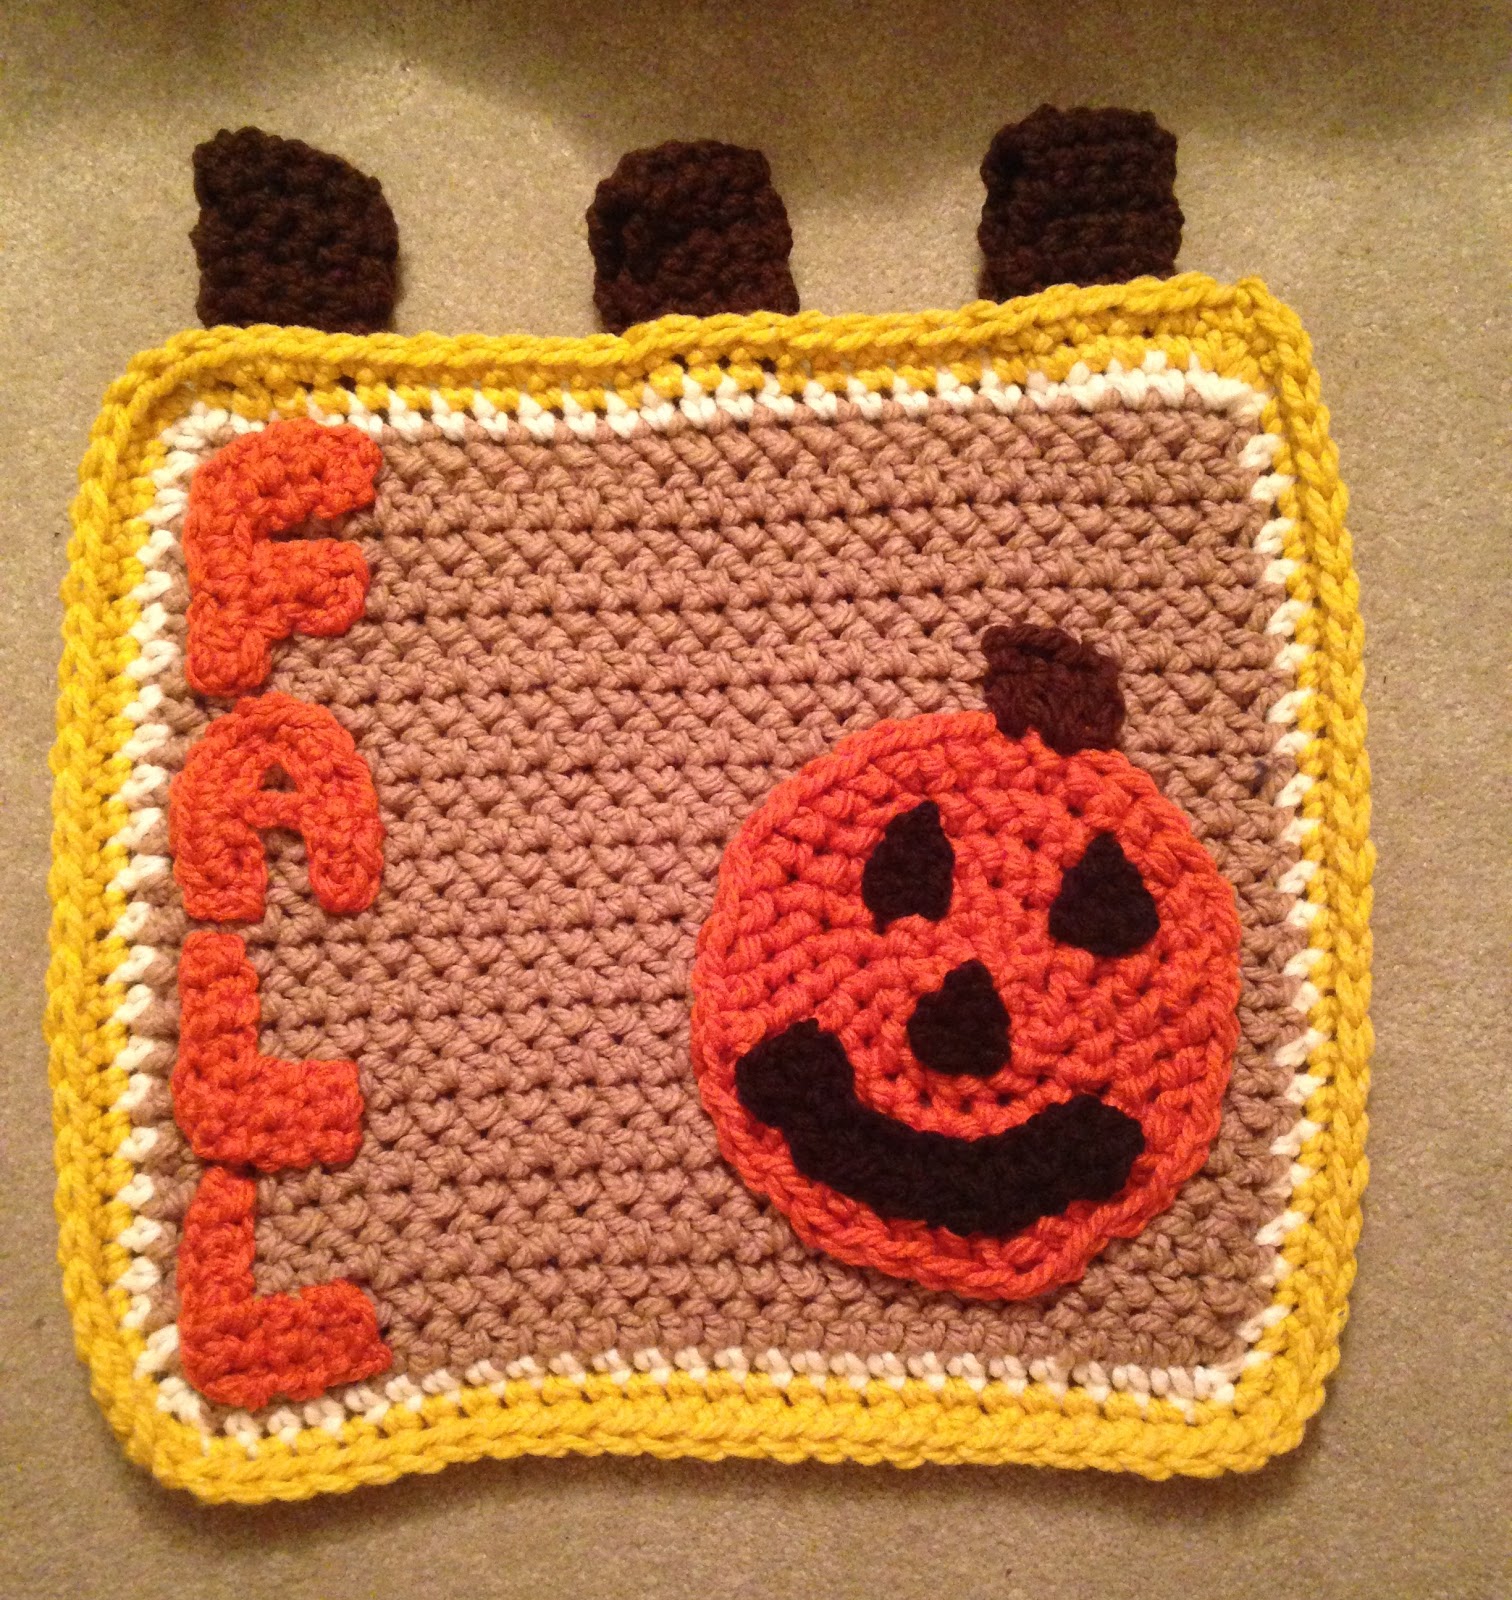
Fall Garden Flag...

This week has been a hectic one - fighting allergies, Home School with my grandson, Jacob, school shopping with my niece and nephew and trying to muster up the energy to complete a few projects.

Some days I think I was productive; other days, I just accomplished what I could...lol.  On the upside, I'm on the mend now so hopefully, I will be completing quite a few projects I've had in the works and in my head (lol).

Here's my Fall Garden Flag.  I wanted something whimsical and not necessarily themed around one central fall-theme.  So, I incorporated several appliques that inspire me - pumpkin, owl and football!!!

Fall Garden Flag
Fall Garden Flag

Difficulty Level:  Easy

Size:  17" wide x 14" long

Gauge:  7 HHDC stitches x 6 rows = 4"

Materials:
--6mm, 8mm & 10mm hooks
--1 skein each of Bernat Softee Chunky Yarn in Soft Taupe, Dark Taupe, Pumpkin Spice, Natural,  Glowing Gold and Black
--2 yds of #6 Chunky Yarn in green for the eyes (I did not have any Bernat Softee in green; so I used a #6 chunky yarn of Deborah Norville by Premier Yarns)
--tapestry needle for weaving

U.S. Stitch Abbreviations:
Ch:  chain
Sl st:  slip stitch
St: stitch(es)
SC:  single crochet
DC:  double crochet
HDC:  half double crochet
HHDC:  Herringbone half double crochet
SC2tog:  single crochet 2 stitches together
FO:  fasten off
Rep:  repeat

Special Stitch: 
1. HHDC:  yarn over, insert hook into stitch, yarn over, pull back through the stitch and through the first loop on the hook, yarn over and pull through the 2 remaining loops on the hook.  Here's a link to my short video tutorial on the Herringbone Half Double Crochet stitch:
HHDC Video Tutorial
Note:  You can use the HDC stitch in place of the HHDC stitch.  You will get a slightly different texture and look for your flag.  I love the texture and look of the HHDC stitch.  

Directions:
Flag:
1.  With Soft Taupe yarn and 10mm hook, Ch26, HHDC in the 2nd Ch from hook and across.  Ch1 and turn.  (25)
2-22.  1 HHDC in each st across.  Ch1 and turn. At the end of Row 22, FO Soft Taupe yarn and join Natural yarn.  (25)
23.  Work 1 SC in each st around the perimeter of the flag with 3 SC st in each corner.  Before completing the last SC st, FO Natural yarn and join Glowing Gold yarn.  Sl st to first st to join and Ch1.
24-25.  1 SC in each st around with 3 SC st in each corner.  At the end of Round 25, FO and weave ends.
Tabs (make 3):
1.  With Dark Taupe yarn and 10mm hook, Ch5, SC in the 2nd Ch from hook and across.  Ch1 and turn.  (4)
2-14.  1 SC in each st across.  Ch1 and turn.  At the end of Row 14, FO and leave a long enough tail for attaching to the flag.

 Assembly:
1.  Join ends of tab together and whipstitch at the top of the flag on the back side.  I placed 2 tabs on each end and 1 in the center.  (See my pics for help)

Appliques:
A.  Pumpkin:
(Pumpkin Spice, Black and Dark Taupe Yarn)
1.  With Pumpkin Spice yarn and 10mm hook, 8 HHDC into MR.  Sl st join to first st and Ch1.  (8)
2.  2 HHDC in each st around.  Sl st join to first st and Ch1.  (16)
3.  2 HHDC in first st, 1 HHDC in next st.  Rep around.  Sl st join to first st and Ch1.  (24)
4.  2 HHDC in first st, 1 HHDC in next 2 st.  Rep around.  Sl st join to first st and Ch1.  (32)
5.  2 HHDC in first st, 1 HHDC in next 3 st.  Rep around.  Sl st join to first st and FO.  Leave a long tail for attaching to the flag.  (40)

Stem:
1.  Join Dark Taupe yarn at the top of your pumpkin and Ch1.  2 DC in the same st as the ch1.  2 DC in the next st.  FO.  (4) 

Eyes and Nose:
1.   With Black yarn and 6mm hook, Ch2.  SC in 2nd ch from hook.  Ch1 and turn.  (1)
2.  2 SC in st.  Ch1 and turn.  (2)
3.  2 SC in first st, 1 SC in next st.  FO, leaving long enough tail for attaching to pumpkin.  (3)

Mouth:
1.  With Black yarn and 10mm hook, Ch13.  SC in 2nd ch from hook.  Ch2, SC in 2nd ch from hook.  Then continue to SC in each base ch across.  After last SC, ch2, SC in 2nd ch from hook.  Sl st to last SC of the base ch and FO.  Leave a long enough tail for attaching.
  B.  Football:
1.  With Dark Taupe yarn and 8mm hook, Ch2.  SC in 2nd ch from hook.  Ch1 and turn.  (1)
2.  2 SC in st.  Ch1 and turn.  (2)
3.  2 SC in first st, 1 SC in next st.  Ch1 and turn.  (3)
4.  2 SC in first st, 1 SC in next st, 2 SC in last st.  Ch1 and turn.  (5)
5.  2 SC in first st, 1 SC in next 3 st, 2 SC in last st.  Ch1 and turn.  (7)
6-9.  1 SC in each st across.  Ch1 and turn.  (7)
10.  SC2tog, 1 SC in next 3 st, SC2tog.  Ch1 and turn.  (5)
11.  SC2tog, 1 SC in next st, SC2tog.  Ch1 and turn.  (3)
12.  SC2tog, 1 SC in next st.  Ch1 and turn.  (2)
13.  SC2tog.  Ch1.  (1)
14.  SC evenly around football with 3 SC st at each end.  FO, leaving long enough tail for attaching.

Laces:
With Natural yarn, embroider laces. 

C.  Owl:
(Dark Taupe, Glowing Gold, Black, Natural, Pumpkin Spice and Green)

I used my Owl Applique Pattern from a previous post with a few minor changes.  Here's the link to my owl:
1.  I used an 8mm hook.  I followed my pattern as directed, except, I "sized-down" on the stitches since this project is using Bernat Softee Chunky yarn.  So, where the pattern says to do a triple crochet, I made a double crochet; where it says to make a double crochet, I made a half double crochet; and where it calls for a half double crochet, I made a single crochet.  And, a single crochet stayed a single crochet.  

D.  FALL letters:
(Pumpkin Spice yarn)
8mm hook
F:
1.  Ch8, SC in 2nd ch from hook and across.  Ch1 and turn.  (7)
2.  SC in the first 2 st only.  Ch1 and turn.  (2)
3-5.  Rep #2.  FO.  Leave tail for attaching.  (2)
6.  Re-join yarn, and Ch1, at stitch #4 of Row 1.  SC in same st and next st.  Ch1 and turn.
7-8.  SC in each st.  Ch1 and turn.  At the end of Row 8, FO and leave tail for attaching.  (2)

A:
1.  Ch16.  SC in 2nd ch from hook and next 6 ch.  2 SC in next ch.  SC in each of the next 7 ch.   FO.  Leave tail for attaching.
2.  Re-join yarn in base chain #4 and ch3.  FO, leave a long enough tail to attach to opposite side (this is the cross bar).

L (make 2):
1.  Ch8.  SC in 2nd ch from hook and across.  Ch1 and turn.  (7)
2.  SC in the first 2 st.  Ch1 and turn.  (2)
3-5.  Rep #2.   

See pics for help with placement of appliques.  
 Happy Crocheting...

Legal:
--don't claim my pattern/design as your own
--don't use my pics as your own
--don't share my pattern electronically or in print format but provide a link to my blog

Wednesday, August 23, 2017

Simple Lion Appliqué

Simple Lion Appliqué I made using Bernat Softee Chunky Yarn.  If you have 5 minutes to spare, then you have time to make this.  I think he's adorable and just adds a little something extra to my Candy Corn Cozy!!!

Simple Lion Appliqué 
Simple Lion Appliqué Pattern
Difficulty Level:  Easy

Materials:
--10mm hook
--3-4 yds of Bernat Softee Chunky Yarn in Pumpkin S-ice
--2 animal eyes 
--very tiny amount of polyfil for nose 
--black yarn for embroidery 

Stitch Abbreviations:
Ch:  chain
Sl st:  slip stitch
St:  stitch(es)
SC:  single crochet
MR:  magic ring
FO:  fasten off

Directions:
1.  6  SC into MR.  Sl st join to first st and Ch1.  (6)
2.  2 SC in each st around.  Sl st join to first st.  (12)
3.  Ch4.  Sl st into first ch (first ear made).  Skip 2 st.  Sl st into next st.  Ch4.  Sl st into first ch (second ear made).  Sl st into next st and FO.  Weave ends.    

For nose:
1.  6 SC into MR.  Sl st join to first st and FO.  Leave tail for attaching.
2.  Attach nose to center.  Stuff a very small (nickel-size) amount of polyfil before closing off.
3.  Embroider nose with black yarn (see pic)

And, that's it!!!  Glue to hair clip, add a magnet, attach to any project, add a pin...lots of ways to use this little lion...
Happy Crocheting...
Legal:
--don't claim my pattern/design as your own
--don't use my pics as your own
--don't share my patterns electronically or in print format but provide a link to my blog

Candy Corn Cozy...

I love eating Candy Corn.  The sugary taste is so yummy and just personifies fall time for me.  I use a large Duncan Hines cake frosting container for my crochet hooks and needed a fall theme.  So, here's a quick Candy Corn Cozy that literally took me less than 20 mins to make -- and that was includint the time it took to make the lion appliqué to put on it...lol!

This would make a great gift for a teacher -- place Cozy around your container and fill with candy, pens, pencils, crayons...add anything a teacher could use on her desk.  Put a smile on a teacher's face as the new school year begins!!!
Candy Corn Cozy
Candy Corn Cozy Pattern
Difficulty Level:  Easy

Materials:
--10mm hook
--#6 Bernat Softee Chunky Yarn in Natural, Glowing Gold and Pumpkin Spice (5-8 yds of each)
--Empty (large) container of Duncan Hines cake frosting (or whatever you decide/want to use)
--tapestry needle for weaving

Stitch Abbreviations:
Ch:  chain
Sl st:  slip stitch
St:  stitch(es)
SC:  single crochet
HDC:  half double crochet
DC:  double crochet 
FLO:  front Loops only
HDC2tog:  half double crochet 2 stitches together 
MR:  magic ring
FO:  fasten off 

Directions:
1.  With Pumpkin Spice, 6 HDC into MR.  Sl st join to first st and Ch1.  (6)
2.  2 HDC in each st around.  Sl st join to first st and Ch1.  (12)
3.  2 HDC in first st, 1 HDC in next st.  Repeat around.  FO Pumpkin Spice yarn and join Glowing Gold.  Sl st join to first st and Ch1.  (18)
4.  In FLO, 2 HDC in first st, 1 HDC in next 2 st.  Repeat around.  Sl st join to first st and Ch1.  (24)
5.  Working in both loops, 1 HDC in each st around.  Sl st join to first st and Ch1.  (24)
6.  HDC2tog, 1 HDC in next 2 st.  Repeat around.  FO Glowing Gold yarn and join Natural yarn.  Sl st join to first st and Ch1.  (18).
7-8.  1 HDC in each st around.  Sl st join to first st and Ch1.  (18)
9.  5 DC in first st.  *Skip 2 st.  1 SC in next st.  Skip 2 st.  5 DC in next st*.  Repeat from * to * around.  Sl st join to top of first DC st and FO.  Weave ends.  

Quick, easy and cute Candy Corn Cozy for your Fall Decor... 

Optional:  
1.  If you would like to add my Lion Appliqué, then here's the link to the free pattern:

2.  Fall ribbon weaved in and out at the top and tied in a bow would look super cute. 

Happy Crocheting...
Legal:
--don't claim my pattern/design as your own
--don't use my pics as your own
--don't share my patterns electronically or in print format but provide a link to my blog

Easy Pumpkin Trio...

This has to be the quickest little "Pumpkin Trio" I have ever made.  I used Bernat Softee Chunky yarn -- less than half a skein for all three pumpkins!!!
Easy Pumpkin Trio
Happy Crocheting...
Legal:
--don't claim my pattern/design as your own
--don't use my pics as your own
--don't share my patterns electronically or in print format but provide a link to my blog


Monday, August 21, 2017

"Fall-la-la" Candy Corn Door Hanging...

With the solar eclipse today - being dark and dreary outside - I've focused my attention on working on Fall projects.  Well, first I had to do First Grade lessons with my grandson, Jacob, since I home school him...lol.

And, here's one that I'm super-excited to show everyone.  I really love how this turned out.  It's my "Fall-la-la" Candy Corn Door Hanging...

The Candy Corn are 3 sizes: small (8" long), medium (9 1/2" long) and large (11" long).

"Fall-la-la" Candy Corn Door Hanging...
"Fall-la-la" Candy Corn Door Hanging Pattern
Difficulty Level:  Easy

Size:  Small: 8" 
          Medium: 9 1/2" 
          Large: 11"

Gauge:  isn't too important for this project 

Materials:
--6mm and 8mm hooks
--#6 Bernat Softee Chunky Yarn: 1 skein each of Pumpkin Spice, Natural and Glowing Gold for the candy corn and hangers and 5-10 yds of Soft Taupe for the bow
--#6 Chunky Yarn in green for leaves 
--small amount of polyfil to lightly stuff each candy corn 
--tapestry needle for weaving

U.S. Stitch Abbreviations:
Ch:  chain
Sl st: slip stitch
St: stitch(es)
SC: single crochet 
HDC: half double crochet 
DC: double crochet
FO: fasten off

Directions:
Small Candy Corn (make 2):
1.  With 8.0mm hook and Natural yarn, Ch2. HDC in 2nd ch.  Ch1 and turn.  (1)
2.  2 HDC in st.  Ch1 and turn.  (2)
3.  2 HDC in first st, 1 HDC in next st.  Ch1 and turn.  (3)
4.  2 HDC in first st, 1 HDC in next st and 2 HDC in last st.  Ch1 and turn.  (5)
5.  1 HDC in each st across.  FO Natural yarn and join Pumpkin Spice yarn.  Ch1 and turn.  (5)
6.  With Pumpkin Spice yarn, 2 HDC in first st, 1 HDC in next 3 st and 2 HDC in last st.  Ch1 and turn.  (7)
7.  1 HDC in each st across.  Ch1 and turn.  (7)
8.  2 HDC in first st, 1 HDC in next 5 st and 2 HDC in last st.  Ch1 and turn.  (9)
9.  1 HDC in each st across.  Ch1 and turn.  (9)
10.  2 HDC in first st, 1 HDC in next 7 st and 2 HDC in last st.  FO Pumpkin Spice yarn and join Glowing Gold yarn.  Ch1 and turn.  (11)
11.  With Glowing Gold yarn, 1 HDC in each st across.  Ch1 and turn.  (11)
12.  2 HDC in first st, 1 HDC in next 9 st and 2 HDC in last st.  Ch1 and turn.  (13)
13.  1 HDC in each st across.  Ch1 and turn.  FO and leave a long tail.  (13)
Repeat to make a second one.

Assembly:
To assemble your candy corns, place the right sides together and whipstitch around.  Leave a large enough opening to turn right side out.  Lightly stuff and finish whipstitching to close.  Weave ends.

Medium Candy Corn (make 2):
1.  With 6.0mm hook and Natural yarn, Ch2. HDC in 2nd ch.  Ch1 and turn.  (1)
2.  2 HDC in st.  Ch1 and turn.  (2)
3.  2 HDC in first st, 1 HDC in next st.  Ch1 and turn.  (3)
4.  2 HDC in first st, 1 HDC in next st and 2 HDC in last st.  Ch1 and turn.  (5)
5.  1 HDC in each st across.  Ch1 and turn.  (5)
6.  2 HDC in first st, 1 HDC in next 3 st and 2 HDC in last st.  Ch1 and turn.  (7)
7.  1 HDC in each st across.  FO Natural yarn and join Pumpkin Spice.  Ch1 and turn.  (7)
8.  With Pumpkin Spice, 2 HDC in first st, 1 HDC in next 5 st and 2 HDC in last st.  Ch1 and turn.  (9)
9.  1 HDC in each st across.  Ch1 and turn.  (9)
10.  2 HDC in first st, 1 HDC in next 7 st and 2 HDC in last st.  Ch1 and turn.  (11)
11.  1 HDC in each st across.  Ch1 and turn.  (11)
12.  2 HDC in first st, 1 HDC in next 9 st and 2 HDC in last st.  Ch1 and turn.  (13)
13.  1 HDC in each st across.  Ch1 and turn.  (13)
14.  2 HDC in first st, 1 HDC in next 11 st and 2 HDC in last st.  FO Pumpkin Spice yarn and join Glowing Gold yarn.  Ch1 and turn.  (15)
15.  1 HDC in each st across.  Ch1 and turn.  (15)
16.  2 HDC in first st, 1 HDC in next 13 st and 2 HDC in last st.  Ch1 and turn.  (17)
17.  1 HDC in each st across.  Ch1 and turn.  (17)
18.  2 HDC in first st, 1 HDC in next 15 st and 2 HDC in last st.  Ch1 and turn.  (19)
19.  1 HDC in each st across.  Ch1 and turn.  (19)
Repeat to make a second one.

Assembly:
To assemble your candy corns, place the right sides together and whipstitch around.  Leave a large enough opening to turn right side out.  Lightly stuff and finish whipstitching to close.  Weave ends.

Large Candy Corn (make 2):
1.  With 8.0mm hook and Natural yarn, Ch2. HDC in 2nd ch.  Ch1 and turn.  (1)
2.  2 HDC in st.  Ch1 and turn.  (2)
3.  2 HDC in first st, 1 HDC in next st.  Ch1 and turn.  (3)
4.  2 HDC in first st, 1 HDC in next st and 2 HDC in last st.  Ch1 and turn.  (5)
5.  1 HDC in each st across.  Ch1 and turn.  (5)
6.  2 HDC in first st, 1 HDC in next 3 st and 2 HDC in last st.  Ch1 and turn.  (7)
7.  1 HDC in each st across.  FO Natural yarn and join Pumpkin Spice.  Ch1 and turn.  (7)
8.  With Pumpkin Spice, 2 HDC in first st, 1 HDC in next 5 st and 2 HDC in last st.  Ch1 and turn.  (9)
9.  1 HDC in each st across.  Ch1 and turn.  (9)
10.  2 HDC in first st, 1 HDC in next 7 st and 2 HDC in last st.  Ch1 and turn.  (11)
11.  1 HDC in each st across.  Ch1 and turn.  (11)
12.  2 HDC in first st, 1 HDC in next 9 st and 2 HDC in last st.  Ch1 and turn.  (13)
13.  1 HDC in each st across.  Ch1 and turn.  (13)
14.  2 HDC in first st, 1 HDC in next 11 st and 2 HDC in last st.  FO Pumpkin Spice yarn and join Glowing Gold yarn.  Ch1 and turn.  (15)
15.  1 HDC in each st across.  Ch1 and turn.  (15)
16.  2 HDC in first st, 1 HDC in next 13 st and 2 HDC in last st.  Ch1 and turn.  (17)
17.  1 HDC in each st across.  Ch1 and turn.  (17)
18.  2 HDC in first st, 1 HDC in next 15 st and 2 HDC in last st.  Ch1 and turn.  (19)
19.  1 HDC in each st across.  Ch1 and turn.  (19)
20.  2 HDC in first st, 1 HDC in next 17 st and 2 HDC in last st.  Ch1 and turn.  (21)
21.  1 HDC in each st across.  FO and leave a long tail.(21)
Repeat to make a second one.

Assembly:
To assemble your candy corns, place the right sides together and whipstitch around.  Leave a large enough opening to turn right side out.  Lightly stuff and finish whipstitching to close.  Weave ends. 

Hangers (make 3):
1.  With 8.0mm hook, ch31.  Sl st in 2nd ch and across.  FO and leave tail for attaching to top of the large candy corn.  (30) 

2.  For the medium candy corn, ch11.  Sl st in the 2nd ch and across.  FO and leave tail for attaching to top.  (11)

3.  For the small candy corn, ch26.  Sl st in 2nd ch and across.  FO and leave tail for attaching to top.  (25)

Attach each hanger to the top of its appropriate candy corn with your tapestry needle.  Make sure to secure it.  I double-knotted and weaved the tail inside and down through the polyfil and to the middle section and then weaved in and of the Pumpkin Spice stitches. 

Bow:
1.  With 6.0mm hook Soft Taupe yarn, ch7.  SC in 2nd ch from hook and across. Ch1 and turn. (6)
2-15.  SC in each st across.  Ch1 and turn.  (6). 
At the end of Row 15, FO and leave a long tail for wrapping around the center of the bow and for attaching to the top part of the Hangers.  

Assembly:
1.  Use tapestry needle to weave the tail to the center of the bow) 
2.  Wrap tail 10-15 times around the center.  Weave and double knot on the back side.  Make sure you have enough leftover tail to attach to the top of the hanger.  

Leaf (make 3):
1.  With 8.0mm hook and green yarn, Ch7. Sl st in 2nd ch from hook, SC in next ch, HDC in next, DC in next 2 ch and 3 DC in the last ch.  Rotate.  Now working on the opposite side of base ch, DC in the next 2 ch, HDC in the next ch, SC in next ch and sl st in last ch.  FO and leave a long tail for attaching and to form a hanger ring...  
Final Assembly:
Once all the pieces are made and the hangers are attached to its appropriate candy corn, then you will want to whipstitch the 3 hangers together at the top.  Then you will attach the leaves at the top and with the remaining tail make a loop for hanging.  And, then last place the bow at the top to cover the area where you whipstitched the leaves and whipstitch the bow in place.  

And, that's it...quick, simple and super cute fall seasonal decor project!!! 


Note:  
As an alternative, you could hold 3 strands of worsted weight yarn together in place of the chunky yarn.  
Happy Crocheting...
Legal:
--don't claim my pattern/design as your own
--don't use my pics as your own
--don't share my patterns electronically or in print format but provide a link to my blog

PIN AND SHARE... 

Sunday, August 20, 2017

Fox Pencil Topper

With school days ahead, here's a super cute Fox Pencil Topper for the kids.  This would also make a great gift for your child's teacher.

It takes less than an hour to make and uses very little yarn.  You can change the main color to gray and your Topper becomes a Wolf...

Fox Pencil Topper
Fox Pencil Topper Pattern
Difficulty Level:  Easy

Size: approximately 3" tall from ears to base

Materials:
--2.5mm and 3.0mm hooks
--#4 worsted weight yarn in Terra Cotta and white (25-30 yds)
--3 small buttons

Stitch Abbreviations:
Ch: chain 
Sl st: slip stitch
St: stitch(es)
SC: single crochet
SC2tog: single crochet 2 stitches together
MR: magic ring 
FO: fasten off

Directions: 
Head:
1.  With 3.0mm hook and Terra Cotta yarn, 6 SC into MR.  Sl st join to first st and Ch1.  (6)
2.  2 SC in each st around.  Sl st join to first st and Ch1.  (12)
3.  2 SC in first st, 1 SC in next.  Repeat around.  Sl st join to first st and Ch1.  (18)
4.  2 SC in first st, 1 SC in next 2 st.  Repeat around.  Sl st join to first st and Ch1.  (24)
5-6.  1 SC in each st around.  Sl st join to first st and Ch1.  At the end of Round 6, FO and weave ends.  Join white yarn and Ch1.  (24)
7-8.  With white yarn, 1 SC in each st around.  Sl st join to first st and Ch1.  (24)

(After Round 8, go ahead and attach 2 small buttons for the eyes between Rounds 7 and 8.  See my pic for placement.  Make sure to leave a big enough space between the eyes for the nose.)

9.  SC2tog, 1 SC in next 2 st.  Repeat around.  Sl st join to first st and Ch1.  (18)
10.  SC2tog, 1 SC in next st.  Repeat around.  Sl st join to first st and Ch1.  (12)
11.  SC2tog.  Repeat 5 more times.  FO and weave ends of white yarn.  Join Terra Cotta Yarn.  Sl st join to first st and Ch1.  (6)
12-15.  1 SC in each st around.  Sl st join to first st and Ch1.  (6)
At the end of Round 15, FO and weave ends.  

Nose:
1.  With 2.5mm hook and Terra Cotta yarn, ch2.  SC in 2nd ch from hook.  Ch1 and turn. (1)
2.  2 SC in st.  Ch1 and turn.  (2)
3.  2 SC in first st, 1 SC in next st.  Ch1 and turn.  (3)
4.  2 SC in first st, 1 SC in next st and 2 SC in last st.  Ch1 and turn.  (5)
5.  1 SC in each st across.  Ch1 and turn.  (5).
6.  2 SC in first st, 1 SC in next 3 st and 2 SC in last st.  FO, leaving a tail to attach to head.  (7)
7.  Attach small black button to nose tip.  

Ears (make 2):
1.  With 2.5mm hook and Terra Cotta yarn, ch2.  SC in 2nd ch from hook.  Ch1 and turn. (1)
2.  2 SC in st.  Ch1 and turn.  (2)
3.  2 SC in first st, 1 SC in next st.  FO and weave ends.  (3)
4.  Join white yarn in any st and Ch1.  SC evenly around ear.  FO, leaving a tail to attach to head.
5.  Attach ears to each side of the head.

And, that's it!  Quick, simple and cute!!!

Happy Crocheting...

Legal:
--don't claim my pattern as your own
--don't use my pics as your own
--don't share my pattern electronically or in print format but provide a link to my blog

Saturday, August 19, 2017

Carolina Panthers Ponytail Headband/Ear Warmer

It's getting to be that time of the year -- cooler days and Carolina Panthers football!!!  With this Ponytail Headband/Ear Warmer, I made my football appliqué removable so, if desired, you can wear your hair up in a ponytail or use the football clip to cover the ponytail opening and wear your hair down - making this versatile and not limiting you to a ponytail only hairdo...

I used Red Heart Super Saver yarn for this project.

Carolina Panthers Ponytail Headband/Ear Warmer
 
Carolina Panthers Ponytail Headband/Ear Warmer Pattern

Difficulty Level:  Easy

Size:  Average Woman's Head

Gauge:  12 HDC stitches x 9 rows = 4" 

Materials:
--5.0mm hook
--Red Heart Super Saver Yarn in Pool, Black, White and Brown (total combined approximately 60 - 80 yards)
--Ponytail Holder
--Hair clip (optional)
--Stitch markers (optional)
--Craft glue (only needed if attaching to a hair clip) 
--Tapestry needle for weaving

Stitch Abbreviations:
Ch: chain
Sl St: slip stitch
St: stitch(es)
SC: single crochet
HDC: half double crochet
SC2tog: single crochet 2 stitches together
HDC2tog: half double crochet 2 stitches together 
FO: fasten off

Directions:
Headband/Ear Warmer
1.  Join black yarn with a sl st and Ch1 to your ponytail holder.  Make 24 SC st around ponytail holder.  Sl st join to first st and Ch1.  (24)
2-3.  1 HDC in each st around.  Sl st join to first st and Ch1.  (24)

Stitch Marker Placement:
Before continuing, you will want to place 2 stitch markers on the opposite side of the ponytail holder.  So, from Row 3, count over 12 stitches. Place a stitch marker in the 13th stitch.  Count over 7 stitches and place the second stitch marker into stitch 20.  

Here's a short video tutorial showing you how to start this project, where to place the stitch markers and why:  
                                           https://youtu.be/LRVFifHU7NM

4.  1 HDC in each of the first 8 st.  Ch1 and turn.  (8)
5.  2 HDC in first st, 1 HDC in the next 6 st and 2 HDC in the last st.  Ch1 and turn.  (10)
6.  2 HDC into the first st; 1 HDC into the next 8 st and 2 HDC into the last st.  FO black yarn and join white yarn.  Ch1 and turn.  (12)
7-8.  With white yarn, 1 HDC in each st across.  At the end of Row 8, FO white yarn and join Pool yarn.  Ch1 and turn.  (12) 
9-40.  With Pool yarn, 1 HDC in each st across.  At the end of Row 40, FO Pool yarn and join white yarn.  Ch1 and turn.  (12)
41-42.  With white yarn, 1 HDC in each st across.  At the end of Row 42, FO white yarn and join black yarn.  Ch1 and turn.  (12)
43.  With black yarn, 1 HDC in each st across.  Ch1 and turn.  (12)
44.  HDC2tog; 1 HDC in the next 8 st; HDC2tog.  Ch1 and turn.  (10)
45.  HDC2tog; 1 HDC in the next 6 st; HDC2tog.  (8)

Now, FO; leaving a long tail to attach to Row 3 of the opposite side of the ponytail holder; whipstitch 8 stitches of Row 45 to the 8 stitches (from stitch marker to stitch marker) of Round 3. 

Football Appliqué:
1.  With brown yarn, ch2.  SC in 2nd ch from hook.  Ch1 and turn.  (1)
2.  2 SC in st.  Ch1 and turn.  (2)
3.  2 SC in first st, 1 SC in next st.  Ch1 and turn.  (3)
4.  2 SC in first st, 1 SC in next st, 2 SC in last st.  Ch1 and turn.  (5)
5.  2 SC in first st, 1 SC in next 3 st, 2 SC in last st.  Ch1 and turn.  (7) 
6-9.  1 SC in each st across.  Ch1 and turn.  (7)
10.  SC2tog, 1 SC in next 3 st, SC2tog.  Ch1 and turn.  (5) 
11.  SC2tog, 1 SC in next st, SC2tog.  Ch1 and turn.  (3)
12.  SC2tog, 1 SC in next st.  Ch1 and turn.  (2)
13.  SC2tog.  Ch1.  (1)
14.  SC evenly around football, placing 3 SC st in each end.  FO and weave ends, if you're going to attach to a hair clip.  FO and leave a long tail if you're going to attach to the headband.  

Embroider:
With white yarn, embroider the laces onto football.  

Happy Crocheting...
Legal:
--don't claim my pattern as your own
--don't use my pics as your own
--don't share my pattern electronically or in print format but provide a link to my blog

PIN and SHARE!!!