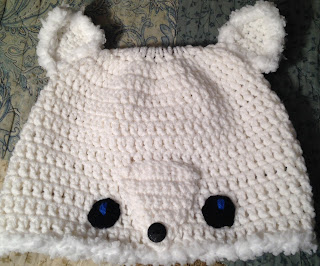
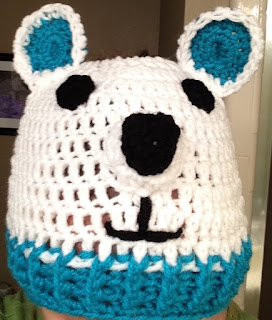
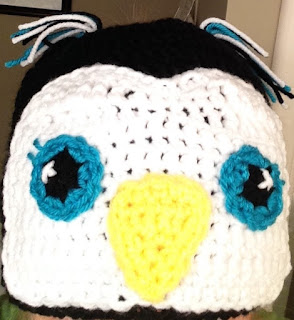
Well, good evening all!!! I decided to make a 2nd set of the Messy Bun/Ponytail Hats. This set is done in Arctic Animals - Polar Bear, Penguin and the Arctic (White) Fox!!! I think they turned out pretty good and offering the pattern below for FREE. I think I may do one or two more sets -- I was thinking of a Safari set and Insect/Bug set...but who knows, I go where the hook leads me...
Enjoy the free pattern and be sure to post your pics if you decide to make one. I'd really love to see what you do with the pattern.
Arctic Hats -Messy Bun/Ponytail Pattern
Size: Teen-Adult
For Pre-teen: use a smaller hook size to make the hat
Difficulty Level: Easy
Gauge: 4 rows of 6 DC per row = 2" x 2"
Materials:
--4.5mm and 5.5mm hooks
--#4
Worsted Weight yarn in White, Peacock, Bright Yellow, Black and Blue
--small amount of Red Heart Buttercup for the trim (if you don't have this; then you can just use the white yarn)
--1 small black button
--small amount of polyfil for Polar Bear nose
--ponytail holder
--tapestry needle for weaving
Abbreviations:
Ch: chain
Sl st: slip stitch
MR: magic ring
SC: single crochet
ESC: extended single crochet
HDC: half double crochet
DC: double crochet
TC: triple crochet
TC2tog: triple crochet 2 stitches together
FPDC: front post double crochet
BPDC: back post double crochet
Dec: decrease
FO: fasten off
Arctic (White) Fox:
Directions:
1.
With white yarn and 5.5mm hook, sl st to join yarn, ch1 to
ponytail holder. 24 DC around ponytail holder. Sl st to join to first
st and ch1. (if you don't have a ponytail holder, ch 30; sl st to first
ch to form a ring and work the 24 DC into the ring). (24)
2. 2 DC in each st around. Sl st to join and ch1. (48)
3. 2 DC in first st, 1 DC in next 3 st. Repeat around. Sl st to join and ch1. (60)
4-13. 1 DC in each st around. Sl st to join and ch1. FO and weave ends. (60)
14. With buttercup yarn, join in any stitch and work SC in each st around. Sl st to join. FO. Weave ends.
Ears (make 2):
1. With 4.5mm hook and white yarn, ch2. 1 SC in 2nd ch from hook. Ch1 and turn. (1)
2. 2 SC in st. Ch1 and turn. (2)
3. 2 SC in first st, 1 SC in next st. Ch1 and turn. (3)
4. 2 SC in first st, 1 SC in next st and 2 SC in last st. Ch1 and turn. (5)
5. 1 SC in each st across. Ch1 and turn. (5)
6. 2 SC in first st, 1 SC in next 3 st, 2 SC in last st. Ch1 and turn. (7)
7-8. 1 SC in each st across. Ch1 and turn. FO and weave ends. (7)
9.
Join buttercup yarn into any st and ch1. SC in same st and evenly around
the ear. FO, leaving a long enough tail to attach to hat.
Nose:
1. With 4.5mm hook and white yarn, Ch11. SC in 2nd ch from hook and across. Ch1 and turn. (10)
2. 1 SC in each st across. Ch1 and turn. (10)
3. Dec first 2 st together, 1 SC in each of the next 6 st, dec last 2 st together. Ch1 and turn. (8)
4. 1 SC in each st across. Ch1 and turn. (8)
5. Dec first 2 st together, 1 SC in each of the next 4 st, dec last 2 st together. Ch1 and turn. (6)
6. 1 SC in each st across. Ch1 and turn. (6)
7. Dec first 2 st together, 1 SC in each of the next 2 st, dec last 2 st together. Ch1 and turn. (4)
8. 1 SC in each st across. Ch1 and turn. (4)
9. Dec first 2 st together, dec last 2 st together. Ch1 and turn. (2)
10. 1 SC in each st across. FO, leaving a long enough tail to attach to hat. (2)
Eyes (make 2):
1.
With 4.5mm hook and black yarn, 6 HDC into MR. Sl st to join and FO,
leaving a long enough tail to attach to hat. Embroidered a small piece
of blue yarn in center of eye.
Assembly (see pics for help):
Ears: I attached them on each side between rows 2-4.
Nose:
I placed the long end on row 9, with the smaller end flush with row 14
of the hat; I attached a black button on top of the nose on rounds 9 and
10.
Eyes: I placed the eyes on each side of the nose at rows 11-12.
Polar Bear:
Directions:
1.
With white yarn and 5.5mm hook, sl st to join yarn, ch1 to
ponytail holder. 24 DC around ponytail holder. Sl st to join to first
st and ch1. (if you don't have a ponytail holder, ch 30; sl st to first
ch to form a ring and work the 24 DC into the ring). (24)
2. 2 DC in each st around. Sl st to join and ch1. (48)
3. 2 DC in first st, 1 DC in next 3 st. Repeat around. Sl st to join and ch1. (60)
4-10. 1 DC in each st around. Sl st to join and ch1. FO and weave ends. (60)
11-13. Join peacock yarn at any st and ch3 (this counts as the first FPDC); BPDC around the next post st. Alternate between FPDC then BPDC. Repeat this around. (60)
Note: if you are not comfortable with doing post stitches, you can just do DC stitches on rows 11-13. If you would like to learn how to do post stitches, then here's a link that has a great tutorial on post stitches:
14. 1 SC in each st around. Sl st to join. FO. Weave ends. (60)
Ears (make 2):
1. With 5.5 hook and Peacock yarn, 6 HDC into MR. Sl st to join. Ch1. (6)
2. 2 HDC in each st around. Sl st to join. Ch1. (12)
3. 2 HDC in first st, 1 HDC in next st. Repeat around. Before completing last st, FO Peacock and join White yarn. Sl st to join. Ch1. (18)
4. With white yarn, 1 ESC in each st around. Sl st to join and FO. Leave a long enough tail to attach to hat.
Nose:
1. With 4.5 hook and White yarn, 6 HDC into MR. Sl st to join and ch1. (6)
2. 2 HDC in each st around. Sl st to join. Ch1. (12)
3. 2 HDC in first st, 1 HDC in next 3 st. Repeat around. Sl st to join. FO. Leave a long enough tail to attach to hat. (15)
Black Spot:
1. With 4.5 hook and Black yarn, ch6. TC in the 4th ch from the hook. TC in the next 2 ch. FO. Leave a long enough tail to attach to the top of the nose.
Eyes (make 2):
1. With 4.5 hook and Black yarn, 6 HDC into MR. Sl st to join and FO. Leave a long enough tail to attach to hat.
Assembly (see pics for help):
Ears: I attached them on each side between rows 2-4.
Nose:
I first attached the black spot to the nose. I then placed the nose at rows 5-8 at the center of the hat. Before you finish attaching, add a small amount of polyfil. Use black yarn, to embroider mouth (see pic).
Eyes: I placed the eyes at rows 3-4.
Penguin:
The Penguin Hat, itself, is made exactly the same as the Arctic Fox Hat. The only
difference is in the yarn I used. I used Black yarn.
See Fox pattern for detailed directions in making the hat.
1-14: with Black yarn
Face:
1. With 5.5 hook and White yarn, ch22. SC in 2nd ch from hook and across. Ch1 and turn. (21)
2-10. 1 SC in each st across. Ch1 and turn. (21)
11. Complete the following st pattern across: SC, HDC, DC, TC, TC2tog, TC, DC, HDC, SC, Sl St, SC, HDC, DC, TC, TC2tog, TC, DC, HDC, SC. Ch1 and turn. (19)
12. Repeat row 11, but into the TC2tog you will put 2 TC stitches. This will bring your stitch count back to 21. Ch1 and turn. (21)
13. SC around perimeter of face. FO and leave a long enough tail to attach to hat.
Nose:
1. With Bright Yellow yarn and 4.5mm hook, Ch2. SC in 2nd ch from hook. Ch1 and turn. (1)
2. 2 SC in st. Ch1 and turn. (2)
3. 2 SC in first st, 1 SC in next st. Ch1 and turn. (3)
4. 2 SC in first st, 1 SC in next st and 2 SC in last st. Ch1 and turn. (5)
5. 1 SC in each st across. Ch1. (5)
6. 1 SC evenly around the nose. FO, leaving a long enough tail to attach to hat.
Eyes (make 2):
1. With Black yarn and 4.5mm hook, 6 HDC into MR. FO Black yarn and join Peacock yarn. Sl st to join and ch1. (6)
2. In Peacock yarn, 2 SC in each st around. FO, leaving a long enough tail to attach to hat. (12)
3. Embroider white yarn to the black portion of the eye and Peacock to the outside corner of the eye. (see pic)
Tassel Ears (make 2):
I
used Peacock, White and Black. I cut (2) 6" long strips of each
color. I weaved each set of strips into the sides at Round 2 and tied
into a double knot. (see pic)
Assembly:
I attached the eyes and the nose to the face before attaching the face to the center of the hat.
(see pic)
Be sure to check out my post on the Messy Bun/Ponytail - Woodland Animals Hats for the Fox, Wolf and Owl!!! Here's the link for ya:
Legal:
--don't use my pics
--don't claim pics or pattern as your own
--do not share/post my pattern anywhere, but link back to my blog
Special Request:
Please share and Re-pin my pins with your friends!!! Follow me on
social media: my blog; Ravelry, Instagram and Pinterest (rilla2u);
Facebook: /rillaedwards; Crocheting & Crafting
Happy Crocheting....


No comments:
Post a Comment