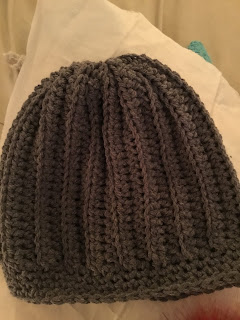
I'm in love with the simplicity and ease of making these "Easy Ribbed Hats". Virtually so easy to make and size to any head. These are worked tube-style.
Quick, easy and makes awesome gifts, especially for Christmas. Worsted weight yarn with a 6.0mm hook is all you need to make affordable, stylish hats for your family and friends...
With our budget this year, I know my family and friends, will be receiving hats and maybe scarves/cowls if time allows.
Materials:
--6.0mm hook (or your size of choice)
--worsted weight yarn (or your weight yarn choice)
--faux fur pom (optional)
--tape measure
--tapestry needle for weaving
Special Note:
You can use any yarn, stitch or hook size you want. You can opt to make a band to turn up for your hat. There are literally so many variations to make so many different designs using the same basic concept.
Directions:
1. You will make a rectangular-shaped piece - measure center top of head to above, at or below the ear (depending on your preference) and then measure your head circumference. This will make up "width x length" for your rectangular-shaped piece. If you want a snug hat, then you can reduce 1-2" from your length. Personally, I like mine to be a little more loose than too snug.
2. Slip stitch or whipstitch the short ends together, with right sides facing.
3. Close the top, by weaving yarn in and out of the last row. Pull tail tight and weave yarn in and out to secure the top closed.
4. Turn right side out and add a pom (optional) - fur or yarn.
5. Add a border to the front of the hat (optional).
Quick, easy and makes awesome gifts, especially for Christmas. Worsted weight yarn with a 6.0mm hook is all you need to make affordable, stylish hats for your family and friends...
With our budget this year, I know my family and friends, will be receiving hats and maybe scarves/cowls if time allows.
Easy Ribbed Hats
Materials:
--6.0mm hook (or your size of choice)
--worsted weight yarn (or your weight yarn choice)
--faux fur pom (optional)
--tape measure
--tapestry needle for weaving
Special Note:
You can use any yarn, stitch or hook size you want. You can opt to make a band to turn up for your hat. There are literally so many variations to make so many different designs using the same basic concept.
Directions:
1. You will make a rectangular-shaped piece - measure center top of head to above, at or below the ear (depending on your preference) and then measure your head circumference. This will make up "width x length" for your rectangular-shaped piece. If you want a snug hat, then you can reduce 1-2" from your length. Personally, I like mine to be a little more loose than too snug.
2. Slip stitch or whipstitch the short ends together, with right sides facing.
3. Close the top, by weaving yarn in and out of the last row. Pull tail tight and weave yarn in and out to secure the top closed.
4. Turn right side out and add a pom (optional) - fur or yarn.
5. Add a border to the front of the hat (optional).
With a Faux Fur Pom:
Without a Pom:
Get creative and make tons (or a few) hats for this Christmas Season. You are definitely sure to put some smiles on faces. And, please share your completed pictures. On Instagram, #rilla2u and I will add your picture(s) to my blog!!!
Happy Crocheting...
Legal:
--don't use/claim my design as your own
--don't use/claim my pics as your own
--okay to make and sale your finished work
--don't share my pattern electronically or in print format (without prior consent) but provide a link to my blog
Social Media:
If you are on the following sites, let's connect and hook up...
- Instagram: Rilla2u
- Pinterest: Rilla2u
- Twitter: Rilla2u
- Facebook: /rilla.edwards


No comments:
Post a Comment