

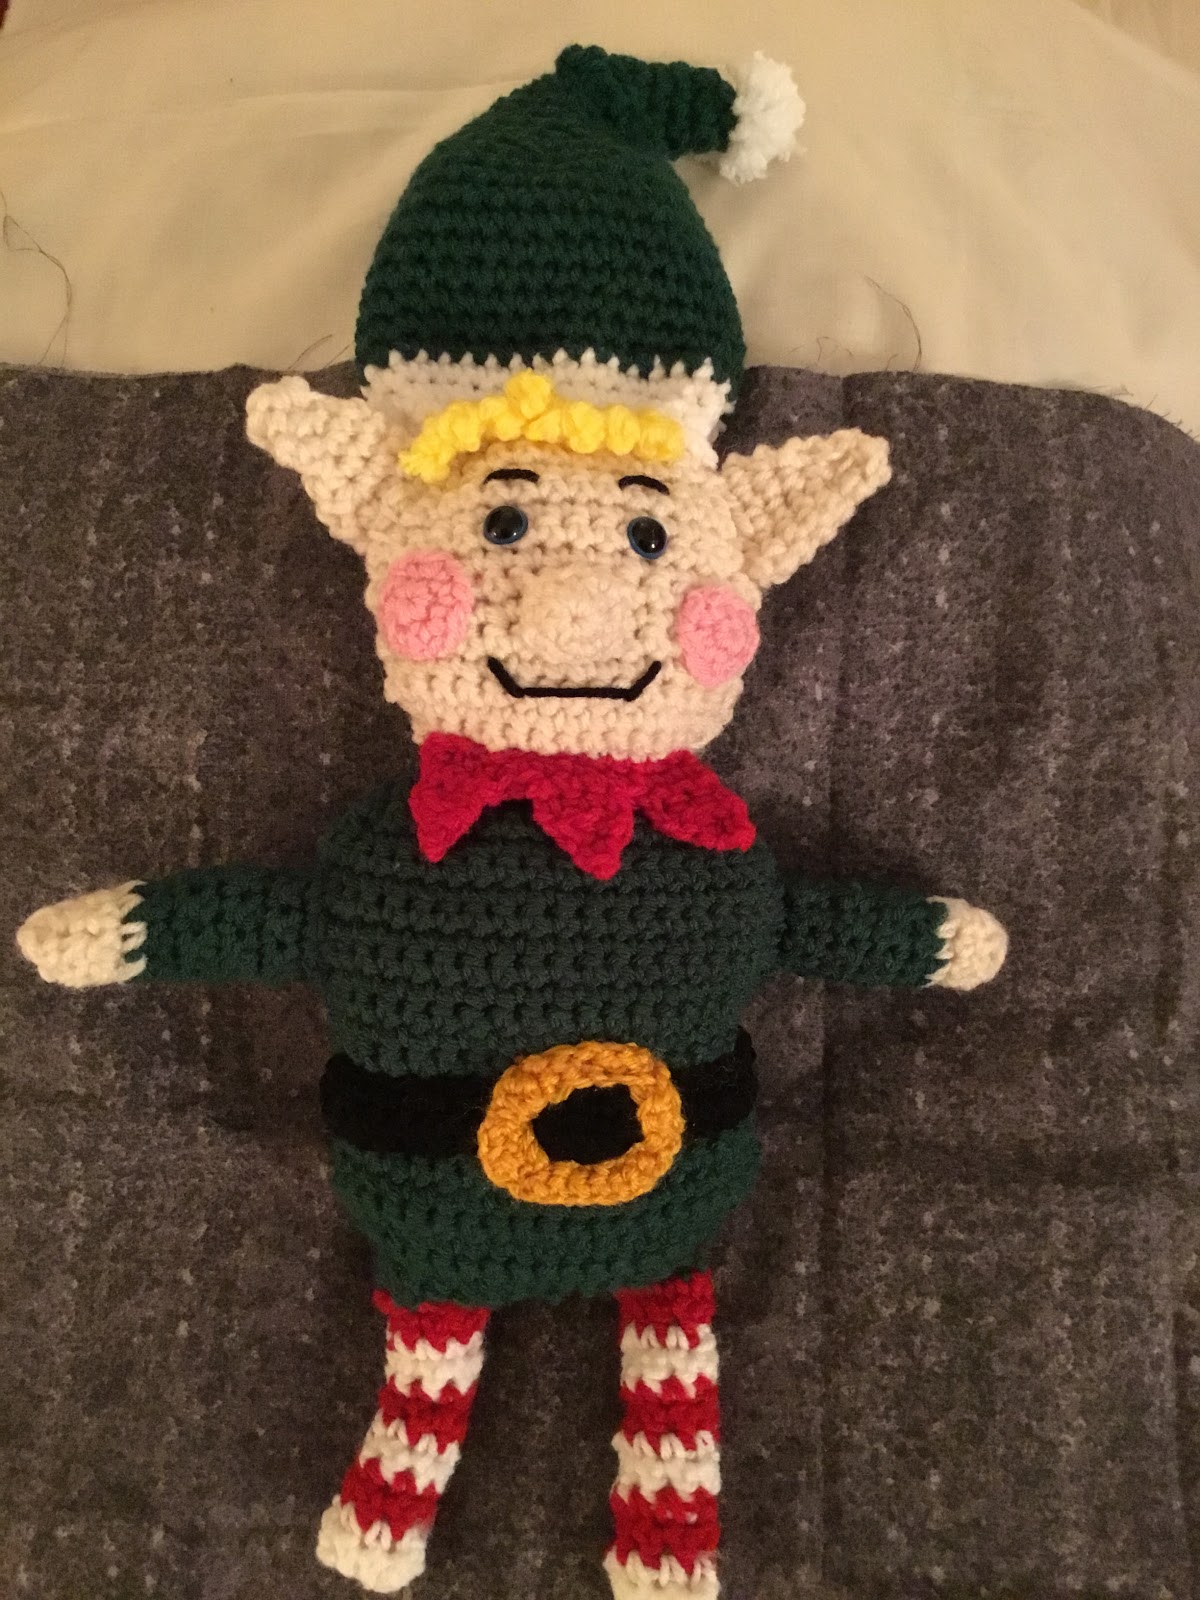
Today, I want to share my fourth pattern in my "CHRISTMAS CHEER
CUDDLERS" - Elf. All of my Cuddlers are made from the same
basic
pattern with feature variations to individualize.
I made these Rag doll style which means they are not overly stuffed with Polyfil. These are perfect for the kids, for decorating around the house, attach to a wreath, nestle in or under your tree, sit on your shelf/table/mantle/bed...just lots of different ways to show off each one...
So, I hope you all will enjoy making your very own ELF!!!
Gauge: Not important for this project
Materials:
--4.0mm & 5.0mm hooks
--#4 worsted weight yarn in Green, Red, Aran White, Black, Gold, Yellow and Pink
--less than 15 inches of Bernat Pipsqueak yarn in White for the boot cuffs
--(2) 15mm black safety eyes - eyes
--Polyfil
--tapestry needle for weaving
U.S. Stitch Abbreviations:
Ch: chain
Sl st: slip stitch
St: stitch(es)
SC: single crochet
SC2tog: single crochet 2 stitches together
SC3tog: single crochet 3 stitches together
HDC: half double crochet
DC: double crochet
TC: triple crochet
Sk: skip
Rep: repeat
MR: magic ring
FO: fasten off
Elf:
 Directions:
Head/Body Panel (make 2):
1. With Green yarn and 5.0mm hook, Ch15. SC in 2nd ch from hook and across. Ch1 and turn. (14)
2. 1 SC in each st across. Ch1 and turn. (14)
3. 2 SC in first st, 1 SC in next 12 st, 2 SC in last st. Ch1 and turn. (16)
4. 2 SC in first st, 1 SC in next 14 st, 2 SC in last st. Ch1 and turn. (18)
5. 2 SC in first st, 1 SC in next 16 st, 2 SC in last st. Ch1 and turn. (20)
6-20. 1 SC in each st across. Ch1 and turn. (20)
21. SC2tog, 1 SC in next 16 st, SC2tog. Ch1 and turn. (18)
22. SC2tog, 1 SC in next 14 st, SC2tog. Ch1 and turn. (16)
23. SC2tog, 1 SC in next 12 st, SC2tog. Ch1 and turn. (14)
24. SC2tog, 1 SC in next 10 st, SC2tog. FO Green yarn and join Aran yarn. Ch1 and turn. (12)
25. With Aran color, 1 SC in each st across. Ch1 and turn. (12)
26. 2 SC in first st, 1 SC in next 10 st, 2 SC in last st. Ch1 and turn. (14)
27. 2 SC in first st, 1 SC in next 12 st, 2 SC in last st. Ch1 and turn. (16)
28-35. 1 SC in each st across. Ch1 and turn. (16)
36. SC2tog, 1 SC in next 12 st, SC2tog. Ch1 and turn. (14)
37. SC2tog, 1 SC in next 10 st, SC2tog. Ch1 and turn. (12)
38. SC2tog, 1 SC in next 8 st, SC2tog. Ch1 and turn. (10)
39. 1 SC in each st across. FO and weave ends. (10)

Make a second panel. One panel is your front piece and the second panel is your back piece. Before joining the two panels together, you will need to make the features for the front side.
Eyes:
1. Attach safety eyes at Rows 34 or 35.
Eyebrows:
1. Embroider with black yarn.
Nose:
Neck Border:
1. With Red yarn and 5.0mm hook, Ch12. SC in 2nd ch from hook and across. Ch1 and turn. (11)
2. 1 SC in the first 3 st. Ch1 and turn. (3)
3. 1 SC in each st across. Ch1 and turn. (3)
4. SC3tog. Ch1 and turn. (1)
5. SC. FO and weave ends. (1)
6. Join Red yarn in the 5th st of Row 1 and repeat steps #2-5.
7. Join Red yarn in the 9th st of Row 1 and repeat steps #2-5.
Ears (make 2):
1. With Aran yarn and 5.0mm hook, 6 SC MR. Sl st join to first st and Ch1. (6)
2. 2 SC in the first st, 1 SC in each of the remaining st. Sl st join to first st and Ch1. (7)
3. 2 SC in the first st, 1 SC in each of the remaining st. St st join to first st and Ch1. (8)
4. 1 SC in each st around. Sl st join to first st and Ch1. (8)
5. 2 SC in the first st, 1 SC in each of the remaining st. Sl st join to first st and Ch1. (9)
6. 2 SC in the first st, 1 SC in each of the remaining st. Sl st join to first st and FO. Leave a long enough tail for attaching. (10)
Arms (make 2):
For the arms, you are going to make a total of 4. 2 arms (1 on each side) for each panel:
1. With 5.0mm hook, join Green yarn at Row 18 with a sl st and Ch1. SC into same st. SC in the end stitches of Row 18-21. Ch1 and turn. (4)
2-8. 1 SC in each st across. Ch1 and turn. At the end of Row 8, FO Green yarn and join Aran yarn. (4)
9. With Aran yarn, 1 SC in each st across. Ch1 and turn. (4)
10. 1 SC in each st across. Ch1 and turn. (4)
11. SC2tog. Rep. Ch1 and turn. (2)
12. SC2tog. FO. Leave a long enough tail for joining.
Legs (make 2):
For the legs, you are going to make a total of 4. 2 (1 on each side) for each panel:
1. With Red yarn and 5.0mm hook, join yarn in the last st of Row 1 with a sl st and Ch1. SC in same st. SC into the next 3 st. Ch1 and turn. (4)
2. 1 SC in each st across. Switch to White yarn. Ch1 and turn. (4)
3-4. With White yarn, 1 SC in each st across. At the end of Row 4, switch to Red yarn. Ch1 and turn. (4)
5-6. With Red yarn, 1 SC in each st across. At the end of Row 6, switch to White yarn. Ch1 and turn. (4)
7-8. With White yarn, 1 SC in each st across. At the end of Row 8, switch to Red yarn. Ch1 and turn. (4)
9-10. With Red yarn, 1 SC in each st across. At the end of Row 10, switch to White yarn. Ch1 and turn. (4)
11-12. With White yarn, 1 SC in each st across. At the end of Row 12, FO and weave ends. (4)
3-8. Rep #2. At the end of Row 8, FO Red yarn and join black yarn. Ch1. (4)
Now, you are ready to start the assembly portion before we complete the Slippers, Belt, Buckle, Hair and Hat.
Assembly:
1. Make sure you have added the eyes, eyebrows, cheeks, nose and mouth to the face.
2. Whipstitch join the front and back panels together. If so desired, you can SC around your Cuddler. Just make sure, whichever method you decide on, that you use the correct yarn color for joining together (green to green sections; Aran to Aran sections, red to red sections and white to white sections).
3. Before you finish off joining, add Polyfil. Remember, this is made Rag Doll style so don't over-stuff.
4. Whipstitch attach the neck border at Row 25.
5. Attach the ears to each side of the head.
Now, you are ready to continue with making the Slippers, Belt, Buckle, Hair and Hat...
Slippers (make 2):
1. With Green yarn and 5.0mm hook, Ch19. SC in 2nd ch from hook and across. Ch1 and turn. (18)
2-4. 1 SC in each st across. Ch1 and turn. At the end of Row 4, FO and leave a long tail.
5. Fold slipper left to right and whipstitch down the short end and across the bottom. FO and weave ends.
6. With Pipsqueak yarn, you can attach in any stitch on top and SC around. OR, you can use your tapestry needle and weave it across the top. (NOTE: if you SC around the top, you will use a little more than the specified amount listed above)
7. For the front of the slipper, I made a MR and placed 6 SC st into it. Sl st joined to first st and FO, leaving a tail to attach it to the front of the slipper.
Attach each slipper to the bottom of each leg.

Belt:
1. With Black yarn and 5.0mm hook, Ch41. SC in 2nd ch from hook and across. Ch1 and turn. (40)
2. 1 SC in each st across. FO. Leave a long tail for joining belt to body.
Buckle:
1. With Gold yarn and 5.0mm hook, Ch25. SC in 2nd ch from hook and across. FO. Leave a long tail for joining buckle to the belt and body.
See my pics for belt/buckle placement.
Hat:
1. With White yarn and 5.0mm hook, Ch30. Sl st join to first ch to form a ring. SC in each st around. (30)
2-4. 1 SC in each st around. At the end of Round 4, FO White yarn and join Green yarn. Ch1. (30)
5. 1 SC in each st around. Sl st join and Ch1. (1)
6-12. Rep #5.
13. SC2tog, 1 SC in the next 3 st. Rep around. Sl st join to first st and Ch1. (24)
14. SC2tog, 1 SC in the next 2 st. Rep around. Sl st join to first st and Ch1. (18)
15. 1 SC in each st around. Sl st join to first st and Ch1. (18)
16. SC2tog, 1 SC in the next st. Rep around. Sl st join to first st and Ch1. (12)
17. 1 SC in each st around. Sl st join to first st and Ch1. (12)
18. SC2tog. Rep 5 more times. Sl st join to first st and Ch1. (6)
19-24. 1 SC in each st around. Sl st join to first st and Ch1. At the end of Round 24, FO and weave ends. (6)
Pompom:
1. With White yarn, I wrapped 20-25 times around 3 fingers. Tied double knot in the center and then trimmed with scissors. Fluff and attach pompom to tip.
Use
White yarn and tapestry needle to attach hat around top of head. I
also used Green yarn and tapestry needle and made a few whipstitches to
make the hat's bent shape near the top.
Hair:
1. With yellow yarn and 5.0mm hook, I joined yarn with a sl st at the top right, just inside of the ear and below the hat. *Ch4. SC in 2nd ch from hook and next 2 ch. Sl st in next st.* Rep from * to * across the top of the forehead until you're at the last st just inside of the ear. FO and weave ends.
And, that's it!!!! Super cute and easy project to complete in one evening.


 Below, you will find the links to the Turkey, Snowman and Santa Cuddlers.
Click on the links to go directly to the patterns...
Below, you will find the links to the Turkey, Snowman and Santa Cuddlers.
Click on the links to go directly to the patterns...


 Be sure to follow my blog for all of my "Holiday Cheer Cuddlers" patterns. I still have my Penguin pattern to share...

Legal:
I made these Rag doll style which means they are not overly stuffed with Polyfil. These are perfect for the kids, for decorating around the house, attach to a wreath, nestle in or under your tree, sit on your shelf/table/mantle/bed...just lots of different ways to show off each one...
So, I hope you all will enjoy making your very own ELF!!!
Christmas Cheer Cuddlers - Elf Pattern


Size: approx. 18" tall

Gauge: Not important for this project
Materials:
--4.0mm & 5.0mm hooks
--#4 worsted weight yarn in Green, Red, Aran White, Black, Gold, Yellow and Pink
--less than 15 inches of Bernat Pipsqueak yarn in White for the boot cuffs
--(2) 15mm black safety eyes - eyes
--Polyfil
--tapestry needle for weaving
U.S. Stitch Abbreviations:
Ch: chain
Sl st: slip stitch
St: stitch(es)
SC: single crochet
SC2tog: single crochet 2 stitches together
SC3tog: single crochet 3 stitches together
HDC: half double crochet
DC: double crochet
TC: triple crochet
Sk: skip
Rep: repeat
MR: magic ring
FO: fasten off
Elf:
Head/Body Panel (make 2):
1. With Green yarn and 5.0mm hook, Ch15. SC in 2nd ch from hook and across. Ch1 and turn. (14)
2. 1 SC in each st across. Ch1 and turn. (14)
3. 2 SC in first st, 1 SC in next 12 st, 2 SC in last st. Ch1 and turn. (16)
4. 2 SC in first st, 1 SC in next 14 st, 2 SC in last st. Ch1 and turn. (18)
5. 2 SC in first st, 1 SC in next 16 st, 2 SC in last st. Ch1 and turn. (20)
6-20. 1 SC in each st across. Ch1 and turn. (20)
21. SC2tog, 1 SC in next 16 st, SC2tog. Ch1 and turn. (18)
22. SC2tog, 1 SC in next 14 st, SC2tog. Ch1 and turn. (16)
23. SC2tog, 1 SC in next 12 st, SC2tog. Ch1 and turn. (14)
24. SC2tog, 1 SC in next 10 st, SC2tog. FO Green yarn and join Aran yarn. Ch1 and turn. (12)
25. With Aran color, 1 SC in each st across. Ch1 and turn. (12)
26. 2 SC in first st, 1 SC in next 10 st, 2 SC in last st. Ch1 and turn. (14)
27. 2 SC in first st, 1 SC in next 12 st, 2 SC in last st. Ch1 and turn. (16)
28-35. 1 SC in each st across. Ch1 and turn. (16)
36. SC2tog, 1 SC in next 12 st, SC2tog. Ch1 and turn. (14)
37. SC2tog, 1 SC in next 10 st, SC2tog. Ch1 and turn. (12)
38. SC2tog, 1 SC in next 8 st, SC2tog. Ch1 and turn. (10)
39. 1 SC in each st across. FO and weave ends. (10)

Make a second panel. One panel is your front piece and the second panel is your back piece. Before joining the two panels together, you will need to make the features for the front side.
Eyes:
1. Attach safety eyes at Rows 34 or 35.
1. Embroider with black yarn.
Nose:
1. With Aran yarn and 4.0mm hook, make a MR. Into the MR, 2 SC, 2 HDC, 2 SC and 2 HDC. Sl st join to first st and Ch1. (8)
2. SC 2 x, HDC 2x, SC 2x, HDC 2x. Sl st join to first st and FO. Leave a long enough tail for attaching. (8)
Mouth:
1. Embroider with black yarn.
Cheeks (make 2):
1. With Pink yarn and 4.0mm hook, 6 SC into MR. Sl st join to first st and Ch1. (6)
2. 2 SC in first st, 1 SC in next st. Rep around. Sl st join to first st and FO. Leave a long enough tail for attaching. (9)
1. With Red yarn and 5.0mm hook, Ch12. SC in 2nd ch from hook and across. Ch1 and turn. (11)
2. 1 SC in the first 3 st. Ch1 and turn. (3)
3. 1 SC in each st across. Ch1 and turn. (3)
4. SC3tog. Ch1 and turn. (1)
5. SC. FO and weave ends. (1)
6. Join Red yarn in the 5th st of Row 1 and repeat steps #2-5.
7. Join Red yarn in the 9th st of Row 1 and repeat steps #2-5.
Ears (make 2):
1. With Aran yarn and 5.0mm hook, 6 SC MR. Sl st join to first st and Ch1. (6)
2. 2 SC in the first st, 1 SC in each of the remaining st. Sl st join to first st and Ch1. (7)
3. 2 SC in the first st, 1 SC in each of the remaining st. St st join to first st and Ch1. (8)
4. 1 SC in each st around. Sl st join to first st and Ch1. (8)
5. 2 SC in the first st, 1 SC in each of the remaining st. Sl st join to first st and Ch1. (9)
6. 2 SC in the first st, 1 SC in each of the remaining st. Sl st join to first st and FO. Leave a long enough tail for attaching. (10)
Arms (make 2):
For the arms, you are going to make a total of 4. 2 arms (1 on each side) for each panel:
1. With 5.0mm hook, join Green yarn at Row 18 with a sl st and Ch1. SC into same st. SC in the end stitches of Row 18-21. Ch1 and turn. (4)
2-8. 1 SC in each st across. Ch1 and turn. At the end of Row 8, FO Green yarn and join Aran yarn. (4)
9. With Aran yarn, 1 SC in each st across. Ch1 and turn. (4)
10. 1 SC in each st across. Ch1 and turn. (4)
11. SC2tog. Rep. Ch1 and turn. (2)
12. SC2tog. FO. Leave a long enough tail for joining.
Legs (make 2):
For the legs, you are going to make a total of 4. 2 (1 on each side) for each panel:
1. With Red yarn and 5.0mm hook, join yarn in the last st of Row 1 with a sl st and Ch1. SC in same st. SC into the next 3 st. Ch1 and turn. (4)
2. 1 SC in each st across. Switch to White yarn. Ch1 and turn. (4)
3-4. With White yarn, 1 SC in each st across. At the end of Row 4, switch to Red yarn. Ch1 and turn. (4)
5-6. With Red yarn, 1 SC in each st across. At the end of Row 6, switch to White yarn. Ch1 and turn. (4)
7-8. With White yarn, 1 SC in each st across. At the end of Row 8, switch to Red yarn. Ch1 and turn. (4)
9-10. With Red yarn, 1 SC in each st across. At the end of Row 10, switch to White yarn. Ch1 and turn. (4)
11-12. With White yarn, 1 SC in each st across. At the end of Row 12, FO and weave ends. (4)
3-8. Rep #2. At the end of Row 8, FO Red yarn and join black yarn. Ch1. (4)
Now, you are ready to start the assembly portion before we complete the Slippers, Belt, Buckle, Hair and Hat.
Assembly:
1. Make sure you have added the eyes, eyebrows, cheeks, nose and mouth to the face.
2. Whipstitch join the front and back panels together. If so desired, you can SC around your Cuddler. Just make sure, whichever method you decide on, that you use the correct yarn color for joining together (green to green sections; Aran to Aran sections, red to red sections and white to white sections).
3. Before you finish off joining, add Polyfil. Remember, this is made Rag Doll style so don't over-stuff.
4. Whipstitch attach the neck border at Row 25.
5. Attach the ears to each side of the head.
Now, you are ready to continue with making the Slippers, Belt, Buckle, Hair and Hat...
Slippers (make 2):
1. With Green yarn and 5.0mm hook, Ch19. SC in 2nd ch from hook and across. Ch1 and turn. (18)
2-4. 1 SC in each st across. Ch1 and turn. At the end of Row 4, FO and leave a long tail.
5. Fold slipper left to right and whipstitch down the short end and across the bottom. FO and weave ends.
6. With Pipsqueak yarn, you can attach in any stitch on top and SC around. OR, you can use your tapestry needle and weave it across the top. (NOTE: if you SC around the top, you will use a little more than the specified amount listed above)
7. For the front of the slipper, I made a MR and placed 6 SC st into it. Sl st joined to first st and FO, leaving a tail to attach it to the front of the slipper.
Attach each slipper to the bottom of each leg.

Belt:
1. With Black yarn and 5.0mm hook, Ch41. SC in 2nd ch from hook and across. Ch1 and turn. (40)
2. 1 SC in each st across. FO. Leave a long tail for joining belt to body.
Buckle:
1. With Gold yarn and 5.0mm hook, Ch25. SC in 2nd ch from hook and across. FO. Leave a long tail for joining buckle to the belt and body.
See my pics for belt/buckle placement.
Hat:
1. With White yarn and 5.0mm hook, Ch30. Sl st join to first ch to form a ring. SC in each st around. (30)
2-4. 1 SC in each st around. At the end of Round 4, FO White yarn and join Green yarn. Ch1. (30)
5. 1 SC in each st around. Sl st join and Ch1. (1)
6-12. Rep #5.
13. SC2tog, 1 SC in the next 3 st. Rep around. Sl st join to first st and Ch1. (24)
14. SC2tog, 1 SC in the next 2 st. Rep around. Sl st join to first st and Ch1. (18)
15. 1 SC in each st around. Sl st join to first st and Ch1. (18)
16. SC2tog, 1 SC in the next st. Rep around. Sl st join to first st and Ch1. (12)
17. 1 SC in each st around. Sl st join to first st and Ch1. (12)
18. SC2tog. Rep 5 more times. Sl st join to first st and Ch1. (6)
19-24. 1 SC in each st around. Sl st join to first st and Ch1. At the end of Round 24, FO and weave ends. (6)
Pompom:
1. With White yarn, I wrapped 20-25 times around 3 fingers. Tied double knot in the center and then trimmed with scissors. Fluff and attach pompom to tip.
Hair:
1. With yellow yarn and 5.0mm hook, I joined yarn with a sl st at the top right, just inside of the ear and below the hat. *Ch4. SC in 2nd ch from hook and next 2 ch. Sl st in next st.* Rep from * to * across the top of the forehead until you're at the last st just inside of the ear. FO and weave ends.
And, that's it!!!! Super cute and easy project to complete in one evening.


Happy Crocheting...
Legal:
--don't use/claim my design as your own
--don't use/claim my pics as your own
--okay to make and sale your finished work
--don't share my pattern electronically or in print format (without prior consent) but provide a link to my blog
Social Media:
If you are on the following sites, let's connect and hook up...
--don't share my pattern electronically or in print format (without prior consent) but provide a link to my blog
Social Media:
If you are on the following sites, let's connect and hook up...
- Instagram: Rilla2u
- Pinterest: Rilla2u
- Twitter: Rilla2u
- Facebook: /rilla.edwards
No comments:
Post a Comment