Thursday, January 26, 2023

Easter Eggs to Dye

 Easter Eggs to Dye 

With the rising cost of eggs this year, I decided to make my own Easter eggs to dye, using 100% cotton yarn.  Plus, I love that these are Eco-friendly and vegan-friendly. 

The eggs are quick and easy to make. So, you can complete one in less than 10 minutes.  

How to Make the Eggs:

Materials:

-3.0mm hook

-cotton yarn, white

-Polyfil

-tapestry needle

U.S. Stitch Abbreviations:

Ch:  chain

Sl st:  slip stitch

St:  stitch(es)

Sc:  single crochet

MR:  magic ring

Dec:  decrease

Rep:  repeat

FO:  fasten off

Note:  pattern is worked in the round.  Use a stitch marker to keep track of the start of each new round and move stitch marker up accordingly.

Directions:

1.  6 SC into MR.  (6)

2.  2 SC in each st around.  (12)

3.  1 SC in each st around.  (12)

4.  1 SC in first st, 2 SC in the next st. Rep around.  (18)

5.  1 SC in each st around.  (18)

6.  1 SC in each of the first 2 st, 2 SC in the next st.  Rep around.  (24)

7-8.  1 SC in each st around.  (24)

9.  1 SC in each of the first 2 st, then dec st.  Rep around.  (18)

10.  1 SC in each st around.  (18)

11.  1 SC in first st, then dec st.  Rep around.  (12)

12.  1 SC in each st around.  (12)

Stuff with Polyfil or cotton yarn. (UPDATE:  the eggs dry faster stuffed with Polyfil, but you can use either or for stuffing)

13.  Dec 6x.  Sl st to first st and FO.  Weave tail in and out of last 6 st.  Pull tail to close up opening.  Weave ends. 


I’ve completed my first trial run - I stuffed 6 with cotton yarn and 6 with Polyfil.  I wanted to see if the filling used made any difference in the depth of the color and drying time.  

I will update this post later with the results I get.  

For the dye:

(Note:  you can buy the Easter Egg dye kit to use)

I used 4 of my canning jars in pint size.  You can use cups, bowls, whatever you have.

I boiled water.

Into each jar, I dropped approximately 18-20 drops of food coloring and 1-1/2 teaspoons of white vinegar.  Then, I filled with boiled water about 1/2 way up each jar.  

I used a pair of black plastic tongs from the Dollar Tree to put my eggs in and out of the jars.  Plus the tongs are great for squeezing excess liquid back into the jar.  This is a very important step; make sure you get as much of the excess liquid out as you can.

I placed each of my eggs in a cupcake liner.  Underneath the liner, I laid out a piece of wax paper - just to be safe!!! 


Look how gorgeous and vibrant they turned out!!!!! I’m so excited to make more eggs and try more colors….

 Happy Crocheting...


Legal:
--don't use/claim my design as your own
--don't use/claim my pics as your own
--okay to make and sale your finished work
--don't share my pattern electronically or in print format (without prior consent) but provide a link to my blog

Social Media:
If you are on the following sites, let's connect and hook up...
  • Instagram:  Rilla2u
  • Pinterest:  Rilla2u
  • Twitter:  Rilla2u
  • Facebook:  /rilla.edwards 
  • Etsy:  rilla2u 
  • TikTok:  rillae2u 
  • YouTube:  Rilla2u 


Monday, January 23, 2023

Buffalo Plaid Trio Washcloth Set

 Buffalo Plaid Trio Washcloth Set

Today, I worked on a trio set of washcloths and/or dishcloths in Buffalo Plaid, using 100% cotton yarn and a 4.0mm hook. 

Each one measures approximately 8” x 8”.  

I made one washcloth in the checkered pattern with a black SC border. 


The second washcloth I made using the C2C (Corner-2-Corner) pattern with a black SC border.  

The third one was done in a stripe pattern with black Sl St across top and bottom and SC along the sides.

Each one was easy and fun to make.  

 Happy Crocheting...


Legal:
--don't use/claim my design as your own
--don't use/claim my pics as your own
--okay to make and sale your finished work
--don't share my pattern electronically or in print format (without prior consent) but provide a link to my blog

Social Media:
If you are on the following sites, let's connect and hook up...
  • Instagram:  Rilla2u
  • Pinterest:  Rilla2u
  • Twitter:  Rilla2u
  • Facebook:  /rilla.edwards 
  • Etsy:  rilla2u 
  • TikTok:  rillae2u 
  • YouTube:  Rilla2u 


Monday, January 16, 2023

Fuzzy Monster Balls to Adopt!!!!

Fuzzy Monster Balls to Adopt!!!!


Today, I’ve been making these “Fuzzy Monster Balls.”  I’m going to make an adoption certificate to go with each one and then will be placing them in my Etsy Shop. 

I plan on doing different fur colors. They each measure approximately 13” around and 4” tall.  

The Fuzzy Monster Balls are super soft and cuddly. My grandchildren saw them and fell in love. 

 Happy Crocheting...


Legal:
--don't use/claim my design as your own
--don't use/claim my pics as your own
--okay to make and sale your finished work
--don't share my pattern electronically or in print format (without prior consent) but provide a link to my blog

Social Media:
If you are on the following sites, let's connect and hook up...
  • Instagram:  Rilla2u
  • Pinterest:  Rilla2u
  • Twitter:  Rilla2u
  • Facebook:  /rilla.edwards 
  • Etsy:  rilla2u 
  • TikTok:  rillae2u 
  • YouTube:  Rilla2u 

Friday, January 13, 2023

Braided Headband

Braided Headband


The braided texture created on this headband is absolutely gorgeous.  With this headband, I also included a Ponytail opening since I have long hair and typically keep my hair up.

I used Crafter’s Secret yarn in Sungold and a 3.0mm hook to make this in Teen - Adult size.

Overall, it is a beautifully, textured pattern that will definitely keep your ears toasty warm.  

For the second headband, I made it with a button closure.  I used the same yarn brand but in the color White.  I also made the width 2 stitches shorter.  


I’m very pleased with the overall outcome of each one.  Working the braid was a lot easier than I had initially anticipated and I thoroughly enjoyed making each one. 


 Happy Crocheting...


Legal:
--don't use/claim my design as your own
--don't use/claim my pics as your own
--okay to make and sale your finished work
--don't share my pattern electronically or in print format (without prior consent) but provide a link to my blog

Social Media:
If you are on the following sites, let's connect and hook up...
  • Instagram:  Rilla2u
  • Pinterest:  Rilla2u
  • Twitter:  Rilla2u
  • Facebook:  /rilla.edwards 
  • Etsy:  rilla2u 
  • TikTok:  rillae2u 
  • YouTube:  Rilla2u 


Monday, January 9, 2023

Plaid Tissue Box Cover


 Plaid Tissue Box Cover

I’m a huge fan of plaid. I love making and designing projects, plaid-themed. I was looking at my plain tissue box cover this morning and realized I needed a winter cover for it - and, thus, Buffalo plaid came to mind. 

I used a 5.0mm hook and #4 worsted weight yarn in Red, Black and Burgundy.  The cover is made in (2) pieces.

The Wrap:


And, The Top:


After, I made the Wrap, I whipstitched the two short ends together with the right sides facing each other.  I then turned the Wrap inside out and placed around the tissue box.  Then, I whipstitched the Top to the Wrap.

This project didn’t take long to complete and doesn’t require a lot of yarn.  The end result is absolutely gorgeous.

Here is the link to my Etsy Shop to purchase the pattern:

Plaid Tissue Box Cover


 Happy Crocheting...


Legal:
--don't use/claim my design as your own
--don't use/claim my pics as your own
--okay to make and sale your finished work
--don't share my pattern electronically or in print format (without prior consent) but provide a link to my blog

Social Media:
If you are on the following sites, let's connect and hook up...
  • Instagram:  Rilla2u
  • Pinterest:  Rilla2u
  • Twitter:  Rilla2u
  • Facebook:  /rilla.edwards 
  • Etsy:  rilla2u 
  • TikTok:  rillae2u 
  • YouTube:  Rilla2u 


Sunday, January 8, 2023

Animal Balls!!!!

Animal Balls!!!!

Here’s a great stash buster — Animal Balls!!!! Quick, easy and SUPER cute projects.  

So far, I’ve made a cute little brown Pug puppy and a purple cat!!!  


All you need is the following:

-3.5mm hook

-#4 worsted weight scrap yarn

-Polyfil

-plastic eyes (optional); you can make crocheted 

-tapestry needle for weaving  

Size:  approximately 4” around

 Happy Crocheting...


Legal:
--don't use/claim my design as your own
--don't use/claim my pics as your own
--okay to make and sale your finished work
--don't share my pattern electronically or in print format (without prior consent) but provide a link to my blog

Social Media:
If you are on the following sites, let's connect and hook up...
  • Instagram:  Rilla2u
  • Pinterest:  Rilla2u
  • Twitter:  Rilla2u
  • Facebook:  /rilla.edwards 
  • Etsy:  rilla2u 
  • TikTok:  rillae2u 
  • YouTube:  Rilla2u 


Wednesday, January 4, 2023

Spring Scrubbies

Spring Scrubbies


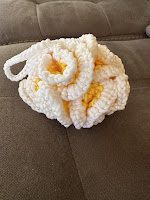
I absolutely love using Yarn Bee’s Scrub-ology yarn. I have tried several different brands of scrubby yarn and this is by far the best to work with. Plus, the wide assortment of colors is amazing.  

I’ve made 3 round scrubbies and one loofah so far.  For the round, I used SC stitches and made increase rounds up to 30.  


For the loofah, I started with a certain number of chains and slip stitched to the first chain to form a circle.   I worked 3 HDC in each chain around.  Slip stitch join to first stitch and chain 1.  I continued to make two more additional rounds.  Then I switched colors, and completed 1 final round with 3 HDC stitches in each stitch around. Fasten off and leave a long tail to weave in and out of the center circle to close up the loofah.  I then joined yarn in center, made a chain 24 slip stitch attached to center for the loop. 


Happy Crocheting...


Legal:
--don't use/claim my design as your own
--don't use/claim my pics as your own
--okay to make and sale your finished work
--don't share my pattern electronically or in print format (without prior consent) but provide a link to my blog

Social Media:
If you are on the following sites, let's connect and hook up...
  • Instagram:  Rilla2u
  • Pinterest:  Rilla2u
  • Twitter:  Rilla2u
  • Facebook:  /rilla.edwards 
  • Etsy:  rilla2u 
  • TikTok:  rillae2u 
  • YouTube:  Rilla2u 

Sunday, January 1, 2023

Four Seasons Plaid Ornaments

Four Seasons Plaid Ornaments 

To start off the new year, I’ve made plaid ornaments for each season.  I absolutely LOVE how each set turned out. I used a combination of single and double crochet stitches, along with the invisible single crochet decrease stitch.  

This project does require knowledge of knowing how to change yarn color before completing a stitch and carrying yarn over.  It’s not a hard process to achieve but something you need to know how to do.  

I used #4 worsted weight yarn (RHSS) and a 3.0 and 4.0 mm hooks.  You will need Polyfil, or the like, for filling each ornament.  

Spring


Summer


Fall


Winter


 Happy Crocheting...


Legal:
--don't use/claim my design as your own
--don't use/claim my pics as your own
--okay to make and sale your finished work
--don't share my pattern electronically or in print format (without prior consent) but provide a link to my blog

Social Media:
If you are on the following sites, let's connect and hook up...
  • Instagram:  Rilla2u
  • Pinterest:  Rilla2u
  • Twitter:  Rilla2u
  • Facebook:  /rilla.edwards 
  • Etsy:  rilla2u 
  • TikTok:  rillae2u 
  • YouTube:  Rilla2u