Tuesday, April 28, 2020

Star Wars Face Mask - Kids!!!

Today’s project was a Kid’s Face Mask, using some Star Wars cotton fabric I bought a couple years ago.  My four-year-old grandson, Luke, is a big Star Wars fan.

Luke is 4 year’s old.  His mask started with an 8” diameter circle.  I hand sewed this but you can easily use your sewing machine and complete in ten minutes or less.

Check out my Adult-sized mask for instructions on how to make this.  Here is the PATTERN LINK...

Star Wars Mask

Happy Sewing...

Legal:
--don't use/claim my design as your own
--don't use/claim my pics as your own
--okay to make and sale your finished work
--don't share my pattern electronically or in print format (without prior consent) but provide a link to my blog

Social Media:
If you are on the following sites, let's connect and hook up...
  • Instagram:  Rilla2u
  • Pinterest:  Rilla2u
  • Twitter:  Rilla2u
  • Facebook:  /rilla.edwards 

Wednesday, April 22, 2020

Pokemon...

My grandchildren introduced my hubby and myself to the world of Pokémon Go last year.  And, since then, we’ve been hooked and fascinated with the game.  We enjoy community days, meeting other trainers, doing raids, taking gyms and, of course, catching Pokémon.

So, my 4-year-old, grandson, Luke, asked me to make him a “Baby Snorlax...”  He actually asked a couple times before I conceded and made him one.  And, he was thrilled with it.  Now, he has given me a whole list of other Pokemon he wants...lol!!!


And, then today, his sister, Miss Arielle wants an Eevee made for her....And, of course, Mamaws (Grandmas, GiGi's, Grannies and so on...) can't say no...lol.

For Eevee, I used a 5.0mm hook and Crafter's Secret yarn in Light Taupe, Warsaw and White.  I used Black yarn to embroider the nose and mouth.  The eyes are 10mm.  To make the fur around the neck, I just used an old hairbrush and just kept combing until I achieved the look I wanted.  You will need polyfil for stuffing.  


I'm hoping to make an assortment of Pokemon this year in-between projects so frequent my blog for updates, patterns and such!!!

Happy Crocheting...
Legal:
--don't use/claim my design as your own
--don't use/claim my pics as your own
--okay to make and sale your finished work
--don't share my pattern electronically or in print format (without prior consent) but provide a link to my blog

Social Media:
If you are on the following sites, let's connect and hook up...
  • Instagram:  Rilla2u
  • Pinterest:  Rilla2u
  • Twitter:  Rilla2u
  • Facebook:  /rilla.edwards

Tuesday, April 14, 2020

Kids Face Masks...

I wanted to make my grand kids face masks and thought something cute would be fun for them to wear. I’ve just been using scrap yarn I have on hand and a 6.0mm hook.

Special Note:  Size will fit most kids; however, all kids aren’t the same. You may have to adjust the number of starting chains and/or the number of rows you make. You may also have to increase or decrease the number of chains for the straps.

Basic pattern:
1.  Start with a Chain 19.  HDC stitch in 2nd stitch from hook and across.  Chain 1 and turn. (18)
2-8.  HDC in each stitch across.  Chain 1 and turn.  At the end of Row 8, fasten off and weave ends. (18)
Border:
1.  With a contrasting color, SC in each stitch around.  I placed 2 SC stitches in each corner.  Slip stitch join to the first stitch.
Straps:
1.  Chain 20 and slip stitch join to the bottom side stitch.  Fasten off and weave ends.  Complete on opposite side for the second strap.


Here is the Face Mask Link...that includes making a pocket for a filter!!!

OR,

You could use cotton fabric on the backside. You can sew or glue it to the back.  I left one end open and inserted a folded coffee filter for added protection...

And, that's it...

As you can see below, I added a few embellishments to create different designs.  Enjoy!!!

Here’s a few pictures of what I’ve completed so far.

Kids Face Masks

Bumblebee Mask:
For the Bumblebee Mask, I used felt in black and red to make the face.  For the antennas, I joined black yarn in the first stitch on top, chain 6 and slip stitch join in the same stitch as I joined the yarn.  I made a second one on the opposite end.

Fox & Wolf Mask:


For the Fox Mask, I started with white yarn and made 3 rows.  I then completed 5 rows in burnt pumpkin yarn.  

For the facial features:
Eyes:  I made a magic ring and put 4 SC stitches.  Slip stitch joined to first stitch and fastened off.  I left a long enough tail for attaching to the mask.

Nose Stripe:
1.  Chain 7.  SC in 2nd chain from hook and across. Chain 1 and turn.  (6)
2.  SC across.   Chain 1 and turn.  (6)  
3.  SC decrease, SC 2x, SC decrease.  Chain 1 and turn.  (4)
4.  SC across.  Chain 1 and turn.  (4)
5.  SC decrease, SC decrease.  Chain 1 and turn.  (2)
6.  SC across.  Fasten off and leave a long tail for attaching.  Weave ends.  (2)

Nose Tip:  6 SC stitches into magic ring.  Slip stitch join to the first stitch and fasten off.  Leave a long enough tail for attaching.

For the Wolf Mask, you will complete same as Fox - just change up colors. 

Assembly:
1.  Attach Nose Tip to Nose Stripe.  Then attach Nose to center of mask, over the white portion.  See picture.
2.  Attach eyes on each side of the nose.  See picture. 

Boy Mask:

Girl Mask:

Unicorn Mask:

Backside:


Happy Crocheting...

Legal:
--don't use/claim my design as your own
--don't use/claim my pics as your own
--okay to make and sale your finished work
--don't share my pattern electronically or in print format (without prior consent) but provide a link to my blog

Social Media:
If you are on the following sites, let's connect and hook up...
  • Instagram:  Rilla2u
  • Pinterest:  Rilla2u
  • Twitter:  Rilla2u
  • Facebook:  /rilla.edwards


Wednesday, April 8, 2020

Face Mask

My Mom and I


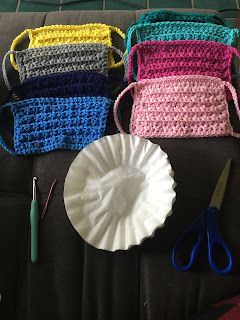
Amid the Covid-19 pandemic, I wanted to share my simple face mask pattern. I designed this a couple years ago.  However, the new pattern below has been updated to include a pocket for a filter to be added.

All you need is:
-6.0mm hook
-#4 yarn
-coffee filter
-tapestry needle
-scissors


This project takes less than an hour to make. Simple and quick - my kinda project!!! Make several in a variety of colors to wear when having to leave the home.

U.S. Stitch Abbreviations:
Ch:  chain
St:  stitch(es)
Sl st:  slip stitch
MR:  magic ring
SC:  single crochet
HDC:  half double crochet
BLO:  back loops only
Rep:  repeat
FO:  fasten off

Directions:
1.  Ch21.  HDC in 2nd ch from hook.  *SC in next st.  HDC in next st.*  Repeat from * to * across.  Ch1 and turn.  
2.  HDC in first st.  *SC in the BLO of the next st.  HDC in the BLO of the next st.*  Repeat from the * to the * across working in the BLO.  In the last st, complete stitch in both loops.  Ch1 and turn.
3-10.  Repeat #2.  
Border:
11.  SC in each st around.  Slip stitch join to the first st.  Ch20.  Sl st join to the bottom stitch to create the ear loop.  FO and weave ends.  Attach yarn on the other side of the mask and repeat, making the second ear loop.  FO and weave ends. 

Now, for the filter pocket.  I made a simple circle.
1.  6 SC into MR.  Sl st join to the first st and Ch1.  (6)
2.  2SC in each st around.  Sl st join and Ch1.  (12)
3.  2 SC in first st, 1 SC in next st.  Rep around.  Sl st join and Ch1.  (18)
4.  2 SC in first st, 1 SC in next 2 st.  Rep around.  Sl st join and Ch1.  (24)
5.  2 SC in first st, 1 SC in next 3 st.  Rep around.  Sl st join and FO.  Leave a long tail for attaching.  (30)
To attach:
Place the pocket to the center of the back side of the mask.  Whipstitch around, leaving the top portion open.  FO and secure remaining tail by weaving ends.  See below picture.
To add filter:
I folded the filter in half, then folded horizontally to fit inside the pocket.  See below picture.

And, that completes my simple "Face Mask" project.  If you choose to make this, I'd love to see pictures of your completed masks.  So, be sure to tag me:   
#rilla2u or @rilla2u on social media!!!

Happy Crocheting...
Legal:
--don't use/claim my design as your own
--don't use/claim my pics as your own
--okay to make and sale your finished work
--don't share my pattern electronically or in print format (without prior consent) but provide a link to my blog

Social Media:
If you are on the following sites, let's connect and hook up...
  • Instagram:  Rilla2u
  • Pinterest:  Rilla2u
  • Twitter:  Rilla2u
  • Facebook:  /rilla.edwards

Saturday, April 4, 2020

Fuzzy Mini-Puppy

Sometimes just playing around with yarn brings about the cutest little projects!!!  My “Fuzzy Mini-Pup” is literally so simple to make.  Simple stitches.  Quick to complete.  Scrap yarn, stuffing and a hook.  I used a set of eyes and nose, but if unavailable, you can simply make crocheted ones.  And, of course, have a handy hairbrush on hand.

Fuzzy Mini-Pup


And, here I added a hanger...

Happy Crocheting...
Legal:
--don't use/claim my design as your own
--don't use/claim my pics as your own
--okay to make and sale your finished work
--don't share my pattern electronically or in print format (without prior consent) but provide a link to my blog

Social Media:
If you are on the following sites, let's connect and hook up...
  • Instagram:  Rilla2u
  • Pinterest:  Rilla2u
  • Twitter:  Rilla2u
  • Facebook:  /rilla.edwards