Wednesday, August 31, 2022

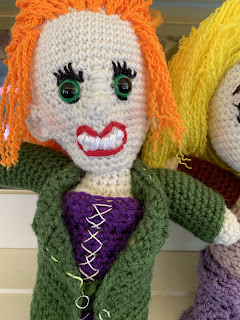
Hocus Pocus - Mary!!!!

 Hocus Pocus - Mary!!!!

Here’s my third Sanderson sister - Mary!!!! Now, my trio is complete and ready for Hocus Pocus 2 to come out on September 30, 2022.

This was a fun project for me and it really made me have to work on my facial skills.  


Here’s my trio together enjoying each other’s company on the patio….


 Happy Crocheting...


Legal:
--don't use/claim my design as your own
--don't use/claim my pics as your own
--okay to make and sale your finished work
--don't share my pattern electronically or in print format (without prior consent) but provide a link to my blog

Social Media:
If you are on the following sites, let's connect and hook up...
  • Instagram:  Rilla2u
  • Pinterest:  Rilla2u
  • Twitter:  Rilla2u
  • Facebook:  /rilla.edwards 
  • Etsy:  rilla2u 
  • TikTok:  rillae2u 

Monday, August 29, 2022

Dollar Tree Doll House DIY

 Dollar Tree Doll House DIY

Here’s a super fun and easy Dollar Tree diy with infinite possibilities.  

I bought the plastic pink, purple and white doll house in the toys section.  

Best of all, beginning September 12 thru September 14, you can get flat rate shipping of $5.99 by using my below link:

Flat Rate Shipping of $5.99

I painted it entirely grey first. Then, after it dried, I painted it the colors I wanted it to ultimately be.


For my display, I purchased a pizza pan from Dollar Tree as well and painted it black. 


I bought packs of seasonal decorations from Dollar Tree and Hobby Lobby to decorate my centerpiece with. This part is completely up to you in the direction you want to take your decor to. I wanted a “kinda” spooky feel but more of a home-like setting decorating for Halloween and fall!!!!  I added pumpkins, sunflowers, hay, trees, trucks, coffin, ghosts flying behind the house, scarecrows and straw buttons.  This part is entirely your inspiration— so be creative and have fun with it!!!!  I attached the items with my hot glue gun. 

The only item I didn’t glue to the pizza pan was the lighted tree since you have to turn it on/off at the bottom of the tree as well as battery placement. 


Happy Crafting…


Saturday, August 27, 2022

Hocus Pocus - Sarah!!!

 Hocus Pocus - Sarah


Here’s my version of sister number 2 from Hocus Pocus completed:  Sarah Sanderson!!!

Here’s a picture of Sarah with Winifred…

 Happy Crocheting...


Legal:
--don't use/claim my design as your own
--don't use/claim my pics as your own
--okay to make and sale your finished work
--don't share my pattern electronically or in print format (without prior consent) but provide a link to my blog

Social Media:
If you are on the following sites, let's connect and hook up...
  • Instagram:  Rilla2u
  • Pinterest:  Rilla2u
  • Twitter:  Rilla2u
  • Facebook:  /rilla.edwards 
  • Etsy:  rilla2u 
  • TikTok:  rillae2u 

Wednesday, August 24, 2022

Hocus Pocus - Winifred!!!

 Hocus Pocus - Winifred!!!


“I smell children…”

“I put a spell on you…” Winifred Sanderson!!!!  The first sister is completed. I will be working on Sarah and Mary now and hopefully have them completed within the next few days. 


 Happy Crocheting...


Legal:
--don't use/claim my design as your own
--don't use/claim my pics as your own
--okay to make and sale your finished work
--don't share my pattern electronically or in print format (without prior consent) but provide a link to my blog

Social Media:
If you are on the following sites, let's connect and hook up...
  • Instagram:  Rilla2u
  • Pinterest:  Rilla2u
  • Twitter:  Rilla2u
  • Facebook:  /rilla.edwards 
  • Etsy:  rilla2u 
  • TikTok:  rillae2u 

Sunday, August 21, 2022

Fall Hats!!!!

 Fall Hats!!!


Over the weekend, Hubby and I took a road trip. What do you do while sitting in a car for hours, crochet of course. 

I made 2 super cute hats that I have added to my Etsy Shop, @rilla2u.  

I made one in the color Sungold, using Crafter’s Secret yarn and aptly named, “Autumn Falls.”

The second hat was made with Red Heart Super Saver Yarn in Camouflage and is a variation of my “Dreamer Hat” pattern. I aptly named it, “Camouflage Dreams Hat!!!” 

If you’re looking for a handmade hat to keep you snuggly warm this fall and winter season, then be sure to check out my Etsy Shop for a wide variety of hats. 

https://www.etsy.com/shop/Rilla2u

 Happy Crocheting...


Legal:
--don't use/claim my design as your own
--don't use/claim my pics as your own
--okay to make and sale your finished work
--don't share my pattern electronically or in print format (without prior consent) but provide a link to my blog

Social Media:
If you are on the following sites, let's connect and hook up...
  • Instagram:  Rilla2u
  • Pinterest:  Rilla2u
  • Twitter:  Rilla2u
  • Facebook:  /rilla.edwards 
  • Etsy:  rilla2u 
  • TikTok:  rillae2u 

Thursday, August 18, 2022

Fall Baskets

 Fall Baskets 

Little Fall Baskets with countless uses!!! Fill with candy, use as a candle cover, use in the bathroom to hold your beauty items, fill with goodies to gift to a friend, teacher or co-worker.  So many different uses.  

Add little felt appliqué to them!!!!

Quick, easy and super cute project.  A 4mm hook and #4 worsted weight yarn is all you need…

Size:  approximately 5” tall

Materials:

-4.0mm hook

-#4 worsted weight yarn

-stitch marker

-tapestry needle


U.S. Stitch Abbreviations 

Ch:  chain

St:  stitch(es)

Sl st:  slip stitch

SC:  single crochet

MR:  magic ring

Rep:  repeat

FO:  fasten off


Special Stitch:  Reverse SC (Crab Stitch)

1.  SC in reverse around.  


Directions:

1.  6 SC to MR.  (6)

2.  2 SC in each st around  (12)

3.  2 SC, 1SC. Rep around.  (18)

4.  2 SC, 1 SC next 2 stitches.  Rep around.  (24)

5.  2 SC, 1 SC next 3 stitches.  Rep around.  (30)

6.  2 SC, 1 SC next 4 stitches.  Rep around.  (36)

7.  BLO.  SC around.  (36)

8-17.  SC around.  (36)

18.  Reverse SC around.  FO.  Weave ends.  (36)


 Happy Crocheting...


Legal:
--don't use/claim my design as your own
--don't use/claim my pics as your own
--okay to make and sale your finished work
--don't share my pattern electronically or in print format (without prior consent) but provide a link to my blog

Social Media:
If you are on the following sites, let's connect and hook up...
  • Instagram:  Rilla2u
  • Pinterest:  Rilla2u
  • Twitter:  Rilla2u
  • Facebook:  /rilla.edwards 
  • Etsy:  rilla2u 
  • TikTok:  rillae2u 
  • YouTube:  Rilla2u
  • Shopify:  Rilla2u.myshopify.com


Monday, August 15, 2022

Tammy Doll

 Tammy Doll

I made my “Tammy” Doll in memory of my sister-in-law, Tammy.  September will make a year she has been gone. I miss her every day. 

Tammy worked at our local hospital for over 20 years and touched so many lives with her kindness, empathy and infectious laugh.

I’m going to add a little recorder into her with Tammy laughing to just make her extra special!!!!


 Happy Crocheting...


Legal:
--don't use/claim my design as your own
--don't use/claim my pics as your own
--okay to make and sale your finished work
--don't share my pattern electronically or in print format (without prior consent) but provide a link to my blog

Social Media:
If you are on the following sites, let's connect and hook up...
  • Instagram:  Rilla2u
  • Pinterest:  Rilla2u
  • Twitter:  Rilla2u
  • Facebook:  /rilla.edwards 
  • Etsy:  rilla2u 
  • TikTok:  rillae2u 


Tuesday, August 9, 2022

Halloween Tote Bag

Halloween Tote Bag

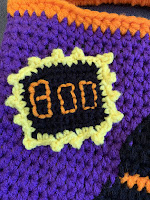
Here’s a cute Halloween bag project for the kids to use to put their candy in while trick-or-treating, carry their  toys in or for the older kids/adults to use for whatever they would like during the Fall/Halloween season.

It’s a very sturdy bag (double-stranded yarn) and measures 15” tall (including handles) and 12” wide.  

The front has a picture graph of a black cat and an appliqué.  

Here’s a picture of the backside of the bag.


I will get the written pattern and graph added this week.


 Happy Crocheting...


Legal:
--don't use/claim my design as your own
--don't use/claim my pics as your own
--okay to make and sale your finished work
--don't share my pattern electronically or in print format (without prior consent) but provide a link to my blog

Social Media:
If you are on the following sites, let's connect and hook up...
  • Instagram:  Rilla2u
  • Pinterest:  Rilla2u
  • Twitter:  Rilla2u
  • Facebook:  /rilla.edwards 
  • Etsy:  rilla2u 
  • TikTok:  rillae2u 

Monday, August 8, 2022

Ghost Mirror Tag

 Ghost Mirror Tag

In continuing with my seasonal decor for fall, here’s a super cute, Ghost Mirror Tag!!!!

The front side displays a cute ghost with a pumpkin hat; the backside a mirror.

It measures 3” across.  

It’s a quick and easy project and doesn’t take long to make. There are so many variations/styles you can make.  This is a great way to use up scrap yarn.  

For Halloween so far, I have made a Pumpkin, Black Cat and now the Ghost. I have listed these to sell in my Etsy Shop. Here is the link:

Halloween Mirror Tags Listing


 Happy Crocheting...


Legal:
--don't use/claim my design as your own
--don't use/claim my pics as your own
--okay to make and sale your finished work
--don't share my pattern electronically or in print format (without prior consent) but provide a link to my blog

Social Media:
If you are on the following sites, let's connect and hook up...
  • Instagram:  Rilla2u
  • Pinterest:  Rilla2u
  • Twitter:  Rilla2u
  • Facebook:  /rilla.edwards 
  • Etsy:  rilla2u 
  • TikTok:  rillae2u 

Saturday, August 6, 2022

Black Cat Mirror Tag

 Black Cat Mirror Tag

With Fall time creeping upon us, and, of course, it being one of my favorite seasons to decorate, I used my Mirror Tag pattern to make a Black Cat!!!!  And, it’s SO adorable….

The Mirror Tags are a great, fun and easily adjustable pattern to make for any season and/or holiday and can be hung anywhere a handy mirror is needed — school locker, book bag, tote, purse, keychain and lots of other places to dangle from…

Simple and quick to make; uses a very small amount of yarn!!!

I use a 3” mirror to make mine.  If you are going to use on a keychain, then I wouldn’t make the chain loop but opt instead to use a keyring attachment at the center top. 
Size:  3" diameter

Materials:
--3.0mm hook
--3" mirror
--Black and pink yarn
--Plastic eyes and nose
--Tapestry needle for weaving
--Stitch Marker

U.S. Stitch Abbreviations:
Ch:  chain
St:  stitch
Sl st:  slip stitch
SC:  single crochet
Rep:  repeat
MR:  magic ring
FO:  fasten off

Note:  pattern is worked in the round; so use your stitch marker to keep track of the first stitch of each new round and move marker accordingly
 
Directions:
1.  6 SC MR.  (6)
2.  2 SC in each st around.  (12)
3.  2 SC in first st, 1 SC in next.  Rep around.  (18)
4.  2 SC in first st, 1 SC in next 2 st.  Rep around.  (24)
5.  2 SC in first st, 1 SC in next 3 st.  Rep around.  (30)
6.  2 SC in first st, 1 SC in next 4 st.  Rep around.  (36)
 
After Round 6, remove hook and use a stitch marker.  We will come back and finish rounds later.

Now we are going to work on face.  

Eyes:
I added the eyes at Round 3. I used wire cutters to trim a small portion of the backside of the eyes off.  In doing this, you have to be careful and not remove too much or the front of the eye will not stay in the clasp.  I trim a small piece off and then to be safe I add a little E6000 glue.

Nose:
I added the nose at the center of Round 1.

Whiskers:
I used my tapestry needle and added them at Round 3/4.

Now, you can return your hook to finishing the pattern.

7.  SC in each st around.  (36).
8.  SC in each st around.  FO and leave a long tail.  (36)

Assembly:
Place the mirror on the backside with mirror side facing out, even everything out and around.  Use your tapestry needle and the long tail to weave in and out of each st of the last round to tighten up and secure.  Weave ends.  

Ears (make 2):
1.  6 SC MR.  (6)
2.  SC around.  (6)
3.  SC around.  FO.  Leave tail for attaching.  (6)

I attached the ears on each side above the eyes.

Tail:
1.  Ch10.  2SC in 2nd ch from hook, *1 SC in next Ch, 2 SC in next Ch,* rep from * to * until the last Ch.  FO and leave a tail for attaching.  

I attached the tail on the lower right side.
 
Hanger:
1.  Ch 40.  Sl st join to first ch.  Leave a tail and secure to top center.
 
And, that's it for this simple pattern.  You can use this basic pattern to make seasonal, sports, animals, school spirit, just about anything you want -- the sky's the limit!!!!


And, here is my Black Cat with my Pumpkin Mirror Tag…


 Happy Crocheting...


Legal:
--don't use/claim my design as your own
--don't use/claim my pics as your own
--okay to make and sale your finished work
--don't share my pattern electronically or in print format (without prior consent) but provide a link to my blog

Social Media:
If you are on the following sites, let's connect and hook up...
  • Instagram:  Rilla2u
  • Pinterest:  Rilla2u
  • Twitter:  Rilla2u
  • Facebook:  /rilla.edwards 
  • Etsy:  rilla2u 
  • TikTok:  rillae2u 

Thursday, August 4, 2022

Bucket Hat

 Bucket Hat

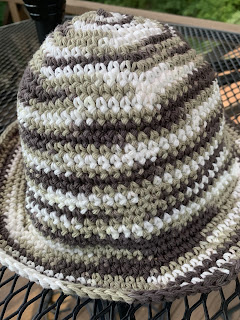
I designed this easy Bucket Hat using Peaches & Creme cotton yarn in the color, “Chocolate,” and a 4.5mm hook. 


Size:  21” - 23” Head Circumference 


Materials:

—4.5mm hook

—Cotton yarn (I used Peaches & Creme in Chocolate)

—Stitch marker

—Tapestry needle


U.S. Stitch Abbreviations:

Ch: chain

St:  stitch

Sl St:  slip stitch

SC:  single crochet 

FLO:  front loop only

MR:  magic ring

Rep:  repeat

FO:  fasten off


Note:  Pattern is worked in the round; so use your stitch marker in the first stitch of each new round to keep track of the round you are working on.


 The Bucket Hat is worked in 3 parts:  Increase Rounds, Middle, Brim.  Read below the information I have provided on increase rounds so that you will know when to stop working these rounds and move on to the Middle section.

Directions:

Increase Rounds:

1.  6 SC into MR.  (6)

2.  2 SC in each st around.  (12)

3.  2 SC, 1 SC.  Rep around.  (18)

4.  2 SC, 1 SC in next 2 st.  Rep around.  (24)

5.  2 SC, 1 SC in next 3 st.  Rep around.  (30)

6.  2 SC, 1 SC in next 4 st.  Rep around.  (36)

7.  2 SC, 1 SC in next 5 st.  Rep around.  (42)

8.  2 SC, 1 SC in next 6 st.  Rep around.  (48)

9.  2 SC, 1 SC in next 7 st.  Rep around.  (54)

10.  2 SC, 1 SC in next 8 st.  Rep around.  (60)

11.  2 SC, 1 SC in next 9 st.  Rep around.  (66)

12.  2 SC, 1 SC in next 10 st.  Rep around.  (72)


NOTE:  here's the diameter after the end of each round from 7-12 to help you in knowing when to stop on your increase rounds.  If you do not need to complete 12 increase rounds, then you will need to altar the middle rounds slightly (you will notice the first 4 rounds of the middle are a repeat of the last round you completed.  Then you will increase 3 times by 3 and 1 time by 9 - just add the additional stitches evenly into whichever Increase Round you stopped on).

R7:  4"

R8:  4 1/2"

R9:  5"

R10: 5 1/2"

R11.  6"

R12.  6 1/2"  

To obtain Head Circumference:  Multiple diameter times (x) 3.14.


Middle Rounds:

13-16.  SC around.  (72)

17.  SC 23, 2 SC next st.  Rep around.  (75)      

18.  SC around.  (75)

19-20.  Rep # 18.  (75)

21.  SC 24, 2 SC next st.  Rep around.  (78)

22.  SC around.  (78)

23-24.  Rep #22.  (78)

25.  SC 25, 2 SC next st.  Rep around.  (81)

26.  SC around.  (81)

27.  SC 8, 2 SC next st.  Rep around.  (90)

28.  SC around.  (90)


Brim Rounds:

29.  This first round is worked in FLO.  SC 14, 2SC next st.  Rep around.  (96)

30.  SC 15, 2 SC in next st.  Rep around.  (102)

31.  SC around.  (102)

32.  SC 16, 2 SC in next st.  Rep around.  (108)

33.  SC around.  (108)

34.  SC 17, 2 SC in next st.  Rep around.  (114)

35.  SC around. FO and weave ends.  (114)

 Happy Crocheting...


Legal:
--don't use/claim my design as your own
--don't use/claim my pics as your own
--okay to make and sale your finished work
--don't share my pattern electronically or in print format (without prior consent) but provide a link to my blog

Social Media:
If you are on the following sites, let's connect and hook up...
  • Instagram:  Rilla2u
  • Pinterest:  Rilla2u
  • Twitter:  Rilla2u
  • Facebook:  /rilla.edwards 
  • Etsy:  rilla2u 
  • TikTok:  rillae2u