

My Little Pony - Twilight Sparkle - Hat and Scarf Set for little girls. A fun project that little girls will surely love.


My Little Pony - Twilight Sparkle


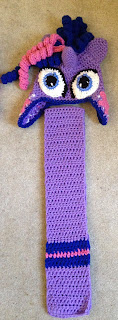
My Little Pony - Twilight Sparkle - Hat and Scarf Set
Difficulty Level: Easy
Size:
--Hat: 6" diameter x 6 1/2" length; 18" - 20" head circumference
--Scarf: 4" wide x 40 1/2" long
(This is sized for 2-4 year olds but can easily be adjusted for any age.)
Gauge: 12 HDC stitches x 8 rows = 4"
Materials:
--6.0mm hook for hat and scarf
--3.0mm, 4.0mm and 5.0mm hooks for features
--#4 worsted weight yarn in light purple, dark pink, black, white, light blue and dark blue
--very small amount of polyfil to stuff horn
--tapestry needle for weaving
U.S. Stitch Abbreviations:
Ch: chain
Sl st: slip stitch
St: stitch(es)
SC: single crochet
HDC: half double crochet
HDC2tog: half double crochet 2 stitches together (decrease)
MR: magic ring
FO: fasten off
Rep: repeat
Sk: skip
Directions:
Hat:
1. With 6.0mm hook and purple yarn, 8 HDC into MR. Sl st join and Ch1. (8)
2. 2 HDC in each st around. Sl st join and Ch1. (16)
3. 2 HDC in first st, 1 HDC in next st. Rep around. Sl st join and Ch1. (24)
4. 2 HDC in first st, 1 HDC in next 2 st. Rep around. Sl st join and Ch1. (32)
5. 2 HDC in first st, 1 HDC in next 3 st. Rep around. Sl st join and Ch1. (40)
6. 2 HDC in first st, 1 HDC in next 4 st. Rep around. Sl st join and Ch1. (48)
(if you need to make this for an older child, then you will need to continue with increase rows; otherwise continue with #7.)
7. 1 HDC in each st around. Sl st join and Ch1. (48)
8-14. Repeat #7. At the end of round 14, Ch1 and turn. (48)
(You will not FO yarn. You will now make the Ear Flaps. If you do not want the Ear Flaps, then continue on to the border.)
Ear Flaps (optional):
1. 1 HDC in each of the first 10 st. Ch1 and turn. (10)
2. 1 HDC in each st across. Ch1 and turn. (10)
3. HDC2tog, 1 HDC in next 6 st, HDC2tog. Ch1 and turn. (8)
4. 1 HDC in each st across. Ch1 and turn. (8)
5. HDC2tog, 1 HDC in next 4 st, HDC2tog. Ch1 and turn. (6)
6. 1 HDC in each st across. Ch1 and turn. (6)
7. HDC2tog, 1 HDC in next 2 st, HDC2tog. Ch1 and turn. (4)
8. 1 HDC in each st across. FO. Weave ends. (4)
1. Now, for the second Ear Flap, count over to the 15th st and join yarn with sl st and Ch1. 1 HDC in same st as Ch1 and into the next 9 st. Ch1 and turn. (10)
2-8. Repeat as above for first Ear Flap. At the end of Row 8, FO and weave ends.
Border:
1. With 6.0mm hook and dark blue yarn, join yarn with sl st and Ch1 into any st. SC in each st around hat. FO and weave ends.
Ears (make 2):
1. With 6.0mm hook and purple yarn, 6 SC into MR. Sl st join and Ch1. (6)
2. 2 SC in first st, 1 SC in next st. Rep around. Sl st join and Ch1. (9)
3. 2 SC in first st, 1 SC in next 2 st. Rep around. Sl st join and Ch1. (12)
4. 2 SC in first st, 1 SC in next 3 st. Rep around. Sl st join and Ch1. (15)
5-8. 1 SC in each st around. Sl st join and Ch1. At the end of Round 8, FO and leave a long tail for attaching to hat.
Eyes (make 2):
1. With 4.0mm hook and black yarn, 6 SC into MR. Sl st join and Ch1. (6)
2. 2 SC in each st around. Before completing last st, FO black yarn and join light blue yarn. Sl st join and Ch1. (12)
3. With light blue yarn, 2 SC in each st around. Before completing last st, FO light blue yarn and join white yarn. Sl st join and Ch1. (24)
4. With white yarn, 1 SC in the first 4 st. 1 HDC in the next 2 st. 2 DC in the next st. 1 DC in the next st. 1 HDC in the next 2 st. 1 SC in the next 4 st. 1 HDC in the next 2 st. 1 DC in the next st. 2 DC in the next st. 1 HDC in the next 2 st. 1 SC in the next 4 st. (26)
5. 1 SC in the first 4 st. 1 HDC in the next 2 st. 2 DC in the next 2 st. 1
DC in the next st. 1 HDC in the next 2 st. 1 SC in the next 4 st. 1
HDC in the next 2 st. 1 DC in the next st. 2 DC in the next 2 st. 1 HDC
in the next 2 st. 1 SC in the next 4 st. FO white yarn. (30)
For Border:
The eyes are oval-shaped. For the border you will work from corner to corner.
6. Join black yarn with sl st and Ch1 at the corner of Round 5. SC in same st as Ch1 and into the next 16 st. FO and leave tail for attaching. See pics for help. (17)

7. With white yarn embroider 2 dots into the center of the eyes (see pics).
Cutie Mark Applique (make 2):
1. With 3.0mm hook and pink yarn, 6 SC into MR. Sl st join and Ch1. (6)
2. 2 SC in each st around. Sl st join and Ch1. (12)
3. 2 SC in first st, 1 SC in next st. Rep around. Sl st join and Ch5. (18)
4. *HDC into 2nd ch from hook and next 3 ch. Sk next st of Round 3. Sl st into the next st. Ch4. SC in 2nd ch from hook and next 2 ch. Sk next st of Round 3. Sl st into the next st. Ch4. SC in 2nd ch from hook and next 2 ch. Sk next st of Round 3. Sl st into the next st.* Ch5. Rep from * to *. Sl st to first st. FO. Leave tail for attaching.
Attaching Cutie Mark:
The Cutie Mark is attached to each side of the Ear Flaps. I then used white yarn and embroidered little x shapes and lines.

Horn:
1. With 4.0mm hook and purple yarn, 3 SC into MR. Sl st join and Ch1. (3)
2. 2 SC in each st around. Sl st join and Ch1. (6)
3. 2 SC in first st, 1 SC in next st. Rep around. Sl st join and Ch1. (9)
4. 2 SC in first st, 1 SC in next 2 st. Rep around. Sl st join and Ch1. (12)
5. 2 SC in first st, 1 SC in next 11 st. Sl st join and Ch1. (13)
6. 2 SC in first st, 1 SC in next 12 st. Sl st join and Ch1. (14)
7. 2 SC in first st, 1 SC in next 13 st. Sl st join and Ch1. (15)
8. 2 SC in first st, 1 SC in next 14 st. Sl st join and Ch1. (16)
9. 2 SC in first st, 1 SC in next 15 st. Sl st join and Ch1. (17)
10. 2 SC in first st, 1 SC in next 16 st. Sl st join and Ch1. (18)
11. 2 SC in first st, 1 SC in next 17 st. Sl st join and Ch1. (19)
12. 2 SC in first st, 1 SC in next 18 st. Sl st join and FO. Leave tail for attaching to hat. (20)
Small Curlicues:
(make 3: 2 blue and 1 pink)
1. With 6.0mm hook, Ch25. 2 HDC in 2nd ch from hook and into each ch across. FO. Leave tail for attaching to top of hat. (48)
Large Curlicues:
(make 5: 4 blue and 1 pink)
1. With 6.0mm hook, Ch50. 2 HDC in 2nd ch from hook and into each ch across. FO. Leave tail for attaching to top of hat. (98)
Scarf:
1. With 6.0mm hook and purple yarn, Ch13. HDC in 2nd ch from hook and across. Ch1 and turn. (12)
2-10. 1 HDC in each st across. Ch1 and turn. At the end of Row 10, switch to dark blue yarn. Ch1. (12)
11-12. With dark blue yarn, 1 HDC in each st across. At the end of Row 12, switch to pink yarn. Ch1. (12)
13. With pink yarn, 1 HDC in each st across. Switch back to dark blue yarn. Turn and Ch1. (12)
14-15. With dark blue yarn, 1 HDC in each st across. At the end of Row 12, switch back to purple yarn. Turn. Ch1. (12)
16-81. With purple yarn, 1 HDC in each st across. Ch1 and turn. At the end of Row 81, switch to dark blue yarn. Ch1. (12)
82-83. With dark blue yarn, 1 HDC in each st across. At the end of Row 83, switch to pink yarn. Ch1. (12)
84. With pink yarn, 1 HDC in each st across. Switch back to dark blue yarn. Turn and Ch1. (12)
85-86. With dark blue yarn, 1 HDC in each st across. At the end of Row 86, switch back to purple yarn. Turn. Ch1. (12)
87-96. With purple yarn, 1 HDC in each st across. Ch1 and turn. At the end of Row 97, FO and weave ends.
Here's Pinkie Pie with Twilight Sparkle. If you would like to make the Pinkie Pie Hat and Scarf, then you can find the pattern HERE!!!

Happy Crocheting...
Legal:
--don't claim my pattern as your own
--don't use my pics as your own
--don't share my pattern electronically or in print format but provide a link to my blog
--okay to make and sale any of my patterns; I just ask to be given credit as the designer
No comments:
Post a Comment