

With the new school year approaching, I wanted to make a backpack. So, I settled on designing a Frog Backpack - toddler-sized.
I used double-stranded #4 worsted weight yarn to make the backpack itself so it was sure to be sturdy. The Frog’s “tummy” is the front pocket. I attached a zipper to the top - this was very easy to attach.
The Frog Backpack measures approximately 8 1/2” x 11” x 2”. The perfect size for little hands.
Frog Backpack

Size: Approx. 8 1/2" x 11" x 2"
Gauge: 12 HDC stitches x 10 rows = 4"
Materials:
--5.5mm hook
--#4 worsted weight yarn in green, yellow and a small amount of black and red
--12" zipper (optional) - you could opt to use buttons, make a flap or make a strap
--tapestry needle for weaving
--needle for attaching zipper
U.S. Stitch Abbreviations:
Ch: chain
Sl st: slip stitch
St: stitch(es)
SC: single crochet
SC2tog: single crochet 2 stitches together (creates a decrease stitch)
HDC: half double crochet
HDC2tog: half double crochet 2 stitches together (creates a decrease stitch)
FLO: front loops only
MR: magic ring
FO: fasten off
Rep: repeat
Directions:
--I used double-stranded yarn.
--The front and back panels are made exactly the same.
Panels (make 2):
1. With 2 strands of yarn held together, Ch23. HDC in 2nd ch from hook, *SC in next ch, HDC in next ch,* rep from * to * across. Ch1 and turn. (22)
2. HDC in first st, SC in next st. Rep across. Ch1 and turn. (22)
3-22. Rep #2. (22)
23. HDC2tog, *SC in next st, then HDC next st,* rep from * to * across until you come to the last 2 st. HDC2tog. Ch1 and turn. (20)
24. Rep #23. (18)
25. Rep #23. (16)
26. Rep #23. (14)
27. Rep #23. (12)
28. Rep #23. FO and weave ends. (10)
Make a second panel.
Now, you are going to be working on the sides and the bottom. You will use one of your panels to complete this.
Sides/Bottom:
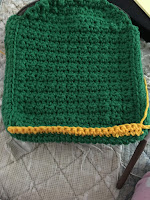
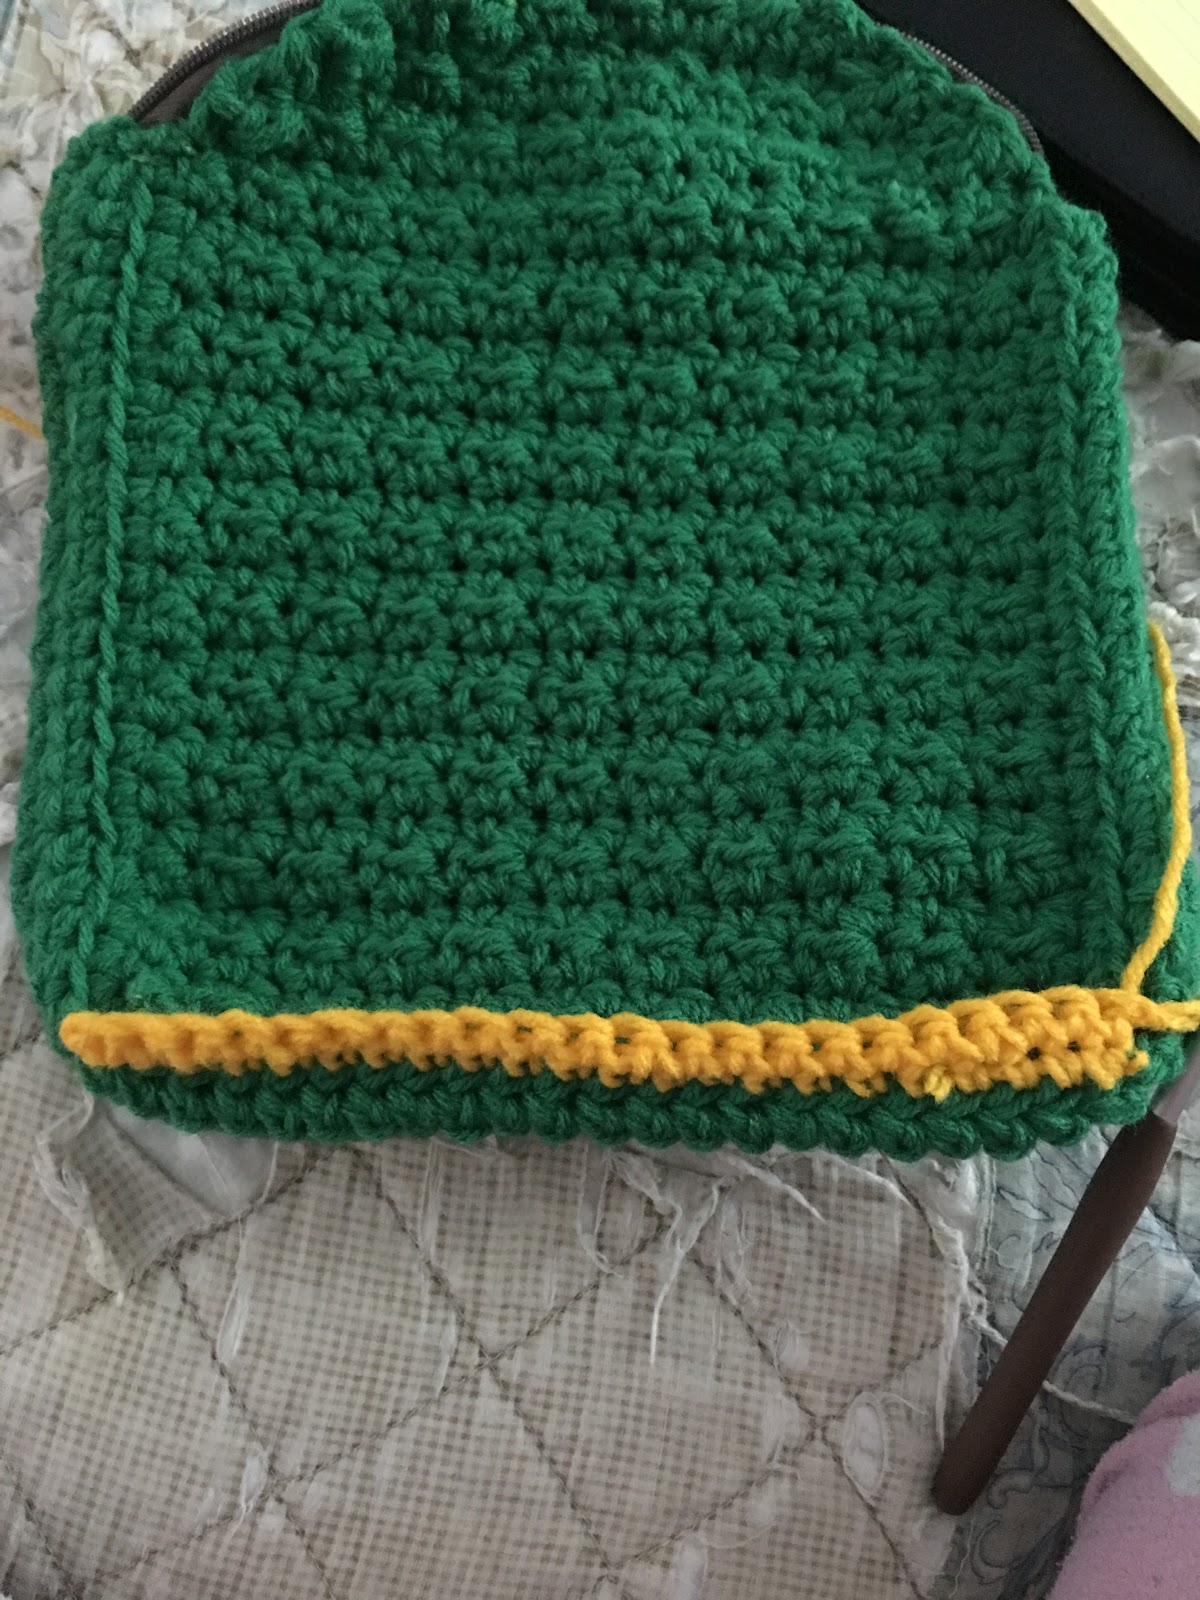
1. Join double-stranded yarn on the right side of your panel in the end stitch of Row 22. Sl st join and Ch1. Into same st, SC evenly down (this will give you 22 stitches), then SC evenly across the bottom (22 stitches), then SC evenly up the left side (22 stitches). Ch1 and turn. (66)
2. Into the FLO, SC around. Ch1 and turn. (66)
3. Working in both loops, SC in each st. Ch1 and turn. (66)
4-6. SC in each st. Ch1 and turn. At the end of Round 6, FO and leave a long tail for attaching. (66)
See below picture.

Now, you will join your 2 panels together. You can whipstich the panels together or you can sl st the panels together. I whipstitched mine. Just match up your panels and join from Row 22 down, across and up again together.
I then attached my zipper. I used pins and positioned it across the top and sides. I then worked from the side, across the top and down the side of one side of the zipper. I then repeated on the other side of the zipper.


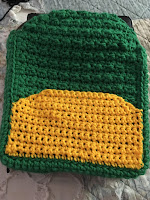
Front Pocket:
The front side of the backpack will be the side that shows Round 2 of working in the FLO of the sides/bottom, which essentially shows the back loop of Round 2 unworked.
1. I joined yarn in the bottom, right corner of Round 2 of the back loop stitch that was unworked. I then ch1. SC in same st. SC 21 times. Ch1 and turn. (22)
2. SC in each st across. Ch1 and turn. (22)
3-11. Rep #2.
12. SC2tog, SC 18 times, SC2tog. Ch1 and turn. (20)
13. SC2tog, SC 16 times, SC2tog. Ch1 and turn. (18)
14. SC2tog, SC 14 times, SC2tog. Ch1 and turn. (16)
15. SC2tog, SC 12 times, SC2tog. Ch1 and turn. (14)
16. SC2tog, SC 10 times, SC2tog. FO and leave a long tail to whipstitch each side. Leave across the top open.

Mouth:
1. With red yarn, Ch24. FO and attach. See pics for help with placement.

Eyes (make 2):
1. With green yarn, 6 SC into MR. Sl st join to first st and Ch1. (6)
2. 2 SC in each st around. Sl st join to first st and Ch1. (12)
3. 2 SC in first st, 1 SC in next st. Rep around. Sl st join to first st and Ch1. (18)
4. 1 SC in the first 5 st. FO and leave a tail for attaching.
Eye center (make 2):
1. With black yarn, 6 SC into MR. Sl st join to first st and FO. Leave tail for attaching to eye. (6)
Attach each eye center to the eye. Then attach the eyes on each side of the front panel. See my pics for help with placement.
Straps (make 2):
--I used yellow yarn to make my straps. You can opt to use green or whatever color of your choosing.
--Please note your number of rows for the straps could be different than mine. So, you may need to make more or fewer rows.
1. Leave a long enough beginning tail for attaching. Ch4. SC in 2nd ch from hook and across. Ch1 and turn. (3)
2-40. 1 SC in each st across. Ch1 and turn. At the end of Row 40, however, FO and leave a long enough tail for attaching. (3)
Attach each strap on each side of the back panel. You will want to make sure to secure the straps. I whipstitched rows 1-3 to the panel and then on the bottom I whipstitched rows 38-40 to the panel.

And, that's it for this simple "Frog Backpack" - Toddler-sized. I hope you all will enjoy this pattern design as much as I do.
Here, is a pic of my 3-year-old grandson, Gabriel, sporting his new "Frog Backpack..."

Happy Crocheting...
Legal:
--don't use/claim my design as your own
--don't use/claim my pics as your own
--okay to make and sale your finished work
--don't share my pattern electronically or in print format (without prior consent) but provide a link to my blog
Did you use acrylic or cotton yarn for this project? I'm worried that acrylic won't be structured enough, but it is softer and cheaper. Thanks!
ReplyDeleteRachel, I used acrylic yarn, double-stranded. It worked great for this project.
Delete