

My granddaughter, Miss Arielle, asked me a week or so ago if I would make her a “crocheted tiger.” I told her, at the time, of course I would. Well, on Saturday, she reminded me about her tiger. So, I stopped working on my “green blanket” (lol) and set out to design her a cute, unique and loveable tiger.
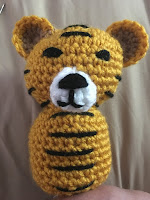
My “Tiger Buddy” is made in one piece — so less ends to weave!!! He stands approx 6” tall. I used RHSS yarn and a 4.5mm hook.
I will add the pattern soon - once I make him a few buddies...so PIN and come back to this post.


And, here’s my granddaughter with her Tiger...

My “Tiger Buddy” is made in one piece — so less ends to weave!!! He stands approx 6” tall. I used RHSS yarn and a 4.5mm hook.
I will add the pattern soon - once I make him a few buddies...so PIN and come back to this post.
Tiger Buddy

Size: Approximately 6” tall
Materials:
-4.5mm hook
-RHSS yarn in Gold, Black, Taupe/Tan and White
-Stitch marker
-Polyfil
-Tapestry needle for weaving
U.S. Stitch Abbreviations:
Ch: chain
Sl st: slip stitch
St: stitch(es)
SC: single crochet
SC2TOG: single crochet 2 stitches together to create a decrease)
MR: magic ring
FO: fasten off
Rep: repeat
Directions:
The head and body is made in one piece. The pattern is worked from the top of the head down. This pattern is worked in the round so you will need to use a stitch marker (I typically use a bobby pin) to keep track of the first and last stitch of each round. Move stitch marker up with the first stitch of each new round.
1. With Gold yarn, 6 SC into MR. Pull to tighten to form ring. (6)
2. 2 SC in each st around. (12)
3. 2 SC in first st, 1 SC in next st. Rep around. (18)
4. 2 SC in first st, 1 SC in next 2 st. Rep around. (24)
5. 2 SC in first st, 1 SC in next 3 st. Rep around. (30)
6. 2 SC in first st, 1 SC in next 4 st. Rep around. (36)
7. 1 SC in each st around. (36)
8-11. Rep #7. (36)
12. SC2tog, 1 SC in next 4 st. Rep around. (30)
13. SC2tog, 1 SC in next 3 st. Rep around. (24)
14. SC2tog, 1 SC in next 2 st. Rep around. (18)
15. SC2tog, 1 SC in next st. Rep around. (12)
16. 1 SC in each st around. (12)
***Stuff head with polyfil.***
17. 2 SC in first st, 1 SC in next st. Rep around. (18)
18. 2 SC in first st, 1 SC in next 2 st. Rep around. (24)
19. 2 SC in first st, 1 SC in next 10 st, 2 SC in next st, 1 SC in next 12 st. (26)
20. 2 SC in first st, 1 SC in next 12 st, 2 SC in next st, 1 SC in next 12 st. (28)
21-26. 1 SC in each st around. (28)
27. SC2tog, 1 SC in next st. Rep around until you have 2 st left. SC2tog. (18)
28. SC2tog, 1 SC in next st. (12)
***Stuff body with polyfil.***
29. SC2tog. Rep 5 more times. Leave a long tail. (6)
***Add more polyfil, if necessary.***
Do not weave the tail in and out of Round 29 yet to close up.
Stripes and Eyes:
1. With tapestry needle, you will want to use a long piece of black yarn. I tied the end into a double knot. I then inserted my needle from the bottom center opening up to the head (through the polyfil). I made 2 black stripes at the center top (forehead). I then made the eyes.
Stop here for a moment and make your nose/mouth to add to the head before continuing with the stripes.
Nose/Mouth:

1. With White yarn, 6 SC into MR. (6)
2. 2 SC in first st, 1 SC in next st. Rep around. (9)
3. 1 SC in each st around. FO and leave tail for attaching.
4. With Black yarn embroider nose tip and mouth. (See my pics for help)
5. Attach below eyes, centered.
Now, you can continue with making your stripes. I made 3 stripes on each side of the nose. I then made stripes on the body portion. I then worked stripes up the backside, center. And, last I weaved my needle back down through the polyfil to the bottom. Trimmed excess tail.

Once you are finished making the stripes, then you can use the tail from Round 29 and weave in and out of the last 6 stitches to close up the bottom. Weave ends.

Ears (make 2):

1. With Taupe/Tan yarn, 6 SC into MR. Pull tail to tighten, but do NOT join. Ch1 and turn. (6)
2. 2 SC in first st, 1 SC in next st. Rep across. FO yarn and weave ends. (9)
3. Join Gold yarn in first st. Ch1. SC in first st and across. FO and leave tail for attaching. (9)
4. Attach ears to each side of the head. (See pics for help with placement)
Legs/Arms (make 4):

1. With Black yarn, 6 SC into MR. (6)
2. 2 SC in first st, 1 SC in next st. Rep around. Sl st join to first st and FO. Weave ends. (9)
3. Join Gold yarn in first st. 1 SC in each st around. (9)
4. 1 SC in each st around. (9)
5. 1 SC in each st around. Sl st join to first st and FO. Leave a tail for attaching. (See pics for help with placement) (9)
Pompom Tail:
1. I held Gold and Black yarn together and wrapped 10 times around 2 of my fingers. I then tied in a double knot in the center. I then trimmed and fluffed. Attach to back of the body.

This pattern is so versatile. You can virtually make any animal you want. Be sure to check out my other posts for my Foxy Fox and Mr. Elephant versions...


And, here’s my granddaughter with her Tiger...

Happy Crocheting...
Legal:
Legal:
--don't use/claim my design as your own
--don't use/claim my pics as your own
--okay to make and sale your finished work
--don't share my pattern electronically or in print format (without prior consent) but provide a link to my blog
No comments:
Post a Comment