Cool Midnight Handbag FREE Pattern
Materials:
--6mm hook
--1 full skein and a small amount from a second skein for the flap and for attaching the straps in Aqua Black by I Love This Yarn (if you don't want to buy the second skein you can use a solid color that will go with it)
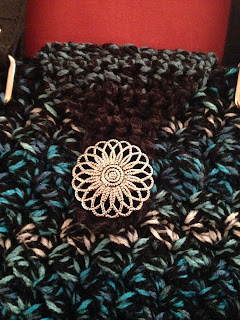
--(1) 1 and 1/2" decorative button
--Microfiber Flat Double Handles (black); you can use whatever handles you want or you can make them; I had these handles on hand and used them
--1 fat quarter of fabric for liner (this is optional); I had a fat quarter on hand with dogs and decided to use it
--tapestry needle for weaving
--sewing needle or machine for making liner, if making it
--coordinating thread for liner, if making it
Skill Level: Easy
Abbreviations:
Ch: chain
Sl st: slip stitch
St: stitch(es)
SC: single crochet
DC: double crochet
SC2tog: single crochet 2 stitches together
SC4tog: single crochet 4 stitches together
FO: fasten off
Special note: this Handbag is worked double-stranded; I held the beginning and ending strands together to make this and I used the whole skein on the bag itself. It would've probably been simpler to hold the strands together using 2 skeins of yarn but one of my very active grandsons was here today so I just worked with the one skein...
Directions:
Handbag:
1. Holding 2 strands of yarn together, now and throughout the pattern, ch21. SC in 2nd ch from hook and into the next 18 ch. Into the last ch, you will do 3 SC. Now, rotate and work on the opposite side of the base ch. 1 SC in each of the next 18 ch and then 2 SC in the last ch. Sl st to join to first st and Ch1. (42)
2. 2 SC in first st, 1 SC in the next 19 st, 3 SC in the next st, 1 SC in the next 20 st and 2 SC in the last st. Sl st to join and Ch1. (46)
3. 2 SC in first st, 1 SC in the next 21 st, 3 SC in the next st, 1 SC in the next 22 st and 2 SC in the last st. Sl st to join and Ch1. (50)
4. 2 SC in first st, 1 SC in the next 23 st, 3 SC in the next st, 1 SC in the next 24 st and 2 SC in the last st. Sl st to join and Ch1. (54)
5. 1 SC in each st around. Sl st to join and Ch1. (54)
6-20. *1 SC and 1 DC in first st, skip next st,* repeat around. (27 SC & 27 DC)
At the end of Round 20, FO and weave ends.
Straps:
I attached my straps 2" in on each side. I used my tapestry needle to whipstitch together.
Closure Flap:
1. I rejoined yarn on Round 20 between the straps on the backside of the handbag. I had 12 st between my straps, so I skipped the first st and joined yarn with a sl st into the next st and Ch1. 1 SC in same st as Ch1 and into next 9 st. Ch1 and turn. (10)
2-4. 1 SC in each st across. Ch1 and turn. (10)
5. SC2tog, 1 SC in next 6 st, SC2tog. Ch1 and turn. (8)
6. SC2tog, 1 SC in next 4 st, SC2tog. Ch1 and turn. (6)
7. SC2tog, 1 SC in next 2 st, SC2tog. Ch1 and turn. (4)
8-9. 1 SC in each st across. Ch1 and turn. (4)
10. 1 SC in first st, ch3, skip 2 st and 1 SC in last st. Ch1 and turn. (2 SC, ch3)
11. 1 SC in first st, 2 SC into ch3 space and 1 SC in last st. Ch1 and turn. (4)
12. 1 SC in each st across. Ch1 and turn. (4)
13. SC4tog. Ch1 and FO. Weave ends.
Fold flap over to the front side so you can position button to attach.
This handbag measures approximately 10 1/2" wide x 8 1/2" long.
To make liner:
I cut my fabric the size of the handbag plus a 1/4" - 1/2" extra on each side. Place right sides together and sew, leaving the opening at the top. I turned up each bottom end, like a triangle and sewed across to give the bottom curve. I turned down the top edges about 1/2" to give a clean edge. Place inside purse and whipstitch around top edge to handbag. This way the right side is showing when you open your handbag.
That's it!!!!
Happy Crocheting!!!!
Legal:
--don't claim pattern as your own
--don't use my pics
--okay to make and sale your finished product
--link back to my blog to credit me as the designer; do not post my pattern to any social media sites but provide a link to my blog


No comments:
Post a Comment