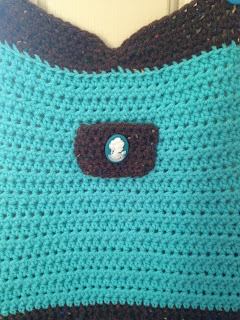
So, I started making a list of different ideas I had. And, I settled on this Apron. Who's Mom isn't #1? This project didn't take a whole lot of yarn and I completed it in one evening. Time plus cost efficient = great gift idea....
#1 Mom Apron
#1 Mom Apron Pattern
Difficulty Level: Easy to Intermediate (since there's post stitches)
Size: Adult
Measures: 26" long
Materials:
--6mm hook
--1 skein Crafter's Secret in Turquoise, #4 worsted weight yarn
--1 skein Hobby Lobby, I Love This Yarn, in Brown Tweed
--small amount of white yarn for embroidery
--(2) 1" buttons for neck strap (one functional; the other decorative only)
--1 decorative button for the pocket (optional)
--Tapestry needle for weaving
Abbreviations:
Ch: chain
Sl st: slip stitch
SC: single crochet
FHDC: foundation half double crochet
HDC: half double crochet
HDC2tog: half double crochet 2 stitches together
FPHDC: front post half double crochet
BPHDC: back post half double crochet
TC: triple crochet
Dec: decrease
FO: fasten off
RS: right side
Special Stitch: I worked FPHDC and BPHDC stitches for the waist area (4 rows). If you're not familiar with post stitches, then you can work these rows as HDC stitches. There's a great website with lots of stitch tutorials where you can learn all about post stitches. Here's the link to it:
Directions:
1. In Turquoise, and 6mm hook, complete 55 FHDC. Ch1 and turn. OR, ch56, HDC in 2 ch from hook and across. (55)
2-32. 1 HDC in each st across. Ch1 and turn. On the last st of Row 32, FO Turquoise yarn and join Brown Tweed. (55)
33-36. HDC in the first st, *BPHDC around the next post, then FPHDC* repeat from * to * until the last st. In the last st, 1 HDC. Ch1 and turn. (55)
(Here's 3 pics of working the FPHDC)
(Here's 1 pic of working the BPHDC)
37. 1 sc in each st across. In the last st, switch back to the Turquoise yarn. Ch1 and turn. (55)
38-50. (Now, we will be working decrease rows) Dec the first 2 st and the last 2 st. 1 HDC in all other st. You will dec by 2 st in each row. At the end of Row 50, you will have 29 st. (53, 51, 49, 47, 45, 43, 41, 39, 37, 35, 33, 31, 29)
51-60. 1 HDC in each st across. At the end of Row 60, switch to Brown Tweed yarn. Ch1 and turn. (29)
61. 1 HDC in each st across. Ch1 and turn. (29)
62-64. 1 HDC in the first 13 st, then Sl st in the next 3 st, and 1 HDC in the last 13 st. Ch1 and turn. (26 HDC & 3 sl st) -- at the end of Row 64 don't turn --
Border:
You will evenly work SC st down the side, across the bottom and up the other side. In the corners, I put 2 SC st. When you get back to the top, Sl st to join and Ch1.
Neck Strap:
65. 1 HDC st in the first 3 st. Ch1 and turn. (3)
66-115. 1 HDC in each st. Ch1 and turn. (3)
Button placement: I placed a 1" button at the top on the opposite side to attach the neck strap to. On the side that I crocheted the neck strap, I also placed a coordinating button for decorative purposes only.
Waist Straps:
1. Join Brown Tweed yarn on the side at Row 33 and Ch1. HDC in same st as Ch1 and in the next 3 st. Ch1 and turn. (4)
2-65. 1 HDC in each st. Ch1 and turn. At the end of Row 65, FO and weave ends.
Repeat on opposite side.
Pocket:
1. Ch20. SC in 2 ch from hook and across. Ch1 and turn. (19)
2-8. 1 SC in each st across. Ch1 and turn. (19)
I folded pocket, left to right, with RS facing, and whipstitched closed the bottom and up the side. Then, I turned the RS out. I then placed it near the top and whipstitched onto the apron. I attached a decorative button.
Here's how I did the last part:
I Embroidered "#1 Mom": I used white yarn and just made a Row of chains. Here's the number count for each one:
#: 4 rows of 12 ch
1: this is the only one that I ch18 and then sc in 2 st from hook and across; then I ch7, sc in 2 ch and across, then I ch7 again and sc in 2 ch and across to make the bottom (see pic how I turned down the top 3 st)
M: 80 ch
O: 40 ch
M: 60 ch
I then just placed and shaped each ch made onto the apron and embroidered it. (See pics)
Note: keep your "1" straight when attaching it; as you can see in the pics my 1 looks a little like a 2 and I had to go back and redo it after I had taken the pics....
Flower:
1. I started with a magic ring. *Ch3, 1 TC, 1 DC, 1 HDC, 1 DC, ch3 and Sl st into magic ring.* Repeat 4 more times. Pull to tighten. FO and weave ends. Leave a tail long enough to attach. I placed my flower in the bottom corner.
And, that's it!!! Enjoy...Happy Mother's Day to all you special moms out there. May God bless and keep each and every one of you. May He be the guiding force in your life.
Happy Crocheting!!!
Legal:
--don't claim pattern as your own
--don't use my pics
--make and sale your finished work, if so desired
--credit me as the designer and link back to my blog
Please share on Social Media and Pin to Pinterest....


No comments:
Post a Comment